Getein Biotech Getein1100 User manual


Warnings, Precautions and Limitations
a. Read this user manual carefully to obtain optimum performance from your analyzer.
b. Only used for in vitro diagnostic analysis of human whole blood, plasma, serum and
urine.
c. To avoid fire, electric shock or personal injury, please turn off the power immediately
and disconnect the power plug when the analyzer emits abnormal odor, smoke or
any liquid seeps into the instrument.
d. Take proper safeguard measures in accordance with health and safety standards in
local country.
e. Specimens and reagents may have potential biological risk of infection, operators
should wear laboratory protective clothing and gloves required by the operation
regulations of laboratory safety to avoid potential biological infection or contamination.
f. All the test kits and consumables should be disposed after single use. Proper
handling and disposal method should be established by the laboratory director in
accordance with local, status and federal regulations.

Symbols & Description
Manufacturer
Consult instructions for use
Caution, consult accompanying documents
Serial number
This way up
Fragile
In vitro diagnostic medical device
Authorized representative in the European Community
Biological risks
CE Mark
Keep away from sunlight
Keep away from rain
Maximum number of identical packages which may be stacked on
one another is “4”

1. Introduction ............................................................................................................... 1
1.1 Intended Use ........................................................................................................ 1
1.2 Product Description .............................................................................................. 1
1.3 Product Principle .................................................................................................. 1
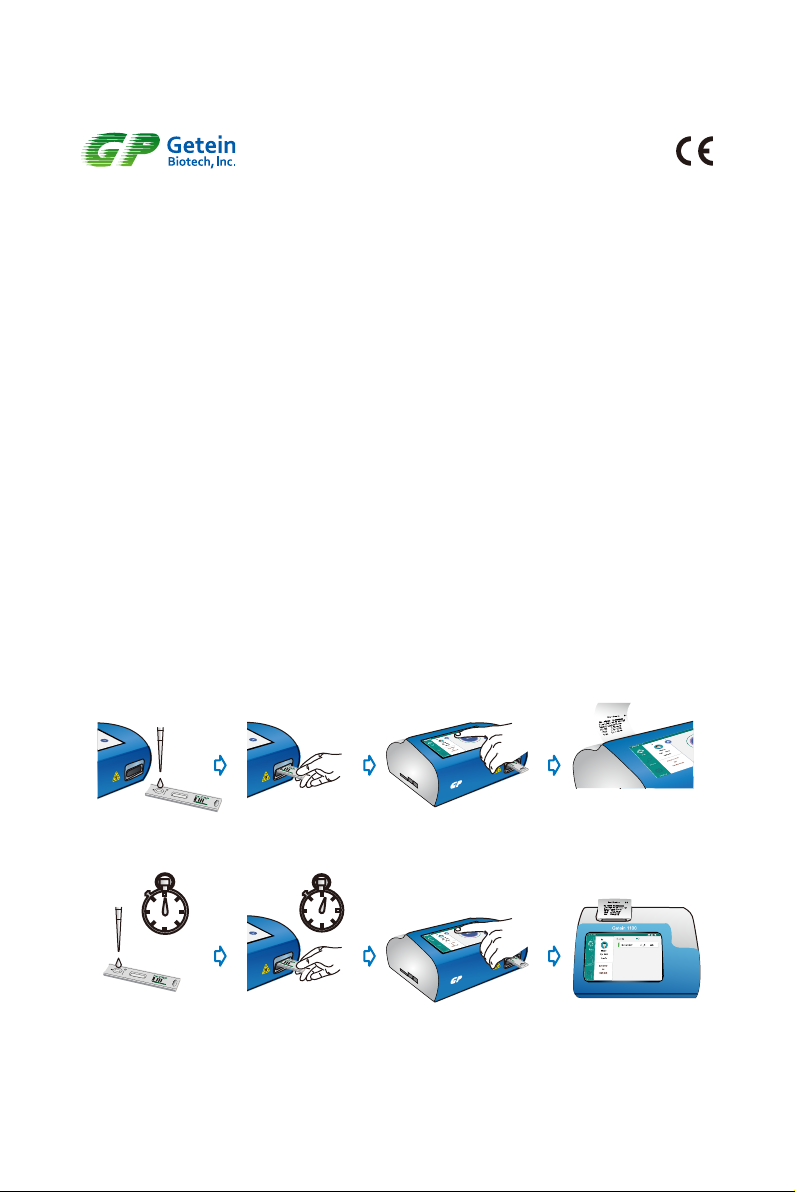
1.3.1 Overview: Running a test ............................................................................ 1
1.3.2 Working Principle ........................................................................................ 2
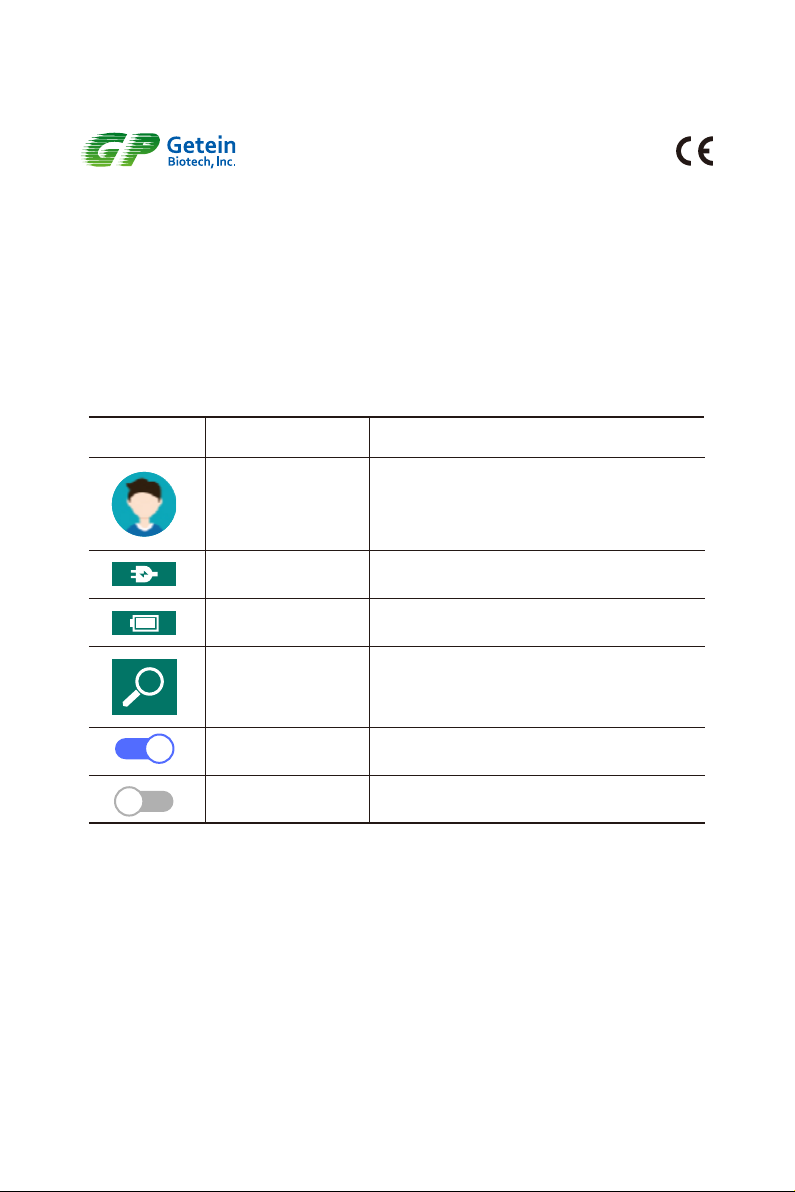
1.4 List of Icons .......................................................................................................... 2
2. Installation ................................................................................................................. 3
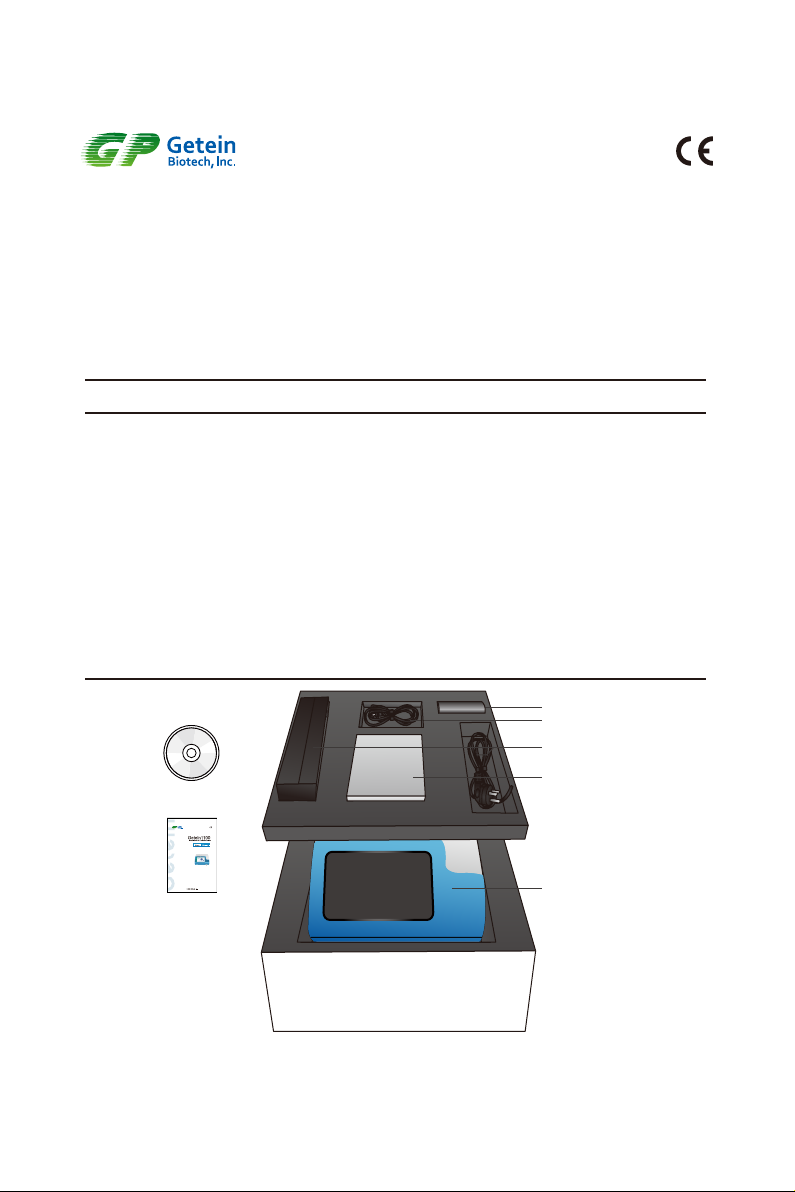
2.1 Unpacking ............................................................................................................. 3
2.2 Analyzer Configuration ......................................................................................... 4
2.3 Main Interface ....................................................................................................... 4
2.4 Performance Summary ......................................................................................... 5
2.4.1 Basic Parameters ........................................................................................ 5
2.4.2 Performance Indexes .................................................................................. 5
2.4.3 Technical Specifications ............................................................................... 6
2.5 Installation Requirements ....................................................................................... 6
2.5.1 Environment ................................................................................................. 6
2.5.2 Space Requirement ..................................................................................... 6
2.6 Setup ..................................................................................................................... 7
2.6.1 Loading Paper .............................................................................................. 7
2.6.2 Barcode Scanner Connection (Optional) ...................................................... 7
2.6.3 Lithium Battery (Optional) ............................................................................. 7
2.6.4 Power Connection ........................................................................................ 7
3. Operation .................................................................................................................... 8
3.1 Preparations before Power On ............................................................................. 8
3.2 Power On .............................................................................................................. 8
3.3 Quality Control Calibration ................................................................................... 9
3.4 Sample Measurement .......................................................................................... 9
3.5 Results Query ...................................................................................................... 11
3.5.1 Query .......................................................................................................... 11
3.5.2 Result Deletion ............................................................................................ 12
3.5.3 Test Report .................................................................................................. 13
4. Settings ..................................................................................................................... 16
4.1 Communications Setting ...................................................................................... 16
4.2 Print Setting ......................................................................................................... 17
4.3 Test Setting .......................................................................................................... 18
4.4 Reaction Time ...................................................................................................... 18
4.5 System Setting ..................................................................................................... 19
4.6 System Version .................................................................................................... 19
4.7 Debug Mode ........................................................................................................ 20
4.8 Screen Wakeup ................................................................................................... 20
4.9 Shutdown ............................................................................................................ 20
4.10 Waste Disposal ................................................................................................. 20
Catalogue

5. Data Management .................................................................................................. 21
5.1 Overview ........................................................................................................... 21
5.2 Software version ................................................................................................ 21
5.3 Environmental Requirements ............................................................................ 21
5.3.1 Hardware Environment ............................................................................. 21
5.3.2 Software Environment .............................................................................. 21
5.4 Software Installation ........................................................................................... 21
6. Maintenance and Troubleshooting ........................................................................ 22
6.1 Maintenance ....................................................................................................... 22
6.2 Precautions .......................................................................................................... 22
6.3 Troubleshooting ................................................................................................... 23
7. Appendix ................................................................................................................. 24
7.1 Copyright ............................................................................................................. 24
7.2 Statement ............................................................................................................ 24
7.3 Manufacturer Responsibility ................................................................................ 24
7.4 Analyzer Lifespan ................................................................................................ 24

1. Introduction
1.1 Intended Use
Getein1100 Immunofluorescence Quantitative Analyzer (hereinafter called Getein1100)
is an analyzer for processing and analysis of Getein test kits including markers for cardio-
vascular diseases, renal diseases, inflammation, fertility, diabetes mellitus, bone metabo-
lism, tumor and thyroid. This manual contains instructions for the use of Getein1100 and
general instructions for testing specimens and quality control materials.
1.2 Product Description
Getein1100 is used to measure concentration of biomarkers in human whole blood,
serum, plasma or urine samples. The results can be used as an aid in clinical diagnosis
of laboratory and point of care testing.
1.3 Product Principle
1.3.1 Overview: Running a test
Apply sample (for example, serum) to the test card, insert the test card into the
Getein1100 after a certain time (outside mode) or immediately (inside mode) and click
“Start” icon. Then the concentration of this sample will be measured and the result will be
displayed (Fig.1-1). The test results can be transmitted to the lab or hospital information
system (LIS or HIS) when connected to computer.
1
Fig.1-1 Running a Test
1
Result
0
1000
2000
3000
4000
Name:__________
No:__________ TestItems:__________
TestMode:__________
Sample:__________
SampleID:_______
Gebder:_______ Age:_______
Barcode:___________________
Sample Dispense Test Card Insert Click “Start” Icon
Sample Dispense Timing the Reaction Manually
Inside Mode (single sample rapid test mode)
Quick mode (mass samples rapid test mode)
Result Show and Print
Click “Start” Icon Result Show and Print
Getein 1100
Getein 1100
Getein 1100

1.3.2 Working Principle
The detection element scans the binding area and converts the optical signal to electrical
signal. The voltage variation between test line and background has a linear relationship
with the antigen concentration which can be used to calculate the concentration. In
conclusion, the antigen concentration in whole blood, plasma, serum, urine can be
calculated quantitatively according to the optical signal of the test line.
1.4 List of Icons
Icon Name Function
Power Connection
Battery
Search
ON
OFF
Name, Gender, Age, Sample ID and Barcode
can be edited here.
No external power, using built-in lithium battery.
Power is connected
Search results by name, sample ID or time.
Indicate the function is off.
Indicate the function is on.
Patient Information
2

3
Table 2-1 Getein1100 Packing List
Fig.2-1 Getein1100 and Main Accessories
No. Description Model Unit Quantity
1
2
3
4
5
6
7
8
9
10
Device
Power Adapter
Printing Paper
CD
Data Cable
User Manual (Device)
User Manual (Management Software)
Qualification Certificate & Warranty Card
Lithium Battery
Barcode Scanner
Getein1100
12 V 5 A
57 × 35 mm
6.4 Ah
set
pc
pc
pc
pc
pc
pc
pc
pc
pc
1
1
1
1
1
1
1
1
Optional
Optional
2. Installation
2.1 Unpacking
Check the analyzer and accessories refer to the packing list (Table 2-1). If you find any
parts missing or any other questions, contact with your agent or Getein’s after-sales
engineer directly.
Getein 1100
Power Adaptor
User Manual
Printing Paper
CD
Getein1100
User Manual Inside
Com Line

4
2.2 Analyzer Configuration
Getein1100 is composed of control system, optical system, display unit, analog signal
acquisition system, mechanical drive system, etc.
Front and rear view of Getein1100 are showed in Fig.2-2 and Fig.2-3.
Fig.2-2 Front View of Getein1100
Fig.2-3 Rear View of Getein1100
2.3 Main Interface
Status Information
Mainly include the status of power, battery and SD card, current date and time.
Detection Information
Mainly include patient information, reagent information and result information.
System Menu
Mainly include Test, Search and Settings.
Test: see details in part 3.4.
Search: see details in part 3.5.
Settings: see details in part 4.1~4.7.
2
3
1
Getein 1100

5
Fig.2-4 Main Interface
2
3
1
2.4 Performance Summary
2.4.1 Basic Parameters
Model Operating
Wavelength (nm)
Resolution
(mV)
Detection Range
(mV)
Getein1100 10 ~ 15000635 ± 5
2.4.2 Performance Indexes
Blank Count Voltage of the blank QC card should be less than 100 mV
Linearity r ≥ 0.95 in the detection range from 0 mV to 3200 mV
Repeatability CV ≤ 2%
Stability The voltage variation of the same standard card with a fixed
concentration tested within 1 hour should be less than±2%

6
2.5 Installation Requirements
2.5.1 Environment
Dry, clean, flat and horizontal surface away from direct sunlight, wind, hot source, noise
source, power interferences, electronic brush type engine and mechanical vibration.
2.5.2 Space Requirement
Place Getein1100 at a horizontal position and reserve enough space for the reagents.
2.4.3 Technical Specifications
Touch screen 7-inch LCD touch screen, 1024 × 600
Communications
Two USB ports for barcode scanning and software update
COM port for PC
Ethernet port for LIS
Data storage 10,000 data
Dimensions 261mm × 241mm × 115mm
Weight 2.0 kg
Operating
Environment
Temperature 10℃~ 35℃
Relative humidity ≤ 70%
Air pressure 70.0kPa ~ 106.0kPa
Storage
Temperature -40℃~ +55℃
Relative humidity ≤ 93%
Air pressure 50.0kPa ~ 106.0kPa
Power Supply 100-240V~ 50/60Hz 60VA

2.6.2 Barcode Scanner Connection (Optional)
Connect the barcode scanner via USB port in the lateral of the analyzer (see details in
the instruction of scanner).
2.6.3 Lithium Battery (Optional)
1) The battery capacity can be divided into 4 categories, displayed as
which represent lower, medium, higher and full power respectively.
2) The charge time of lithium battery is 6 hours and the battery can work for at least 3
hours (Note: The charging time and working time will change over time).
3) In order to avoid being affected by low power consumption and extend battery lifetime,
please connect power when it shows .
2.6.4 Power Connection
1) Use the adapter packed together with Getein1100.
Power supply: AC100V ~ AC240V ± 10%, Frequency: 50~60Hz ± 1Hz.
2) Connect power with Getein1100 through the AC/DC adapter.
3) Press the power switch to turn on the analyzer.
7
Fig.2-5 Loading Paper
2.6 Setup
2.6.1 Loading Paper
1) Open the printer cover.
2) Place the printing paper into the printer with carbon sensitive surface facing the screen.
3) Pull out approximate 5 cm of paper from the roll, then close the cover.
a). Open the printer cover b). Loading paper c). Close the printer cover

8
Fig.3-1 Reagent Information Select Interface
3. Operation
3.1 Preparations before Power On
Please confirm whether the analyzer is ready for use according to the following steps
before turning on the switch.
1) Check whether the power supply is ready or connected safely.
2) Check whether the printing paper is enough or paper installation is OK.
3.2 Power On
Press the switch to turn on the analyzer, then system will start its self-checking and then
enter the Test Interface.
Test Interface mainly includes Patient Information, Reagent Information and Result
Information. Users can input patient information and select test item, sample and test
mode as required (Fig.3-1). (Barcode can be scanned through scanner or inputted by
the user; No. cannot be modified, it will increase automatically.)
S/P
W.B
Urine
cTnI
hs-CRP+CRP
CK-MB/cTnI/Myo
mAlb
PCT/CRP
NT-proBNP/NGAL

9
Fig.3-2 SD Card Calibration
3.3 Quality Control Calibration
To guarantee the accuracy of measurement and the comparability of data, calibration is
required before running patient samples. Please use corresponding SD card to calibrate
the analyzer before testing different batches of kits (Note: SD card for different batches
cannot be exchanged).
Steps: Just attach the SD card to the SD card recognition zone, and the analyzer would
show the remind, click “OK” to import the reagent parameters (Fig.3-2).
Note: User can also use insert the SD card into the SD card slot to do the calibration.
3.4 Sample Measurement
User can do sample detection as the following steps (Fig.3-3):
1) Edit patient’s information if needed.
2) Click “Start” after inserting the card, test item will be auto-recognized and the result will
be shown on the screen. Users can also see the voltage waveform by slide to the left
side.
3) Normally, the test card will auto-quit after testing, if not, please click on “Quit” icon to quit
manually.
Read parameter of hs-CRP+CRP, do you
want to use the data?
Remind
OKCancel
SD
card
or

10
Fig.3-3 Sample Measurement Procedure
Note:
1) Do not change the interface during the measurement.
2) Different items have different sample volume and reaction time, please refer to the user
manual of specific items carefully for accurate information.

11
Input name or sample ID here
Fig.3-4 Search Interface
3.5 Result Query
3.5.1 Query
Click on “Search” icon to switch to result query interface, there are three ways to query
results (Fig.3-4).
Search by sample ID:
Search by name:
hs-CRP+CRP 10 mg/L
hs-CRP+CRP 20 mg/L
Fig.3-5 Name and Sample ID Search Interface
1) Input full or part of the Name or Sample ID (Fig.3-5).

12
2) Select required Date & Time (Fig.3-6).
Fig.3-6 Date & Time Search Interface
3.5.2 Result Deletion
User can delete the unwanted result by selecting the certain result and sliding to the left
side. Click “Delete” and a remind will be shown in the following interface (Fig.3-7). Then
Click “OK” to delete it.
Search by date ( ):

2.6.2 Barcode Scanner Connection (Optional)
Connect the barcode scanner via USB port in the lateral of the analyzer (see details in
the instruction of scanner).
2.6.3 Lithium Battery (Optional)
1) The battery capacity can be divided into 4 categories, displayed as
which represent lower, medium, higher and full power respectively.
2) The charge time of lithium battery is 6 hours and the battery can work for at least 3
hours (Note: The charging time and working time will change over time).
3) In order to avoid being affected by low power consumption and extend battery lifetime,
please connect power when it shows .
2.6.4 Power Connection
1) Use the adapter packed together with Getein1100.
Power supply: AC100V ~ AC240V ± 10%, Frequency: 50~60Hz ± 1Hz.
2) Connect power with Getein1100 through the AC/DC adapter.
3) Press the power switch to turn on the analyzer.
13
3.5.3 Test Report
Click on the required record for detailed test report (Fig.3-8). In the test report interface,
three icons named “Print”, “Save” and “Upload” are listed. Slide to the left side to view the
test voltage waveform.
Print: click to print the test result;
Save: click to save the modifications;
Upload: click to transmit data to PC, LIS and HIS.
Fig.3-7 Record Deleting Interface
Delete
a
b

14
Fig.3-8 Test Report Interface
Table of contents