Getinge WD15 CLARO User manual

GETINGE WD15 CLARO
GE15
TECHNICAL MANUAL
6001396902

The model name and serial number should always be provided when ordering
spare parts or during queries per telephone or written correspondence:
Serial number of the machine:
……………………………………………………
Machine model:
……………………………………………………
The manual, or parts thereof, are a part of the product. This manual must not be
modified, reproduced or copied without GETINGE’s written consent. The content
may not be reused by third parties or used for unauthorized purposes. Violators will
be prosecuted. Additional copies of this manual can be obtained from GETINGE
for a fee.
© Copyright 2013 GETINGE, Reprinting prohibited.
Getinge Disinfection AB
Ljungadalsgatan 11
352 46 Växjö
SWEDEN
Internet: www.getinge.com
2019-10-30

Contents
PREFACE.......................................................................................................................... 7
1 SAFETY PRECAUTIONS............................................................................................. 8
1.1 Important............................................................................................................. 9
1.2 Isolator switch..................................................................................................... 9
1.3 Signs and labels................................................................................................ 10
1.3.1 Attention symbols................................................................................ 10
1.4 Product liability.................................................................................................. 10
1.4.1 Declaration of Conformity................................................................... 10
1.4.2 Disclaimer........................................................................................... 10
1.4.3 Manufacturer....................................................................................... 11
1.4.4 Warranty............................................................................................. 11
2 PRESENTATION........................................................................................................ 12
2.1 Areas of use...................................................................................................... 12
2.2 Control panel..................................................................................................... 13
2.2.1 Indicators............................................................................................ 13
2.2.2 Control buttons.................................................................................... 14
2.2.3 Window............................................................................................... 14
2.3 Software description and settings..................................................................... 17
2.3.1 Process selection................................................................................ 18
2.3.2 Control system.................................................................................... 18
2.3.3 Password............................................................................................ 19
3 MENU TREE............................................................................................................... 21
3.1 Home menu....................................................................................................... 22
3.1.1 Process selection................................................................................ 22
3.1.2 Start process....................................................................................... 22
3.1.3 Process screen................................................................................... 23
3.2 Main menu........................................................................................................ 23
3.2.1 Login/Logout....................................................................................... 24
3.2.2 About................................................................................................... 24
3.2.3 System menu...................................................................................... 24
3.2.4 Alarm history....................................................................................... 42
3.2.5 Print..................................................................................................... 43
3.3 A parameters..................................................................................................... 44
3.4 P parameters..................................................................................................... 45
3.5 DIP switches..................................................................................................... 49
4 ALARM MANAGEMENT............................................................................................. 50
4.1 Information texts................................................................................................ 51
4.2 Error indicators.................................................................................................. 52
4.2.1 Alarms................................................................................................. 52
4.2.2 Acknowledgement of an error code.................................................... 53
4.2.3 Emergency opening of the machine................................................... 54
4.2.4 Error codes in the machine................................................................. 55
4.3 Troubleshooting................................................................................................ 56
5 PREVENTIVE MAINTENANCE.................................................................................. 60
5.1 Periodic maintenance........................................................................................ 60
Contents
TECHNICAL MANUAL GETINGE WD15 CLARO 3 (128)
<Doc_TEC><Doc_6001396902><Rev.I><Lang_en>

5.1.1 Service table....................................................................................... 61
5.2 Consumables.................................................................................................... 62
5.3 General (Item 1)................................................................................................ 62
5.3.1 Checking electrical cables and connection points 1.1 ....................... 62
5.3.2 Checking the cooling fan 1.2 .............................................................. 63
5.3.3 Checking the panel 1.3 ...................................................................... 63
5.3.4 Checking the machine is level 1.4 ..................................................... 63
5.3.5 Checking the Quick guide 1.5 ............................................................ 63
5.3.6 Checking error codes and number of processes 1.6 ......................... 63
5.4 The chamber (Item 2)........................................................................................ 63
5.4.1 Clean the inside of the chamber 2.1 .................................................. 63
5.4.2 Check the spray arms 2.2 .................................................................. 64
5.4.3 Replacing spray arm bearings 2.3 ..................................................... 64
5.4.4 Checking temperature sensors 2.4 .................................................... 64
5.4.5 Checking the strainer in the bottom of the chamber 2.5 .................... 65
5.4.6 Checking insert for goods 2.6............................................................. 65
5.4.7 Checking the wash cart guide rails 2.7 .............................................. 65
5.4.8 Checking the salt level in the salt filter (Option) 2.8............................ 65
5.5 Door (Item 3)..................................................................................................... 65
5.5.1 Checking door and door springs 3.1................................................... 65
5.5.2 Checking the door seal and chamber seal 3.2.................................... 66
5.5.3 Checking the door lock and switch for proper functioning 3.3............ 66
5.5.4 Checking the door wire 3.4................................................................. 66
5.6 Connections (Item 4)......................................................................................... 66
5.6.1 Checking water and drain connections 4.1......................................... 66
5.6.2 Checking the filter for incoming water 4.2........................................... 67
5.7 Dosing system (Item 5)..................................................................................... 67
5.7.1 Checking hoses 5.1............................................................................ 68
5.7.2 Replacing a hose to a hose pump 5.2 ............................................... 68
5.7.3 Checking the dosing amount 5.3........................................................ 71
5.7.4 Checking the empty container alarm 5.4 ........................................... 71
5.8 Dryer (Item 6).................................................................................................... 72
5.8.1 Replacing a HEPA filter 6.1 ............................................................... 72
5.8.2 Checking fan function 6.2 .................................................................. 72
5.8.3 Checking the CPU card and the HEPA filter 6.3 ................................ 72
5.9 Lighting (Item 7)................................................................................................ 72
5.9.1 Checking lighting 7.1........................................................................... 72
5.10 Test run (Item 8) (at each service).................................................................. 73
5.10.1 Function and leakage check 8.1 ...................................................... 73
5.10.2 Checking the panel 8.2..................................................................... 73
5.10.3 Temperature check 8.3 .................................................................... 74
6 FUNCTION CHECK.................................................................................................... 75
6.1 Instructions, cable, switch................................................................................. 75
6.2 Filters and valves.............................................................................................. 75
6.3 Operator display................................................................................................ 75
6.4 Insert for items.................................................................................................. 75
6.5 Door.................................................................................................................. 75
Contents
4 (128) TECHNICAL MANUAL GETINGE WD15 CLARO
<Doc_TEC><Doc_6001396902><Rev.I><Lang_en>


6.6 Detergent dosing............................................................................................... 76
6.7 Washing system................................................................................................ 76
6.8 Temperature check........................................................................................... 76
6.9 Dryer................................................................................................................. 76
7 REPAIRS AND ADJUSTMENT................................................................................... 77
7.1 Maintenance with open door............................................................................. 78
7.1.1 Attachment pin door............................................................................ 78
7.2 Maintenance from the chamber........................................................................ 79
7.2.1 Replacing an element......................................................................... 79
7.2.2 Replacing/Cleaning strainers.............................................................. 80
7.2.3 Replacing/Cleaning spray arms.......................................................... 80
7.2.4 Replacing the guides for the upper tray.............................................. 81
7.3 Maintenance from front side.............................................................................. 82
7.3.1 Replacing a HEPA filter...................................................................... 82
7.3.2 Replacing a dosing pump................................................................... 83
7.3.3 Replacing the waste pump.................................................................. 83
7.3.4 Replace the pressure switch from the sump and pump pressure....... 83
7.3.5 Replacing fuses.................................................................................. 84
7.3.6 Assembly of front panel...................................................................... 84
7.4 Removing cover panels..................................................................................... 85
7.5 Maintenance from above with the top plate off................................................. 86
7.5.1 Door switch......................................................................................... 86
7.5.2 Spray arm tap at top........................................................................... 86
7.6 Maintenance from the side with the cover plates removed............................... 87
7.6.1 Lamps................................................................................................. 87
7.6.2 Regenerating tank............................................................................... 87
7.7 Maintenance from back side............................................................................. 88
7.7.1 Drying box........................................................................................... 88
7.7.2 Main pipe............................................................................................ 89
7.7.3 Valves................................................................................................. 89
7.7.4 Electric terminals................................................................................. 89
7.8 Maintenance from bottom................................................................................. 89
7.8.1 Turning the machine........................................................................... 90
7.8.2 Circulation pump and fan.................................................................... 91
7.8.3 Sump................................................................................................... 91
7.8.4 Salt filter.............................................................................................. 92
7.8.5 Spray arm bottom............................................................................... 92
7.9 Connecting a PC............................................................................................... 92
7.10 Printer Martel MCP8810X (Option)................................................................. 93
7.11 Printer Lexmark C524/534 (Option)................................................................ 95
7.12 Netcom (Option).............................................................................................. 97
7.13 External dosing (option).................................................................................. 99
7.14 Load program to flash memory..................................................................... 100
7.14.1 Loading system programs............................................................... 101
7.14.2 Load in a new application into PACS with CS1000........................ 104
7.14.3 Reloading the backup from “Flash prom” to PACS......................... 106
7.14.4 Cold start......................................................................................... 107
Contents
TECHNICAL MANUAL GETINGE WD15 CLARO 5 (128)
<Doc_TEC><Doc_6001396902><Rev.I><Lang_en>
7.14.5 Changing user language................................................................. 108
7.14.6 Calibrating temperature sensors – with resistance......................... 109
7.14.7 Temperature sensors – with ice bath and oil bath.......................... 111
7.14.8 Calibrating detergent dosing........................................................... 114
8 SENSOR LIST........................................................................................................... 116
9 ADDRESSES............................................................................................................ 119
Alphabetical index.......................................................................................................... 121
Contents
6 (128) TECHNICAL MANUAL GETINGE WD15 CLARO
<Doc_TEC><Doc_6001396902><Rev.I><Lang_en>
PREFACE
This manual is intended for users of products from Getinge
Disinfection AB.
The user manual describes the design and operation of the
machine and the maintenance for which the user is responsible.
The installation manual describes the machine's installation. The
technical manual describes necessary information for operators
and maintenance personnel. The information in the manual must
be complied with to ensure safe and error-free operation.
Read the manual before use.
Before using the machine for the first time, users must read this
manual and familiarize themselves with the functioning and
operation of the machine as well as its safety instructions.
Operators and maintenance personnel must complete training
arranged through Getinge's sales organization.
The information in this manual describes the machine as
dispatched from Getinge Disinfection AB. There may be
differences due to customization for customers or countries.
The machine is accompanied by the following documentation:
• User manual
• Installation manual
• Quick guide
• Declaration of conformity
The following documentation is supplied via electronic media:
• User manual
• Installation manual
• Quick guide
• Electrical diagrams
• Program sheets
The following documentation shall be provided by the sales
company to the end user on request:
• Technical manual
• Spare parts list
The accompanying Quick guide must be hung up and clearly
visible in the installation area.
The information in this manual was up-to-date on the date that the
manual was issued.
PREFACE
TECHNICAL MANUAL GETINGE WD15 CLARO 7 (128)
<Doc_TEC><Doc_6001396902><Rev.I><Lang_en>
1 SAFETY PRECAUTIONS
The equipment must be used in accordance with
the safety instructions below. If in doubt, contact
a representative of the reseller without delay.
Use caution when handling detergent. See the
container for additional instructions. Wear
protective glasses and protective gloves when
handling agents.
This machine has a number of built-in safety devices.
To avoid injury, it is highly important not to bypass these safety
devices.
If the equipment is used in a manner not specified by the
manufacturer this can impair the safety equipment on the machine.
Note: Before performing any service or maintenance work,
be sure to cut power to the machine. Shut off steam and
water supplies and drain the process, booster and waste
tanks.
1 SAFETY PRECAUTIONS
8 (128) TECHNICAL MANUAL GETINGE WD15 CLARO
<Doc_TEC><Doc_6001396902><Rev.I><Lang_en>

1.1 Important
• The machine is designed for connection to water only (and for
steam if applicable).
• Read the manual thoroughly before use.
• The machine should only be handled by authorized
personnel. Personnel must also receive regular training.
• Exercise precaution when using the machine, as it uses hot
water and possibly steam.
• Exercise precaution when handling the chemical agent used
in the machine. Follow the instructions for the agent:
oif the agent is swallowed, comes into contact with the
eyes or skin or if vapors are inhaled.
ofor instructions on dosing and washing temperatures.
ofor instructions regarding storage and sorting/disposal of
packing.
• Make sure that the machine has access to detergent before
the process starts. This is important both for the operation of
the machine and for keeping the washing chamber free from
staining.
• The machine must be kept clean if it is to work properly.
• Do not wash down or hose down the machine with water.
• Installation and service work must be performed by trained
personnel.
• Never bypass the machine's door switch under any
circumstances.
• Leakage in the system, e.g. due to a worn door seal, must be
repaired without delay.
• Spare parts must only be obtained from Getinge's sales
companies.
1.2 Isolator switch
The machine must have a lockable switch for the electric power
supply. A lockable switch is not included in the delivery scope. The
switch must be easily accessible on a wall close to the machine.
The installation must conform to and be marked in accordance with
local regulations.
1 SAFETY PRECAUTIONS
TECHNICAL MANUAL GETINGE WD15 CLARO 9 (128)
<Doc_TEC><Doc_6001396902><Rev.I><Lang_en>
1.3 Signs and labels
1.3.1 Attention symbols
There are warnings, instructions, and advice in this manual that
require extra attention. The symbols and designs used are:
Risk of injuries or machine damage.
This symbol indicates a warning in the manual
concerning the handling of components sensitive
to ESD. The warning applies to damage that may
occur to circuit boards and/or hardware.
Hot surface. Risk of injury.
Live components.
Irritating substances such as acids.
1.4 Product liability
1.4.1 Declaration of Conformity
The product compliance is stated in the Declaration of Conformity.
1.4.2 Disclaimer
• The manufacturer cannot guarantee that the product will work
as intended if accessories or spare parts other than those
approved by the manufacturer are used.
• The product liability only applies when the instructions in this
manual have been followed in their entirety.
• The manufacturer accepts no responsibility for personal
injuries when the instructions in this manual have not been
followed in their entirety.
• The manufacturer reserves the right to change the
specification and design of the product without any prior
notice.
1 SAFETY PRECAUTIONS
10 (128) TECHNICAL MANUAL GETINGE WD15 CLARO
<Doc_TEC><Doc_6001396902><Rev.I><Lang_en>
1.4.3 Manufacturer
This product was manufactured by:
Getinge Disinfection AB
Ljungadalsgatan 11
352 46 Växjö
SWEDEN
1.4.4 Warranty
The product warranty applies in accordance with the agreement
reached between the Getinge sales company and the customer.
1 SAFETY PRECAUTIONS
TECHNICAL MANUAL GETINGE WD15 CLARO 11 (128)
<Doc_TEC><Doc_6001396902><Rev.I><Lang_en>

2 PRESENTATION
2.1 Areas of use
WARNING!
Improper use may result in damage to objects
and personal injury.
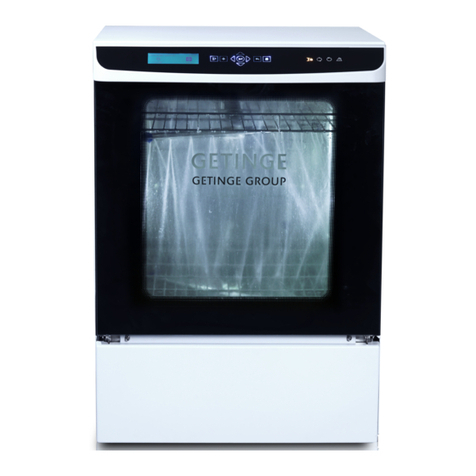
Getinge WD15 CLARO is a washer-disinfector intended for
cleaning, disinfecting, and drying surgical instruments (solid and
tubular), dishes, hand bowls, glass items, suctions flasks,
anesthesia equipment, and baby feeding bottles. The goods must
be placed in the proper accessories, as recommended by Getinge
Disinfection AB.
The customer is responsible for ensuring that an Installation
Qualification, Operating Qualification and Performance
Qualification according to ISO 15883 are carried out before the
product is put into use.
000329
Figure 1. WD15
2 PRESENTATION
12 (128) TECHNICAL MANUAL GETINGE WD15 CLARO
<Doc_TEC><Doc_6001396902><Rev.I><Lang_en>

2.2 Control panel
The machine is operated from the control panel located in the top
edge of the door.
The panel can be divided into three areas: indicators, keys, and
windows. Each area is described under the respective heading.
3
87
6
54
21
002234
Figure 2. Control panel
1. Window
2. Control and navigation
keys
3. Indicators
4. Open the door
5. Activate display (Number
of available keys depends
on machine type)
6. - Confirm selection
by navigation
- Start the selected
process
- Reset alarm
signal in the event
of an alarm
7. Back one step
8. Go to menu
2.2.1 Indicators
The indicators show the current operating status of the machine.
Symbol Description
Door locked The machine door is closed
and locked.
Ongoing
process
The machine is running a
selected process.
Completed
process
Green light: Process
completed without errors.
Red light: Process completed
but an error occurred while it
was running. Process not
approved.
Alarms An alarm has been triggered.
2 PRESENTATION
TECHNICAL MANUAL GETINGE WD15 CLARO 13 (128)
<Doc_TEC><Doc_6001396902><Rev.I><Lang_en>

2.2.2 Control buttons
The keys are used to navigate through the machine program and
to select functions.
Function Key Description
Open the door The machine door unlocks and
opens.
More Can be selected during a
process.
Navigation The Up, Down, Right, and Left
arrows are used to control the
cursor and other values in the
process diagram, also called
cursor keys.
In operating mode is used
as the START key and to
acknowledge the alarm to stop
the audible signal.
When navigating, the
machine’s program is used
to select, enter, or confirm the
highlighted alternatives.
Back Return to the previous window
or menu, or undo an entry.
Menu Go to main menu.
2.2.3 Window
Information is displayed in the window about the current process
(process window) and a number of various types of ”pop-up”
windows (Alarm window, Information windows, Dialog window and
Input window).
2.2.3.1 Example of a Process window
TEMP CHAMBER TEMP IND CHAMBER
91.2 °C 91.2 °C
000567
The process window displays the current process and the
remaining time. See also in the 3.1.3 Process screen section.
2 PRESENTATION
14 (128) TECHNICAL MANUAL GETINGE WD15 CLARO
<Doc_TEC><Doc_6001396902><Rev.I><Lang_en>

2.2.3.2 Example of an Alarm window
A00 POWER FAIL
000568
In case of an alarm, the relevant alarm displays as a popup
window in the process diagram at the same time that the alarm
signal sounds. See the 4 ALARM MANAGEMENT section on
handling alarms.
2.2.3.3 Example of an Information window
STARTING
000569
000570
Information is automatically displayed in the process diagram for
three seconds in the form of a popup window. Then the Information
symbol is displayed in the previous process illustration.
During an ongoing process the information message is also
displayed in the process status window.
2.2.3.4 Example of a Dialog window
000571
The window is displayed until a selection is made by pressing the
desired key.
2 PRESENTATION
TECHNICAL MANUAL GETINGE WD15 CLARO 15 (128)
<Doc_TEC><Doc_6001396902><Rev.I><Lang_en>

2.2.3.5 Example of an Input window
000572
Use the navigation keys to edit the value. Select the digit that
you want to change using the Right and Left arrows. Use the Up
and Down arrows to change a number. Save by pressing .
To enter a name, select the desired letter using the cursor keys
and press to select the letter. Select the back arrow, furthest to
the right, and press to cancel the entry. To toggle between lower
case and capital letters, select the up arrow furthest to the left and
press .
To switch to a numerical keyboard, select the box with numbers
furthest to the left and press .
Save the entry by selecting furthest to the left and pressing .
There are various entry windows depending on the input data
required.
In addition to plain text, a number of different symbols (as
described in the table below) are used in the window.
Function Symbol Description
Process handling
Program Open the menu to choose a
program.
Start Start the selected program.
Alarm management
Alarms An alarm symbol displays if an
alarm goes off and is not yet
acknowledged.
Miscellaneous
Save Save changes and entered
values.
Numerical
keyboard
Shift from alphabetical to
numerical keyboard.
2 PRESENTATION
16 (128) TECHNICAL MANUAL GETINGE WD15 CLARO
<Doc_TEC><Doc_6001396902><Rev.I><Lang_en>

Function Symbol Description
Alphabetical
keyboard
Shift from numerical to
alphabetical keyboard.
Information An incident has occurred.
During an ongoing process the
entire information message
appears in the process status
window.
Insufficient user
rights
No authorization for access to
the menu.
Scroll list If there are more rows than
space available on the process
screen, a scroll list is displayed
on the right. To reach the row
above or below, just continue
pressing on the cursor key.
2.2.3.6 Process management status
The keys displayed in the window below Process handling can
adopt three different states according to the below.
Symbol Status Description
Active The key can be pressed but is
not selected.
Selected The key is selected. Activation
takes place with .
Not available The key is currently not
available.
2.3 Software description and settings
This section describes the PACS 350 control and monitoring
system.
2 PRESENTATION
TECHNICAL MANUAL GETINGE WD15 CLARO 17 (128)
<Doc_TEC><Doc_6001396902><Rev.I><Lang_en>

2.3.1 Process selection
Several different items of equipment can be connected to the
control unit for programming, monitoring and documenting the
disinfection processes.
The operator communicates with the control unit via a control panel
or an ordinary PC.
All operator panels can be used to monitor the processes, since
they display all the set parameter values as well as actual values
on request.
Programs, system definitions and process data can be
documented by connecting a printer to the unit.
The computer contains programs for calibration of the temperature
and pressure sensors. Where alternative correction constants are
known, they can be entered manually. The testing functions
include means of activating analog and digital outputs and for
reading analog and digital inputs.
2.3.2 Control system
The machine is run and monitored by the control system PACS
350. Through a number of temperature and pressure sensors, the
machine’s software controls the selected process and ensures that
each program runs correctly. If a process for any reason is not
correctly carried out, an alarm will be activated and an error
message will provide information about the cause of the error.
Operators and service personnel communicate with the control unit
through the machine’s control panel. The service personnel can
also communicate through a PC connected to the control unit. The
process is controlled and monitored through the control panel by
using a set of buttons. It is also controlled and monitored through
information presented on the panel display.
Programs, parameters and process data can be documented by
connecting a printer to the unit.
The unit’s software contains programs for calibrating analog
sensors and for monitoring dosage, which means that calibration
can be done without connecting a PC to the unit.
The unit’s service program includes functions that assist in
activating analog and digital outputs and for monitoring analog and
digital inputs.
2 PRESENTATION
18 (128) TECHNICAL MANUAL GETINGE WD15 CLARO
<Doc_TEC><Doc_6001396902><Rev.I><Lang_en>

2.3.3 Password
There are four passwords with different levels of authorization in
the system program. The operator password has the lowest
authority; the programming password has full authority.
The password levels are as follows:
• Operator – code 558387.
• Supervisor – contact service for code.
• Service - contact service for code.
• Programming – contact service for code.
Passwords are entered through an entry window that automatically
appears once you have selected a menu that requires a password.
Enter the password with the help of the buttons . Choose
and press to confirm the password you have entered.
Note: In the menu tree, where a password must be entered,
there is a letter code (between PW: A-K) which indicates
which function the respective password level gives
authorization for.
If a user has logged in through the main menu (Log in), they are
automatically given access to all menus and functions as per the
access rights of that password. If a menu outside the area of
authorization is selected, an input window appears for a new log in
with a password that has more authorization.
If an incorrect password is entered, an info text will be shown on
the display. Press to get back to the input window.
Note: The password cannot be changed.
2.3.3.1 Operator
Authorization code Authorization
Default settings Panel setup, Localization, Machine
name, Date and time, Screen setup
Basic settings process Edit A parameters.
Basic printout. Emergency printout, Test page.
Password 1 Acknowledge the alarm.
2 PRESENTATION
TECHNICAL MANUAL GETINGE WD15 CLARO 19 (128)
<Doc_TEC><Doc_6001396902><Rev.I><Lang_en>

2.3.3.2 Supervisor
Code in menu tree Authorization
Default Panel setup, Localization, Machine
name, Date and time, Screen setup
Extended settings Machine setting, Print setting,
Communication
Basic settings process Edit A parameters.
Extended settings
process
Edit P parameters, Configure
parameters.
Basic printout. Emergency printout, Test page.
Expanded printout Alarm list, Program, All programs.
Change the name and
order of processes.
Change the name and order of
processes.
User rights Rights, New user, Delete user
Password 1. Acknowledge the alarm.
2.3.3.3 Service
Code in menu tree Authorization
Default Panel setup, Localization, Machine
name, Date and time, Screen setup
Extended settings Machine setting, Print setting,
Communication
Basic settings process Edit A parameters.
Extended settings
process
Edit P parameters, Configure
parameters.
Basic printout. Emergency printout, Test page.
Expanded printout Alarm list, Program, All programs.
Change the name and
order of processes.
Change the name and order of
processes.
User rights Rights, New user, Delete user
Basic service Analog inputs, Digital outputs, System
flags, User flags, Service message
Extended service Calibration, Analog inputs, Digital
outputs, Test triac, Back up RAM
Password 1. Acknowledge the alarm.
2 PRESENTATION
20 (128) TECHNICAL MANUAL GETINGE WD15 CLARO
<Doc_TEC><Doc_6001396902><Rev.I><Lang_en>
Other manuals for WD15 CLARO
2
This manual suits for next models
1
Table of contents
Other Getinge Laboratory Equipment manuals

Getinge
Getinge 600 User manual

Getinge
Getinge WD 14 TABLO User manual

Getinge
Getinge Decomat 4656 User manual

Getinge
Getinge VS60 User manual

Getinge
Getinge 9120 User manual

Getinge
Getinge 600 User manual

Getinge
Getinge 46-SERIES User manual

Getinge
Getinge 86 SERIES User manual

Getinge
Getinge Decomat 4656 User manual

Getinge
Getinge 8666 Operating instructions