GEV AURORA MINI LCI 16903 User manual

Max. 14 Ct./Min aus dem deutschen Festnetz.
Mobil max. 42 Ct./Min.
International calls may vary.
GEV GmbH
Heidehofweg 16
25499 Tangstedt
Germany
www.gev.de
service@gev.de
Hotline: +49 (0)180/59 58 555
www.gev.de
Typ: Einbau-Dämmerungsschalter
AURORA MINI LCI 16903
150 mm
100 mm
BA01175900
16WOA31
16903

ABD
2 3
C
(L)
BRAUN
BLAU
ROT
2
1
1
12 3

Mit dem Kauf dieses Artikels haben Sie sich für ein qualitativ
hochwertiges GEV Produkt entschieden. Bitte lesen
Sie diese Bedienungsanleitung sorgfältig durch, um ein
einwandfreies Funktionieren zu gewährleisten. Bewahren
Sie diese Anleitung sorgfältig auf, um gegebenenfalls
später nachlesen zu können.
Arbeitsweise
Einbau-Dämmerungsschalter für den nachträglichen Einbau in
Leuchten. Der Dämmerungsschalter schaltet in Abhängigkeit
von der Umgebungshelligkeit. Unterschreitet diese einen
bestimmten Wert, so schaltet der Dämmerungsschalter die
Leuchte automatisch EIN und bei Überschreitung dieses
Wertes wieder AUS.
Sicherheitshinweise
Die Montage darf nur von einem Fachmann
unter Berücksichtigung der landesüblichen
Installationsvorschriften ausgeführt werden. Es darf
nur in spannungsfreiem Zustand gearbeitet werden, dazu
unbedingt die Stromkreissicherung abschalten.
Überprüfen Sie, ob die Anschlussleitung span-nungsfrei ist!
Bei Schäden, die durch Nichtbeachtung dieser
Bedienungsanleitung verursacht werden, erlischt der
Garantieanspruch! Für Folgeschäden übernehmen wir
keine Haftung! Bei Sach- oder Personenschäden, die durch
unsachgemäße Handhabung oder Nichtbeachtung der
Sicherheitshinweise verursacht werden, übernehmen wir keine
Haftung. Aus Sicherheits- und Zulassungsgründen ist das
eigenmächtige Umbauen und/oder Verändern des Gerätes
nicht gestattet.
Montageort
Der Lichtsensor sollte so montiert werden, dass die vom
Dämmerungsschalter eingeschaltete Leuchte nicht den
Lichtsensor selbst beleuchtet.
Installation
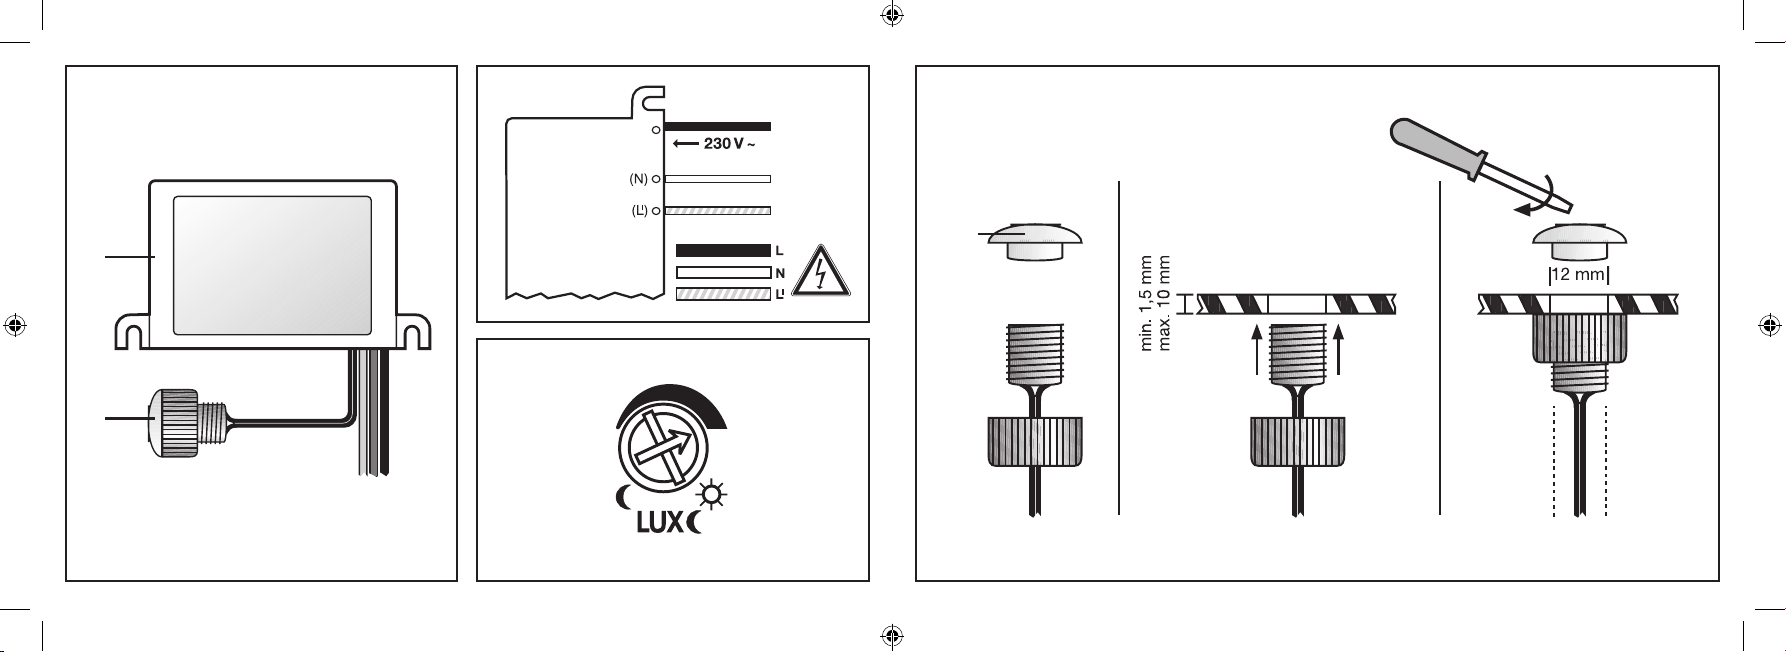
Der Dämmerungsschalter besteht aus zwei Teilen, Abb. A1 das
Leistungsteil, Abb. A2 der Lichtsensor. Der maximal Abstand
zwischen Lichtsensor und Leistungsteil beträgt ca. 18 cm.
Drehen Sie die transparente Sensorkappe vom Lichtsensor ab
(Abb. D1). Der Lichtsensor benötigt eine Önung (Durchmesser
11 mm) und wird von innen durch die Önung eingesetzt
(Abb. D2). Richten Sie den Lichtsensor bündig zur Einbaufläche
aus. Befestigen Sie den Lichtsensor mit der transparenten
Sensorkappe (Abb. D3). Montieren Sie das Leistungsteil. Die
Netzanschlussleitung gemäß Schaltbild (Abb. B) verdrahten.
Über N + L'können Sie den zu schaltenden Verbraucher,
z. B. eine Leuchte, o. ä. anschließen. Schalten Sie die
Stromkreissicherung wieder ein.
Einstellung
Die individuelle Einstellung sollte in der Tageszeit erfolgen,
in der die Beleuchtung eingeschaltet werden soll (z. B. in der
Dämmerung). Drehen Sie den Regler (Abb. C) entgegen dem
Uhrzeigersinn auf Minimum. Anschließend drehen Sie den
Regler in entgegengesetzter Richtung bis die angeschlossene
Beleuchtung eingeschaltet wird. Der eingestellte Lux-Wert
entspricht der Umgebungshelligkeit.
Bitte beachten Sie, dass die angeschlossene Beleuchtung
leicht zeitverzögert einschaltet.
Recycling-Hinweise
Dieses Gerät darf nicht mit dem unsortierten Hausmüll
entsorgt werden. Besitzer von Altgeräten sind gesetzlich
dazu verpflichtet, dieses Gerät fachgerecht zu
entsorgen. Informationen erhalten Sie von Ihrer Stadt- bzw.
Gemeindeverwaltung.
Technische und optische Änderungen ohne Ankündigung vorbehalten.
4 5
DEGBFRITPL
Einbau-Dämmerungsschalter
AURORA MINI LCI 16903
Technische Daten
Netzanschluss 230 V ~
Dämmerungsschalter Ca. 5 lx – 500 lx, stufenlos einstellbar
Schaltleistung Max. 200 W LEDs, max. 200 W Energiesparlampen,
max. 800 W Glühlampen, Halogen
Leistungsaufnahme Ca. 0,5 W
Schutzart Sensor IP 54, Leistungsteil IP 20
Schutzklasse II
Zulässige Umgebungstemperatur - 20 °C ... + 40 °C
Abmessungen ca. Sensor Ø 14 mm, Leistungsteil B 75 mm x H 39 mm x T 24 mm
μ = Kontaktönungsweite < 1,2 mm

76 Subject to technical and design changes without prior notice.
DEGBFRITPL
Please read these instructions carefully and keep for future
reference. By purchasing this item, you have chosen a
high-quality GEV product. Please read these operating
instructions carefully to ensure correct operation. Keep
these instructions in a safe place so that you can refer back
to them if necessary.
Operation
Twilight switch for retrofitting in lights. The twilight switch
controls lighting depending on ambient brightness. If the level
of brightness falls below a certain value, the twilight switch
automatically switches the light ON; if this value is exceeded, it
switches the light OFF again.
Safety instructions
This device may only be installed by a technician
in accordance with the applicable regulations.The
electrical power supply and the circuit protection must
be switched o during the entire installation process.
Please check that the connection cable is disconnected!
Under no circumstances does the warranty cover damage
resulting from failure to observe these instructions. Nor do we
accept liability for any indirect damage. Similarly, we can accept
no liability for any material damage or bodily injury caused
by mishandling or failure to observe the safety instructions.
In these cases, no warranty claim may be made. In addition,
for safety and compliance reasons, you are not authorised to
dismantle and/or alter the house light in any way.
Installation position
The light sensor must be positioned so that the light activated
by the twilight switch does not shine directly onto the light
sensor.
Installation
The twilight switch LCI consists of two components: the power
section (Fig. A1), and the light sensor (Fig. A2). The distance
between the light sensor and power section must not exceed
18 cm. Turn the transparent sensor cap to remove it from the
light sensor (Fig. D1). The light sensor requires a 11 mm-
diameter opening; install the light sensor into the opening
from the inside (Fig. D2). Adjust the light sensor so that it fits
flush against the surface. Fasten the light sensor using the
transparent sensor cap (Fig. D3). Mount the power section.
Connect the mains connection cable as shown in the wiring
diagram (Fig. B). Switch the circuit protection back on.
Setting
Perform the individual settings at the same time of day as the
time when you wish the lighting to come on (e.g. at twilight).
Turn the controller anti-clockwise (Fig. C) to the minimum
position. Then turn the controller in the opposite direction until
the connected lighting is switched on. The set lux value now
corresponds to the ambient brightness level.
Please note that there is a slight delay before the connected
lighting switches on.
Recycling instructions
This device may not be disposed of with unsorted
household waste. Owners of old devices are required by
law to dispose of this device correctly. Contact your local
town council for further information.
Technical information
Mains connection 230 V ~
Twilight switch approx. 5 lx – 500 lx, infinitely variable
Switching capacity max. 200 W LEDs, max. 200 W energy-saving bulbs,
max. 800 W incandescent bulbs and halogen bulbs
Power consumption approx. 0.5 W
Protection type IP 54 sensor, IP 20 power section
Protection class II
Permissible ambient temperature approx. -20 °C ... +40 °C
Approx. measurements Sensor Ø 14 mm, Power section W 75 mm x H 39 mm x D 24 mm
μ = contact gap < 1.2 mm
Integrated twilight switch
AURORA MINI LCI 16903

Modifications techniques et optiques réservées sans avertissement préalable.
98
DEGBFRITPL
Veuillez lire soigneusement cette notice et la conserver.
En achetant cet article, vous avez choisi un produit GEV
de qualité supérieure. Pour l’utiliser dans les meilleures
conditions, nous vous recommandons de lire attentivement
ce mode d’emploi. Conservez soigneusement ce document
en vue d’une éventuelle consultation future.
Fonctionnement
Interrupteur crépusculaire à intégrer à un luminaire.
L’interrupteur crépusculaire active le système d’éclairage
en fonction de la luminosité ambiante. La lumière s’allume
et s’éteint automatiquement lorsque la luminosité passe
respectivement au-dessous ou au-dessus d’une valeur seuil
prédéterminée.
Consignes de sécurité
L’installation de ce produit doit impérativement être
eectuée par un spécialiste et conformément aux
prescriptions en vigueur. L’alimentation électrique
doit obligatoirement être coupée (fusible secteur déconnecté)
pendant toute la durée de l’installation.
Le câble d’alimentation ne doit être soumis à aucune tension.
La garantie ne couvre en aucun cas les dommages dus à un
non-respect de la présente notice. Nous déclinons par ailleurs
toute responsabilité quant aux éventuels dommages indirects.
De même, nous ne pourrons être tenus pour responsables
des éventuels dommages matériels ou blessures corporelles
résultant de manipulations inappropriées ou du non-respect
des consignes de sécurité. Dans de tels cas de figure, tout
recours en garantie sera exclu. En outre, pour des raisons de
sécurité et de conformité, tout démontage et toute modification
de l’éclairage d’extérieur sont interdits.
Lieu de montage et positionnement
Le photocapteur doit être installé de sorte que le luminaire activé
par l’interrupteur crépusculaire ne l’éclaire pas directement.
Installation
L’interrupteur crépusculaire LCI est composé de deux éléments:
la partie électrique (fig. A1) et le photocapteur (fig. A2). L’écart
maximum entre le photocapteur et la partie électrique est de
18 cm. Retirez le cache transparent du photocapteur (fig. D1).
Le photocapteur requiert un orifice de 11 mm de diamètre,
dans lequel il doit être introduit depuis l’intérieur (fig. D2).
Positionnez le photocapteur de telle façon qu’il aeure la
surface de montage. Fixez le photocapteur au moyen du cache
transparent (fig. D3). Installez la partie électrique. Raccordez le
câble d’alimentation conformément au schéma électrique (fig.
C). Remettez en place le fusible secteur.
Réglages
Le réglage personnalisé doit être eectué au moment
de la journée où vous souhaitez que l’éclairage s’allume
(p. ex. au crépuscule). Tournez ensuite le régulateur dans la
direction opposée jusqu‘à activation de l‘éclairage connecté.
La valeur en lux ainsi paramétrée correspond à la luminosité
ambiante.
Attention : l‘éclairage connecté s‘active après un bref délai.
Remarques concernant le recyclage
Cet appareil ne doit en aucun cas être jeté avec les ordures
ménagères. Les propriétaires d’équipements électriques
ou électroniques usagés ont en eet l’obligation légale de
les déposer dans un centre de collecte sélective. Informez-vous
sur les possibilités de recyclage auprès de votre municipalité.
your local town council for further information.
Caractéristiques techniques
Raccordement au réseau 230 V ~
Interrupteur crépusculaire env. 5 lux à 500 lux, réglable en continu
Puissance de coupure LED : 200 W max., ampoules à économie d‘énergie : 200 W max.,
ampoules à incandescence : 800 W max., halogènes
Consommation env. 0,5 W
Type de protection capteur IP 54, partie électrique IP 20
Classe de protection II
Plage de température ambiante autorisée env. -20 °C ... +40 °C
Dimensions approx. capteur Ø 14 mm, partie électrique l 75 mm x h 39 mm x p 24 mm
μ = largeur d’intervalle de coupure < 1,2mm
Interrupteur crépusculaire pour montage intégré
AURORA MINI LCI 16903

La ditta si riserva il diritto di apportare variazioni tecniche ed estetiche senza preavviso.
1110
DEGBFRITPL
Leggere attentamente e conservare queste istruzioni
per l’uso Con l’acquisto di questo articolo si è scelto un
prodotto GEV di qualità superiore. Leggere attentamente le
istruzioni per l’uso per garantire un corretto funzionamento
e conservarle con cura per una eventuale consultazione
successiva.
Funzionamento
Integrazione - interruttore crepuscolare per l‘installazione
sostitutiva in lampade già presenti. L‘interruttore crepuscolare
accende o spegne la lampada in base alla luminosità
dell‘ambiente circostante: se inferiore rispetto al valore
impostato, la lampada si accende automaticamente, se
superiore, si spegne.
Indicazioni di sicurezza
Il montaggio deve essere svolto esclusivamente da
personale specializzato, nel pieno rispetto delle norme
di installazione locali.
Tale operazione deve essere eettuata soltanto previa
interruzione dell’alimentazione di corrente del circuito elettrico.
Verificare che il cavo sia privo di tensione!
In caso di danni derivanti dalla mancata osservanza delle
istruzioni per l’uso, la garanzia decade. Il produttore non si
assume alcuna responsabilità in merito a tali danni.
Inoltre, il produttore non si assume alcuna responsabilità
in caso di danni a cose o persone conseguenti a un utilizzo
inadeguato del dispositivo o alla mancata osservanza delle
norme di sicurezza. Nei suddetti casi decade ogni diritto di
garanzia.
Per motivi relativi a sicurezza e certificazioni, non è consentito
apportare variazioni e/o modifiche arbitrarie alla lampada.
Punto di installazione
Il sensore di luminosità deve essere installato in modo tale
da non essere illuminato direttamente dalla lampada attivata
tramite l‘interruttore crepuscolare.
Installazione
L‘interruttore crepuscolare LCI è costituito da due componenti:
sezione di potenza (Fig. A1) e sensore di luminosità (Fig. A2).
La distanza massima tra il sensore di luminosità e la sezione
di potenza è di circa 18 cm. Ruotare la calotta trasparente e
separarla dal sensore (Fig. D1). Installare il sensore di luminosità
dall‘interno, in un‘apertura con un diametro di 11 mm (Fig. D2).
Orientare il sensore di luminosità a livello rispetto alla superficie
di installazione. Fissare il sensore di luminosità con la calotta
trasparente (Fig. D3). Installare la sezione di potenza. Collegare
il cavo di connessione alla rete elettrica come indicato nello
schema (Fig. B). Attivare nuovamente l‘interruttore automatico
del circuito elettrico.
Regolazione
È necessario eseguire la regolazione nel momento della
giornata in cui si desidera che l‘illuminazione si accenda (ad
esempio al tramonto). Ruotare il regolatore (Fig. C) in senso
antiorario fino al raggiungimento del valore minimo. Girare
quindi il regolatore in direzione opposta fino a che non si attiva
l‘illuminazione collegata. Il valore di Lux impostato corrisponde
alla luminosità dell‘ambiente circostante.
Tenere presente che l‘illuminazione collegata si accende con
un leggero ritardo.
Indicazioni per il riciclaggio
Questo dispositivo non deve essere smaltito come rifiuto
indierenziato. Chi possiede un vecchio dispositivo è
vincolato per legge allo smaltimento conformemente
alle normative in vigore. Per ulteriori informazioni rivolgersi
all’amministrazione comunale.
Interruttore crepuscolare da incasso
AURORA MINI LCI 16903
Dati tecnici
Collegamento di rete 230 V ~
Interruttore crepuscolare ca. 5 Lux – 500 Lux, regolazione continua
Potenza di interruzione LED da max. 200 W, lampade a risparmio energetico da max. 200 W,
lampade a incandescenza da max. 800 W, alogene
Potenza assorbita ca. 0,5 W
Tipo di protezione Sensore: IP 54, sezione di potenza: IP 20
Classe di protezione II
Temperatura ambiente consentita ca. -20 °C ... +40 °C
Dimensioni ca. Ø sensore: 14 mm, Sezione di potenza: L 75 mm x A 39 mm x P 24 mm
μ = apertura dei contatti < 1,2 mm

Zastrzegamy sobie możliwość dokonania niezapowiedzianych zmian technicznych i optycznych.
DEGBFRITPL
12 13
Kupno niniejszego artykułu oznacza wybór wysokiej
jakości wyrobu marki GEV. Aby zapewnić prawidłowe
działanie wyrobu, prosimy o uważne zapoznanie się z
niniejszą instrukcją obsługi. Instrukcję tę należy starannie
przechowywać do ewentualnego późniejszego użytku.
Sposób działania
Wyłącznik zmierzchowy do wbudowania w istniejące oprawy
oświetleniowe. Wyłącznik zmierzchowy przełącza oświetlenie
w zależności od jasności otoczenia. Jeśli spadnie ono poniżej
określonej wartości, wyłącznik zmierzchowy automatycznie
włączy oświetlenie, a gdy jasność wzrośnie powyżej tej
wartości, ponownie je wyłączy.
Wskazówki bezpieczeństwa
Montaż może być wykonywany wyłącznie przez
specjalistę, przy przestrzeganiu obowiązujących
w danym kraju przepisów dotyczących instalacji
elektrycznych.
Dozwolona jest wyłącznie praca przy odłączonym napięciu. W
tym celu należy bezwzględnie rozłączyć bezpiecznik obwodu
prądowego.
Sprawdź, czy w przewodzie podłączeniowym nie ma
napięcia!
W przypadku szkód spowodowanych nieprzestrzeganiem
niniejszej instrukcji obsługi gwarancja wygasa! Za szkody
wtórne nie przyjmujemy żadnej odpowiedzialności! Nie
przyjmujemy odpowiedzialności w przypadku szkód
rzeczowych i obrażeń ciała spowodowanych nieumiejętnym
postępowaniem lub niestosowaniem się do uwag związanych
z bezpieczeństwem. W takich przypadkach wszelkie
roszczenia gwarancyjne wygasają. Z przyczyn związanych z
bezpieczeństwem i dopuszczeniami technicznymi, samowolne
przeróbki lub modyfikacje urządzenia są niedozwolone.
Miejsce montażu
Czujnik oświetlenia należy zamontować tak, aby oprawa
oświetleniowa załączana przez przełącznik zmierzchowy nie
oświetlała samego czujnika oświetlenia.
Instalacja
Wyłącznik zmierzchowy składa się z dwóch części, stopnia
mocy (rys. A1) i czujnika oświetlenia (rys. A2). Maksymalna
odległość pomiędzy czujnikiem oświetlenia a stopniem
mocy wynosi ok. 18 cm. Odkręć przezroczysty kołpak z
czujnika oświetlenia (rys. D1). Czujnik oświetlenia wymaga
wykonania otworu (o średnicy 11 mm), a jego montaż
następuje poprzez przełożenie przez otwór od wewnątrz
(rys. D2). Czujnik oświetlenia ustaw równo z powierzchnią
montażu. Zamocuj czujnik oświetlenia przy użyciu
przezroczystego kołpaka (rys. D3). Zamontuj stopień mocy.
Wykonaj połączenia sieciowe zgodnie ze schematem (rys. B).
Włącz z powrotem zabezpieczenie obwodu prądowego.
Ustawianie
Indywidualne ustawianie powinno odbywać się w porze dnia,
w której ma następować włączanie oświetlenia (np. o zmroku).
Obróć regulator (rys. C) na minimum w kierunku przeciwnym
do ruchu wskazówek zegara. Obrócić regulator w przeciwnym
kierunku, aż włączy się podłączone oświetlenie. Nastawiona
wartość oświetlenia odpowiada jasności otoczenia.
Należy pamiętać, że podłączone oświetlenie włączy się z
lekkim opóźnieniem.
Uwagi dotyczące recyklingu
Niniejszego urządzenia nie wolno usuwać razem z
niesortowanymi odpadami domowymi. Posiadacze
zużytego sprzętu są ustawowo zobowiązani do
zapewnienia prawidłowej utylizacji urządzeń. Odpowiednie
informacje można uzyskać u odpowiednich władz miejskich lub
gminnych.
Dane techniczne
Przyłącze zasilania sieciowego 230V ~
Wyłącznik zmierzchowy ok. 5 lx – 500 lx, regulowany bezstopniowo
Moc łączeniowa Diody LED o mocy maks. 200 W, żarówki energooszczędne o mocy maks. 200 W,
żarówki, halogenowe o mocy maks. 800 W
Pobór mocy ok. 0,5W
Stopień ochrony IP 54 czujnik, moduł mocy IP 20
Klasa ochrony II
Dopuszczalna temperatura otoczenia -20 °C ... +40 °C
Wymiary ok. czujnik Ø 14 mm, stopień mocy 75 mm x 39 mm x 24 mm (szer. x wys. x głęb.)
μ = szerokość rozwarcia styków < 1,2 mm
Montowany przełącznik zmierzchowy
AURORA MINI LCI 16903

1514
This manual suits for next models
1
Table of contents
Languages:
Other GEV Switch manuals
Popular Switch manuals by other brands

Sima
Sima VS-560 user manual

UNICONTROL Electronic
UNICONTROL Electronic Cleveland Controls RSS-495-011 manual

TRENDnet
TRENDnet TE100-S810Fi - Switch user guide

StarTech.com
StarTech.com IES101G2SFPW quick start guide

Eterna
Eterna WS120PIR Safety and installation instructions

Chauvet
Chauvet Net-Switch Quick reference guide