Gfp FT60 User manual

Gfp FT60
March2019
1
OPERATING MANUAL Gfp FT60
Please read this manual carefully before operating!
Unpacking, assembly, and operating videos are available at
:
www.gfpartnersllc.com

Gfp FT60
March2019
2
Table of Contents
Contents Page
1. Introduction …………………………………………………… 3
2. Important Safety Instructions………………………………….. 3
3. Installation Safeguards ………………………………………... 3
4. General Safeguards……………………………………………. 4
5. Operating Conditions …………………………………………. 5
6. Packing List……………………………………………………. 6
7. System Components ……………………………………….…. 7
8. Control Panel …………………………………………………. 8
9. Installation/Assembly
A. Uncrate the machine……………………………………. 9
B. Attaching the legs to the table……………….…………. 10
C. Attaching the support wings to the table……………….. 11
D. Attaching rotating control handle feed guide.………….. 11
E. Lighting the cutting surface ..…………………………… 12
F. Adjusting the leveling pads……………………………… 12
10. Operation………………….. ……….………………………….. 12
A. Rotating the table……………………………………..… 12
B. Illuminating the cutting surface……………………..….. 13
C. Feeding rigid substrates…………………………………. 13
D. Cautions to observe when cutting on the mat…………… 14
11. See It in Action..……………………………………………….. 14
12. Troubleshooting ………………………………………………. 15
13. Specifications …………………………………………………. 15
14. Warranty ………………………………………………………. 16

Gfp FT60
March2019
3
1. Introduction
Thank you for choosing a Gfp FT60 finishing table. It has been designed and manufactured to provide
years of continuous service. Please read this manual thoroughly before operating. Please inspect the box
and the finishing table for shipping damage. Damage should be brought to the attention of the delivering
carrier immediately
We reserve the right to make changes to this publication and to the products described in
it without notice. The details given in this manual are based on the most recent information available to
us. They may be subject to change in the future. We retain the right to make changes to the construction
or the design of our products without accepting any responsibility for modifying earlier versions
WARNING! Any unauthorized changes or modifications to this unit without our prior written approval
will void the user’s warranty and will transfer health and safety obligations to the end user.
CAUTION! Please pay attention to all passages with these symbols. This information is
vital to preventing user injury and/or damage to the unit. Failure to follow this information could void the
user’s warranties and transfer all safety obligations to the user.
2. Important Safety Instructions
In this operating manual you will find important safety messages regarding the product.
Read these instructions carefully, failure to comply with the following safety procedures could result
in serious injury.
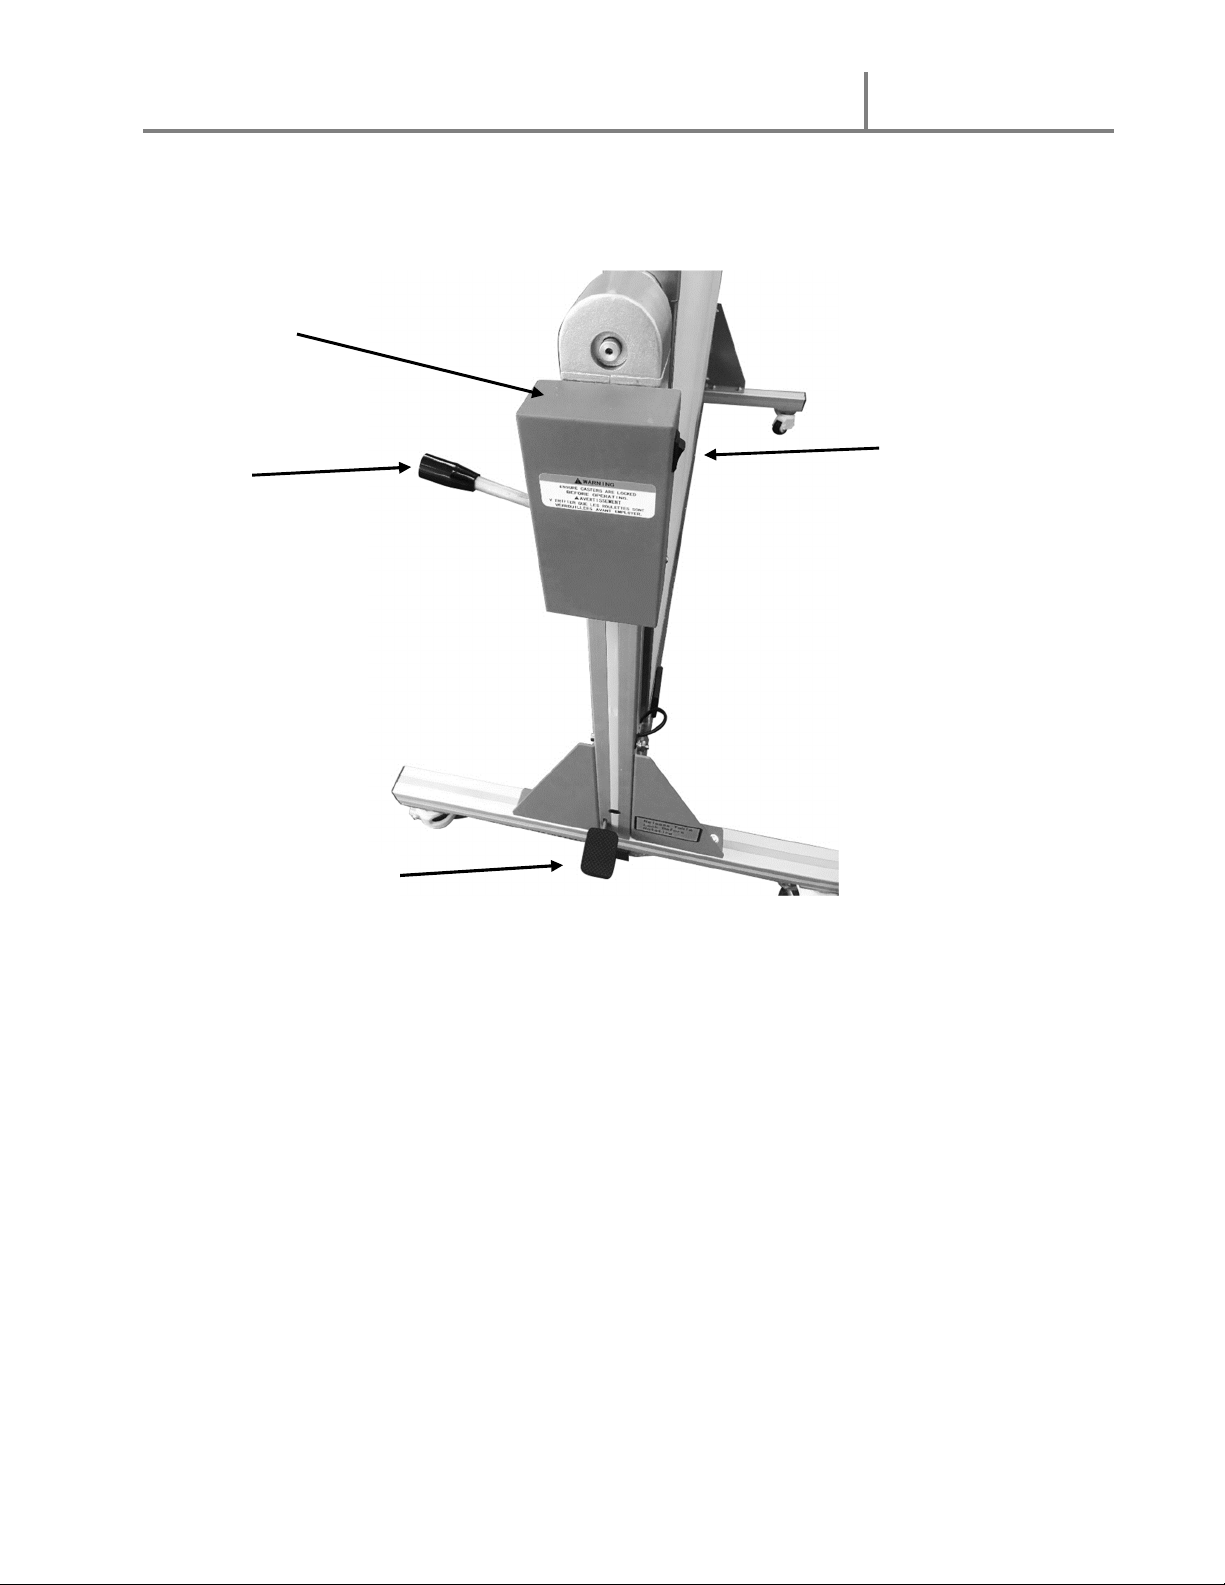
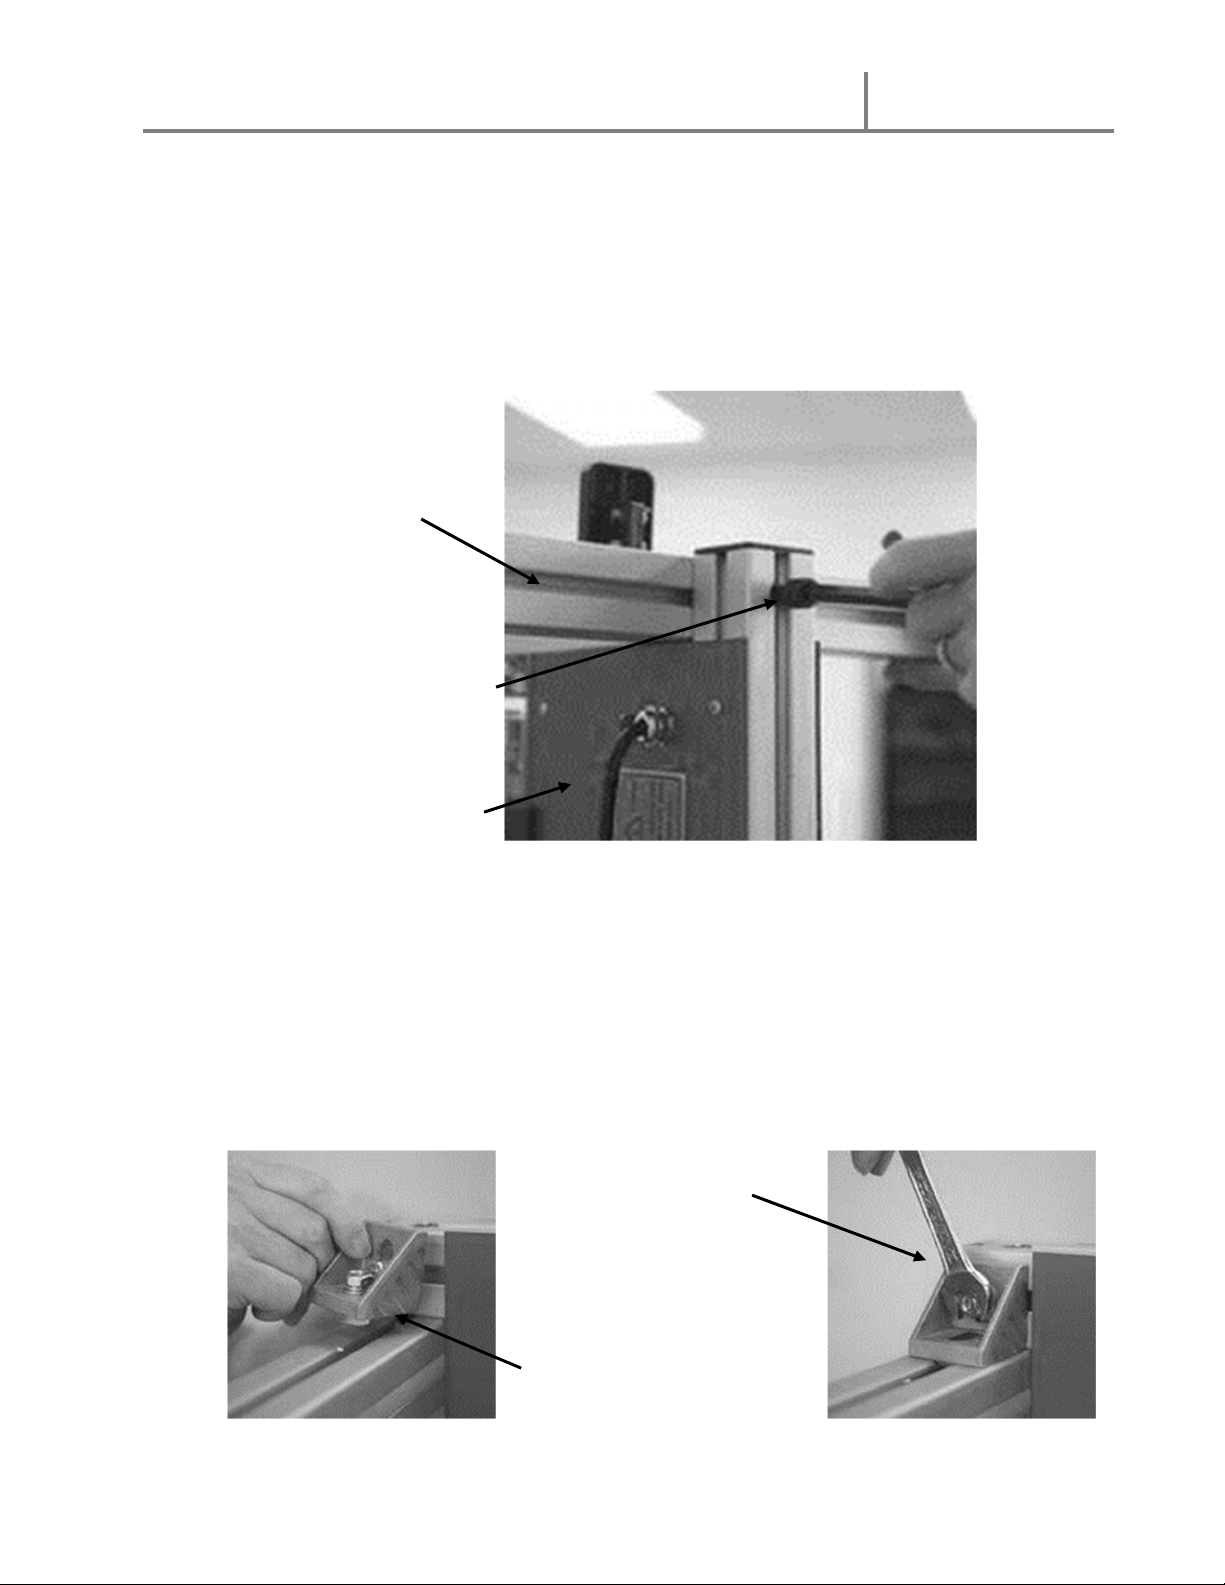
WARNING: Do not attempt to service or repair the table. Only authorized maintenance and
service technicians should make repairs.
WARNING: Do not connect the finishing table to an electrical supply or attempt to operate the
laminator until you have completely read these instructions. Maintain these
instructions in a convenient location for future reference.
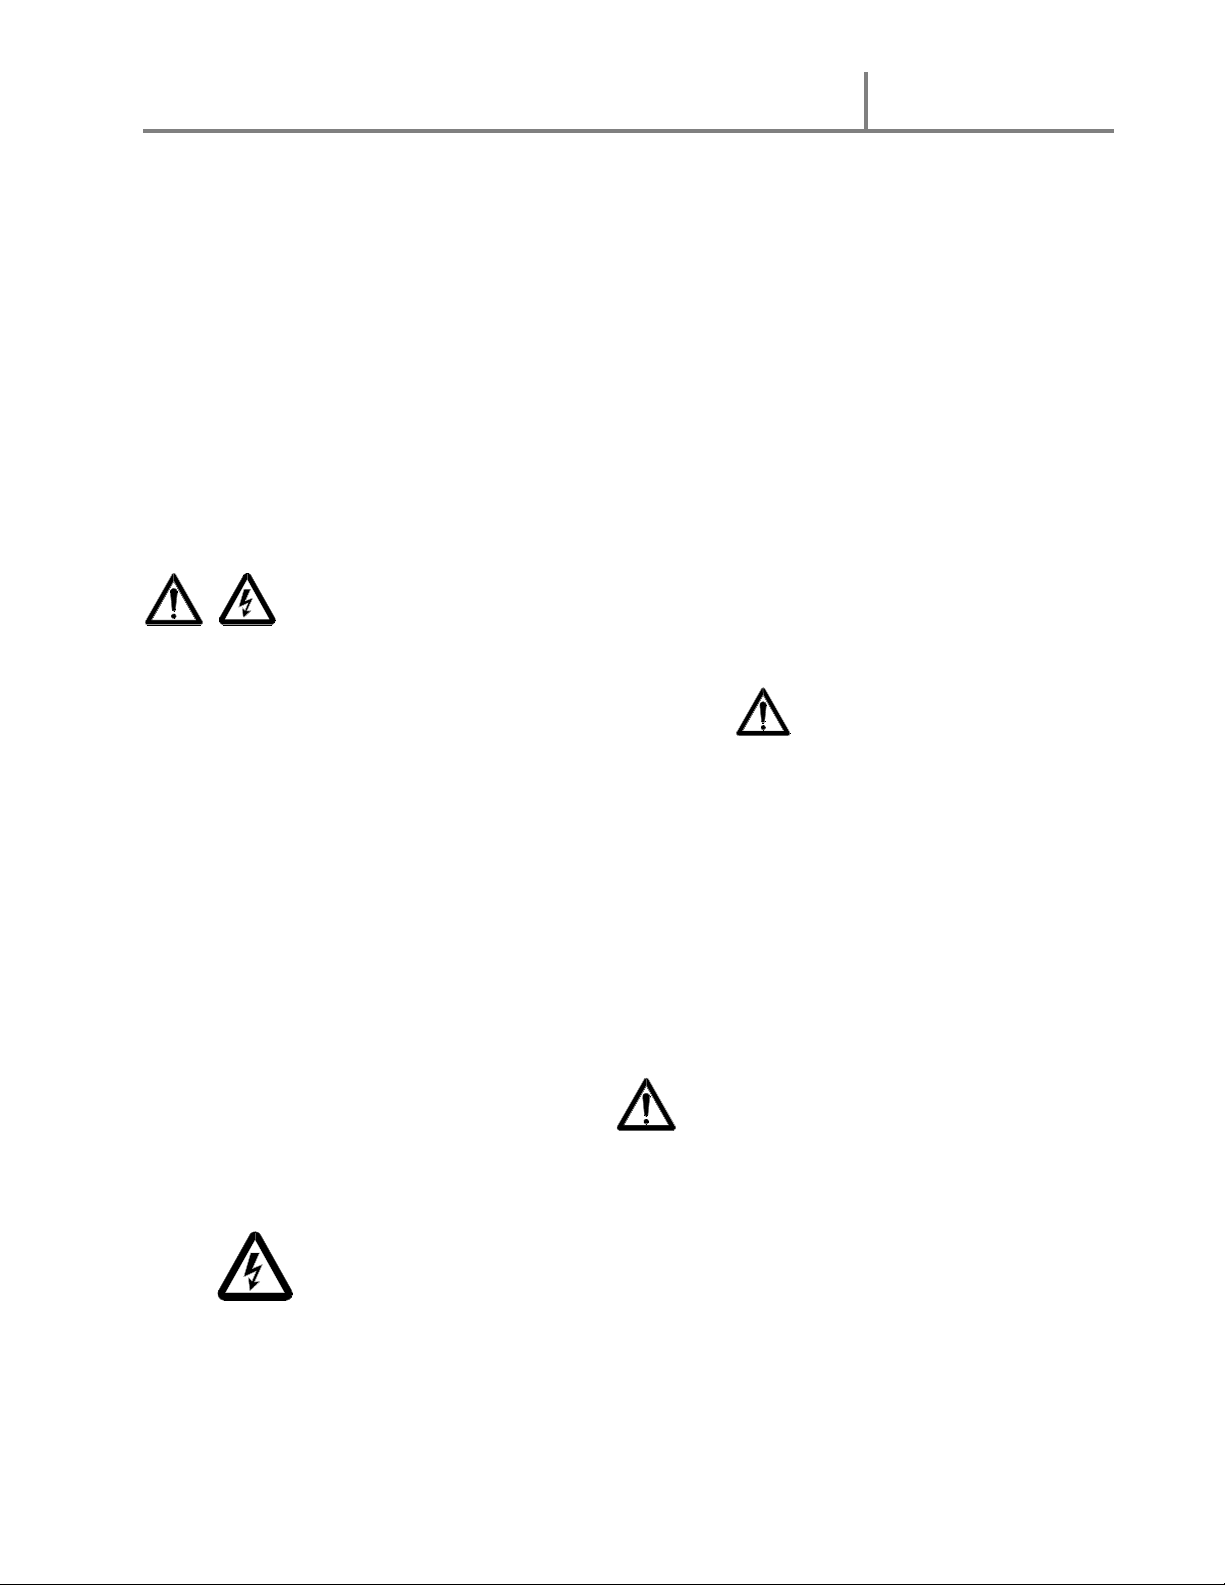
WARNING: To guard against injury, the following safety precautions must be observed in the
installation and use of the laminator.
3.
Installation Safeguards
•Shipping damage should be brought to the immediate attention of the delivering carrier.
•Avoid locating the finishing table near sources of forced heated or cold air.
•The receptacle must be located near the equipment and easily accessible.
• Connect the attachment plug provided with the finishing table to a suitably
grounded outlet only. This machine must have reliable earth ground wire to ensure the safety
of the machine during operations
•Contact an electrician should the attachment plug provided with the unit not match the receptacles at
your location

Gfp FT60
March2019
4
•
Ensure that the voltages of the power supply you are using match the rated working voltages
before operation. Do not use incorrect power supply.
•Do not use damaged wires or sockets. If abnormal conditions occur, switch off the power
supply first.
•
Only a licensed electrician should install wiring and outlet for the finishing table.
•Do not defeat or remove electrical and mechanical safety equipment such as panels.
4. General Safeguards
•Do not use the machines for purposes other than feeding rigid substrates into your
laminator/printer and trimming finished products.
•Keep out of reach of children.
•Keep flammable and wet objects away from the unit.
•Do not use flammable sprays or materials when cleaning the unit
•Shut down the power and unplug the power cord before moving the machine
•Note the locations of foot wheels while moving or operating this machine to avoid injuries
to your feet.
•
Disconnect from the power supply before repairs, maintenance or moving to a new
location.
• Disconnect from the power supply when the machine is not in use for a long time.
•Perform only the routine maintenance procedures referred to in these instructions.

Gfp FT60
March2019
5
5. Operating Conditions
•Place machine on level surface
•Environment requirements:
Ambient temperature: 50⁰ F - 104⁰ F
Humidity:30%—80%;ideal humidity:55%
•Due to the static on film rolls and rigid boards, you should try to keep the
environment clean.
•Provide enough space around machine to ensure the safe and effective operation.
The minimum area covered is 8 ft. x 10 ft.
•For repairs and replacement mats, please contact your local distributor.
Unauthorized repairs and dismantling will affect future maintenances of the
machine.
Warning: Do not keep the unit in direct sunshine or near it.
Do not keep the unit in a dusty place or places with strong vibrations.

Gfp FT60
March2019
6
6. Packing List
Remove all parts from shipping crate and boxes. Inspect parts and the machine
Main Machine Crate
Part Qty
Part Qty
Table
1
Hexagon socket head cap screw (
M8×70)
4
Control handle connecting rod 1 Hexagon socket head cap screw (
M12×110)
2
Chassis caster cross tube
2
Hexagon socket head cap screw (
M8×65)
2
Reinforcing plate
4
Internal hexagonal wrench
(
S=10)
1
T
-
bolt M8
16
Internal hexagonal
wrench
(
S=6)
1
Flat padΦ8 24 Open end wrench (
12-14)
1
Spring padΦ8 24 External corner piece 4
Nut M8
24
Operating manual
1

Gfp FT60
March2019
7
7. System Components
1. Cutting side
2. Hinge holder
3. Rotating control
box and
ON/OFF light switch
4. Rotating control handle
. Reinforcing plate
6. Rotating lock pedal
7. Front support beam and cover
8. Support surface of the transfer
feeder table
9. Transfer balls
10. Feeding guide plate
11. Back support beam and cover

Gfp FT60
March2019
8
8. Control Box
2
1 Control Box
2 Rotating Lock Handle
3 Cutting Mat Light Switch
4 Table Vertical Lock Pedal
1
3
4

Gfp FT60
March2019
9
9. Installation
9A. Uncrate the machine
1. Remove screws holding the top cover and set the top aside
2. Remove the bolts that secure the 3 cross supports and lift out.
3. Remove screws holding all 4 side panels to the skid
4. Remove all the hardware bags, foam corner pieces, brackets
5. Lay out all the pieces to be assembled
Heavy! Handle with care!!
Warning: when moving the machine, lift by using the rails at each side of the table.
Do not use the
pneumatic shocks to lift the table! The table is heavy use caution and good lifting
practices when assembling the unit.

Gfp FT60
March2019
10
9B. Attaching the legs to the table
1. Using 2 people, lift the table off the skid and stand it on its top
2. Attach a leg to one side by sliding it between the base and the upright
3. Insert a large bolt (12x110mm) into the hole on the top and tighten
4. Note the locator tab position.
5. Secure one corner support to the leg and upright by sliding the bolt head into the slot
on the base. NOTE: “Slot in the end of the bolt indicates the direction of the bolt
head”
6. Insert bolt into the slot on the corner support and the leg; tighten with the wrench
7. Repeat this process on the back with a corner support then do the same thing on the
other side of the table
Leg with castors
12x110mm bolt and
Allen wrench
Bottom cross member
Locator tabs
Supplied wrench

Gfp FT60
March2019
11
9C. Attaching the support wings to the table
1. Carefully lower the table to the floor and stand upright
2. Attach the blue support wings to the legs and uprights using the long bolts on top
and the bolt inserts on the bottom and legs
3. Tighten all the nuts with the wrench
9D. Attaching the rotating control han le an the fee gui e
1. Screw the handle into the threaded hole in the slot of the Control Box
2. Attach the side guide to the feed table. NOTE: the side guide can be attached to
either side of the table depending on which side you prefer to feed
Leg and column support wings
Table vertical locking pedal
Screw handle in here

Gfp FT60
March2019
12
9E. Lighting the cutting surface
1. Plug the power cord to turn on the lighted cutting mat side
9F. A justing the leveling pa s
1. To raise and lower the leveling pads, spin the red dial toward you to lower
them and away from you to raise them.
10. Operation
10A. Rotating the table
To rotate the table, step on the lock release pedal at the bottom of the control panel leg; this
will retract the locking pad. Next push down on the handle with one hand and with the
other hand, push the table in the direction of the DOWN decal. Repeat to rotate to the
opposite side.
To lock the table in the vertical position, push the handle with one hand and the table with
the other hand. When the table has reached the vertical position, raise the locking block
with your foot by stepping on the pedal.
Fuse
Power Cord

Gfp FT60
March2019
13
NOTE: Make sure the power cord is unplugged from the wall outlet before moving the
finishing table.
10B. Illuminating the cutting surface
Insert the plug of the power cord into a 110-120 VAC outlet, press the power switch to turn
on the LED lights under the cutting mat.
10C. Fee ing rigi substrates
Rotate the table to the ball bearing side. Line up the guide plate to match the width of the
substrate to be laminated or mounted.
Slide the table up to the feed table of the laminator or printer.
Cutting table light switch
Power cord and fuse

Gfp FT60
March2019
14
10D. Cautions to observe when cutting on the mat
NOTE: The ball bearing feeding side of the table is not designed to be used as a cutting
surface; do not cut on this side as it will permanently damage the surface.
1. Avoid repetitious cutting in the same location and direction
2. ALWAYS use the proper knife with a sharp blade
a. Dull blades make you press harder with the knife.
b. Slide knives with break-away blades, (not heavy duty), such as OLFA and
Xacto-type knives work best
c. DO NOT USE utility knives common to the trades designed to cut sheet
rock and carpet
3. Apply only enough pressure to cut through the item being cut
a. Use same pressure you would use trimming vinyl on a vehicle without
scoring the paint
b. More pressure is not the answer to cutting rigid substrate
4. Cut ridged substrates such as Coroplast, Sintra and PVC in multiple steps.
a. Score the outer layer several times until you separate the pieces
5. Score PVC on the mat, then lay it along the edge of the table and snap it off
6. The person cutting on the mat determines how long the mat will last
7. Cutting mats do not last forever and will wear out
11. See It in Action
To see the FT60 in action, go to:
https://www.gfpartnersllc.com/ft60

Gfp FT60
March2019
15
12. Troubleshooting
13. Specifications
Model FT60
Input / Output Height 38”
Power Supply 120V 60Hz 100W 0.83A
Table Dimensions (W x D x H) 70.5” x 49” x 38” (1791x1245x965mm)
Folded Dimensions (W x D x H) 70.5” x 32” x 61” (1791x813x1550mm)
Shipping Dimensions (W x L x H) 75” x 69” x 11” (1905x1753x280mm)
Net Weight 209 lbs. (95kg)
Shipping Weight 395 lbs. (180kg)
Problems Causes Solutions
Cutting mat does not
illuminate
1. No power
2. Main power switch is OFF
3. Blown main power fuse
4. Circuit breaker has tripped
1. Plug in power cord
2. Place power switch to ON (I)
3. Replace fuse on lower panel
4. Reset circuit breaker
Table will not rotate
1. Handle not being pressed
down far enough
2. Trying to rotate in the
wrong direction
3. Table LOCK is engaged
1. Ensure handle can be pushed down
2. Note the DOWN label on the table for the
proper correct direction
3. Release Table LOCK
Table not level
1. Leveling pads not even
2. Pneumatic shocks out of
adjustment
1. Adjust the red leveling disks
2. Adjust the position of the pneumatic shocks
Table will not move 1. The leveling pads are
touching the floor 1. Raise the leveling pads

Gfp FT60
March2019
16
14. Warranty
March 2019
Graphic Finishing Partners, LLC warrants each new Gfp Laminator is free from defects in material
and workmanship for a period of one (1) year from the date of installation. A machine which
proves defective in materials or workmanship within the warranty period will be repaired or, at
Gfp’s option, replaced without charge. This warranty is extended only to the original purchaser.
This warranty is the only warranty made by Gfp and cannot be modified or amended. Gfp’s sole
and exclusive liability and the customer’s sole and exclusive remedy under this warranty shall be,
at Gfp’s option, to repair or replace any such defective part or product. These remedies are only
available if Gfp’s examination of the product discloses to Gfp’s satisfaction that such defects
actually exist and were not caused by misuse, neglect, attempt to repair, unauthorized alteration or
modification, incorrect line voltage, fire, accident, flood or other hazard.
The warranty made herein is in lieu of all other warranties, expressed or implied, including any
warranty or merchantability or fitness for a particular purpose. Gfp will not be liable for personal
damage or personal injury (unless primarily caused by its negligence), loss of profit, or other
incidental or consequential damages arising out of the use or inability to use this equipment.
This warranty specifically does not cover damage caused by lifting, tilting and/or any attempt to
position the machine other than rolling on the installed castors or feet on even surfaces, or
improper use of the machine. It also does not cover abuse of the mat such as using incorrect
knives, dull blades, excessive pressure and repetitive cutting in the same locations. Warranty
repair or replacement by Gfp or its authorized reseller(s) does not extend the warranty beyond the
initial period from the date of installation. Unauthorized customer alterations will void this
warranty.
Contact Information
CORRESPONDENCE: SHIPPING:
Graphic Finishing Partners LLC Graphic Finishing Partners LLC
PO Box 1097 13878 Parks Steed Drive
Maryland Heights, MO. 63043 Earth City, MO. 63045
800-986-2005
Table of contents
Popular Indoor Furnishing manuals by other brands

Hoppekids
Hoppekids 36-1002-41-09A Assembly instruction

Core Products
Core Products Boston BT240 Assembly instructions

Delinia iD
Delinia iD B120 Assembly instructions

Atlantic
Atlantic RICHMOND HEADBOARD Assembly instructions

Forte
Forte CMBV43RB Assembling Instruction

Allsteel
Allsteel Park Easel Installation Packet

SUNVILLA
SUNVILLA 1900467 Assembly / care & use instructions

Illuminated Mirrors
Illuminated Mirrors Diamond X 100877K72 instruction manual

Next
Next 859229 Assembly instructions

Outsunny
Outsunny 01-0319 Assembly instructions

FURNITUREBOX
FURNITUREBOX BELGRAVIA CHAIR Assembly guide

Forte
Forte PTQM01L Assembling Instruction