GIA GIATSU W1 User manual

OWNER’S MANUAL
WINDOW AIR CONDITIONER
ENGLSIH
Thanks for choossing our product.
Please, read carefully this manual
before using the product
W1
GIA-W-09W1 |GIA-W-12W1

CONTENTS
Thank you for choosing air conditoner.Our design is based on the best eff-
iciency and the lowest noise operation and it can keep the room comfortable.
Please read this operating manual carefully before operating the unit and keep it
for consultation.
Structure mechanism and Installation
The Refrigerant 1
Safety operation of flammable refrigerant 22
Precautions 2
Installation 3
Function 7
Operation procedure
8
Power requirement
Notes for installation 6
9
Air direction adjustment
Part identification 9
Remote control operation procedure 10
Introduction for icons on display screen 10
Introduction for buttons on remote controller 11
Remote control panel 15
Care and maintenance
Operation Tips 16
Caution 17
Care and maintenance 19
Troubleshooting guide 20
21
This marking indicates that this product should not be disposed with other household wastes
throughout the EU. To prevent possible harm to the environment or human health from un-
controlled waste disposal, recycle it responsibly to promote the sustainable reuse of mate-
rial resources. To return your used device, please use the return and collection systems or
contact the retailer where the product was purchased. They can take this product for envi-
ronmental safe recycling.
R32: 675
After service
This appliance is not intended for use by persons (including children) with reduced physical, sensory
or mental capabilities, or lack of experience and knowledge, unless they have been given supervision
or instruction concerning use of the appliance by a person responsible for their safety.
Children should be supervised to ensure that they do not play with the appliance.

- 1 -
The Refrigerant
ƔTo realize the function of the air conditioner unit, a special refrigerant circulates
.
leads to explosion
. It can
Ɣ&RPSDUHGWRFRPPRQUHIULJHUDQWV5LVDQRQSROOXWLQJUHIULJHUDQWZLWKQR
ORZHr5KDVJRWYHU\JRRGWKHUPRG\QDPLFIHDWXUHVZKLFKOHDGWRDUHDOO\KLJK
WARNING:
'RQRWXVHPHDQVWRDFFHOHUDWHWKHGHIURVWLQJSURFHVVRUWRFOHDQRWKHUWKDQ
WKRVHUHFRPPHQGHGE\WKHPDQXIDFWXUH6KRXOGUHSDLUEHQHFHVVDr\FRQWDFW\RXU
QHDUHVWDXWKRUL]HG6HUYLFH&HQWUH
7KHDSSOLDQFHVKDOOEHVWRUHGLQDURRPZLWKRXWFRQWLQXRXVO\RSHUDWLQJLJQLWLRQ
electric heater.)
'RQRWSLHUFHRUEXUQ
WKDQP
’s
instructions onl\.
%HDZDUHWKDWUHIULJUDQWVQRWFRQWDLQRGRXr.
5HDGVSHFLDOLVW’VPDQXDO
3OHDVHUHDGWKLVRSHUDWLQJPDQXDOFDUHIXOO\EHIRUHRSHUDWLQJWKHXQLW
WRWKHPDWHULDOREMHFWVIRUUHIHUHQFH

- 2 -
electric shock.
Please contact dealer when you need to repair air conditioner.
injury or damage.
sensory or mental capabilities, or lack of experience and knowledge, unless they
have been given supervision or instruction.
Ɣ'RGLVFRQQHFWSRZHUVXSSO\ZKHQFOHDQLQJDLUFRQGLWLRQHU2WKHUZLVHLWPD\FDXVH
Ɣ'RQRWUHSDLUDLUFRQGLWLRQHUE\\RXUVHOI,WPD\FDXVHHOHFWULFVKRFNRUGDPDJH
Ɣ0DLQWHQDQFHPXVWEHSHUIRUPHGE\TXDOLILHGSURIHVVLRQDOV2WKHUZLVHLWPD\FDXVH
Ɣ7KHDSSOLDQFHLVQRWWREHXVHGE\SHUVRQVLQFOXGLQJFKLOGUHQZLWKUHGXFHGSK\VLFDO
Ɣ&KLOGUHQEHLQJVXSHUYLVHGQRWWRSOD\ZLWKWKHDSSOLDQFH
Please install the devices for short-circuit protection and electrical leakage protection
$FFRUGLQJWRWKHORFDOVDIHW\UHJXODWLRQVXVHTXDOLILHGSRZHUVXSSO\FLUFXLWDQGFLUFXLW
when installing the air conditioner.
break.
Working temperature range
Ć2SHUDWLQJ 7emperature Range
,QGRRUVLGH'B:%&
0D[LPXPFRROLQJ 32/23 43/-
0aximum heating 27/- 24/18
2XWGRRUVLGH'%:%&
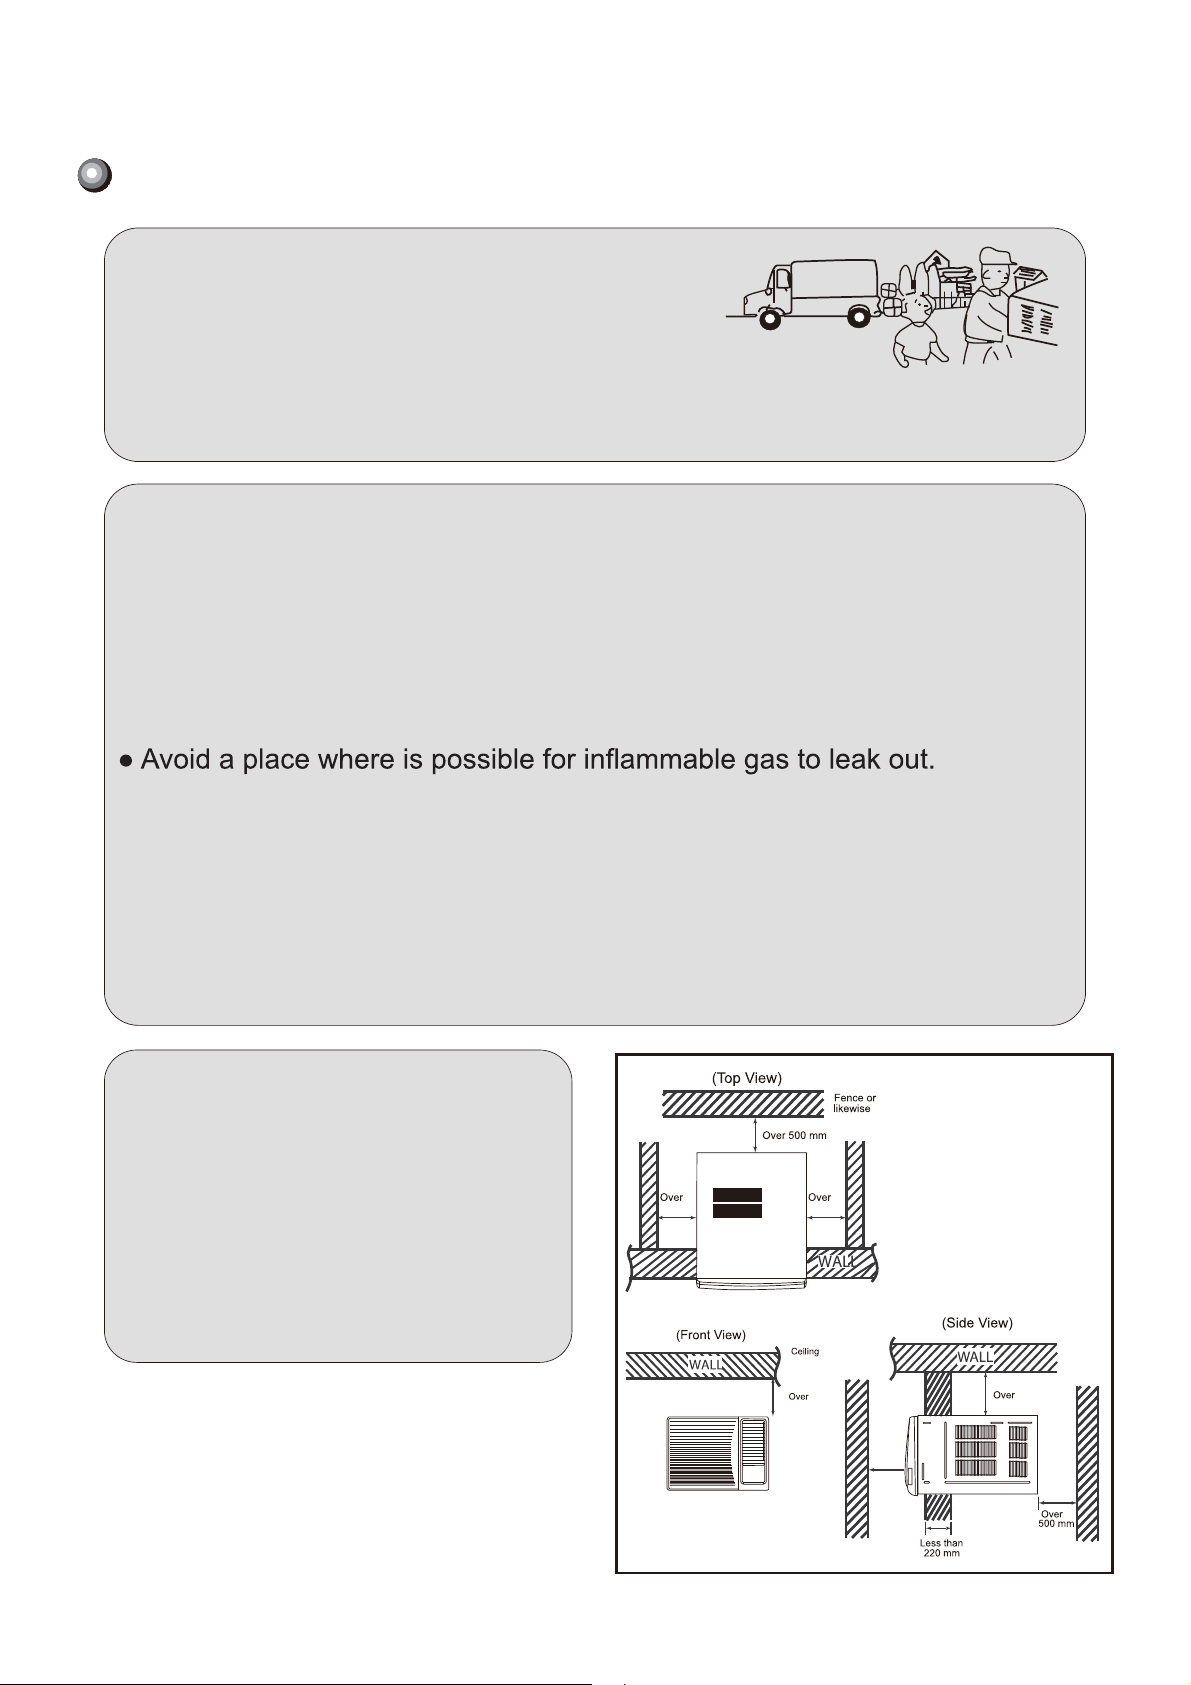
7KHRSHUDWLQJWHPSHUDWXUHUDQJHRXWGRRUWHPSHUDWXUHIRUFRROLQJRQO\XQLWLV
&a&IRUKHDWSXPSXQLWLV&a&
Precautions
7his appliance can be used by children aged from 8 years and above and persons with
reduced physical, sensory or mental capabilities or lack of experience and knowledge if
they have been given supervision or instruction concerning use of the appliance in a safe
way and understand the hazards involved. &KLOGUHn shall not play with the appliance.
&OHDQLQg and user maintenance shall not be made by children without supervision.
Warning
7KHDLUFRQGLWLRQHUVKRXOGEHLQVWDOOHGLQDFFRUGDQFHZLWKQDWLRQDOZLULQJUHJXODWLRQ
$LU&RQGLWLRQHUVKRXOGEHSURSHUO\JURXQGHG,QFRUUHFWJURXQGLQJPD\FDXVHHOHFWULF
shock.
hazard.
broken.
injury or damage.
personal injury.
Ɣ'RQRWFRQQHFWDLUFRQGLWLRQHUWRPXOWLSXUSRVHVRFNHW2WKHUZLVHLWPD\FDXVHILUH
Ɣ'RLQVWDOOWKHDLUVZLWFK,IQRWLWPD\FDXVHPDOIXQFWLRQ
Ɣ'RQRWVSLOOZDWHURQWKHUHPRWHFRQWUROOHU¶RWKHUZLVHWKHUHPRWHFRQWUROOHUPD\EH
Ɣ'RQRWVSUD\ZDWHURQDLUFRQGLWLRQHU,WPD\FDXVHHOHFWULFVKRFNRUPDOIXQFWLRQ
Ɣ'RQRWH[WHQGILQJHUVRUREMHFWVLQWRDLULQOHWRUDLURXWOHW,WPD\FDXVHSHUVRQDO
Ɣ'RQRWVWHSRQDLUFRQGLWLRQHURUSXWKHDY\REMHFWV,WPD\FDXVHGDPDJHRU
Ɣ'RQRWEORFNDLURXWOHWRUDLULQOHW,WPD\FDXVHPDOIXQFWLRQ

- 3 -
Installation
Installation precaution:
Window type conditioner is so valuable and the
improper installation of it will cause a lot of da-
mage! Please associate the professional tech-
nician to install the unit and don’t install it by yourself. Otherwise, we are not
responsible for the damage like this.
Location:
ƔThe condensation water must be drained away conveniently.
ƔInstall air conditioner unit far away from TV set or radio etc. to avoid distur-
bing video or voice.
ƔIn salt and coastal area or place where is near thermal springsand polluted
by sulphurous gas, or other special areas, please contact the seller before
use.
ƔAvoid other heat sources or direct sun light.
ƔAvoid a place where is easy for children to touch.
Ɣ
Don't use the unit in the immediate surrondings of a laundry,a bath,a shower
or a swimming pool.
Ɣ)RUZLQGRZW\SHDLUFRQGLWLRQHUZLWK remote control, install in a location
where is strong electromagnetic disturbance, you should contact the seller
in advance to avoid the malfunction in use.
How to install:
Ɣ
Choose a location where there are
no any obstacle surrounding the
unit, and the plug is accessible.
Ɣ3UHSDUHWKHLQVWDOODWLRQKROHVOLJ
htly bigger than unit size.
Ɣ&KRRVHWKHLQVWDOODWLRQVSDFHDF
cording to the following diagram.
The distance of obstructions from
window unit inside should be upper
300mm, lower 1500mm, left 500mm,
right 500mm, front 1500mm.
Over
100 mm
500mm 500mm
300mm 300mm

- 4 -
Installation procedure:
1) Remove the sticker from the front panel.
3) Fill up sews in the cabinet with sponge
or foam.
2) Put the unit into the installation hole.
Ɣ:KHQLQVWDOOLQJWKHXQLWLWVKRXOGEHVO
DQWHGGRZQWRWKHEDFNWRDYRLGWKHHQ
largement of noise or vibration. (Slant
between 6-10mm.) (Shown at right
Ɣ 7KHLQVWDOODWLRQSODFHVKRXOGEHVWURQJ
HQRXJKWRDYRLGWKHHQODUJHPHQWRI
noise or vibration.
6~10mm
Horizontal line
Installation assistance:
Ɣ8VHLURQVXSSRUW
7KHLQVWDOODWLRQKROHVKRXOGEHVWUR
QJHQRXJKWRVXSSRUWWKHDLUFRQGLW
ioner.
,ILWFDQQRWLURQVXSSRUWKDVWR
EHXVHG
RXWGRRUV,URQVXSSRUWVKR
Ɣ8VHVXQVKDGHERDUG
Air cRQGitioner shoulGavoiGanything
WREHGURSSHGLQWRLWDQGDYRLGGLUHFW
VXQVKLQH,IWKHUHLVQRFRYHURQLW
you shoulGcontact the seller for inst-
DOOLQJWKHVXQVKDGHERDUG:KHQLQ
stalling the VXQVKDGe boarGGRQ’t let
LWEORFNWKHDLULQOHWDWWKHVLGHJULOOH
:all
:RRGHQ
frame
6XQVKDGH
ERDUG
Rubber
plate
6~10mm
Support
Horizontal line

- 5 -
Drain water :
Drain pan and drain hose need to be installed before using. Drain hose is
not included in the products, you need to purchase it locally to satisfy your
particular needs. Use the following procedure to install drain pan and drain
hose.
1. Slide out the chassis from the cabinet.
2. Install the drain pan to the corner of the cabinet with 2 screws.
3. Connect the drain hose to the outlet on the drain pan bottom.
4. Slide the chassis into its original place in the cabinet.
To get the maximum cooling efficiency , the air conditioner is designed to
splash the condensation water on the condenser coil . If the splashing sound
annoy you , you can remove the rubber plug from the chassis to lower the
noise, which also cause a bit loss of performance.

- 6 -
Notes for installation
Remove
Noise
Electric wiring
Before removing air conditioner to the other place, you
Then it must be done under the direction of the profe-
ssional technician. In addition, the charge of this must
be paid.
enlargement of noise and vibration.
Ɣ'RQ¶WSXWDQ\WKLQJLQIURQWRIWKHRXWOHWRIWKHXQLW
to avoid increasing noise.
Ɣ%HVXUHWKDWKRWDLURUQRLVHZLOOQRWLQFRQYHQLHQFHQHLJKERUV
Ɣ3OHDVHFRQWDFWWKHVHOOHUDVVRRQDV there is strange noise during operation.
Ɣ3OHDVHXVHWKHVDIHW\VXSSRUW
Ɣ0XVWFRQQHFWZLWKJURXQGUHOLDEOy.
ƔThe exclusive circuit must be used. But removable socket
FDQ¶WEHXVHGEHFDXVHSRRUFRQWDFWRILWFDQFDXVHRYHUKHDW
Ɣ'RQ¶WSXOOWKHSRZHUFRUGVWURQJOy.
and leakage current is less than 30mA.
Ɣ&RQQHFWLQJPHWKRGEHWZHHQDLUFRQdLWLRQHUVDQGSRZHUFRUGDQGLQWHUFRQ
necting method of each individual elePHQWZLWKRQHDQRWKHUVKRXOGDFFRUG
ZLWKZLULQJGLDJUDPRQWKHXQLW
ƔThe air conditioner should be installeGLQDFFRUGDQFHZLWKQDWLRQDOZLULQJ
regulation.
ƔAn all-pole disconnection VZLtch having a contact separation of at least 3mm
Ɣ$LUVZLWFKWKHUPDOPDJQHWLFEUHDNHU) should be installed in the circuit.
Ɣ,IWKHVXSSO\FRUGLVGDPDJHGLWPXVWEHUHSODFHGE\WKHPDQXfacturer or
ƔAll The dectrical Zork must be done according to the local Ziring regulations.

- 7 -
Function
Introduction
Window type room air conditioners can
regulate the room temperature and dry the
room. It is convenient for your work, study
and life. It can be widely used in residence,
so on.
Room
temp.
Spring Autumn
Winter
Wind
direction
Summer
Cooling in summer
Heating in winter
(Only for heat unit)
Dehumidifying in rainy or
humid season
In hot summer, Air conditioner can
cool down theroom air by transferring
heat out.
Without reducing the room temp., air
conditioner can dehumidify and make
the room air dry and comfortable.
Dry
In cold winter, Air conditioner can
heat up room air.

- 8 -
Power requirement
Rated voltage :
ƔThe electric components will be damaged when
the voltage is too high. If the voltage is too low,
the compressor will vibrate violently to damage
the refrigerant system and easily cause the
compressor and electric components not work.
To ensure the reliable earthing, please do not connect earth
wire to the following places:
Earth wire
Water pipe
The ground must be connected.
Ɣ6SHFLDOVRFNHWPXVWEHXsed. Furthermore, the
socket and wiring must conform to the wiring
regulations. And the earthing method must be
reliable.
protection switch of enough power capacity
and air switch with enough space.
220-240V~ 50Hz

- 9 -
Air direction adjustment
positioning the vane to discharge the air upwards,
downwards or straight out.
Panel outlook picture, just for reference, please take the real unit as standard.
Remote
control
panel
Air inlet
louver
Cabinet
Front intake
grille
(behind the
front intake
grille)
Part identification

- 10 -
Buttons on remote controller
Introduction for icons on display screen
1
3
5
2
4
6
7
ON/OFF button
MODE button
+/- button
FAN button
SWING button
SLEEP button
TIMER button
Timer on Timer off Sending signal
swing operation
sleep operation
lock
set speed
Set timeSet temperature
heat operation
fan operation
dry operation
cool operation
auto operation
Remote control operation procedure
21
3
45
67

- 11 -
Introduction for buttons on remote controller
Note:
Ɣ
When power is connected(stand by condition), you can operate the air conditioner
through the remote controller.
Ɣ
When unit is on, each time you press the button on remote controller, the sending
signal icon " " on the display of remote controller will blink once. If the air con-
ditioner gives out a beep sound, it means the signal has been sent.
Ɣ:KHQXQLWLVRff, set temperature will be displayed on the remote controller (If the
light of WKH unit display is turned on, the corresponding icon will be displayed);
When unit is on, it will display the icon of the on-going function.
Press this button to turn unit on/off.
ON/OFF button
1
Pressing this button once can select your required mode circularly as below (the
corresponding icon " " will be lit up after the mode is selected):
Ɣ
When selecting auto mode, air conditioner will operate automatically according to
ambient temperature. Set temperature can't be adjusted and won't be displayed
either. Press FAN button to adjust fan speed.
Ɣ:KHQVHOHFWLQJFRROPRGHDLUFRQGLWLRQHUZLOORSHUDWHXQGHUcool mode. Then
press + or - button to adjust set temperature. Press FAN button to adjust fan speed.
Ɣ:KHQVHOHFWLQJGU\PRGHDLUFRQGLWLRQHUZLOORSHUDWHDWORZfan speed under dry
mode. In dry mode, fan speed can't be adjusted.
Ɣ:KHQVHOHFWLQJIDQPRGHDLUFRQGLWLRQHUZLOORSHUDWHLQIDQmode only. Then
press FAN button to adjust fan speed.
Ɣ:KHQVHOHFWLQJKHDWPRGHDLUFRQGLWLRQHUZLOORSHUDWHXQGHUheat mode. Then
press + or - button to adjust set temperature. Press FAN button to adjust fan speed.
(Cooling only unit can’t receive heating mode signal. If set HEAT mode by remote
controller, press ON/OFF button can’t turn on the air conditioner.)
AUTO COOL DRY FAN HEAT
MODE button
2
Ɣ
Pressing + or - button once will increase or decrease set temperature by 1°F(°C).
Hold + or - button for 2s, set temperature on remote controller will change quickly.
Release the button after your required set temperature is reached.
Ɣ:KHQVHWWLQJ Timer On or Timer Off , press + or - button to adjust the time.(See
TIMER Button for setting details)
+ / - button
3
Ɣ7KLVLVDJHQHUDOXVHUHPRWHFRQWUROOHULWFRXOGEHXVHGIRUWKHDLUFRQGLWLRQHUV
with multifunction; For some function, which the model doesn't have, if press
the corresponding button on the remote controller that the unit will keep the
original running status.

- 12 -
Introduction for buttons on remote controller
Press this button to turn on left & right air swing.
SWING button
5
Under Cool, Heat mode, press this button to turn on Sleep function. Press this button
to cancel Sleep function. Under Fan, Dry and Auto mode, this function is unavailable.
SLEEP button
6
TIMER button
7
Note:
Ɣ8QGHU Auto speed, air conditioner will select proper fan speed automatically acc-
ording to ambient temperature.
Ɣ)DQVSHHGFDQWEHDGMXVWHGXQGHU'U\PRGH
FAN button
4
Pressing this button can select fan speed circularly as: AUTO, SPEED 1 ( ),
SPEED 2 ( ) , SPEED 3 ( ), SPEED 4 ( ) (unavailable in this air conditioner.
Speed 4 is the same with speed 3.).
AUTO
SPEED 1 (equals to low fan speed)
SPEED 3 (equals to high fan speed) SPEED 4 (equals to high fan speed)
SPEED 2 (equals to mid fan speed)
Ɣ:KHQXQLWLVRQSUHVVWKLVEXWWRQWRVHW7LPHU2II72))DQd H icon will be
EOLQNLQJ:LWKLQVSUHVVRUEXWWRQWRDGMXVWWKHWLPHfor Timer Off. Pressing
+ or - button once will increase or decrease the time by 0.5h. Hold + or - button
for 2s, time will change quickly. Release the button after your required set time
is reached. Then press TIMER button to confirm it. T-OFF and H icon will stop
blinking.
Ɣ:KHQXQLWLVRIISUHVVWKLVEXWWRQWRVHW7LPHU2Q721DQG H icon will be
EOLQNLQJ:LWKLQVSUHVVRUEXWWRQWRDGMXVWWKHWLPHfor Timer On. Pressing
+ or - button once will increase or decrease the time by 0.5h. Hold + or - button
for 2s, time will change quickly. Release the button after your required set time
is reached. Then press TIMER button to confirm it. T-ON and H icon will stop
blinking.
Ɣ&DQFHO7LPHU2Q2II,I7LPHUIXQFWLRQLs set up, press TIMER button once to
review the remaining time. Within 5s, press TIMER button again to cancel this
function.

- 13 -
Introduction for buttons on remote controller
Note:
Ɣ5DQJHRIWLPHVHWWLQJLVaK
Ɣ7KHLQWHUYDOEHWZHHQWZRPRWLRQVFDQWH[FHHGVRWKHUZLVHWKHUHPRWHFRQ
WUROOHUZLOOH[LWVHWWLQJVWDWXV
Function introduction for combination buttons
3UHVV³´DQG³´EXWWRQVVLPXOWDQHRXVO\FDQWXUQRQRUWXUQRIIFKLOGORFNIXQFWLRQ
:KHQFKLOGORFNIXQFWLRQLVVWDUWHGXS/2&.LQGLFDWRURQUHPRWHFRQWUROOHULV21
,I\RXRSHUDWHWKHUHPRWHFRQWUROOHUUHPRWHFRQWUROOHUZRQ¶WVHQGVLJQDO
Child lock function
Temperature display switchover function
8QGHU2))VWDWXVSUHVV³´EXWWRQDQG³02'(´EXWWRQVLPXOWDQHRXVO\FDQVZLWFK
EHWZHHQ&DQG)
Operation guide
$IWHUSXWWLQJWKURXJKWKHSRZHUSUHVV212))EXWWRQRQUHPRWHFRQWUROOHUWR
WXUQRQWKHDLUFRQGLWLRQHU
3UHVV02'(EXWWRQWRVHOHFW\RXUUHTXLUHGPRGHAUT2&22/'5Y)$1
+(AT
3UHVVRUEXWWRQWRVHW\RXUUHTXLUHGWHPSHUDWXUHTHPSHUDWXUHFDQ¶WEH
DGMXVWHGXQGHUDXWRPRGH
3UHVV)$1EXWWRQWRVHW\RXUUHTXLUHGIDQVSHHGDXWRORZPHGLXPDQGKLJK
VSHHG

- 14 -
Replacement of batteries in remote controller
1. Press the mark “ ” on back cover of batteries box cover for remote controller with
fingers as shown in the fig, and then remove the batteries box cover along the arrow
direction. Battery
Cover of battery box
Remove
Reinstall
2. Replace with two #7 (AAA 1.5V) dry batteries.
Make sure positions for “+” pole and “-” pole are
correct.
3. Reinstall batteries box cover.
ƔThe distance between signal sender and receiving window should be no more
than 8m, and there should be no obstacles between them.
Ɣ
conditioner when using the remote controller.
ƔReplace new batteries of the same model when replacement is required.
ƔWhen you don’t use remote controller for a long time, please take out the
batteries.
NOTICE

- 15 -
Note:
Remote control panel
1POWER BUTTON
Operation starts when pressing this button, and stops
when pressing this button again.
2
FAN SPEED BUTTON
Select the fan speed HIGH, MID, LOW and AUTO in sequence.
3
Timer can be set by pressing / button. Timer can be
set in 0.5hour increments between 1 and 10 hours, or in
1hour increments for 10 hours or above after each push
on or button.
4 TEMP/TIMER BUTTON
Press the keypad to increase the set (operating)
temperature of the unit.and Press the keypad to
decrease the set (operating) temperature of the unit.
The temperature seting range is from 16~30ć
MODE BUTTON
Select the operation mode, AUTO, HEAT, COOL, FAN,
DRY (for reverse cycle model) or COOL,FAN, DRY
(for cooling only model).
5SIGNAL RECEIVER
6
SWINGBUTTON
Activate the automatic air swing function.
7 FILTER BUTTON
This feature is a reminder to clean the Air Filter (See
Care and Cleaning) for more efficient operation and
cooling. The LED (light) will illuminate after 250 hours
"Check Filter" button and the light will go off.
of operation. To reset after cleaning the filter, press the
If wireless remote controller is lost, open the surface panel and operate manually.

- 16 -
Operation Tips
Operation for comfort and economy
Do not overcool the room te-
mperature. This is not good
for health and wastes electr-
icity.
Keep blind or curtains closed.
Do not let sunshine enter the
room directly when the air co-
ndition is in operation.
Keep the room temp. uniform.
Adjust the vertical and horizo-
a uniform temperature in the
room. Air can’t be discharged
to the direction of air-in.
Make sure that the doors and
windows are tightly closed.
Avoid opening doors and wi-
ndows as much as possible
to keep air conditioning in the
room.
duce dehumidifying effects.
once every two weeks.
Ventilate the room occasionally.
Since windows are kept closed, it
is a good idea to open them and
ventilate the room now and then.
When starting the unit, curtains or
windows should be closed to pre-
vent the heat/cool leakage.

- 17 -
Caution
Operations for safety and health
1) The plug must be accessible after the appliance is positioned.
2) Do not use this appliance in the laundry.
3) If the power cord is damaged, it must be replaced by the manufacture or its
service agent in void of hazard.
Select the most appropriate
temperature. Pay attention to
adjust the temperature to suit
the conditions. Rooms occup-
ied by infants,the elderly, or
the sick should be kept at an
appropriate temperature.
Do not use heating apparatu-
ses in the vicinity. The air co-
nditioner’s plastic parts will
melt if exposed to excessive
heat.
Avoid exposing the body dire-
ctly to a continuous unidirect-
This is not recommended for
health reason.
Ɣ'RQRWSXOORXWWKHSRZHU
cord.
Ɣ'DPDJHWRWKHFRUGPD\
result in serious electric
shocks
ƔDo not use the air conditioner
for other purposes except for
cooling the room.
ƔDo not use the air conditioner
for other purposes such as
dr
ying clothes, preserving
foods, or cultivating vegeta-
bles.
Ɣ'RQRWEORFNWKHDLULQWDNH
and outlet vents.
This causes lowered perform-
ance and irregular operation.
Ɣ'RQRWLQVHUWVWLFNVRURWKHU
objects into these vents as it
is dangerous to touch the ele-
ctric components and the fan.

- 18 -
Always wait at least 3 minutes before
switching the air conditioner on again
after you have switched it off during
cooling or heating.
Always wait at
least 3 minutes.
Inappropriate treatment of the unit involves the risk of severe
damages of people and material. Details to this refrigerant
are found in chapter “refrigerant”.
Appliance shall be installed, operated andstored in a room with
2.
This manual suits for next models
2
Table of contents
Other GIA Air Conditioner manuals

GIA
GIA Emelson IST3 User manual

GIA
GIA GIATSU JONICA Service manual

GIA
GIA Giatsu IX41BR32 User manual

GIA
GIA GIATSU P14 User manual

GIA
GIA V4+R GIA2528WD2RN1TC User manual

GIA
GIA HTW HTW-MRBT075HWN1R Service manual

GIA
GIA GIATSU WAVE GIA-VEI-09V1 Service manual

GIA
GIA GIA-MDI-09M01 Service manual

GIA
GIA GIATSU DIAMANT GIA-S09DIAR32-EXT Service manual

GIA
GIA GIA-MCF-18M01 Service manual