GigaBlue Quad 4K User manual

1
Manual GIGaBLUe
DIGITAL MULTIMEDIA
RECEIVER
uHD QUAD
4K
www.gigablue.de

2
Manual GIGaBLUeBox
Initiation
Dear Customer,
thank you have decided to purchase the one GigaBlue UHD Quad 4K.
This manual should help you to connect your GigaBlue box properly and to get to know the
numerous functions better.
The GigaBlue HD Quad Plus is a world first with a fast 2 x 1.7 GHz processor, 4GB of
memory, adapters and a color LCD screen; the possibilities of this multimedia box are very
extensive. They are reached by fast Gigabyte LAN in your private and external network the
highest performance. Furthermore, in software MediaPortal is integrated.
You can use the GigaBlue Box as your Web browser, photo archives, music archives, film
archive and many other functions.
You can adjust the GigaBlue box according to your wishes via plugin Service.
We hope you will enjoy reading the manual, and of course in the use of your GigaBlue UHD
Quad 4K.
Should a problem with your GigaBlue UHD Quad 4K occur please download
http://www.gigablue.de under down the service request form and fill it out completely.
Your Gigablue Team

3
GIGaBLUeHD Quad Plus
Contents
General Information _____________________ 4
Key Features ___________________________ 4
Safety Instructions _____________________ 5
Notes: Disposal ________________________ 6
Delivery content ________________________ 7
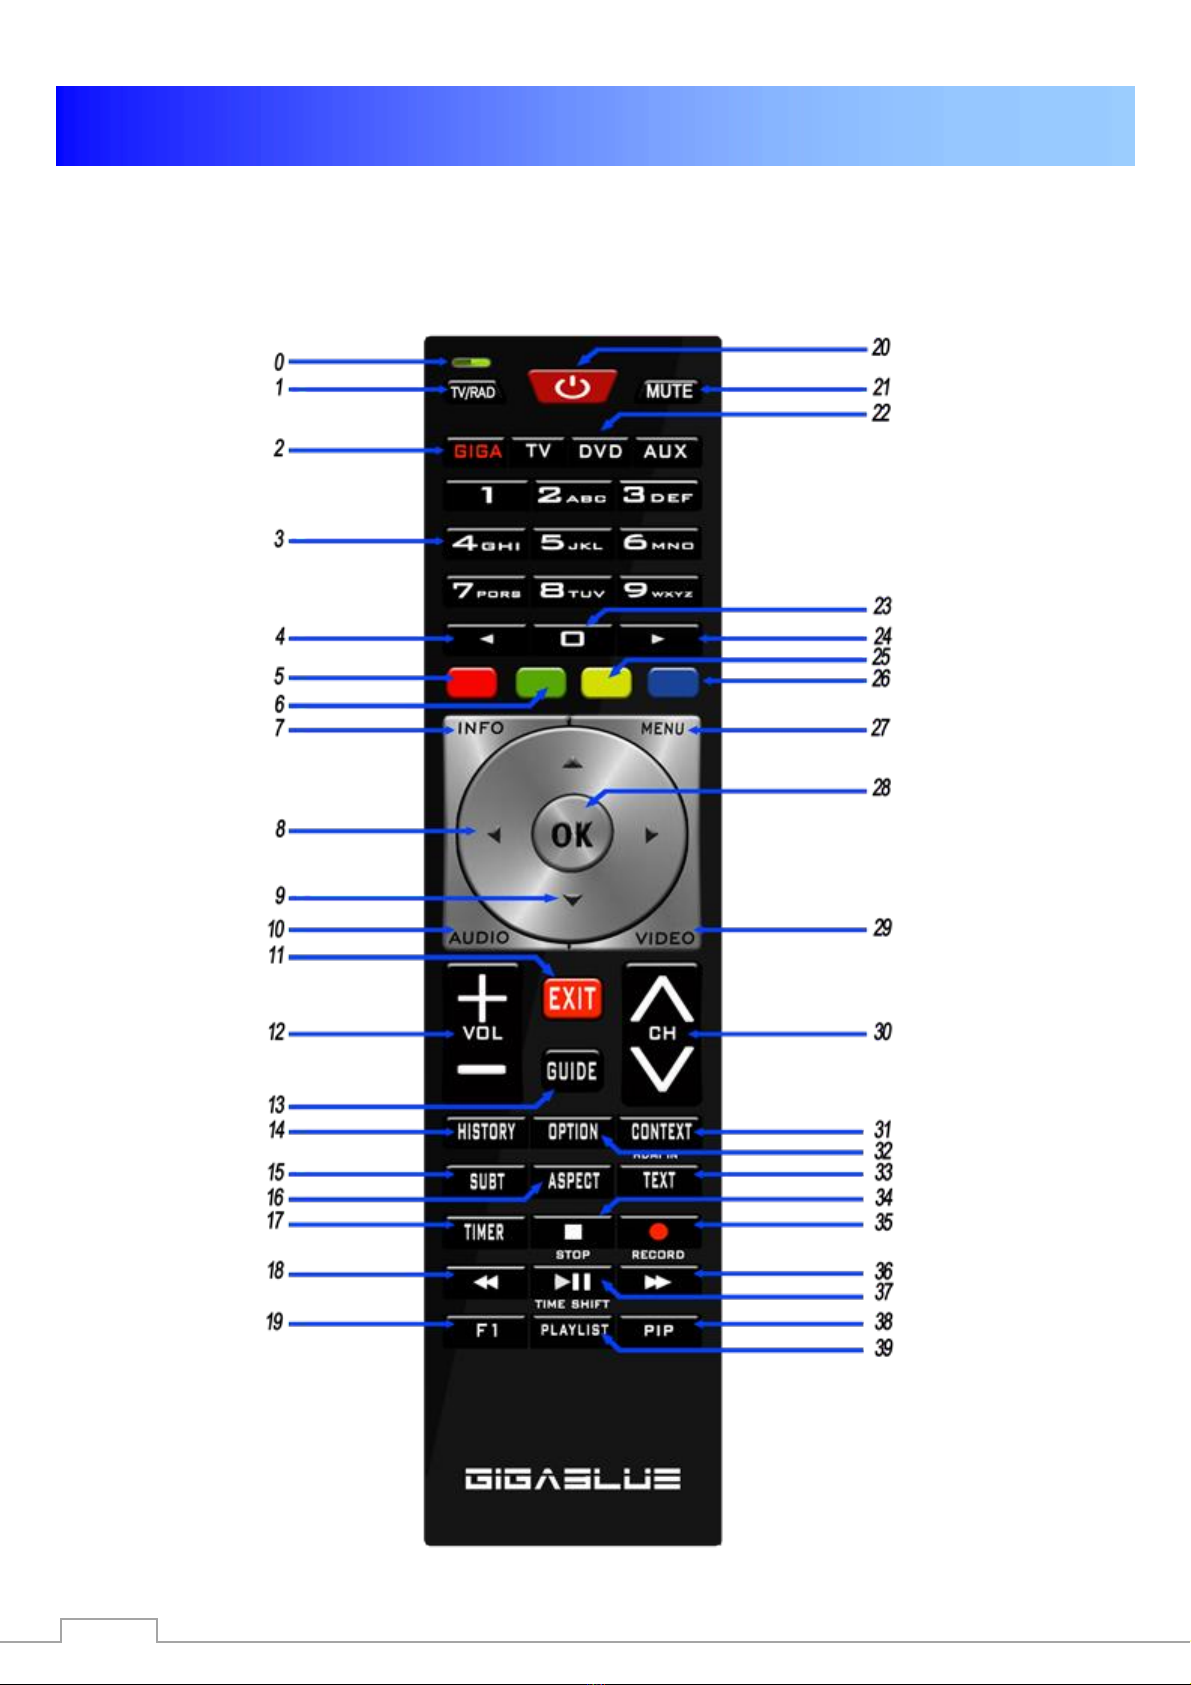
Remote Controls Functions _____________ 8
Front View ____________________________ 10
Rearpannel / Quad 4K__________________ 11
Installation____________________________ 12
Antenna and TV Equipment ____________ 12
TV Devices RCA / Component __________ 13
Start wizard 1_______________________ 14-22
Channel list install_____________________ 22
Turning on and off_____________________ 23
Program selection _____________________ 24
Volume / Audio selection_______________ 25
Sub channels__________________________ 26
TV Radio Switch_______________________ 26
Teletext _______________________________ 27
Subtitle _______________________________ 27
Program Information`s __________________ 28
Program Information’s EPG ____________29-31
Create Bouquet________________________ 31
Add channels _________________________ 32
Delete channels from the favorites list __ 34
Move channels from the favorites list ___ 35
Insert Marker __________________________ 36
Parental control______________________37-40
HDD Operation ________________________ 40
HDMI-CEC ____________________________ 43
Sleep-Timer ___________________________ 44
Language selection ____________________ 45
User mode ____________________________ 45
Time zone ____________________________ 47
Video settings _________________________ 47
Audio settings_________________________ 48
Video output __________________________ 48
Aspect ratios __________________________ 49
Color format___________________________ 49
AC3 Standard _________________________ 49
Network settings_____________________50-53
WLAN setting_______________________ 53-54
Factory reset __________________________ 55
Channel search ________________________55
Tuner Configuration (FBC) ____________ 56-61
Channel automatic scan _______________ 63
Channel search DVB-C ________________ 64
Channel search DVB-T/T2______________ 65
Rotor with USALS _____________________ 66
Manual Scan __________________________ 67
Fast scan _____________________________ 67
Unicable Configuration ________________ 68
Sat>IP ________________________________ 70
GigaBlue SERVER BOX________________ 71
SAT Finder____________________________ 72
Immediately Recording __________________73
EPG Recording ________________________74
Timer_________________________________75
Front panel____________________________ 76
LCD Skin______________________________76
LCD Clock_____________________________77
LED __________________________________77
Information____________________________ 77
Software Update GigaBlue Box ___________79
Software Update via Internet _____________80
Install Firmware ________________________83
Installing Extensions____________________83
PiP Picture in Picture ___________________84
Quad PiP Picture in Picture ______________85
Extensions ____________________________87
User Interface / Basic Settings____________88
Button allocation _______________________ 88
User Interface / Skin ____________________ 89
Weather_______________________________89
Position and Size_______________________89
Webbrowser GigaBlue Box_______________ 90
Web interface__________________________92
GigaBlue Player for Mobile devices________92
Problem-solving________________________93
Technical Specifications_________________94
Technical Specification ________________ 96
Universal Remote Control________________ 97
Universal Remote Control________________ 98
Installing the HDD ______________________ 99
Installing the Tuners ___________________ 100

4
General Information
You can view the GigaBlue Box numerous HD and SD programs,
are sent via satellite optional DVB-C / T. In this manual the installation of GigaBlue box and
the procedure for implementation will explains various functions. In addition, special
functions are explained in details which are available only at the box GigaBlue. So you can
use these functions optimally. The skin shown here is the default skin, in other skins only
the graphical user interface, but the function remains the same changes.
Key Features
• Fully compatible with MPEG-2/4 and DVB-S / S2
• Resolution: 20160p,1080p, 1080i, 720p, 576p, 576i
• Digital Audio with AC-3 support by SPDIF
• User-friendly, on-screen menu system Linux
• Various channel editing functions
(Favorites, Lock, Rename, Delete and Sort)
• Automatic search for newly added transponders
• (automatic network search)
• Easy and fast software upgrade via USB or Internet
• Timer function, automatic on / off with the appropriate setting of the function (once, daily,
weekly and monthly)
• Automatic system for moving bookmarked channels
• Electronic TV / Radio program (EPG)
• Video connectors: HDMI, RCA, COMPONENT
• RS-232
• Different switch types, LNB types and NTSC / PAL monitor types
• SCPC and MCPC receivable from C / Ku band satellite
• Multi LNB controlled by DiSEqC 1.0, 22 kHz
• Automatic PAL / NTSC conversion
• Last channel is automatically saved
• Play multimedia files like MP3, videos and pictures in HD quality
• PVR on HDD or Network
• Media Portal, Streaming
• Timeshift (time shifting)
• Plugin Service (extensions)
• HDMI CEC control
• PiP & Quad PiP (Picture in Picture)
• Built-in UPnP server / client
• Web Browser
• IP TV, IP Radio

5
General Information
This GigaBlue product was manufactured according to international safety standards.
Please read all safety and operating instructions before operating the product carefully and keep
all safety and operating instructions in your records.
Safety Instructions
• Setting up the GigaBlue Box
The GigaBlue Box may only be operated in closed rooms.
• Power supply: External power supply 12 V 4 A
Outlets, extension cords or the power adapter must not be overloaded, since the risk of electric
shock or fire could result.
• Liquids
The device must not come into contact with dripping or splashing. Do not place objects filled with
liquids such as vases or glasses on the instrument.
• Clean the GigaBlue Box
Before cleaning the GigaBlue Box from the power disconnect. No liquid or
Use aerosol cleaners. Clean the appliance only with a damp cloth
• Ventilation
the ventilation slots on the top of GigaBlue Box may not be covered, so that proper ventilation of
GigaBlue box is ensured. Direct
Sunlight and installation in addition to a heating add to the GigaBlue box damage.
• Connect the LNB's and TV
The GigaBlue box must be disconnected from the mains before you connect the LNB's or TV.
• Repair or replacement
Opening or removing the covers of the user to dangerous voltages or other hazards may be
suspended.
Repair or replacement may be carried out only by qualified technicians. Furthermore, void the
warranty, the user should make changes to the GigaBlue box.

6
General Information
Notes: Disposal
The GigaBlue Box packaging consists entirely of recyclable materials.
Perform these exclusively that for you in your state, appropriate system.
The GigaBlue Box may at end of life not be disposed of with normal household waste but must
be brought to a collection point for the recycling of electrical and electronic equipment.
The symbol on the product, the instruction manual or the packaging indicates.
The materials are recyclable according to their labeling.
By recycling, material recycling or other forms of utilizing old devices, you make an important
contribution to environmental protection.
Please ask where the disposal facility is requested from your local municipality.
Also make sure that the dead batteries of the remote control and electronic waste from entering
the household waste.
You are thereby making an important contribution to environmental protection.

7
General Information
Delivery content
Please verify that you have received the GigaBlue box complete with all accessories.
•GigaBlue UHD Quad 4K
•Power supply and cord
•GigaBlue Remote Control
•User Manual
•Batteries
GigaBlue UHD Quad 4K
Power supply
2 Batteries Mignon 1,5 V 220 V Connection cable
User Manual
Remote Control

8
General Information
Remote Controls Functions

9
General Information
Remote Control Functions
1. Switching TV/Radio
2. Giga , TV, Aux, DVD
3. Number field
4. Numeric keypad ◄
5. Red function Button
6. Green function Button, Plugin/Save
7. Information on the receiving channel
8. Arrow button ◄ lift and ►right
9. Channel list button ▲+ ▼-
10. Select Audio button
11. Exit
12. Volume ▲+ ▼ -
13. EPG (Electronic Program Guide)
14. History button
15. Subtitels button
16. Aspect button
17. Timer button
18. Control button reverse ◄◄
19. Freely programmable button
20. Power on/off
21. sound on/off
22. Universal function TV/DVD/AUX
23. Go back to the previous channel 0
24. Numeric keypad ►
25. Timeshift start
26. Bluepannel button
27. Menü button
28. OK button
29. Video button
30. Program ▲+ ▼-
31. Context button
32. Option channels
33. Teletext / Virtuell keyboard
34. Stop button
35. Recording button
36. Control button forward ►►
37. Play / Pause Timeshift ►||
38. PiP button (Picture in Picture)
39. HDD Atchive button
40. Control Recording / Music
Caution: if GigaBlue remote GigaBlue Box not
operated, please press the button GIGA

10
General Information
Front View
Power on/off
Turns GigaBlue box to standby
Menu
Opens the menu
Exit
Exits the menu / channel list
◄
A channel back / Navigate menu
►
A channel forward / Navigate menu
▲
Channel list Open / Navigating the Menu
▼
Channel list Open / Navigating the Menu

11
General Information
Rearpannel / Quad 4K
SD Card
FBC Tuner
A&B
Digital
Output
USB 3.0
port for
connecting
external
USB
devices
such as
Power
Supply
Connector
Plug & Play
Tuner DVB-
C/T2 and DVBS-
2X
(Tuner
optional)
HDMI output
DVD, PC and
etc devices
HDMI IN
TV
Diveces
E-
Power
ON/Off
USB 2.0 for connection
of external USB
devices, for example,
HDD, DVD, WiFi, etc
E-SATA Port
for HDD and
E-SATA devices
Network Connection
10/100/1000 Mbit for
Internet and FW Update

12
Installation
Antenna and TV Equipment
This chapter describes the installation of GigaBlue Box is explained. For information about installing
external devices as, see below. As the satellite dish, LNB, refer to the corresponding manuals of the
manufacturer. When installing a new appliance, the corresponding installation chapter in the
manual must be observed.
Output to
LNB / DiSEqC
or Multi switches TV
Output to
TV equipment
HDMI
Input to digital terrestrial or cable network
(Tuner Optional)

13
Installation
TV Devices RCA / Component
If the GigaBlue box on Audio / Video (also called RCA) want to connect or the Component
connection follow the graph shown below. The individual connectors are color-coded on both
TV and the GigaBlue box. Note that if you use Component for connecting an additional
opportunity for the audio connection must be used.
Zum Verstärker AC3

14
Installation
Start wizard 1
Using the Startup Wizard, you can set up your GigaBlue box in a few minutes.
When you first start the GigaBlue you get
the following Fig.1. Set the video output
on. You have the ability to determine the
outcome of the arrow keys ▲ ▼ and
press the OK button.
Then set the coding a, it can be reached
with the arrow keys ▲ ▼ and confirm with
the OK button Fig.2.
In the next steps Langue:
Then select with the arrow keys ▲ ▼
language Fig. 3 and press the OK button.
HDMI
Video
output
(Resulation)
2160p für 4K TV
1080p
1080i
720p
576p
480p
480i
Fig.1
Fig. 2
Fig.3

15
Installation
Start wizard 2
Next, the network is configured.
Press OK to move to the next
menu Fig.1.
Apply in Fig.2 the settings and
click OK.
If you want to assign a static IP,
press the arrow keys ◄► and set
DHCP to NO.
Now set the network so. That it fits
to your network
If you have chosen a wireless
LAN, press the OK button WLAN
configuration see page 53 and 54
Now your GigaBlue box for the
first start is configured Fig.3. Click
OK to close the installation.
Abb. 1
Abb. 2
Abb. 3

16
Installation
Start wizard 3
You will now be asked if you see
the "See all eight arrowheads
If you confirm arrowheads with
OK, if not with the
Arrow keys ◄► and set to no and
press OK. Fig. 1
When arrowheads are not
visible. Please first select
left with arrow keys ▼ ▲
and adjust with arrow keys
◄► until you see
arrowheads.
Then right, up, down
Confirm the selection with
OK and you get to the next
menu fig.3.
The Startup Wizard will now launch
in your selected, Figure 1, Language
and Video mode. With OK you get
to the next point.
Abb. 1

17
Der first Start
Start wizard 4
The start wizard is now started in
your selected Fig.1, language.
Press OK to move to the next
point.
You will be asked if you want to
make the basic settings
(recommended) or want to quit the
start wizard. Use the arrow keys
▲ ▼ to access the individual
menu items. Fig. 2
Fig. 1
.
Fig. 2
Startassistant FBC Tuner

18
The first Start
Start wizard 5
Then, if you have not finished the startup
wizard, the tuner configuration will take
place with the arrow keys ◄► you have
the possibility of tuning the tuner to your
Sat antenna or DiSEqC adjust. Fig.1
In the mode setting you have various
choices possibilities
Simple
DiSEqC A/B
DiSEqC A/B/C/D
Rotor
(Will be described in detail)
Singly
Toneburst A/B
Use the arrow keys ◄► the
Configuration that suits your satellite
System Fig.2 and press the OK button.
Tuner B:
If you have antenna cable connected
to Tuner B. Equal to FIG.3
if you have connected only one
Antenna cable to Tuner A, Internal
loop through to Tuner A. FIG.4
Fig.1
Fig.1
Fig.2
DVB-S2 FBC Tuner - What is it?
This type of tuner will be used for the
first time on a GB UHD QUAD.
FBC stands for "Full Band Capture" and
means that the entire frequency band of
a level is received.
Fig. 3
How does it work?
Two FBC tuners are powered by two Sat
IF inputs (LNB1 IN and LNB2 IN), then
eight demodulators are dynamically split
between both FBC tuners. Each of these
demodulators can then demodulate a
transponder or an SCR frequency.
Fig.4

19
The first Start
What are the advantages of this?
1. Faster changeover times, since the next program
can already be pre-dunked and demodulated.
2. In classical operation, up to eight transponders of
a plane could also be demodulated or e.g. three from
one level and five from another level when both sat
IF inputs are powered.
3. Each demodulator could get a Unicable / JESS
SCR frequency, so there are eight transponders to
receive independently.FBC
Unicable / JESS for two Satpositions
Unicable: The respective settings must be adapted to the
SCR system. LNB 1 and LNB 2 are to be adjusted to the
aligned satellite system. Here in the example it is 13 °
East (Eutelsat) and 19.2 ° East (Astra). Unicable is to be
selected under LOF. It must also be noted that the correct
settings are made under Unicable configuration and
manufacturer. If these pre-programmed settings do not
agree with the installed components, select Unicable
User defined, under the then menu item Diction
Unicable [EN50494] must be selected. The remaining
settings, such as channel and frequency must, however,
be made manually. The frequencies may only be
assigned once for each connected tuner; if this is
ignored, interference will occur.
JESS: The settings for JESS can only be changed in
Unicable User defined mode, then JESS [EN50607]
must be selected under the then menu item Diction.
The remaining settings, such as channel and frequency
must, however, be made manually. The frequencies
may only be assigned once for each connected
tuner; if this is ignored, interference will occur.
Procedure: Settings can be changed via the control pad
left / right.
1. Setting under tuner A for now LNB (LNB 1) e.g Astra
19.2°Ost
2. save
3. Setting under Tuner A for the second LNB (LNB 2)e.g
Hotbird 13°Ost
4. save
5. Setting under tuner B for the first LNB (LNB 1) e.g..
Astra 19.2°Ost
6. save
7. Tuner B setting for the second LNB (LNB 2) e.g.
Hotbird 13°Ost Save
See Pages 56 to 62

20
The first Start
Start wizard 6
If you have opted for the standard
channel list, press OK. Fig.1.
Would you rather start an automatic
channel search, select with the
arrow keys ▼ ▲ No and you move
to the next menu Fig.2.
You can also install channel list
later Plugin Server
After installing 2x Green button
Under Setting, select the desired
channel list and install
Fig. 1
Fig. 2
Table of contents
Other GigaBlue Receiver manuals