Gigaset_QUG _ A31008-M2404-X106-1-7643 _ August 9, 2012
Gigaset S820A - Touch & Type
ÐÃÞòôóV
Â
˜
Apr
26
Thu
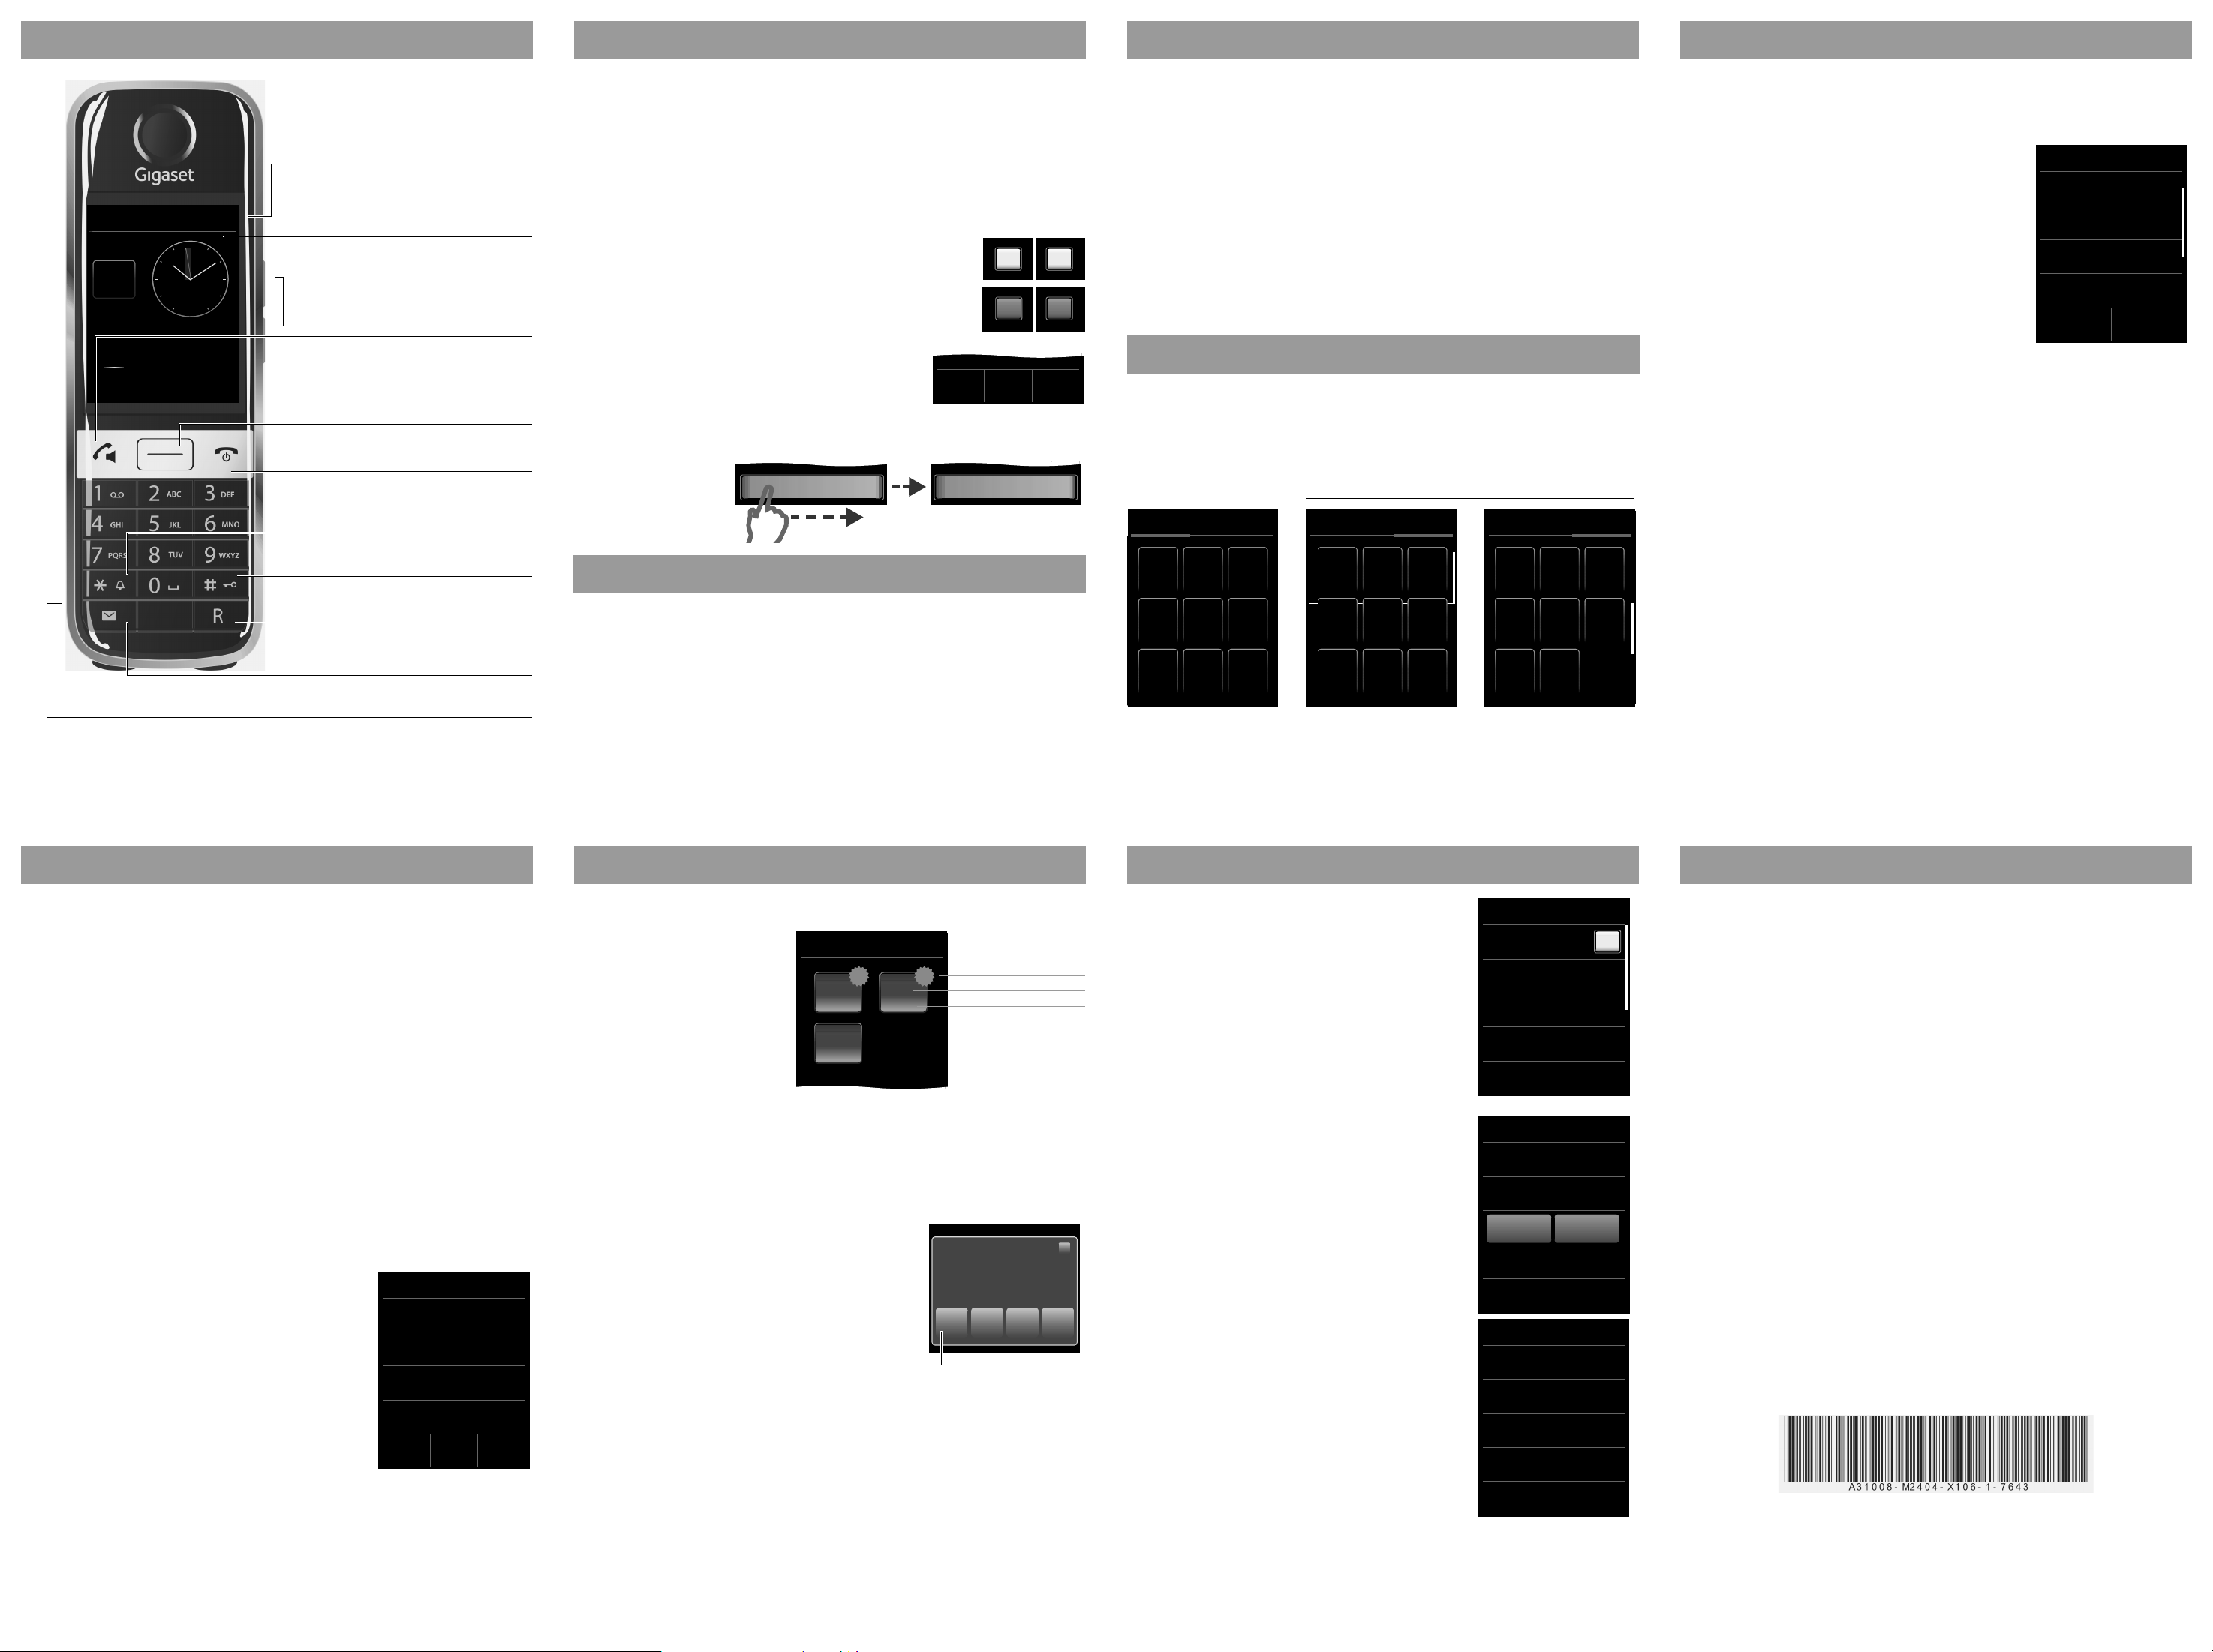
Status bar
Icons show the telephone's current settings and oper-
ating status. Touch the status bar to open the status
page.
vMenu key
Open the main menu/return to the idle display
aEnd call/end key
Press briefly: end call/paging call, reject internal call,
return to idle status
Press and hold: switch handset on/off
Touchscreen/display
Handset keys
Side keys
Set the volume during a call
Mini USB connection socket
Connect the handset to your PC (Gigaset QuickSync)
Idle display or menu page
Star key
Press and hold: activate/deactivate ringtones
Hash key
Press and hold: activate/deactivate keypad and display
lock
Message key
Call up messages page
Recall key
Recall (flash),
Press and hold: enter dialling pause
cTalk key
Dial displayed number, accept call,
switch between earpiece and handsfree mode,
Press briefly: open redial list
Press and hold: start dialling
Using the phone
Switching the handset on/off
¤Press and hold the end call key a. You will hear a melody.
Switching off the handset is only possible in idle state.
Operating the touchscreen
Icons, list entries, switches and selection areas shown on the display are sensitive areas. Touching
these areas allows you to set and start functions and navigate between the various display screens
(pages).
Selecting functions/list entries
Touch a list entry or the corresponding icon to select the list item (contacts, submenu, call lists) or
to activate/deactivate a function.
Switching functions on/off or selecting functions
Touch the switch briefly to switch on/off or select/deselect
functions.
The function is switched on or selected if the switch is orange
(text on) or the switch is light grey (‰icon).
Options and options bar
Many displays have an options bar at the bottom. This displays
all the actions that you can apply in the current context.
¤Touch an option to perform the corresponding action or touch
Options to display a list of further options.
Activating/deactivating the automatic display lock
The display is automatically locked during a call or when listening to the answering machine to
prevent inadvertent operation. You can briefly deactivate the lock (for 3 seconds) to operate the
telephone via the display. The lock then reactivates automatically.
To unlock slide across
the display from left to
right, pressing down on
the bottom line.
Making calls
Making an external call
¤Enter the number and briefly press c. Or:
¤Press and hold c; enter number.
You can cancel dialling by pressing a.
Accepting a call
You have the following options:
¤Press c.
¤Take the handset out of the charger, if Auto Answer is activated.
¤Touch to divert the call to the answering machine.
For calling line identification
The number is shown on the display. If the number of the caller is stored in Contacts, additionally
the name and number type of the Contacts entry is displayed.
On/
selected
or
Off/
deselected
on ‰
off
hConf-
erence
Options
Options bar (example)
] ^
Slide to unlock ^
Unlocked
Making calls
No calling line identification
Instead of name and number, the following is displayed:
uExternal: No number is transferred.
uWithheld: Caller has withheld calling line identification.
uUnavailable: Caller has not requested calling line identification.
Handsfree mode
¤If you are going to let someone listen in, you should tell the other party that this is happening.
Activating while dialling
¤Enter the number, press c twice.
Switching between earpiece and handsfree mode
During a call, when establishing the connection and when listening to the answering machine:
Press c.
Switching to mute
Deactivate the handset's microphone during an external call. The other parties cannot hear you,
but you can still hear the other party.
Switch to mute, cancel muting (activate/deactivate microphone): Touch–.
Phone settings/applications
All the functions for the base and the handset are provided in a menu (main menu).
¤Briefly press the middle key vwhen the handset is in idle status.
The main menu is divided into two "pages". The Applications page comprises all the applications
offered by your base or handset. The Settings page offers all the setting options for the base,
handset and telephony.
¤Touch the icon to open the menu of the appropriate setting/application.
Switching between menu pages:
¤Touch the desired page in the header.
Returning to the idle display from anywhere in the menu:
¤Press the akey briefly.
Start telephone applications Adapt telephone settings to suit
your requirements
"Settings"
"Applications"
Applications Settings Applications Settings
˜
Call List Contacts
Â
Write
SMS
¾
Baby
Phone
Á
Calendar
Alarm
Ù
Divert
Š
1 Touch
Call
ž
Internal
Call
åã
Select
Services
Call Pro-
tection
System
Ï
Date +
Time
á
Language
+Location
Æ
HS +
Base
Î
Display +
Keypad
i
Audio
Settings
ï
Quick
Dial
í
Applications Settings
Ì
Answer
Machine
Network
Mailbox
n
Blue-
tooth
»
Select
Services
ã
Tele -
phony
ª
SMS
Ë
Quick
Dial
í
Call Pro-
tection
Contacts
Opening the contacts
Menu key v¤œContacts or
during a call depending on the situation œ or Options ¤Contacts
Creating a new entry
¤Open the contacts. If no entries have been created
¤New Entry, otherwise
¤Options ¤New Entry
¤Enter the components of each entry via the individual fields.
Where necessary, scroll down to see additional components.
To create an entry, you must enter at least one number.
If available, confirm each entry with è. Touch ‘to exit the menu
without saving (exceptions: ringtone and caller picture).
The first number in each entry is automatically highlighted in green
(ý). This number is used when you open the contacts entry and press
the talk key.
¤Touch Save.
Selecting a Contacts entry, navigating in Contacts
If there are more than four entries in your contacts, a scroll bar
appears on the right-hand side. You have the following options:
uScroll to the name you are searching for.
uEnter the first letter of the name via the keypad. The letter appears in the header. The display
jumps to the first name that begins with this letter. If necessary, scroll until you reach the
desired entry.
Dialling with Contacts
Menu key v¤œContacts
¤Scroll through your contacts until the desired entry appears.
You have the following options:
¤Press cto dial a number of the entry marked in green.
– There is only one number saved: The number is dialled immediately.
–Therearenumerous numbers saved: The detail view opens.
¤Press c. The number with the green dot is dialled. Or:
¤Touch the desired number.
Or:
¤Touch the name of an entry to open the detail view.
¤Press c. The number of the entry marked with the green dot is dialled. Or:
¤Touch the desired number.
Viewing an entry (detail view)
¤Open contacts ¤Touch the desired entry.
Editing entries
¤TouchN.
uChange/delete first name, surname, number or eMail address: Touch the entry ¤Where nec-
essary, touch the relevant field ¤Delete data by touching ç¤Where necessary, enter new
data ¤Touchèto confirm. Touch ‘to exit the menu without saving.
uDelete a caller picture or ringtone assignment: ¤No Picture/No Ringtone
uDelete a birthday: Touch the Birthday field ¤þ
Deleting an entry
¤In the detail view: Options ¤Delete ¤Touch Yes to confirm.
New Entry
Add Name
Add Number
Add eMail
Add Ringtone
LSave
Using lists
Redial list
The redial list contains the twenty numbers last dialled with the handset. To dial a number:
¤In idle state briefly press c to open the redial list.
¤Press c. The phone dials the last dialled number (marked with a green dot). Or:
¤Touch an entry to open the detail view.
¤Press c. The number of the entry marked with the green dot is dialled. Or:
¤Touch the desired number.
Managing entries in the redial list
¤Open redial list. ¤Touch an entry. The detail view for this entry opens.
¤You can delete the entry or save the number in Contacts.
Call list
The last 20 entries are shown in the call list.
¤Opening the call list via the messages page or message pop-up opens the Missed Calls list.
¤Opening the call list via the Applications menu page opens the list of all calls.
You can switch between call lists:
uShow all: Full list of all calls (missed, outgoing, incoming)
uShow by type ¤Missed: List of missed (unaccepted) calls
uShow by type ¤Accepted:List of accepted calls and calls recorded by the answering
machine (Ã)
uShow by type ¤Outgoing: List of outgoing calls (dialled numbers)
¤Open the detail view: Touch the entry. The display shows all the available information. In the detail
view, you can delete the entry or add the number to the contacts.
List entry
The following information is displayed in the list entries:
uThe list type (in the header)
uIcon for the type of entry:
–Call list: ™(Missed), ›(Accepted), š(Outgoing),
Ã(Call on the answering machine)
–SMS list: Œ(unread), †(read)
–Answering machine list: Ã(call on the answering
machine)
The icon is red for new (unread) entries.
uCaller’s number. The caller’s name and number type (Home,
Office, Mobile) is displayed instead if the caller’s number is
stored in the contacts. For missed calls, the number of calls
from this number is also shown in square brackets.
uDate and time of call (if set).
Open the detail view: Touch an entry. The display shows all the
available information. The message is played back in the answering
machine list. The SMS text is displayed in the SMS inbox list. You can
delete the entry or copy the number for the entry to the contacts.
Call back a caller from the calls list: In the detail view, briefly touch the name or number.
If you press the ckey after you have opened a list, the number for the entry marked by a green dot is
dialled.
Missed Calls
ýJames Foster
™18:30, Home
01712233445566
™11.06., 18:30
LShow
all
Show
by type
Call list (example)
Using lists
Opening lists via the message page in the idle display
You can call up the messages page
by pressing the messages key d
on the keypad. You can access the
following message lists:
užAnswering machine list
u5Network mailbox, if your
network provider supports this
function and the number of
the network mailbox is stored
in your telephone
u·SMS inbox
uÕMissed calls list
u\Missed appointments list
The list of missed calls is always displayed. The icon for the network mailbox is always displayed,
provided the number is stored in the telephone. The other lists are only displayed if they contain
messages.
¤Touch an icon to open the corresponding list.
Exception: If you touch the icon for the network mailbox, your telephone will dial the number
for the network mailbox. No list will open on the display.
Message pop-up
An advisory tone sounds as soon as a new entry arrives in a list.
The message key also flashes (if activated). The message pop-up
is displayed and partially covers the idle display.
The number of new messages in each list is displayed beneath
the icons.
¤Close the pop-up: Touch é(top right).
¤Open the list: Touch the relevant list icon.
If the network mailbox has been configured: Touching 6
opens the message page rather than a list.
The messages LED flashes (if activated), until you have opened a
list or the messages page.
Deleting lists
You can delete the entire contents of the individual lists:
Menu key v¤Settings menu page ¤ÊSystem ¤Clean-up List ¤Touch the desired list
¤Touch the desired list type ¤Touch Yes to confirm.
Message Centre
Number of new messages
List type (see above)
Number of old messages
No new messages
Number of old messages
31
119
2
[
¾™
Messages page (example)
You received:
À
1
3
¾
™
1
Ã
2
Answering machine and/or
Network mailbox
Message pop-up (example)
Answer machine
Activating/deactivating the answer machine
Menu key v¤Settings menu page ¤ÃAnswer Machine
¤Activation on/off
Defining Mode
Menu key v¤Settings menu page ¤ÃAnswer Machine
¤Mode
–Announcement: Caller can leave messages
–Advisory Message: Caller only hears a recorded mes-
sage
–Time Control:
When activated, enter the time when each mode
should be activated via Announcement from/Advisory
Message from.
¤Touch ‘to exit the sub-menu.
Recording a personal announcement/advisory message
¤Announcements ¤Announcement or Advisory Message
¤ñ¤Record an announcement after the ready tone (mini-
mum 3 seconds up to a maximum of 180 seconds).
¤öComplete and save the recording.
Cancel a recording: Press the end call key aor ‘
while recording.
After recording you can:
–Play back the announcement: Touch ÿ.
–Repeat the recording: Touch ñduring playback.
–Delete the announcement: Touch þand Yes
to confirm.
Additional setting options
uSet the recording parameters:
¤Open the Recordings sub-menu.
–Recording Length: 1 min., 2 min., 3 min. or Maximum.
–Recording Quality: Longplay or Excellent.
–Ring Delay: No Delay, 10 sec., 18 sec., 30 sec. or Auto-
matic (10 seconds if there are new messages,
otherwise 18 seconds).
Select your setting using the relevant parameter field
(´=selected), save and return with ‘.
uSwitch call screening on/off on the handset: Activate/
deactivate the Call Screening switch.
Switch call screening off for the current recording: Press
the end call key a.
uActivate/deactivate playback of the recording time: Turn
the Play Time Stamp switch on/off.
Answer Machine
Activation
Mode
Announcement
Announcements
Recordings
L
Announcement
Current Announcement
Standard
L
ýû
Recordings
Recording Length
3 min.
Recording Quality
Excellent
Ring Delay
18 sec.
L
Answer machine
Playing back messages
¤Press and hold key; the answering machine starts to play new messages straight away
(prerequisite: no network mailbox is set up).
Or:
¤Message playback via the messages page: message key d¤ž
The answering machine list is opened.
– Listen to all new messages: Touch Play all new.
– Listen to individual messages: Touch a list entry.
– Delete all old messages: Delete all (only available if there are no new messages)
The following options are available during playback:
uAdjust the playback volume using the side keys.
uRepeat the last 5 seconds of playback: replay last 5 seconds.
uDelete message: þ.
uTouch the caller's number: Playback is stopped; the caller is called back.
uTouch the caller's name: Playback is stopped; you can edit the entry in the contacts.
Deleting all messages
Menu key v¤Settings menu page ¤ÊSystem ¤Clean-up List ¤Message Centre ¤Delete
all messages on Answer Machine ¤Touch Yes to confirm.
More answering machine functions
uPick up call during answering machine recording
Press the talk key corAccept.
uDivert call to answering machine:
If the answering machine is switched on and the handset is displaying an external
call: , the answering machine starts immediately in Announcement mode.
uRecording of external call: Options ¤Record
End recording: End Record
Tell the other party that the call is being recorded.
Issued by
Gigaset Communications GmbH
Frankenstr. 2a
D-46395 Bocholt
© Gigaset Communications GmbH 2012
All rights reserved. Subject to availability.
Rights of modification reserved.
www.gigaset.com
This user guide is made from 100% recycled paper.
A31008-M2404-X106-1-7643


