Gin Verso Manual


pilot manual
v2.0, 03/2014

Reversible airbag
harness

4
Contents
Thank you... 5
Warning 6
About Gin Gliders 7
Introducing the Verso 8
Before you fly 12
Flying with the Verso 27
Maintenance and repairs 30
Final words... 33
Technical data 34
Materials 35

5
Thank you...
...for choosing Gin Gliders. We are confident you’ll enjoy many rewarding experiences in the air
with your GIN Verso.
This manual contains important safety, performance and maintenance information. Read it
before your first flight, keep it for reference, and please pass it on to the new owner if you ever
re-sell your harness.
Any updates to this manual, or relevant safety information, will be published on our website:
www.gingliders.com. You can also register for e-mail updates via our website.
Happy flying and safe landings,
GIN team

6
Warning
Like any extreme sport, paragliding involves unpredictable risks which may lead to injury or
death. By choosing to fly, you assume the sole responsibility for those risks. You can minimize the
risks by having the appropriate attitude, training and experience and by properly understanding,
using and maintaining your equipment. Always seek to expand your knowledge and to develop
self-reliance. If there is anything you do not understand, consult with your local dealer as a first
point of contact, with the GIN importer in your country or with Gin Gliders directly.
Because it is impossible to anticipate every situation or condition that can occur while
paragliding, this manual makes no representation about the safe use of the paragliding equipment
under all conditions. Neither Gin Gliders nor the seller of GIN equipment can guarantee, or be held
responsible for, the safety of yourself or anyone else.
Many countries have specific regulations or laws regarding paragliding activity. It’s your
responsibility to know and observe the regulations of the region where you fly.

7
About Gin Gliders
Dream
In forming Gin Gliders, designer and competition pilot Gin Seok Song had one simple dream:
to make the best possible paragliding equipment that pilots all over the world would love to fly—
whatever their ambitions.
At Gin Gliders, we bring together consultant aerodynamists, world cup pilots, engineers and
paragliding school instructors, all dedicated to fulfilling this dream.
Touch
We’re a “hands-on” company that puts continuous innovation and development at the centre of
everything we do.
At our purpose-built R&D workshop at head office in Korea, we are able to design, manufacture,
test-fly and modify prototypes all in a matter of hours. Our international R&D team is on hand both
in Korea and at locations worldwide. This guarantees that your equipment has been thoroughly
tested to cope with the toughest flying conditions.
Our own production facilities in East Asia ensure the quality of the finished product and also
the well-being of our production staff.
Believe
We believe that the product should speak for itself. Only by flying can the pilots understand
their equipment and develop trust and confidence in it. From this feeling comes safety, comfort,
performance and fun. The grin when you land should say it all!

8
Introducing the Verso
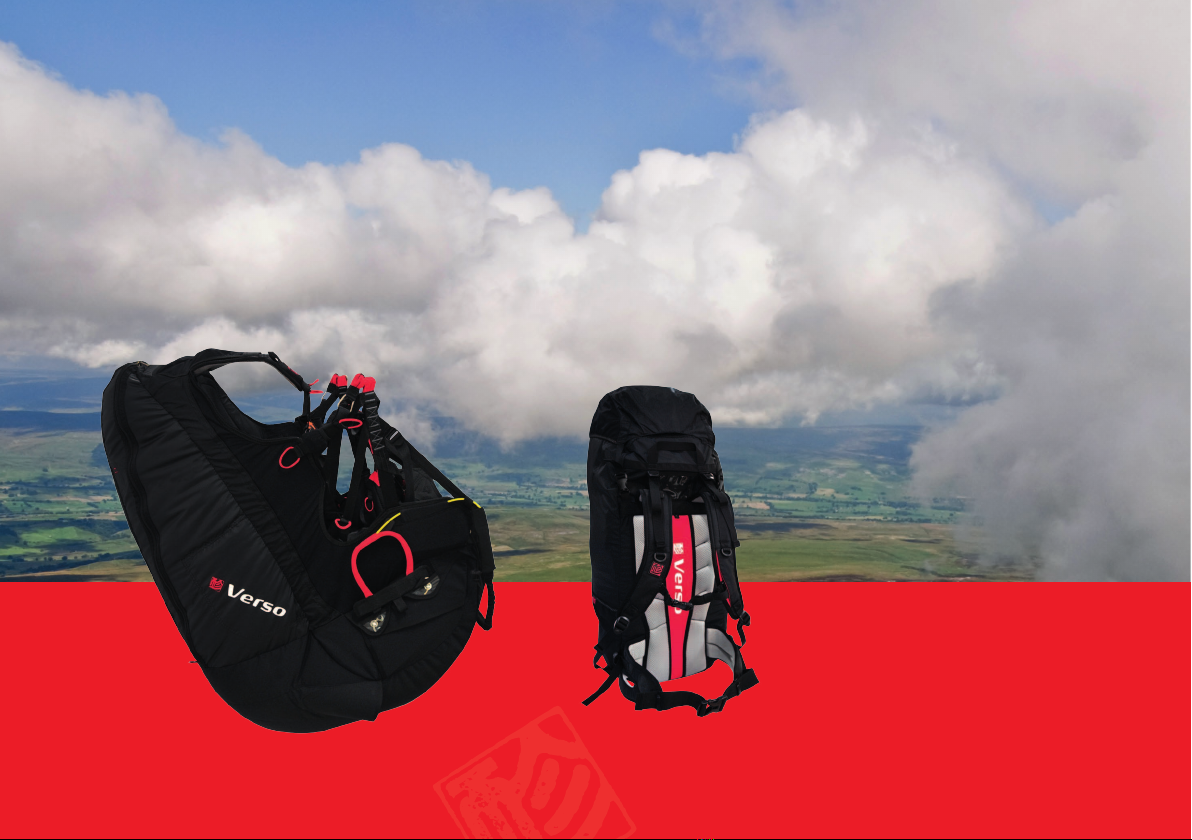
The Verso is a reversible airbag harness with carbon seat plate and underseat rescue container.
The Verso offers comfort, safety and convenience in a compact, lightweight package. The Verso is
well-suited to leisure pilots, hike ‘n fly pilots and travellers, yet is comfortable enough to be used
on long cross-country flights.
The Verso is a sleek and easy harness, designed for maximum comfort and ease of use. The
elegant design focuses on simplicity, eliminating the need for complicated adjustments.
The overall geometry of this harness has been designed to enable the pilot to move
comfortably and freely, enabling an easier, fast run for take-off and landing.
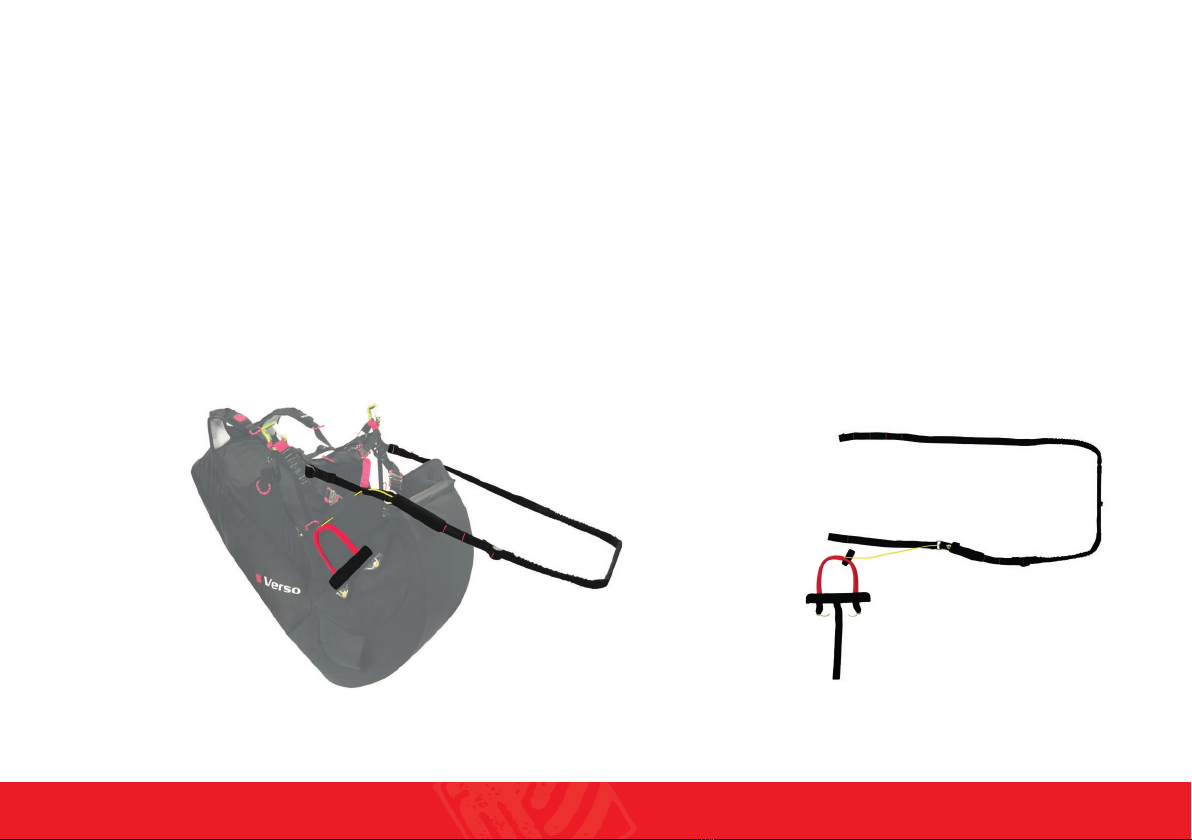
Leg and chest straps are integrated into the “T-bar system” to prevent the pilot from falling
out of the harness if he forgets to fasten the leg straps.
The safety has also been improved on the 2nd generation Verso by a pre-inflation system
for the airbag. Medical grade titanium wire has been used to ensure that the airbag is partially
inflated at all times, even on take-off when the pilot has their back to the wind. The rescue
container has also been reshaped to allow easier deployment, particularly under high G forces. The
re-designed rescue handle is easier to reach at all times.
These developments ensure that the new Verso is a worthy sucessor to the previous Verso, one
of the most popular reversible harnesses on the market.

9
Specifications
The Verso has EN and LTF certification.
Size XS S M L XL
Pilot height (cm) under 165 160-175 170-185 over 180 over 180
Weight (kg)* 3.6 3.7 3.9 4.1 4.3
* - weight does not include rescue handle, top cover, optional footbar, carabiners
Delivery package
1 Harness convertible to rucksack
1 Carbon seat plate
2 Carabiners
1 Rescue handle and 2 lengths of line to help close the harness rescue container
1 Rucksack top cover for helmet or extra loose item storage.
Airbag back protection
The Verso is a harness with a built-in airbag. The airbag helps to absorb the force of an impact
by allowing air to dissipate progressively. This protects the pilot as much as possible in the event
of an incident, but it cannot completely eliminate the risk of injury. The Verso back protection is EN
/ LTF certified.

10
Optional Items
Footbar with quick release system
The optional footbar with quick release system consists of a footbar with a specially designed
rescue handle. In the event of a reserve deployment, the footbar is automatically released. This
is to eliminate the possibility of the footbar interferring with the reserve. Please see the “Before
you fly” section of this manual for details of installation and adjustment of the optional footbar.
We recommend that you do not use other types of footbar with the Verso.

11
Rescue parachute
The Verso is designed for use with a GIN rescue parachute, such as the One G or Yeti Rescue.
Every first installation of a rescue system into the harness (that means every new combination of
harness and rescue system) must be checked by a qualified paragliding professional. This is called
a “compatibility check”. In this compatibility check you, the pilot, must always sit in the harness
hanging from a simulator and deploy the rescue from the harness container. This check must also
be done each time after the rescue has been repacked and re-installed.
Speed bar
The Verso is compatible with all common types of speed systems. We produce a range of
speedbars, please see www.gingliders.com for details.
Flight deck
The Verso may be fitted with a flight deck, allowing easier viewing of instruments and/or
carrying of ballast, please see www.gingliders.com for details.
Other Accessories
For up-to-date information on additional accessories, visit www.gingliders.com or contact your
local GIN dealer or the distributor in your country.

12
Before you fly
CAUTION: Make sure that the speed
system is not too short. The front
risers of your paraglider must not be
pulled down in normal (unaccelerated)
flight.
Make sure your dealer has checked the harness for completeness and basic settings. Your
harness must be assembled by a suitably qualified paragliding professional, for example, your
instructor.
Gin Gliders recommend that assembly be carried out in the following order. If you are in any
doubt whatsoever about this procedure, please seek professional advice from your instructor, GIN
dealer or importer.
Installing the speed system
Assemble the speed system from top to bottom. Pass the cord of the speed bar through the
pair of pulleys near the side pocket and route it out through the black tube near the front corners
at each side of the seat. Attach the elastic cord to the speed bar to keep the speed bar flush with
the end of the seat plate when not in use. This allows easy access to the speed bar and prevents
tangling in case of a rescue deployment.
1
4
3
2

13
Installing the speed system (continued)
Installing the optional quick release footstrap
7
6
5

14
To install the optional quick release footstrap, wrap the webbing of the footstrap around the
D-ring. Ensure that the 2 rings line up with each other and that the cord loop is pushed through the
rings. Route the long yellow plastic line through the neoprene tunnel, velcro strap at the end of
the seat, and the cord loop that is protruding through the footstrap rings. Finally, tuck the plastic
line into the neoprene cover of the footstrap.
If the plastic line is too long, trim it to fit your leg.
12
3
4
5

15
Adjusting the optional footstrap
There are 4 red adjustment strips embroidered onto the footstrap. To ensure that the footstrap
is adjusted symmetrically, position the appropriate red strip over the bar of the plastic buckle, and
then on the opposite side of the harness, adjust the length of the footstap to the same red strip.

16
Left side
-20 -15 -10 -5 (cm)
Right side
-5 -10 -15 -20 (cm)

17
WARNING: If you are in any doubt about
any aspect of rescue installation, seek
professional advice.
IMPORTANT: You must perform a test
deployment from a simulator to verify
the installation.
Rescue Installation and compatibility check
Gin Gliders recommend that rescue installation is performed properly by a competent person.
The Verso is compatible with GIN One G or Yeti rescue parachutes. Other manufacturers’ rescues
may also be used but we cannot guarantee their efficacy—check your rescue manual for details.
Every first installation of a rescue system into the harness (that means every new combination
of harness and rescue system) must be checked by a qualified paragliding professional for
compatibility. To verify the installation, you must perform a test deployment by sitting in a
simulator.
Rescue parachutes should be repacked at least every 150 days; so installing your rescue in a
new harness may also provide a good opportunity for a repack. After every repack of the rescue
parachute you should also do a compatibility check. Make sure that the rescue parachute can be
released from the rescue container in the harness—it must be done by you, the pilot, sitting in the
harness hanging from a simulator.

18
Connecting the rescue bridles to the harness webbing
When you attach the rescue bridles to the harness webbing, a Maillon Rapid type 7mm
Stainless Steel carre (square) is recommended. But in any case, the connector should be rated at
least 9 times the maximum weight. Our recommended 7mm connector for example has a minimum
breaking load of 3125kg and an EN certificate of conformity.
Use rubber bands, tape or plastic heat shrink tube to hold the maillon in place. Avoid webbing
to webbing connections, as there is a danger of getting the knot the wrong way round. This
significantly weakens the connection and also makes it difficult to disconnect the rescue parachute
if you land in trees.

19
Attaching the rescue deployment bag to the harness deployment handle
The rescue container of the Verso comes with its own deployment handle. This handle and its
strap must be connected to the deployment bag of the parachute. In particular, check the length of
the strap connecting the rescue deployment handle to the rescue inner container. It should be long
enough that the reserve can be extracted without the danger of the pins not being pulled before
the strap tightens on the reserve, but not so long that there is excessive slack that extends the
movement required for deployment.
The deployment bag of other manufacturers’ rescue systems (i.e. non-GIN rescue systems)
may have different loop positions which may cause a deployment failure. Be sure to contact
your parachute dealer or a qualified professional to check the connection, position and secure
deployment, and refer to the rescue manual for details.
Adjustment of rescue container volume
The Verso has a Velcro system to adjust the volume of container according to the size and
shape of your rescue. This is to ensure that your rescue is held firmly in place in the rescue
container.
To adjust the rescue container volume for a smaller rescue, first detach the edge of the flap
inside the container and fasten it using the Velcro (see photo). This decreases the height of the
container. Then, check that the rescue fits the remaining space. The rescue should fit comfortably
in the container. The rescue should be held so that it can’t move around, but not too tightly that
extraction becomes difficult. If necessary, place a piece of foam behind the rescue to reduce the
depth of the container.

20
NOTE: If using the optional footbar, the
dedicated rescue handle with longer
plastic wire has to be used. Connect the
long plastic wire to the quick-release
footbar mechanism as detailed in the
instructions on page 13.
Installing the rescue in the harness rescue compartment
Using the line, pull the elastic loops through the ring of each rescue container flap. Close the
rescue container flaps in the order shown in the photos below. Secure the rescue container flaps
by placing the release pins through the elastic loops as shown. Insert each side of the rescue
handle in neoprene and secure with the attached Velcro.
1
34
2
Table of contents
Other Gin Accessories manuals