Ginnys L-RS1500-18 User manual

www.ginnys.com
18 Qt. Roaster Oven
with Buffet Server
Model# L-RS1500-18
INSTRUCTION MANUAL
Before operating your new appliance, please read all instructions carefully and keep for future reference.
IMPORTANT SAFEGUARDS ..
When using electrical appliances, basic safety precautions should always be
followed, including the following:
1. Read all instructions before operating.
2. Do not touch hot surfaces. Use handles or knobs if applicable.
3. Remove all packaging plastics and other materials from unit before operating.
4. Wash all removable accessories before using for the first time.
5. To protect against electrical shock, do not immerse cord, plug or appliance itself
in water or other liquids.
6. Close supervision is necessary when appliance is used by or near children.
7. Unplug from outlet when not in use and before cleaning. Allow to cool before
putting on or taking off parts.
8. Do not operate any appliance with a damaged cord or plug or after the appliance
malfunctions or has been damaged in any manner. Contact Ginny’s Customer
Returns for details.
9. The use of accessory attachments not recommended by the appliance
manufacturer may cause injuries.
10. Do not use outdoors.
11. Do not let cord hang over edge of table or counter or touch hot surfaces.
12. Do not place on or near a hot gas or electric burner, or in a heated oven.
13. Always attach plug to appliance first, then plug cord into wall outlet. To
disconnect, turn all controls to OFF position, then remove plug from wall outlet.
14. Oversized foods or metal utensils must not be inserted in the appliance as they
may cause a fire or risk of electrical shock.
15. A fire may occur if the appliance is covered or touching flammable material
including curtains, draperies, walls and the like when in operation.
16. Do not clean with metal scouring pads. Pieces can break off the pad and touch
electrical parts, involving a risk of electrical shock.
17. Extreme caution should be exercised when using containers constructed of other
material other than metal or glass.
18. Do not store any materials other than manufacturer's recommended accessories
in this unit when not in use.
19. Do not place any of the following materials in the unit: Paper, cardboard, plastic
and the like.
SAVE THESE INSTRUCTIONS
THIS PRODUCT IS FOR HOUSEHOLD USE ONLY!

www.ginnys.com
A
B
C
D
E
F
G
Description of Parts ..
PARTS & FEATURES
A) High Dome Lid with Vent: Removable lid with built-in ventilation steam
vents. CAUTION: Take care when removing lid during cooking cycle.
Escaping hot steam may cause burns. Always tilt the lid open away from
you to divert the steam and avoid the steam ventilation holes.
B) Enamel coated containers: each holds 1qt
C) Buffet Server Rack: Placed over the Cooking Pan, this will hold the 3-PC
individual Server containers.
D) Removable Main Cooking Pan: Porcelain coated cooking pan with an
18Qt. capacity. Removable for easy cleaning.
E) Roaster Oven Main Body: The body is surrounded by a wrap-around
heating coil to provide an ALL OVER heat distribution.
F) Temperature Control Knob: The temperature control knob also acts as the
On/Off switch for the roaster oven. The temperature always maintains the
desired temperature setting of up to 450°F.
G) Removable Roasting Rack: This chrome-plated rack helps make
placement and removal of food quick and easy. Also allows for grease to
drain from food during the cooking process.
BEFORE USING YOUR ROASTER OVEN..
1. Remove all packaging materials such as cardboard and Styrofoam
2. Wash all the removable parts in hot, soapy water. Rinse thoroughly and dry.
3. The exterior of the oven can be cleaned with a soft damp cloth and warm
soapy water. Dry thoroughly. Do not use abrasive materials or cleaners.
DO NOT IMMERSE THE ROASTER OVEN BODY in water!
Note: Due to the manufacturing process, some smoke and odor may be noticed
during the first use. This should disappear after the first heating of the Roaster Oven.
****IMPORTANT POINTS WHEN USING YOUR ROASTER OVEN****
Always use the Main Cooking Pan inside the Roaster Oven when cooking.
Warning: Never put food or liquids directly into the Roaster Oven Main Body.
Avoid the steam vents during the cooking process or when removing or lifting the
lid from the body of the roaster oven.
Always take care to lift the lid at an angle away from you so any hot steam is
directed in the other direction.
Avoid frequent removal of the lid to check on the cooking process or to stir the
food. Significant amount of heat is released whenever the lid is lifted, therefore
the cooking time may need to be extended.

www.ginnys.com
USING YOUR ROASTER OVEN ..
Place the roaster oven on a heat-resistant surface.
1. Make sure the roaster oven is plugged.
2. Make sure the Temperature Control Switch is set to the OFF position.
3. Place the Main Cooking Pan into the Roaster Oven.
4. Plug power cord into working outlet.
5. Preheat the Roaster Oven for 15-20 minutes by turning the Temperature
Control to the desired temperature.
6. Place the Roasting Rack into the bottom of the cooking pan. Put food onto
the rack. Cover Roaster Oven with lid.
Note: Some foods or recipes do not require the use of the roasting rack.
7. When the cooking cycle is complete. Turn the Temperature Control to the
OFF position and unplug the Roaster Oven from the outlet.
8. Remove the lid carefully using oven mitts.
9. Remove the Roasting Rack with the food.
10. Remove food from rack and complete any other preparations to the food and
serve.
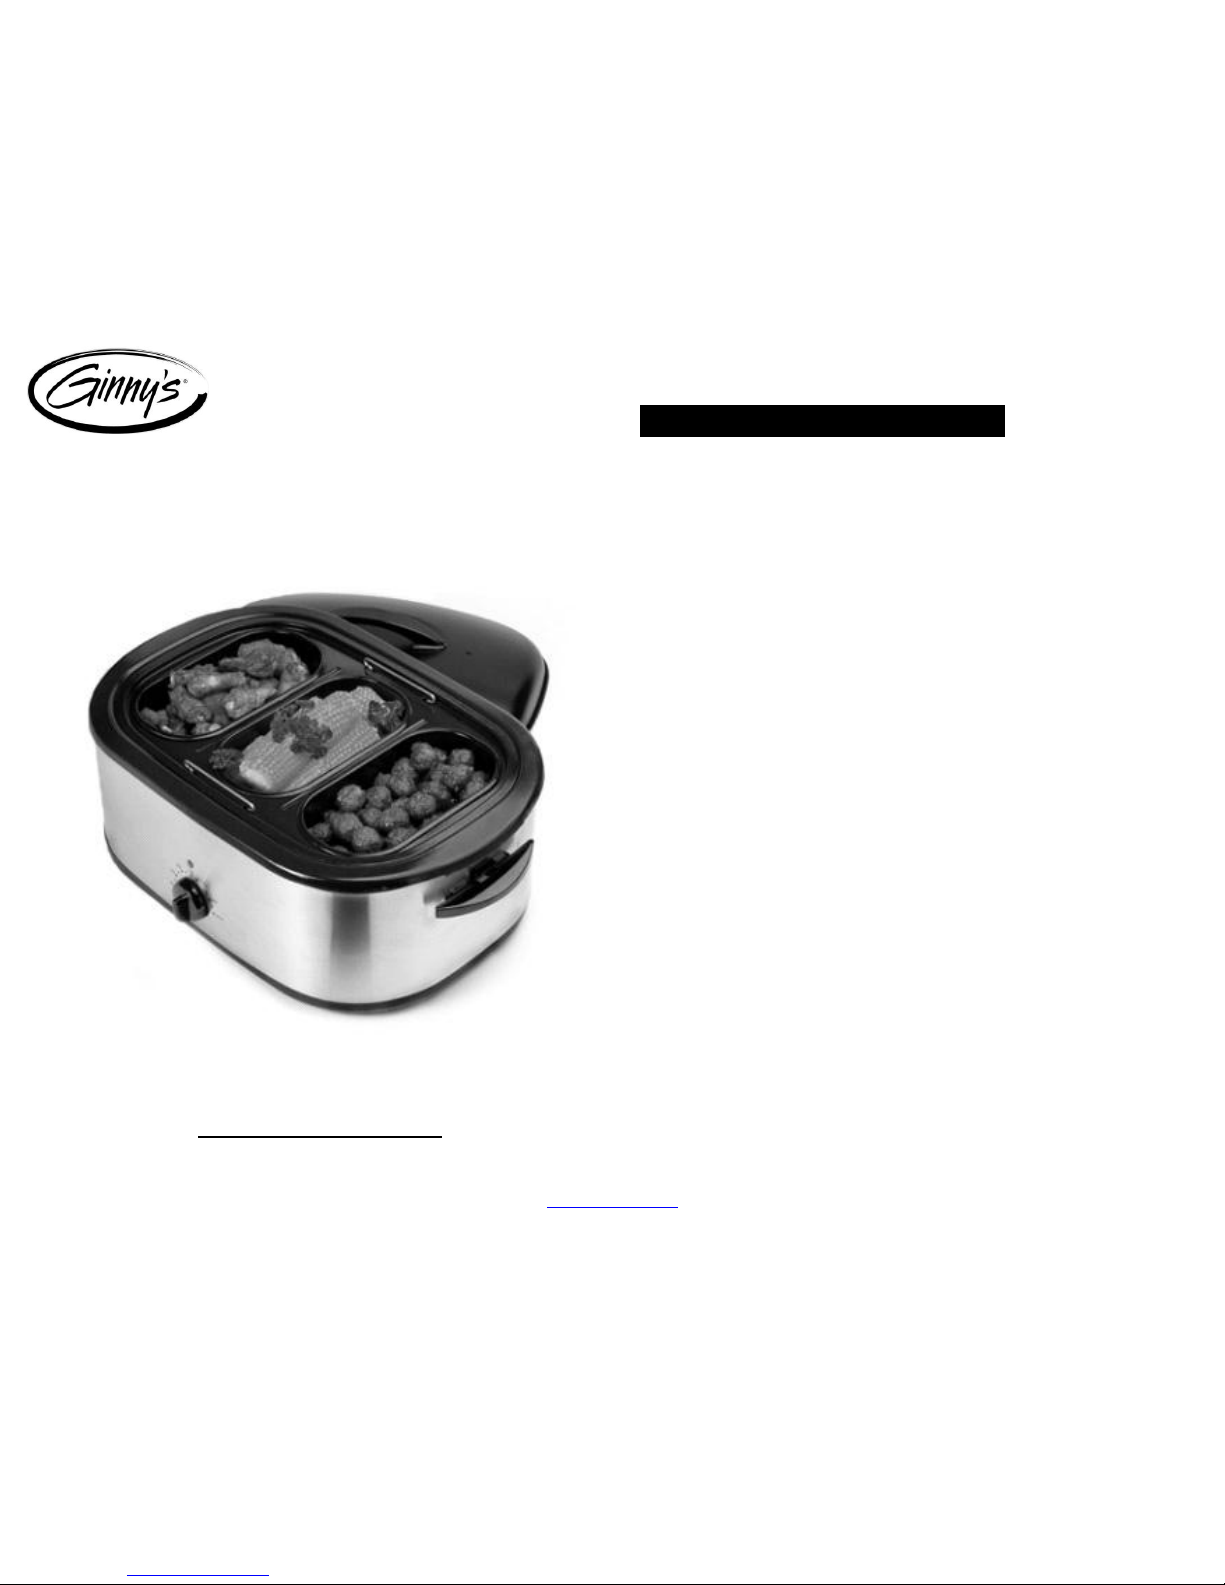
USING THE BUFFET SERVER:
1. Wash all the parts to the Buffet Server with warm soapy water. Dry
thoroughly.
2. Place the Main Cooking Pan into the oven body. Fill with enough water to fill
up approximately half way.
WARNING: Never add water to the Roaster Oven body directly.
3. Place the Buffet Server Frame onto the Cooking Pan. Make sure the frame
is secure and balanced.
4. Insert the three serving dishes into the frame. Make sure they are also
secure and balanced.
5. Place lid on and plug the roaster oven into a working outlet. Preheat at
350°F for 30 minutes or until the water inside is very hot.
6. Remove lid carefully and add hot, pre-cooked food into the individual serving
dishes.
7. Place cover back on and set the temperature to 250°F to keep the food
warm. If necessary, the temperature can be adjusted.
8. Stir the food occasionally and keep food covered to maintain the
temperature.
9. Check periodically and carefully add more hot water if necessary.
****IMPORTANT POINTS WHEN USING THE BUFFET SERVER****
Note: When keeping food warm, temperatures should always be maintained above
150°F or above.
Make sure that all three serving trays are in place when using the Buffet
Server.
Use the Buffet Server only to keep food warm.
Do not use the Serving Dishes, and the Buffet Server Frame on the stove
top, in an oven, broiler or in a microwave oven.
It is recommended to spray the inside of the Serving Dishes with a non-stick
cooking spray or wipe the inside with a dab of oil if you will be serving foods that
have the tendency to stick.
.. COOKING GUIDE ..
It is recommended to use a Meat Thermometer to determine the internal temperature
when cooking meat or poultry.
INTERNAL FOOD TEMPERATURE GUIDE
MEAT
RARE
MEDIUM
WELL DONE
Beef
145°F
160°F
170°F
Pork
Not Recommended
160°F
170°F
Lamb
145°F
160°F
170°F
Smoking Ham
- Cook before eating
- Fully Cooked
Not Recommended
160°F
140°F
Poultry
- Roasting Chicken
- Turkey
Not Recommended
180°F
180°F
ROASTING GUIDE:
The cooking chart below is approximate and should be used as a guideline only.
MEAT
WEIGHT (lbs.)
TEMPERATURE
MINUTES per lbs.
Beef Roasts
- Standing Rib
- Sirloin Tip
- Tenderloin
- Pot Roast
- Corned Beef
4 –6
3 –5
3½ - 4
4 –6
3 –5
325°F
350°F
450°F
300°F
300°F
20 - 25
20 - 25
8 - 12
30 - 40
15 - 20
Lamb
- Leg
- Shoulder
(boneless)
5 –8
3 –4
350°F
350°F
25
25
Pork
- Loin Roast
- Rolled Shoulder
- Chops
- Ribs
3 –5
4 –6
4 –5
8 –10
350°F
350°F
325°F
450°F to brown…
…decrease to 250°F
25 –30
35 –40
15 –20
15 –20
Smoked Ham
- Bone-in
(Shankless)
- Boneless
- Fully Cooked
10 –15
8 –12
5 –10
325°F
325°F
325°F
20 –25
15 –20
13-28
Veal
- Loin
- Shoulder
4 –6
3 –5
325°F
325°F
30 –35
30 –25
Continued on
next page

www.ginnys.com
Poultry
- Chicken (whole)
- Chicken (whole)
- Chicken (pieces)
- Turkey (prebasted)
- Turkey, fresh
3½ - 5
6 –8
6 –8
10 –14
14 –22
10 –14
350°F
350°F
350°F
375°F
375°F
350°F
15 –17
18 –20
8 –10
12 –17
13 –18
15 –20
SLOW COOKING:
If you wish to use the Roaster Oven in a Slow Cooking mode, it is recommended to
use with less tender cuts of meat. The heat is more gradual with slow cooking. It
isn’t necessary to stir during the slow cooking cycle. Avoid removing the lid or this
may result in the loss of heat to cook. When using a standard recipe, slow cook 1½
hours for every 30 minutes. Slow cook using the 250°F setting.
BAKING:
When baking inside the roaster oven, always use the Roasting Rack at the
bottom of the roaster oven. Always place any baking pans on top of the rack.
Never place directly on the bottom of the roaster oven.
It is recommended to use metal pans in the roaster oven for they provide
better heat transfer and browning.
It is recommended to preheat the roaster oven before baking.
FOOD
TEMPERATURE
BAKING TIME (minutes)
Muffins
425°F
15 –20
Bread (yeast)
400°F
40 –45
Bread Rolls
400°F
18 –20
Cookies
350°F
11 –13
Cupcakes
350°F
25 –30
Sheet Cake
350°F
40 –45
Bundt Cake
350°F
50 –60
Pound Cake
350°F
50 –60
Brownies
350°F
25 –30
Cheesecake
325°F
50 –60
Fruit Pie
425°F
45 –50
Custard Pie
350°F
50 –60
Pastry Shell
425°F
10 - 13
Pizza (9-inch)
425°F
20 –25
Potatoes
350°F –400°F
50 –60
Sweet Potatoes / Yams
350°F –400°F
55 –65
Scalloped Potatoes
350°F
75 –90
Apples
350°F
35 –45
.. CLEANING INSTRUCTIONS \
CLEANING YOUR ROASTER OVEN:
*WARNING: NEVER IMMERSE YOUR ROASTER OVEN MAIN BODY IN WATER
OR OTHER LIQUIDS.
1. Turn the Temperature Control setting to the OFF position.
2. Unplug the Roaster Oven from the wall outlet.
3. Always allow the Roaster Oven to cool down completely before handling.
4. The Cooking Pan, the Lid,chrome rack,small containers and the Roasting
Rack are dishwasher safe
5. Wipe the inside and outside of the Roaster Oven body with a damp cloth.
CLEANING YOUR BUFFET SERVER:
*WARNING: THE BUFFET SERVER IS HOT. ALWAYS LET IT COOL DOWN
COMPLETELY BEFORE HANDLING.
1. Always allow the buffet server to completely cool before cleaning.
2. The Enamel coated containers and the Buffet Server Rack are dishwasher
safe. Rinse and dry thoroughly.
…POLARIZED PLUG …
If this appliance has a polarized plug (meaning one blade is wider than the other
one), please follow the below instructions:
To reduce the risk of electric shock, this plug is intended to fit into a polarized outlet
only in one direction. If the plug does not fit fully into the outlet, reverse the plug. If it
still does not fit, contact a qualified electrician. Do not attempt to modify the plug in
any way.
This appliance is intended for Household Use Only.

www.ginnys.com
1 YEAR LIMITED WARRANTY
Ginny’s warrants this product free from defects in material and workmanship for one
year from provable date of purchase.
Within this warranty period, Ginny’s will repair or replace, at its option, defective parts
at no charge, provided the product is returned, freight prepaid with proof of purchase
to Ginny’s. Allow 2-4 weeks for return shipping.
This warranty does not cover improper installation, misuse, abuse or neglect on part
of the owner. Warranty is also invalid in any case that the product is taken apart or
serviced by an unauthorized service station.
This warranty gives you specific legal rights and they may vary from state to state.
THE FOREGOING WARRANTIES ARE IN LIEU OF ALL OTHER WARRANTIES
AND CONDITIONS, EXPRESS OR IMPLIED, INCLUDING BUT NOT LIMITED TO
THOSE OF MERCHANTIBILITY OR FITNESS FOR A PARTICULAR PURPOSE.
GINNY’S Customer Returns
Phone: 800-991-4442
8:00 am to Midnight, Monday through Friday
www.ginnys.com
Table of contents
Other Ginnys Oven manuals
Popular Oven manuals by other brands

Frigidaire
Frigidaire FCWD3027AS Getting started

Hotpoint Ariston
Hotpoint Ariston NRO 642 D Z operating instructions

Zanussi
Zanussi ZOHID3X1 user manual

Dacor
Dacor EO Series Planning guide

Electrolux
Electrolux E30EW85ESS - Icon Designer Series Electric Double... Specifications

Forno Bravo
Forno Bravo Pompeii Oven instructions