Gladiator GACP15XXMG User manual

GARAGE
COMPACTOR
Use & Care Guide
COMPACTADOR
DEGARAJE
Guía de uso y cuidado
COMPACTEUR
DEGARAGE
Guide d’utilisation et d’entretien
In U.S.A. call: 1-866-342-4089
En los EE.UU., llame al: 1-866-342-4089
Aux États-Unis, composer le: 1866342-4089
W11613633A In Canada call: 1-800-807-6777
En Canadá, llame al: 1-800-807-6777
Au Canada, composer le: 1800807-6777
www.gladiatorgarageworks.com
TABLE OF CONTENTS/TABLA DE CONTENIDOS/TABLE DES MATIÈRES
Model / Modelo / Modèle :
GACP15XXMG
GARAGE COMPACTOR
INSTALLATION SAFETY.....................2
GARAGE COMPACTOR
INSTALLATION INSTRUCTIONS........2
Parts and Tools .................................2
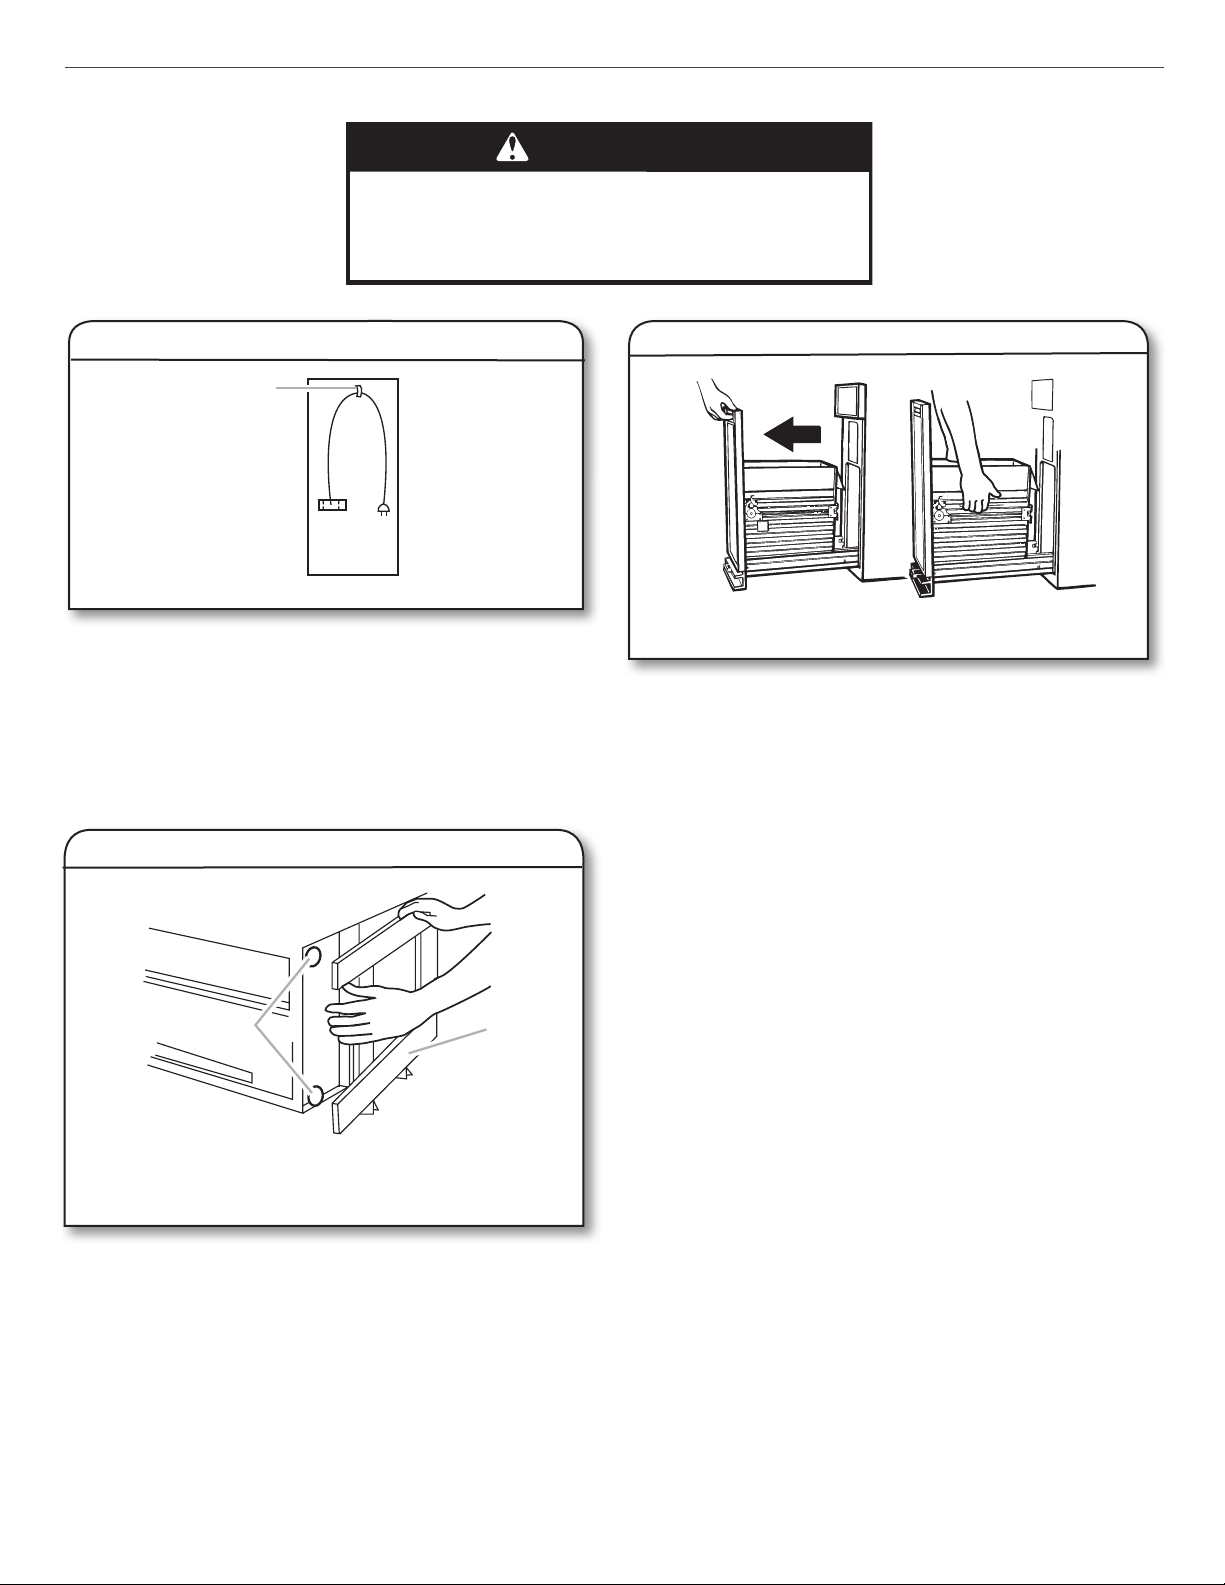
Unpacking ....................................... 3
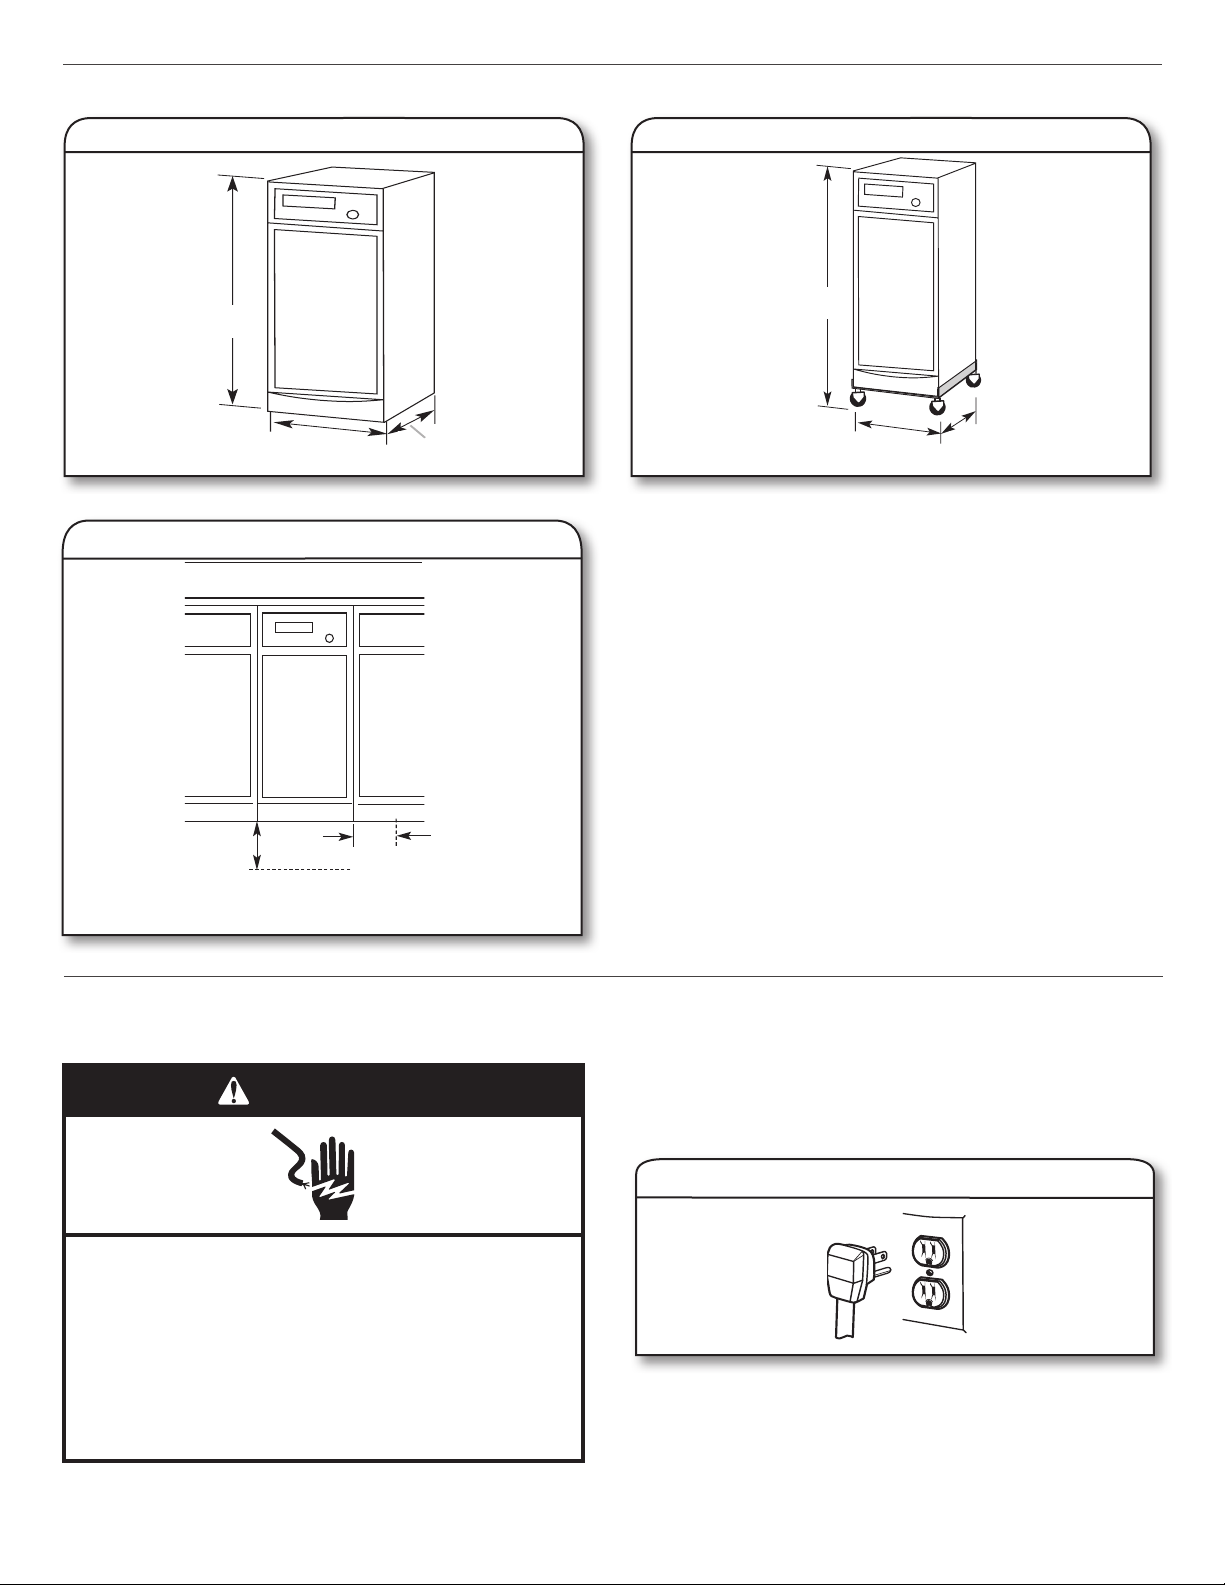
Location Requirements ................... 4
Electrical Requirements................... 4
Install the Casters (optional) .............5
Install the Compactor .......................5
COMPACTOR USE .............................6
How Your Compactor Works ............6
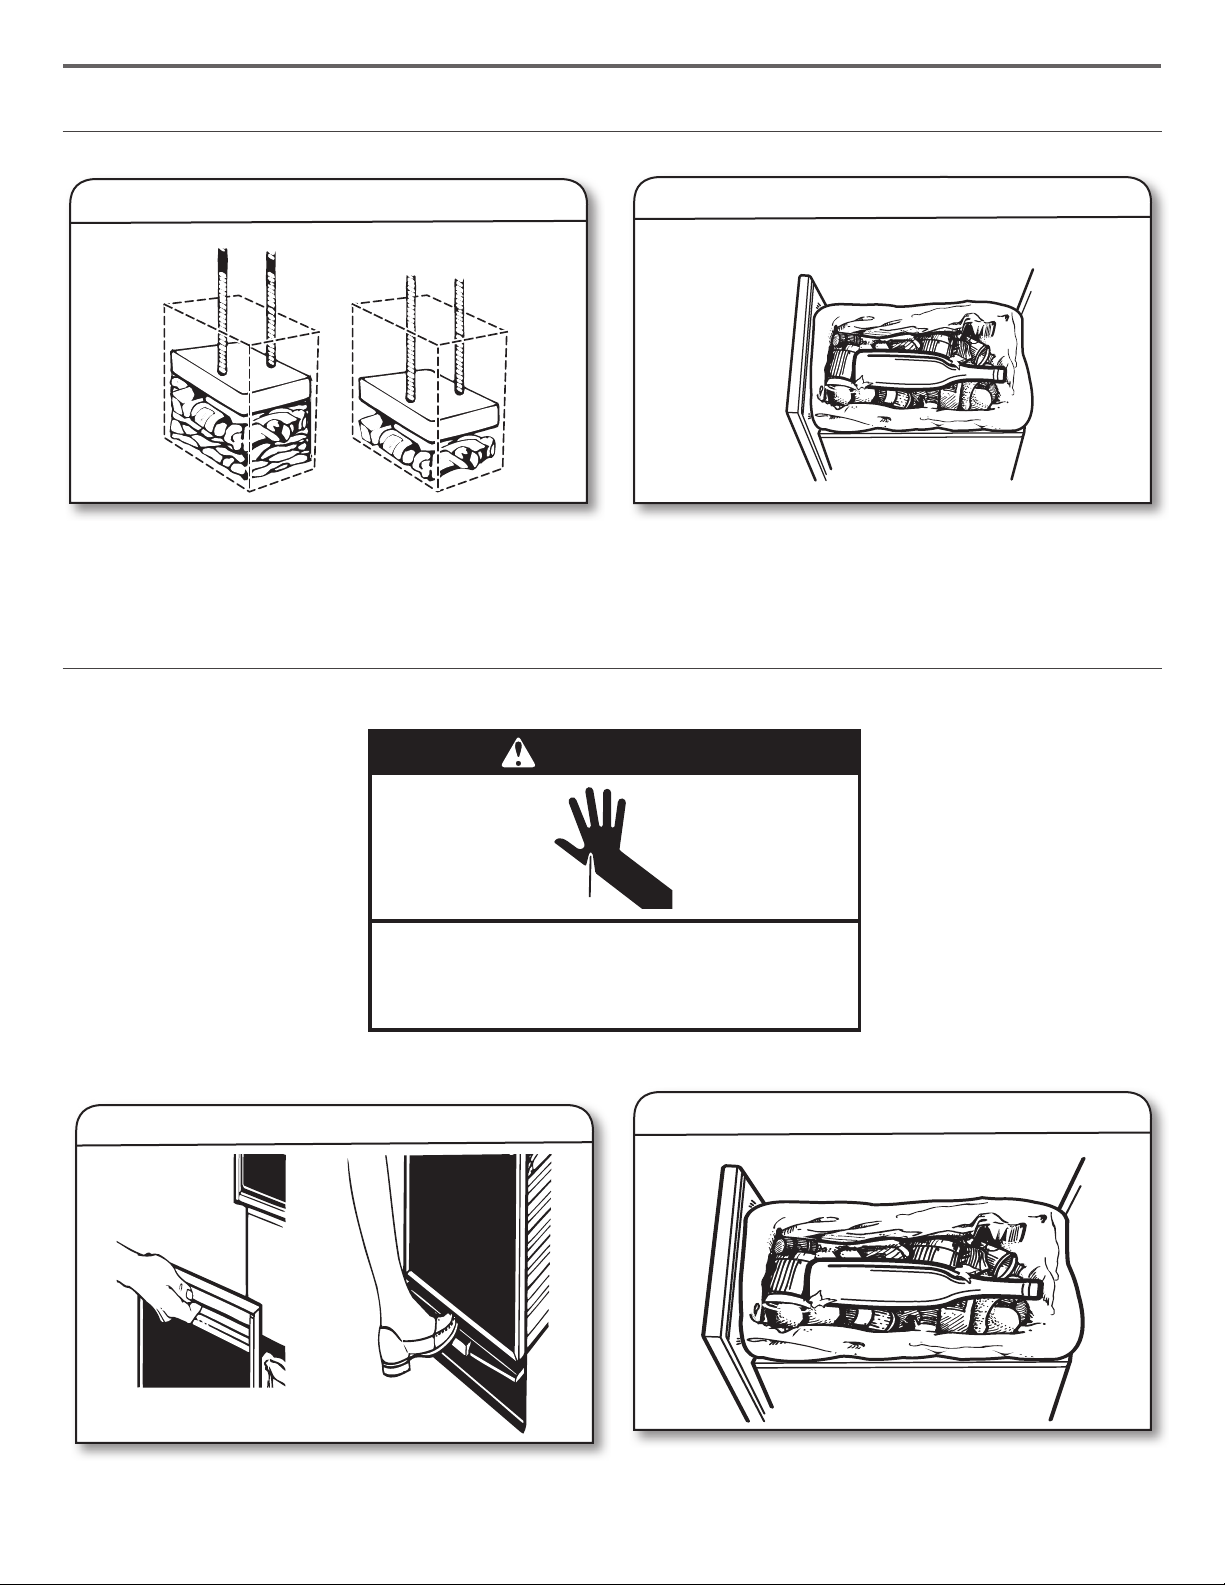
Loading ............................................6
Starting the Compactor ...................7
Removing a Filled Bag .....................7
Installing a New Bag ........................8
COMPACTOR CARE...........................9
Cleaning............................................9
TROUBLESHOOTING.......................11
WARRANTY.......................................11
COMPACTADOR DE GARAJE
SEGURIDAD DE INSTALACIÓN ...12
COMPACTADOR DE GARAJE
INSTRUCCIONES DE INSTALACIÓN ..12
Piezas y herramientas.....................12
Desempaque...................................13
Requisitos de ubicación .................14
Requisitos eléctricos.......................14
Instalación de las ruedas (opcional)...15
Instale en compactador..................15
USO DEL COMPACTADOR...........16
Cómo funciona su compactador....16
Cómo cargar ...................................16
Puesta en marcha del compactador.. 17
Eliminación de bolsas llenas...........17
Instalación de una bolsa nueva ......18
CUIDADO DEL COMPACTADOR .. 19
Limpieza..........................................19
SOLUCIÓN DE PROBLEMAS.......21
GARANTÍA .....................................21
SÉCURITÉ POUR L’INSTALLATION
DU COMPACTEUR DE GARAGE..22
INSTRUCTIONS POUR
L’INSTALLATION DU
COMPACTEUR DE GARAGE........22
Pièces et outils................................22
Déballage........................................23
Exigences d’emplacement .............24
Spécications électriques...............24
Installer les roulettes (optionnel) .....25
Installation du compacteur .............25
UTILISATION DU COMPACTEUR...26
Fonctionnement du compacteur ....26
Chargement ....................................26
Mise en marche du compacteur.....27
Retirer un sac plein.........................27
Installation d’un nouveau sac .........28
ENTRETIEN DU COMPACTEUR ..29
Nettoyage .......................................29
DÉPANNAGE .................................31
GARANTIE .....................................31

2
You can be killed or seriously injured if you don't immediately
You can be killed or seriously injured if you don't follow
All safety messages will tell you what the potential hazard is, tell you how to reduce the chance of injury, and tell you what can
happen if the instructions are not followed.
Your safety and the safety of others are very important.
We have provided many important safety messages in this manual and on your appliance. Always read and obey all safety
messages.
This is the safety alert symbol.
This symbol alerts you to potential hazards that can kill or hurt you and others.
All safety messages will follow the safety alert symbol and either the word “DANGER” or “WARNING.”
These words mean:
follow instructions.
instructions.
DANGER
WARNING
GARAGE COMPACTOR INSTALLATION SAFETY
IMPORTANT SAFETY INSTRUCTIONS
WARNING: When using an electrical appliance, basic precautions should always be followed, including the following:
SAVE THESE INSTRUCTIONS
■Read all instructions before using the compactor.
■Close supervision is necessary when used by or near
children. Do not allow to be used as a toy, or to run
unattended at any time. Lock Key Switch when not in use
and store key out of reach of children.
■Do not touch moving parts.
■Do not operate with a damaged cord set, plug, motor, or
after damage in any manner. Have the compactor examined,
repaired or adjusted by an authorized serviceperson.
■Use only for intended use as described in this manual.
Do not use other than manufacturer's recommended
attachments.
■Do not compact toxic or volatile ammable material such
as oily rags and insect sprays. Do not compact lighted
cigarettes, cigars, or other hot or burning items. Do not
overload the compactor.
■Do not take apart the compactor. Incorrect reassembly can
cause electric shock when subsequently used.
■Handle a loaded trash bag with care. Sharp objects can
pierce the bag and cause injury. Do not overload trash bag
with heavy material such as glass.
■This compactor is intended for household use only.
■Unplug the compactor before servicing
■Do not modify the plug attached to the compactor; use only
with a grounded receptacle.
■Do not use replacement parts that have not been
recommended by the manufacture (e.g. parts made at home
using a 3D printer).
GARAGE COMPACTOR INSTALLATION
INSTRUCTIONS
Parts Supplied
■Caster frame
■Fixed casters with wheel
brakes (2)
■Swivel casters (2)
■Locking nuts (16)
■Bolts (16)
Parts and Tools
■Level
■Pliers
■5/16" hex-head socket
wrench
■7/16" hex-head socket
wrench
■Tape measure
■Utility knife
■Flat-head screwdriver
Installer: Leave Use and Care Guide with the homeowner.
Homeowner: Keep Use and Care Guide for future reference and for local electrical inspector’s use, if required.
Gather the required tools and parts before starting installation.
Read and follow the instructions provided with the tools listed
here.
Tools Needed

3
A. Cord clip
A
1. Attach Power cord to the cord clip
Place the 2 corner posts from the carton on the oor near the
compactor. Open the compactor drawer and remove any shipping
materials or other items from the drawer.
NOTE: Do not remove the compactor bag.
Grasp the handle and raise the front of drawer until it clears
the drawer stops. Grasp sides of drawer and lift drawer out of
compactor. Place the drawer on the 2 corner posts.
2. Drawer placement
Place the other 2 corner posts on the oor to the side of the
compactor. Grasp the sides of the compactor cabinet and put
compactor on its side on top of the corner posts. Remove the
shipping base from the bottom of the compactor.
3. Remove the shipping base
A. Leveling legs
B. Shipping
base
B
A
IMPORTANT: Do not grasp console to move compactor. Begin in the room where the compactor will be located.
WARNING
Excessive Weight Hazard
Use two or more people to move and install appliance.
Failure to do so can result in back or other injury.
Unpacking
Remove compactor from shipping carton and all packaging
materials such as tape and shipping pads. Use a mild detergent
and warm water to remove waxy residue caused by shipping
material. Dry thoroughly with a soft cloth. For more information,
see “Cleaning”. Be sure the power cord is attached to the cord
clip on the rear of the compactor

4
Location Requirements
(86.7 cm)
34
¹⁄₈
"
24"
(61 cm)
15"
(38.1 cm)
38"
(96.5 cm)
24"
(61 cm)
15"
(38.1 cm)
Electrical Requirements
Please see the gure for the Product dimensions. Please see the gure for the Product dimensions with casters.
Please see the gure for the clearance dimensions.
1. Product Dimensions 2. Product Dimensions with Casters
WARNING
Electrical Shock Hazard
Plug into a grounded 3 prong outlet.
Do not remove ground prong.
Do not use an adapter.
Do not use an extension cord.
Failure to follow these instructions can result in death,
fire, or electrical shock.
3. Clearance Dimensions
BA
A. Leave 6" (15.2 cm) of clearance space to the right side of the
compactor in order to remove the compactor bags.
B. Leave 23" (58.4 cm) of clearance in front of the compactor in order
to fully open or remove the compactor drawer.
1. Grounding plug
This compactor must be grounded while in use to reduce
the risk of electric shock. The compactor is equipped with a
three-conductor cord and 3 prong grounding-type plug to t
the proper groundingtype receptacle. The green (or green and
yellow) conductor in the cord is the grounding wire.
NOTE: Do not connect the green (or green and yellow) wire to a
live terminal.
This compactor is for use on a single phase, 115 V, 60 Hz,
AC only 15 A or 20 A fused and properly grounded circuit
and is equipped with a grounding plug as shown below. It is
recommended that a separate circuit serving only this appliance
be provided.
Recommended Grounding Method

5
IMPORTANT: Do not grasp control panel to move compactor. Slide compactor onto cardboard or hardboard before moving compactor
across oor to prevent damaging oor covering. Do not allow the rear frame of the compactor to touch the oor covering when lifting or
moving compactor.
Locate included caster frame. Set it on the oor with the lip
facing down.
Install the Casters
(optional)
Assemble Caster Frame and Install the Compactor on the Caster Frame
1. Locate the caster frame
Install the (2) swivel casters to the back (closed end) of the frame
assembly with (4) bolts and nuts.
2. Install the swivel casters
Install the (2) xed casters to the front (open end) of the frame
assembly with (4) bolts and nuts.
3. Install the xed casters
A. Swivel casters
B. Fixed casters
C. Open end of frame assembly
D. Closed end of frame assembly
A
C
D
B
To keep the caster frame from moving during the initial
installation, block the wheels or place frame against a wall. Lock
the back casters in place by pushing the locks down. Tilt the
back of the compactor forward and push the compactor up onto
the caster frame assembly over the open end of the frame. Slide
the compactor all the way back until it touches the back lip of
the caster frame assembly.
4. Install Compactor On Caster Frame
Wall
Install the Compactor
IMPORTANT: Do not grasp control panel to move compactor.
Move the compactor to its nal position. Grasp sides of compactor drawer and place bottom of drawer into tracks. Lift at the handle so
drawer will go over drawer stops. Close the drawer. Check that drawer opens freely. If the toe plate rubs against oor, see “Adjusting the
Toe Plate” for further instructions. Plug into a grounded 3 prong outlet.
Adjusting the Toe Plate
If the toe plate rubs the oor covering, the toe plate clearance may be changed as follows:
Mark on each side of the toe plate the amount of toe plate that rubs the oor covering. Remove the drawer from the unit. See Step 3 in
the “Unpacking” section. Use a ruler and a pencil or chalk to draw a line between the marks on each side of toe plate. Use scissors or
utility knife to cut toe plate along line. Replace drawer. If toe plate still rubs oor covering, repeat steps 1 through 4.
A. Caster frame
B. Closed end of caster frame (with lip)
C. Open end of caster frame (without lip)
A
B
C

6
COMPACTOR USE
How Your Compactor Works
The compacting ram is the part of the compactor which
compresses the trash. The compacting ram does not go to the
bottom of the drawer. You will not see compacting of trash the
rst few times you load the compactor.
NOTE: The compactor drawer should be more than 1/2 full
before the compactor can begin to compress the load.
You may hear a noise when glass breaks. Strong glass bottles
may not break at all. The trash in a full compactor bag will be
about 1/4 the size of its original bulk.
1. Compacting ram compresses the trash
Load bulky trash, bottles, and cans in the center of the drawer.
Bottles or cans not placed in the center may become caught
between the ram and the drawer. The Drawer Monitor Switch
then senses a “misload” and causes the ram to return to the
“up” position without compacting.
2. Loading of bulky trash, bottles, and cans
Loading
IMPORTANT: Do not push items down into compactor with hands or feet.
NOTE: You will not see compacting of trash the rst few times you load the compactor. The compactor drawer should be about 1/2 full
before the compactor can begin to compress the load.
Open the drawer. Lift and pull the handle or press the toe bar to
open the drawer.
NOTE: Pressing the toe bar opens the container only 3" to 6"
(7.6 cm to 15.2 cm), depending on the load.
1. Open the drawer
Wrap or cover wet or messy trash. Do not compact items that
may develop offensive odors such as raw meat, sh, grapefruit
rinds, disposable diapers, or personal hygiene items. Load
bottles or cans on their sides in the center of the drawer. Do not
load bottles in an upright position and Close the drawer.
2. Place trash in compactor
WARNING
Cut Hazard
Do not push items down into compactor with
hands or feet.
Doing so can result in cuts.

7
Starting the Compactor
To start the compactor, turn the Key-Knob to START and then
let go. The compactor will automatically stop at the end of the
cycle. To stop the compactor during a cycle, Turn the Key-Knob
to LOCK/OFF. Then turn the Key-Knob to ON so the compacting
ram will rise. When the ram stops rising, you can open the
drawer.
Turn the Key-Knob to the LOCK/OFF position. Remove the
Key-Knob and store it out of children’s reach.
2. To Remove the Key-Knob
Removing a Filled Bag
When the trash is compacted to the top of the drawer, remove the bag. If the bag is too heavy, compact less trash before emptying it in
the future.
IMPORTANT: Do not push items down into compactor with hands or feet.
Pull the drawer completely open. Remove top of bag from bag
retainer buttons. Pull up all 4 bag cuffs and Close bag with twist
tie provided.
1. Pull up bag cuffs
Push Side-Lock Latch down and tilt drawer side open.
2. Side-Lock Latch
1. To Start and Stop the Compactor
WARNING
Excessive Weight Hazard
Two people may be required to remove and transport
compacted bag.
Unlock latch to assist in the removal of the bag.
Failure to do so can result in back or other injury.
WARNING
Cut Hazard
Do not push items down into compactor with hands or
feet.
Doing so can result in cuts.

8
Installing a New Bag
Do not use any kind of bag other than those designed especially for use in your compactor. Order replacement compactor bags through
your local dealer or by calling the toll-free number on the cover or in the “Assistance or Service” section.
IMPORTANT: Before installing a new bag, be sure:
■The drawer side is securely locked.
■The container is clean and free of debris.
Place folded bag into the drawer. Open bag and pull top
edges over the drawer top. Lock bag in place by pulling the
4 prepunched holes over the bag retainer buttons. Holes will
expand over the buttons without damaging the bag.
1. Place folded bag
Press inside of bag against the drawer bottom, sides and
corners for a smooth t.
2. Lock bag
3. Lift out bag

9
COMPACTOR CARE
Your new compactor is designed to give you many years of dependable service. However, there are a few things you are expected to
do in order to properly maintain your compactor. This section will tell you how to clean and care for your compactor.
Cleaning
Before cleaning the compactor, turn the Key-Knob (or Key-Switch) to the OFF & LOCK position and remove it.
NOTE: Any services other than those outlined in this section should be performed by a designated service representative.
Cleaning Exterior Surfaces
Wash exterior surfaces (including stainless steel) with a clean sponge or soft cloth and a mild detergent in warm water. Do not use
abrasive or harsh cleaners. Rinse and dry thoroughly with a soft cloth.
Wipe up spills right away. Some foods can damage the nish if left on the compactor surface.
Cleaning Inside the Drawer
NOTE: You may want to wear gloves since there may be bits of glass in the drawer.
Remove the bag. See “Removing a Filled Bag.”
Press down on the lever-action lock (or Side-Lock latch). Hold
the lever-action lock down and tilt the side of the drawer out
until the lock clears the drawer front.
1. Side-Lock latch
NOTE: If desired, the drawer side can be removed by tilting it
up, then lifting it out.
Wash the interior of the drawer with a clean sponge or soft cloth
and a mild detergent in warm water. Rinse and dry thoroughly
with a soft cloth. If the drawer side was removed, slide it back
into the tilted position. Press the lever-action lock (or Side-
Lock Latch) down while pushing the drawer side to the upright
position. Latch the drawer side by pushing up the lever-action
lock (or Side-Lock Latch).
2. Drawer side can be removed
WARNING
Cut Hazard
Wear gloves when cleaning inside the drawer or cabinet,
or the ram.
Failure to do so can result in cuts.

10
Vacuum the inside of the cabinet. Liquid spills or wet trash
should be cleaned up by hand, or by using a vacuum cleaner
designed to pick up liquids. Wash the inside of the cabinet
with a clean sponge or soft cloth and a mild detergent in warm
water. Rinse and dry thoroughly with a soft cloth. To replace
the drawer, grasp it by the sides and insert the rollers onto the
tracks. Lift the front of the drawer and push it in fully past the
stops.
2. Clean inside of the cabinet
Cleaning the Ram
Wipe glass particles off of the ram cover with a cloth or paper
towels. Remove foods with a clean sponge or soft cloth and a
mild detergent in warm water. Rinse and dry thoroughly with a
soft cloth.
NOTE: You may want to wear gloves since there may be bits of
glass present.
1. Wipe glass particles
Pull the drawer out until it stops.
NOTE: Look to see how the drawer rollers move in the tracks.
It will be easier to replace the drawer after you have nished
cleaning.
Lift the front of the drawer to clear the stops. Grasp the drawer
on the sides and pull it out the rest of the way. Set the drawer
down gently.
Cleaning Before a Vacation
If you will be away for more than a couple of days, remove the
compactor bag. Remove the Key-Knob (or Key-Switch) and
store it out of children’s reach.
Cleaning Inside the Cabinet
1. Pull the drawer out
NOTE: You may want to wear gloves since there may be bits of glass in the cabinet

11
WARRANTY
For warranty information:
In the U.S.A. call 1-866-342-4089 or visit our website at
www.GladiatorGW.com
In Canada call 1-800-807-6777 or visit our website at
www.gladiatorgarageworks.ca
There are many benets for registering the product. Find out more and register the product online at www.gladiatorgarageworks.com.
TROUBLESHOOTING
Try the solutions suggested here rst in order to avoid the cost of an unnecessary service call.
Trash is not compacting
■Is the drawer less than half-full? Drawer must be more
than half full before trash is compacted.
Your compactor won’t operate
■Is the power supply cord unplugged? Plug into a
grounded 3 prong outlet.
■Has a household fuse blown, or has a circuit breaker
tripped? Replace the fuse or reset the circuit breaker. If the
problem continues, call an electrician.
■Is the drawer completely closed? Close the drawer rmly
and start the compactor again.
■Is the Key-Knob turned all the way to START? Turn the
Key Knob (Key-Switch) fully to START and release (on some
models). See “Starting the Compactor”.
■Did you press ON before pressing START? Press ON
before pressing START (on some models). See “Starting the
Compactor.”
The drawer won’t open
■Is the ram all the way up? Drawer will open only when ram
is fully raised.
To raise the ram on models with a Key-Knob (or
Key-Switch): Turn the Key-Knob (Key-Switch) to START
and release. See “Starting the Compactor.”
To raise the ram on models with push button controls:
Press OFF, and then press ON. See “Starting the
Compactor.”
■Is the Solid Cycle engaged? Drawer remains LOCKED
until you reset by lifting the foot pedal up.
There is not enough compaction or force
■Do you use the compacting cycle frequently enough?
Compacting works best when only a few items are loaded.
Bottles don’t break
■How often do you notice this? Bottles will not break every
time. The thickness of the bottle’s glass and the content of
the trash load below it may keep the bottle from breaking.
Electrical Shock Hazard
Plug into a grounded 3 prong outlet.
Do not remove ground prong.
Do not use an adapter.
Do not use an extension cord.
Failure to follow these instructions can result in death,
fire, or electrical shock.
WARNING

1212
COMPACTADOR DE GARAJE SEGURIDAD DE INSTALACIÓN
INSTRUCCIONES DE SEGURIDAD IMPORTANTES
ADVERTENCIA: Al utilizar aparatos eléctricos, se deben seguir las precauciones básicas de seguridad, entre las que se incluyen las siguientes:
GUARDE ESTAS INSTRUCCIONES
■Lea todas las instrucciones antes de usar el compactador.
■Se debe supervisar atentamente cuando sea utilizado
por niños o cerca de ellos. No permita que lo usen como
juguete, o que funcione sin la supervisión de adultos en
ningún momento. Cierre el interruptor de llave cuando no
esté en uso y guarde la llave lejos del alcance de niños.
■No toque las partes movibles.
■No haga funcionar el aparato con piezas dañadas como el
cable, enchufe, motor o después de ocurrido un accidente
o cualquier daño conocido. Haga revisar el compactador y
que se realicen las reparaciones o ajustes necesarios por
parte de un técnico autorizado.
■Utilice solo para su uso indicado, según este manual. No use
complementos que no sean recomendados por el fabricante.
■No compacte materiales tóxicos o inamables como paños
con combustible e insecticidas en difusor. No compacte
cigarrillos o cigarros encendidos u otros elementos
encendidos o calientes. No sobrecargue el compactador.
■No sobrecargue el compactador. El armado incorrecto
puede causar choques eléctricos cuando se use
posteriormente.
■Manipule las bolsas cargadas de basura con cuidado. Los
objetos losos pueden romper la bolsa y causar lesiones.
No sobrecargue la bolsa de basura con materiales pesados
como vidrio.
■Este compactador ha sido diseñado únicamente para uso
doméstico.
■Desconecte el compactador antes de repararlo
■No modique el enchufe que viene con el compactador;
úselo únicamente con un tomacorriente conectado a tierra.
■No use piezas de repuesto que no hayan sido
recomendadas por el fabricante (por ejemplo piezas hechas
en casa con una impresora 3D).
COMPACTADOR DE GARAJE
INSTRUCCIONES DE INSTALACIÓN
Piezas suministradas
■Bastidor con ruedas
■Ruedas jas con frenos (2)
■Ruedas giratorias (2)
■Tuercas de seguridad (16)
■Pernos (16)
Piezas y herramientas
■Nivel
■Pinzas
■Llave de cubo de cabeza
hexagonal de 5/16"
■Llave de cubo de cabeza
hexagonal de 7/16"
■Cinta métrica
■Cuchillo multiusos
■Destornillados de cabeza
plana
Instalador: Deje la Guía de uso y cuidado con el propietario de la casa.
Propietario: Conserve este manual de uso y cuidado para referencia futura y para uso del inspector eléctrico de su localidad, si fuera necesario.
Reúna las herramientas y las piezas necesarias antes de
comenzar la instalación.
Lea y siga las instrucciones provistas con las herramientas
enumeradas aquí.
Herramientas necesarias
Si no sigue las instrucciones de inmediato, usted puede
morir o sufrir una lesión grave.
Si no sigue las instrucciones, usted puede morir o sufrir
una lesión grave.
Todos los mensajes de seguridad le dirán el peligro potencial, le dirán cómo reducir las posibilidades de sufrir una lesión y lo que
puede suceder si no se siguen las instrucciones.
Su seguridad y la seguridad de los demás es muy importante.
Hemos incluido muchos mensajes importantes de seguridad en este manual y en su electrodoméstico. Lea y obedezca siempre
todos los mensajes de seguridad.
ADVERTENCIA
PELIGRO
Este es el símbolo de alerta de seguridad.
Este símbolo le llama la atención sobre peligros potenciales que pueden ocasionar la muerte o una lesión a
usted y a los demás.
Todos los mensajes de seguridad irán a continuación del símbolo de advertencia de seguridad y de la palabra
“PELIGRO” o “ADVERTENCIA”. Estas palabras significan:

1313
A. Abrazadera del cable
A
1. Conecte el cable eléctrico a la
abrazadera del cable
Coloque los 2 esquinales de cartón en el piso cerca del
compactador. Abra el cajón del compactador y saque todo
material de embalaje u otro artículo que se encuentre en el cajón.
NOTA: No saque la bolsa del compactador.
Sujete la manija y levante el frente del cajón hasta que pase
los topes del cajón. Sujete ambos lados del cajón y levante el
cajón fuera del compactador. Coloque el cajón sobre los dos
esquinales.
2. Colocación del cajón
Coloque los otros dos esquinales en el piso al costado del
compactador. Sujete ambos lados del gabinete del compactador
y ponga el compactador sobre los esquinales. Quite la base de
embalaje del fondo del compactador.
3. Retire la base del envío
A. Patas niveladoras
B. Base de transporte
B
A
IMPORTANTE: Para mover el compactador no lo sujete por la consola. Comience en el cuarto donde va a permanecer el compactador.
Desempaque
Retire el compactador de la caja de envío y todos los materiales
de empaque, como la cinta adhesiva y las almohadillas de envío.
Use un detergente suave y agua tibia para quitar el residuo
ceroso ocasionado por el material de embalaje. Secar bien con
un paño suave. Para más información, vea “Limpieza”. Cerciórese
de que el cable eléctrico esté jo a la abrazadera del cable, en la
parte posterior del compactador
ADVERTENCIA
Peligro de Peso Excesivo
Use dos o más personas para movere instalar el
compactador.
No seguir esta instrucción puede ocasionar una
lesión en la espalda u otro tipo de lesiones.

14
Requisitos de ubicación
(86,7 cm)
34
¹⁄₈
"
24"
(61 cm)
15"
(38,1 cm)
38"
(96,5 cm)
24"
(61 cm)
15"
(38,1 cm)
Requisitos eléctricos
Vea la gura para ver las dimensiones del producto. Vea la gura para ver las dimensiones del producto con ruedas.
Vea la gura para ver las dimensiones del espacio libre.
1. Dimensiones del producto
2. Dimensiones del producto con las ruedas
3. Dimensiones del espacio libre
BA
A. Leave 6" (15.2 cm) of clearance space to the right side of the
compactor in order to remove the compactor bags.
B. Leave 23" (58.4 cm) of clearance in front of the compactor in order
to fully open or remove the compactor drawer.
1. Enchufe a tierra
Este compactador debe mantenerse conectado a tierra mientras esté
en uso para reducir el riesgo de choque eléctrico. El compactador viene
equipado con un cable eléctrico de tres conductores y un enchufe de
3 terminales del tipo conectado a tierra para que pueda encajar en
el tomacorriente conectado a tierra apropiado. El conductor verde (o
verde y amarillo) del cable eléctrico es el alambre de conexión a tierra.
NOTA: No conecte el alambre verde (o verde y amarillo) a un
terminal con corriente.
Este compactador emplea un suministro eléctrico monofásico
de 115V, 60Hz CA solamente, de 15 A o 20A, debidamente
conectado a tierra y protegido con fusibles, y está equipado
con un enchufe de conexión a tierra tal como se ilustra a
continuación. Asimismo se recomienda el uso de un circuito
independiente que preste servicio únicamente a este aparato.
Método de conexión a tierra recomendado
ADVERTENCIA
Peligro de Choque Eléctrico
Conecte a un contacto de pared de conexión a tierra de
3 terminales.
No quite la terminal de conexión a tierra.
No use un adaptador.
No use un cable eléctrico de extensión.
No seguir estas instrucciones puede ocasionar
la muerte, incendio o choque eléctrico.
A. Deje 6" (15,2 cm) de espacio libre al lado derecho del compactador
para poder sacar las bolsas del compactador.
B. Deje 23" (58,4 cm) de espacio libre al frente del compactador para
poder abrir o sacar completamente el cajón del compactador

15
IMPORTANTE: Para mover el compactador no lo sujete por el tablero de control. Deslice el compactador hacia un cartón o un tablero
antes de desplazarlo por el piso para evitar que se dañe el revestimiento del piso. Al levantar o mover el compactador no deje que el
marco posterior del compactador toque el revestimiento del piso.
Ubique el armazón de ruedas que se incluye. Fíjelo en el piso
con el borde hacia abajo.
Instalación de las ruedas (opcional)
Arme el armazón de ruedas e instale el compactador en él
1. Ubique el armazón de ruedas
Instale las (2) ruedas giratorias en la parte trasera (extremo
cerrado) del ensamblaje del marco con (4) pernos y tuercas.
2. Instale las ruedas giratorias
Instale las (2) ruedas jas en la parte delantera (extremo abierto)
del ensamblaje del marco con (4) pernos y tuercas.
3. Instale las ruedas jas
A. Ruedas giratorias
B. Ruedas fijas
C. Extremo abierto del conjunto del bastidor
D. Extremo cerrado del conjunto del bastidor
A
C
D
B
Para evitar que el armazón se mueva durante la instalación
inicial, bloquee las ruedas o coloque el armazón contra una
pared. Bloquee las ruedas traseras en su lugar empujando los
candados hacia abajo. Incline la parte trasera del compactador
hacia adelante y empújelo hacia arriba sobre el conjunto
del bastidor con ruedas sobre el extremo abierto. Deslice el
compactador completamente hacia atrás hasta que toque el
borde posterior del conjunto del bastidor con ruedas.
4. Instale el compactador en el armazón
de ruedas
Wall
Instale el compactador
IMPORTANTE: Para mover el compactador no lo sujete por el tablero de control.
Mueva el compactador a su ubicación nal. Sujete los lados de la gaveta del compactador y coloque el fondo de la gaveta en los rieles.
Levántela en la parte de la manija de modo que el cajón pase los topes. Cierre el cajón. Verique que el cajón se abra libremente. Si la
placa de base roza el piso, vea “Ajuste de la placa de base” para obtener instrucciones adicionales. Conecte a un tomacorriente con
conexión a tierra de 3terminales.
Ajuste de la placa de base
Si la placa base roza el revestimiento del piso, el espacio libre puede cambiarse como sigue:
Marque a cada lado de la placa de base la cantidad de la placa de base que roza el revestimiento del piso. Saque el cajón de la unidad.
Vea el paso 3 en la sección “Desempaque”. Use una regla y un lápiz o una tiza para trazar una línea entre las marcas laterales de la
placa de base. Use unas tijeras o el cuchillo de uso general para cortar la placa de base lo largo de la línea. Vuelva a colocar el cajón.
Si la placa de base todavía roza el revestimiento del piso, repita los pasos del 1 al 4.
A. Bastidor con ruedas
B. Extremo cerrado del bastidor con ruedas (con borde)
C. Extremo abierto del bastidor con ruedas (sin borde)
A
B
C
Pared

16
USO DEL COMPACTADOR
Cómo funciona su compactador
El pisón de compresión es la parte del compactador que
comprime la basura. El pisón de compresión no llega hasta
el fondo del cajón. Las primeras veces que usted cargue el
compactador no verá la compactación de la basura.
NOTA: El cajón del compactador debe estar lleno a más de la mitad
antes de que el compactador pueda comenzar a comprimir la carga.
Al romperse los vidrios podrá oír ruidos. Las botellas de vidrio
resistente quizás no se rompan en absoluto. La basura en una bolsa
de compactador llena tendrá 1/4 del tamaño de su volumen original.
1. El pistón de compresión aplasta la basura
Cargue la basura voluminosa, botellas y latas en el centro
de la gaveta. Las botellas o latas que no se coloquen en el
centro pueden quedar atascadas entre el pisón y la gaveta.
El interruptor de control de la gaveta luego detecta “misload”
(carga mal colocada) y hace que el pisón regrese a su posición
“up” (arriba) sin compactar.
2. Cómo cargar basura voluminosa,
botellas y latas
Cómo cargar
IMPORTANTE: No empuje los elementos hacia dentro del compactador con las manos o los pies.
NOTA: Las primeras veces que usted cargue el compactador no verá la compactación de la basura. El cajón del compactador debe
estar lleno hasta la mitad antes de que el compactador pueda comenzar a comprimir la carga.
Abra el cajón. Levante y jale la manija o presione el pedal para
abrir el cajón.
NOTA: Al presionar la barra de base, el contenedor se abre solo
de 7,6 cm a 15,2 cm (3" a 6"), según la carga.
1. Abra el cajón
Envuelva o tape la basura mojada o desarreglada. No ponga
en el compactador artículos que puedan desarrollar olores
ofensivos como la carne cruda, pescado, cáscaras de toronjas,
pañales desechables o artículos de higiene personal. Recueste
las botellas o latas en el centro del cajón. No cargue botellas en
posición vertical y cierre el cajón.
2. Coloque la basura en el compactador
Peligro de cortaduras.
No empuje los elementos hacia dentro del
compactador con las manos o los pies.
No seguir esta instrucción puede ocasionar
cortaduras.
ADVERTENCIA

17
Puesta en marcha del compactador
Para prender el compactador, gire la perilla llave hacia START
(puesta en marcha), y luego suéltela. El compactador se
detendrá automáticamente al término del ciclo. Para detener
el compactador durante un ciclo, gire la perilla de llave a
LOCK/OFF (Trabado/Apagado). Gire la perilla llave hacia ON
(Encendido) para que el émbolo compactador se levante.
Cuando el pisón deja de levantarse, usted puede abrir el cajón.
Gire la Perilla llave hacia la posición LOCK/OFF (Trabado/
Apagado). Retire la perilla llave y guárdela fuera del alcance
delos niños.
2. Para quitar la perilla llave
Eliminación de bolsas llenas
Una vez que la basura haya sido compactada hasta la parte superior del cajón, saque la bolsa. Si la bolsa está demasiado pesada, en
el futuro compacte menos basura antes de sacarla.
IMPORTANTE: No empuje los elementos hacia dentro del compactador con las manos o los pies.
Jale la gaveta hasta abrirla por completo. Separe la parte
superior de la bolsa de los botones de retención de la misma.
Jale hasta cuatro puños de bolsa y cierre la bolsa con las
ataduras de alambre que vienen provistas.
1. Tire hacia arriba de los puños de la bolsa
Oprima la traba del seguro lateral hacia abajo e incline el lado
del cajón para abrir.
2. Pestillo de la traba lateral
1. Para encender y apagar el compactador
Peligro de cortaduras.
No empuje los elementos hacia dentro del
compactador con las manos o los pies.
No seguir esta instrucción puede ocasionar
cortaduras.
ADVERTENCIA
ADVERTENCIA
Tal vez se necesiten dos personas para retirar y
transportar las bolsas compactadas.
Retire el seguro para ayudar a retirar la bolsa.
No seguir esta instrucción puede ocasionar lesiones en
la espalda o de otro tipo.
Peligro de peso excesivo

18
Instalación de una bolsa nueva
No use ningún tipo de bolsa que no sea la diseñada especialmente para usar en su compactador. Solicite las bolsas de repuesto para
el compactador por medio de su distribuidor local o llamando al número gratuito indicado en la portada o en la sección “Asistencia o
Servicio”.
IMPORTANTE: Antes de instalar una bolsa nueva, cerciórese de que:
■La traba del cajón está bien asegurada.
■El contenedor está limpio y libre de desechos.
Coloque la bolsa doblada en el cajón. Abra la bolsa y jale los
bordes superiores sobre la parte superior del cajón. Asegure
la bolsa en su lugar jalando los cuatro agujeros preperforados
sobre los botones de retención de la bolsa. Los agujeros se
expandirán sobre los botones sin dañar la bolsa.
1. Coloque la bolsa doblada
Presione el interior de la bolsa contra el fondo, los lados y las
esquinas del cajón para lograr que encaje bien.
2. Cierre la bolsa
3. Saque la bolsa

19
CUIDADO DEL COMPACTADOR
Su nuevo compactador está diseñado para proporcionarle años de servicio conable. Sin embargo, hay ciertas cosas que usted debe
hacer para mantener su compactador apropiadamente. Esta sección le dirá cómo limpiar y cuidar de su compactador.
Limpieza
Antes de limpiar el compactador, gire la perilla llave (o interruptor llave) a la posición OFF (apagado) y LOCK (trabado) y retírela.
NOTA: Cualquier otro servicio que no esté descrito en esta sección deberá efectuarlo un representante de servicio técnico designado.
Limpieza de las supercies exteriores
Lave las supercies exteriores (incluyendo el acero inoxidable) con una esponja limpia o un paño liso y un detergente suave en agua
caliente. No use productos de limpieza abrasivos o ásperos. Enjuague y seque meticulosamente con un paño suave.
Limpie los derrames de inmediato. Ciertos alimentos pueden dañar el acabado si se dejan en la supercie del compactador.
Limpieza del interior del cajón
NOTA: Quizás sea necesario ponerse guantes ya que podrían encontrarse pedacitos de vidrio en la gaveta.
Saque la bolsa. Vea “Eliminación de bolsas llenas”.
Presione hacia abajo la traba de palanca (o el pestillo de la traba
lateral). Sostenga hacia abajo la traba de palanca e incline el
costado de la gaveta hacia afuera hasta que la traba libere el
frente del cajón.
1. Pestillo de la traba lateral
NOTA: Si lo desea, puede quitar el lado de la gaveta
inclinándolo y luego levantándolo hacia afuera.
Lave el interior del cajón con una esponja limpia o un paño
liso y un detergente suave en agua caliente. Enjuague y seque
meticulosamente con un paño suave. Si ha quitado el lado del
cajón, deslícelo de vuelta hacia la posición inclinada. Presione
la traba de palanca (o el pestillo de la traba lateral) hacia abajo
empujando al mismo tiempo el lado del cajón a la posición
vertical. Asegure el lado del cajón empujando hacia arriba la
traba de palanca (o el pestillo de la traba lateral).
2. Se puede quitar el extremo del cajón
Peligro de cortaduras
Use guantes cuando limpie al interior del cajón o
gabinete, o compuerta.
No seguir esta instrucción puede ocasionar
cortaduras.
ADVERTENCIA

20
Pase la aspiradora en el interior del gabinete. Los derrames
líquidos o basura mojada deben limpiarse a mano, o usando una
aspiradora diseñada para recoger líquidos. Lave el interior del
gabinete con una esponja limpia o un paño liso y un detergente
suave en agua caliente. Enjuague y seque meticulosamente
con un paño suave. Para volver a colocar el cajón, sujétela por
ambos lados e introduzca los rodillos en los rieles. Levante el
frente del cajón y empújelo hasta pasar los topes.
2. Limpie adentro del gabinete
Limpieza del pisón
Limpie las partículas de vidrio de la cubierta del pisón con un
paño o toallas de papel. Quite los alimentos con una esponja
limpia o un paño liso y un detergente suave en agua caliente.
Enjuague y seque meticulosamente con un paño suave.
NOTA: Es conveniente usar guantes, ya que puede haber
pedazos de vidrio presentes.
1. Limpie las partículas de vidrio
Jale el cajón hacia afuera hasta que se detenga.
NOTA: Observe cómo se mueven los rodillos del cajón en los
rieles y se desconectan. Le será más fácil volver a montar del
cajón después de haber terminado la limpieza.
Levante la parte frontal del cajón para pasar los topes.
Sujete el cajón por los lados y jálelo hacia afuera por completo.
Ponga del cajón en el piso con cuidado.
Limpieza antes de las vacaciones
Si va a ausentarse por más de un par de días, quite la bolsa
del compactador. Retire la perilla llave (o el interruptor llave)
yguárdela fuera del alcance de los niños.
Limpieza del interior del gabinete
1. Saque el cajón
NOTA: Quizás sea necesario ponerse guantes ya que podrían encontrarse pedacitos de vidrio en el gabinete
Other manuals for GACP15XXMG
1
Table of contents
Languages:
Other Gladiator Tools Storage manuals

Gladiator
Gladiator GAWB04HWEG User manual

Gladiator
Gladiator STEEL MODULAR GEARBOX CABINET User manual

Gladiator
Gladiator GAAC27HWGX User manual

Gladiator
Gladiator PREMIER GAMT41HWJG User manual

Gladiator
Gladiator GAWB04HWJW User manual

Gladiator
Gladiator GAMT41HWJG00 User manual

Gladiator
Gladiator VERSATOP Series User manual

Gladiator
Gladiator GCB100 User manual