GLI International GLI-9143 User manual

Manual No. 9143
Revision 0-401
MODEL GLI-9143
HAND-HELD/PORTABLE
DISSOLVED OXYGEN METER

Model GLI-9143 Portable D.O. Meter 2 Rev. 0-401
Please read this instruction manual carefully
before using the instrument. This manual will
provide you with all the necessary information
for the correct use of the instrument, as well
as a precise idea of its versatility.
This meter is in compliance with European
Community (CE) directives EN 50081-1 and
EN 50082-1.
TABLE OF CONTENTS
PRELIMINARY EXAMINATION ................................. 2
GENERAL DESCRIPTION .....................................2-3
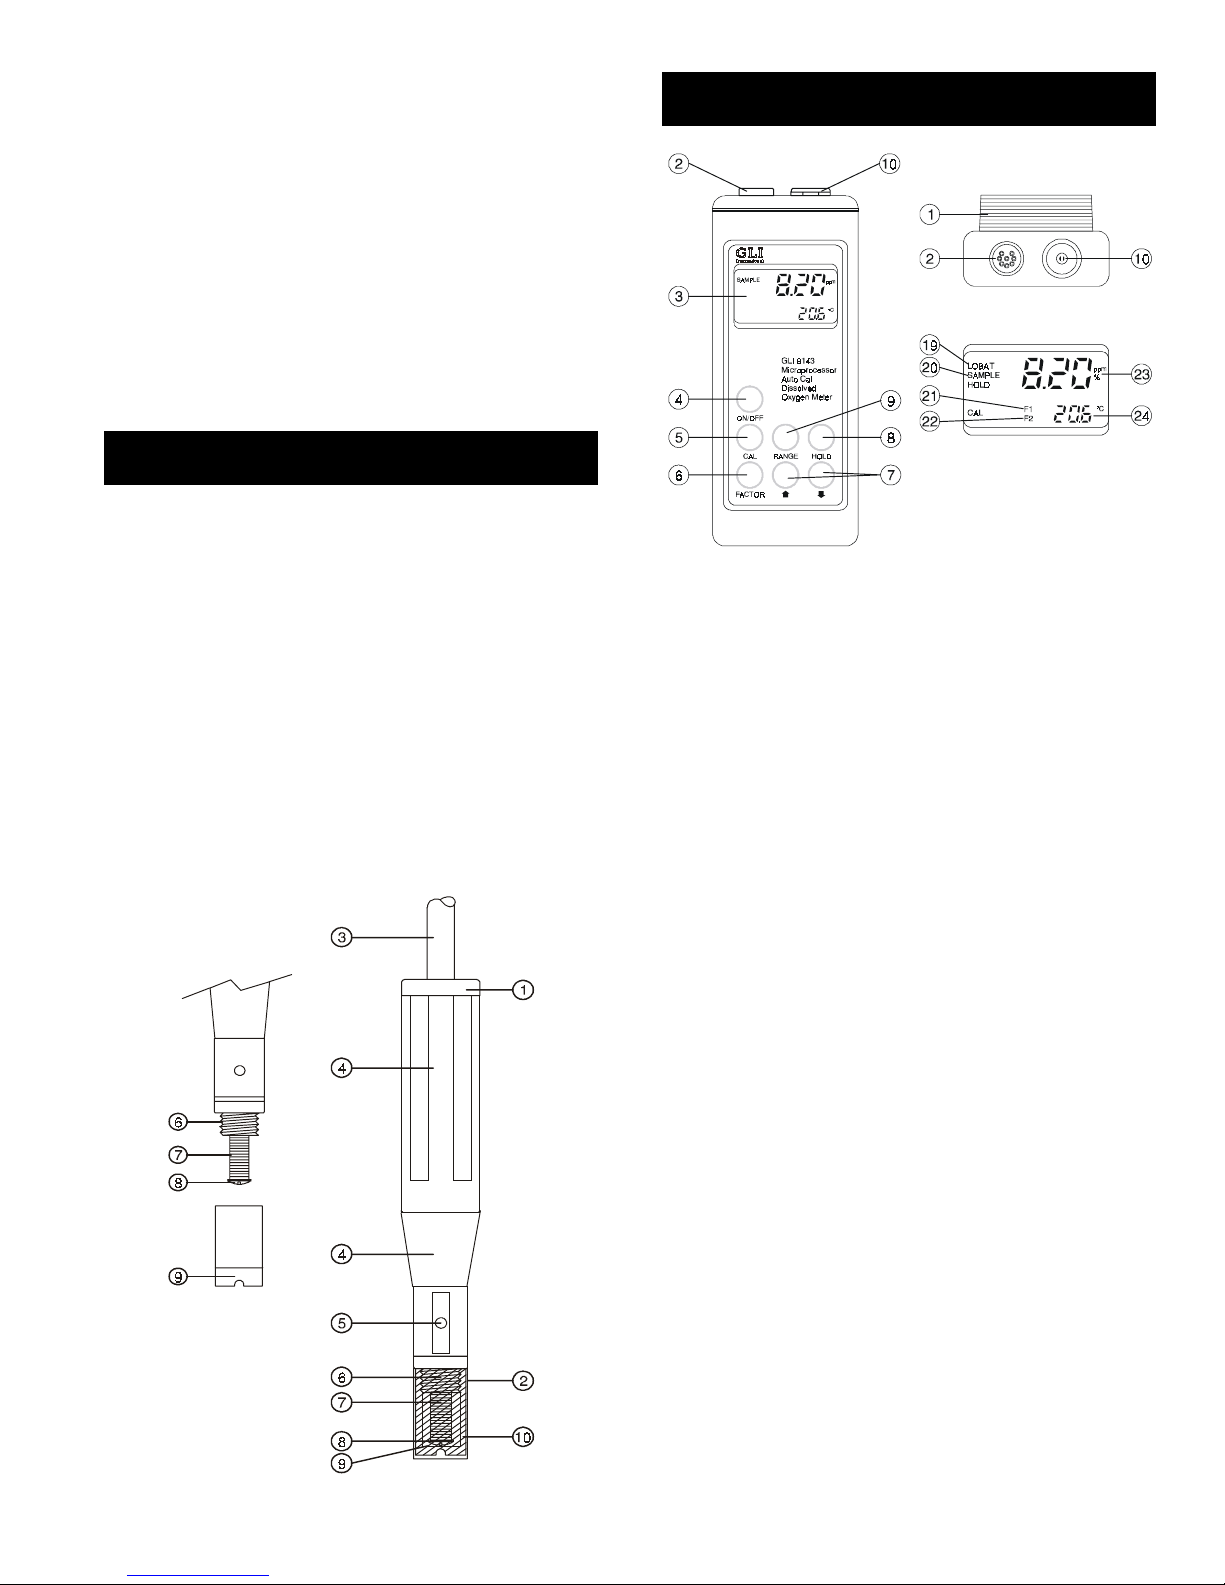
FUNCTIONAL DESCRIPTION -- PROBE .................. 3
FUNCTIONAL DESCRIPTION -- METER .................. 3
SPECIFICATIONS..................................................... 4
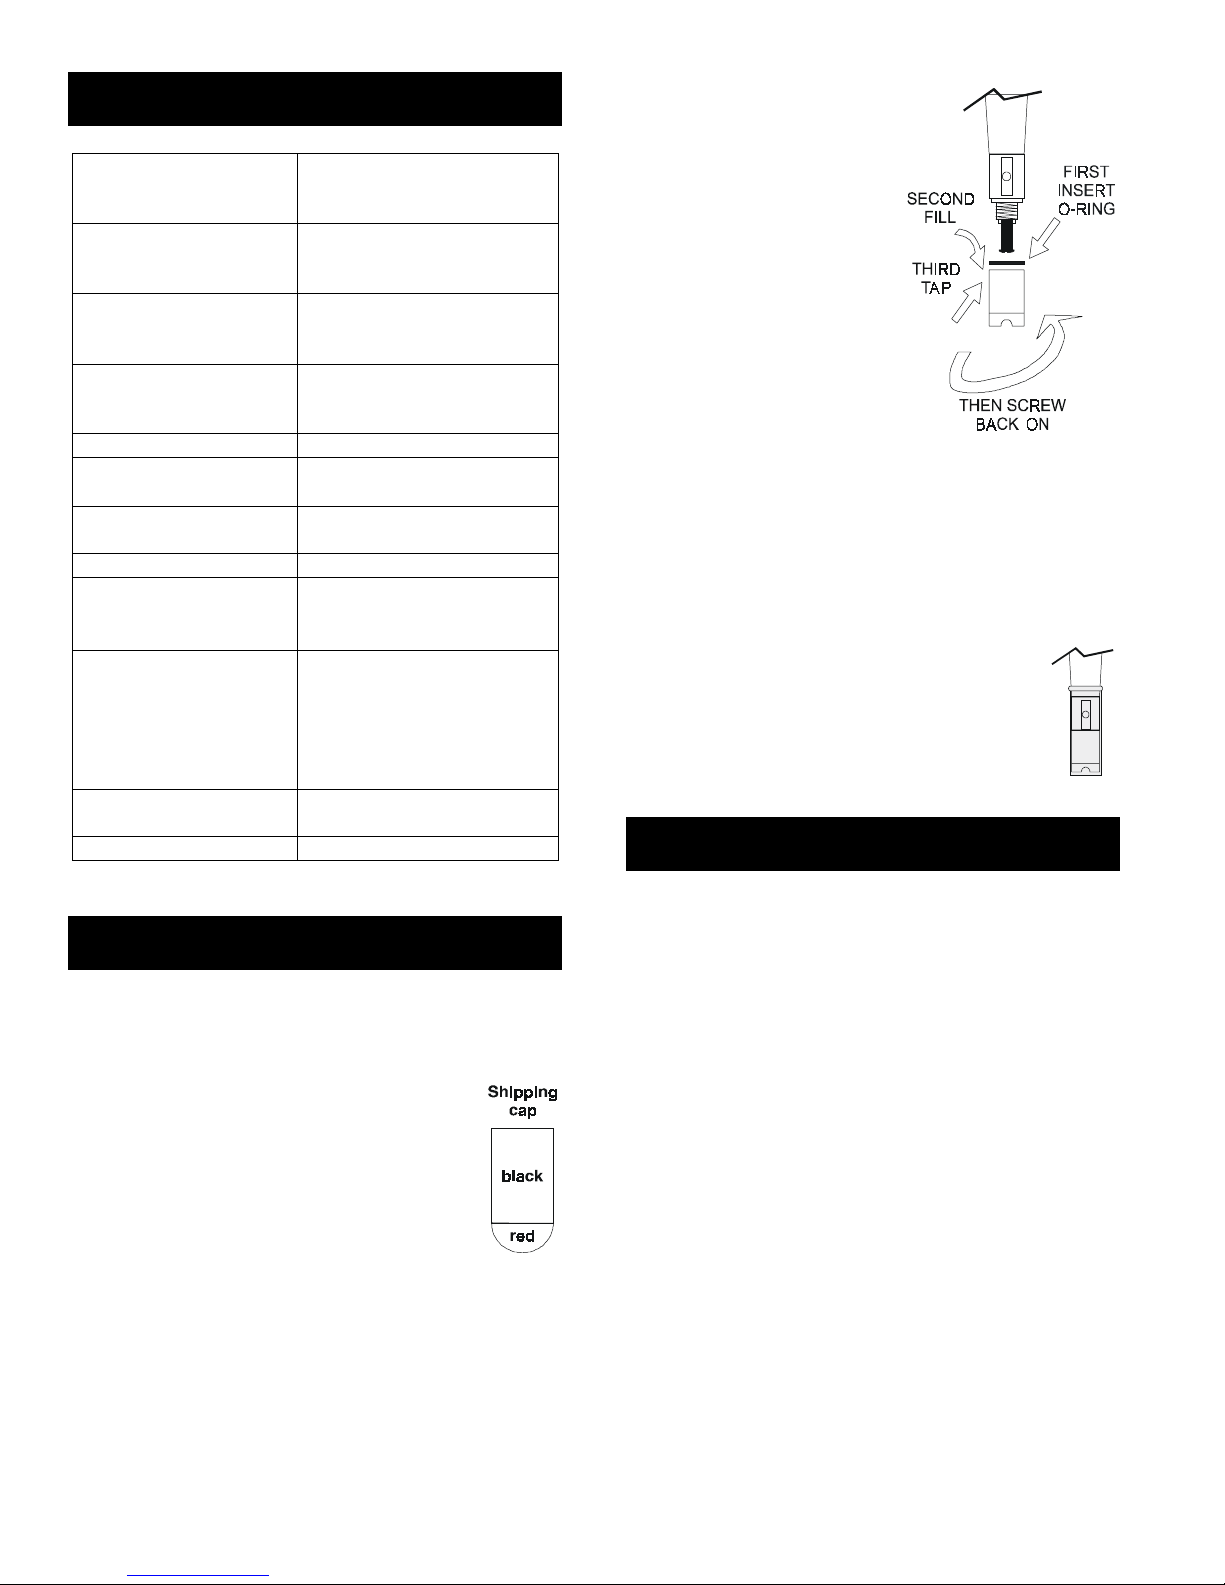
PROBE PREPARATION ........................................... 4
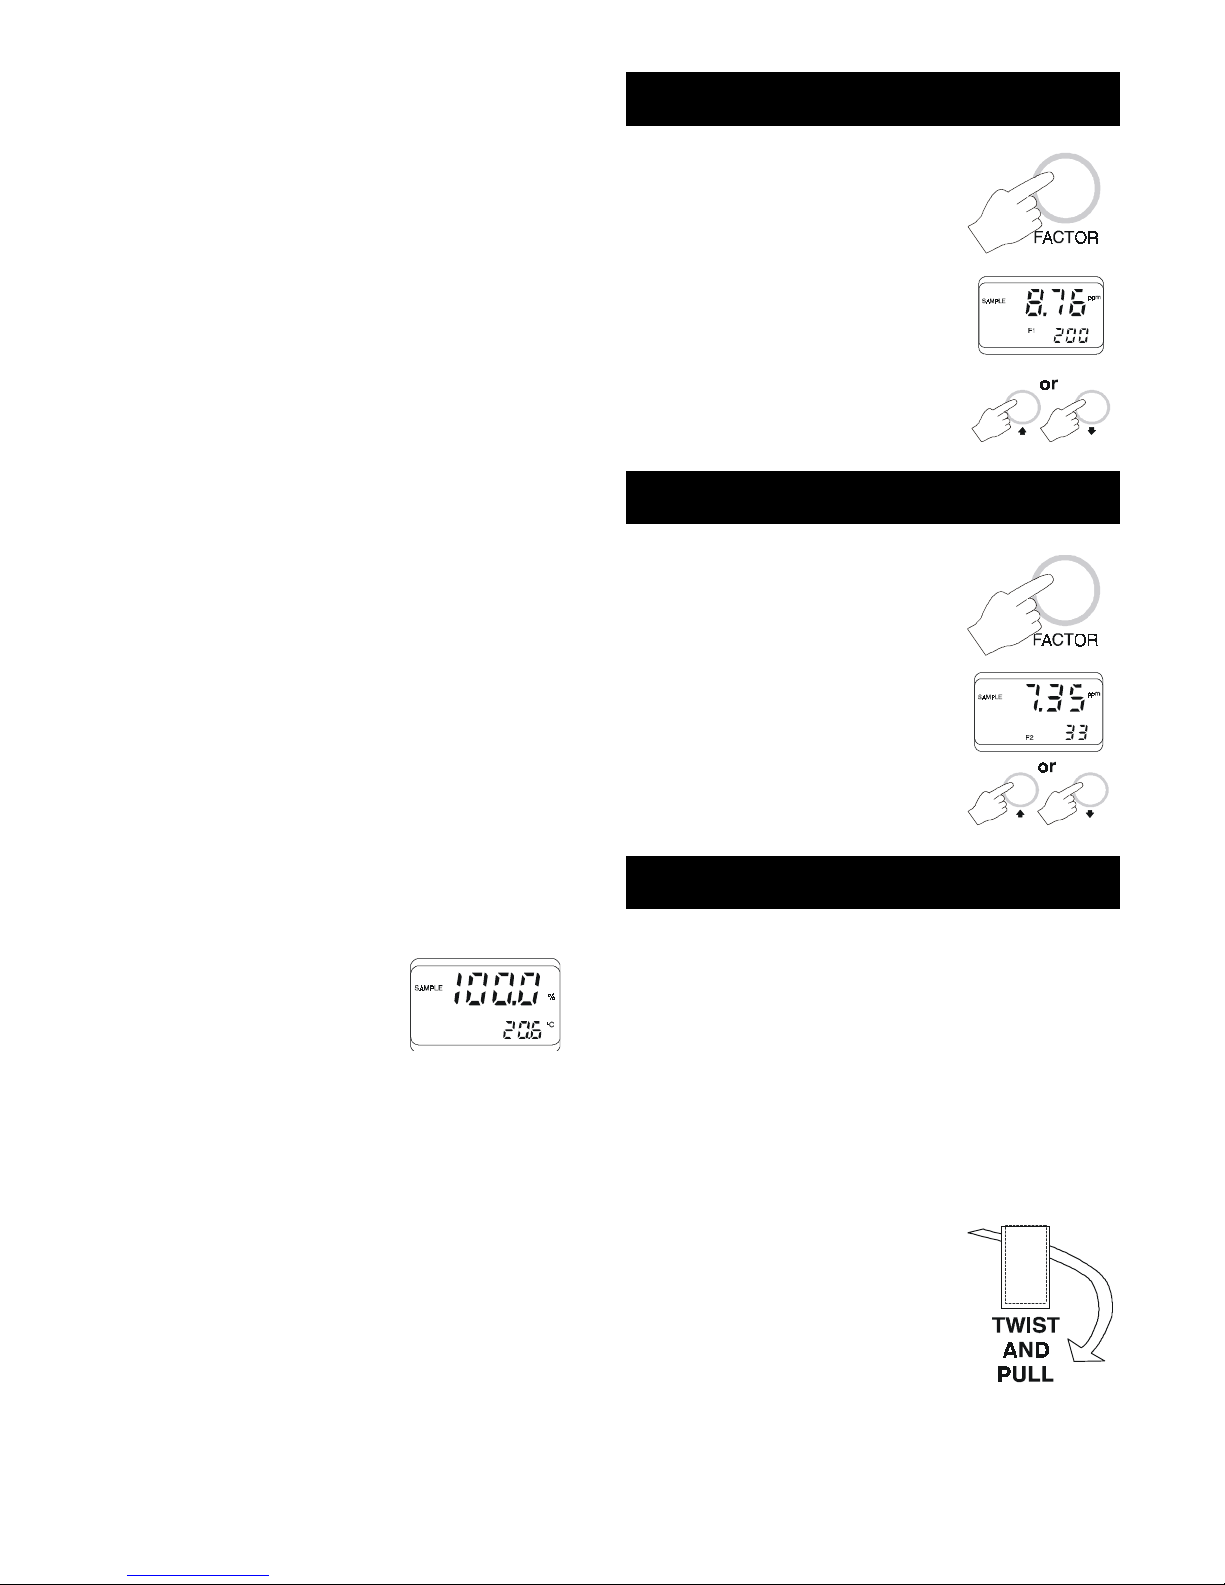
CALIBRATION .......................................................4-5
MEASUREMENT ................................................... 5-6
ALTITUDE COMPENSATION.................................... 6
SALINITY COMPENSATION..................................... 6
PROBE AND MEMBRANE MAINTENANCE...........6-7
BATTERY REPLACEMENT ...................................... 8
WARRANTY.............................................................. 8
PRELIMINARY EXAMINATION
Remove the instrument from the packing
material and examine it carefully to make
sure that no damage has occurred during
shipping. If there is any damage, notify the
transit carrier immediately.
Each meter is supplied complete with:
•GLI-76407/4 Dissolved Oxygen Probe
with 13 ft. (4 m) cable or GLI-76407/10
Dissolved Oxygen Probe with 33 ft. (10 m)
cable
•Spare membranes (two)
•Protective cap
•30 ml electrolyte solution
•Instruction Manual
•AA size Alkaline Batteries (four)
•Rugged Carrying Case
NOTE: Save all packing material until you
are sure that the instrument func-
tions correctly. All defective items
must be returned in their original
packaging together with the supplied
accessories.
GENERAL DESCRIPTION
The GLI-9143 is a water-resistant, micro-
processor-based, auto-calibration Dissolved
Oxygen meter with automatic temperature
compensation (ATC).
It has been developed for dissolved oxygen
and temperature measurement in water and
wastewater as well as other applications such
as fish farming.
Dissolved oxygen is indicated in hundredths
of parts per million (ppm = mg/L) or in % of
saturation.
The temperature range is indicated in centi-
grade from 0 to 50°C with 0.1°C resolution.
The ppm and the % saturation are both com-
pensated for changes in solubility of oxygen
in water and for permeability of the mem-
brane as well as the temperature effect.
Salinity compensation in water allows deter-
mination of mg/L of dissolved oxygen in salty
waters and the altitude compensation read-
justs for the altitude variance.
Four 1.5V AA alkaline batteries provide
power and make the instrument completely
portable. The meter is also designed to be
used with a battery charger or a 12VDC
power supply. A 12VDC input jack is incorpo-
rated into the housing.
A microprocessor ensures an accurate and
rapid calibration and measurement. The rug-
ged meter case is water-resistant for
maximum protection in the field as well as in
the laboratory.

Rev. 0-401 3 Model GLI-9143 Portable D.O. Meter
The dissolved oxygen probe has a mem-
brane covering the polarographic sensor
elements and a built-in thermistor for tem-
perature measurement and compensation.
The thin permeable membrane isolates the
sensor elements from the testing solution, but
allows oxygen to enter. When a voltage is
applied across the sensor, oxygen that
passes through the membrane causes a cur-
rent to flow from which the oxygen
concentration is determined.
FUNCTIONAL DESCRIPTION -- PROBE
1) D.O. Probe
2) Protective Cap
3) Watertight Shielded Cable
4) Polypropylene Probe Body
5) Temperature Sensor
6) O-ring Seal
7) Silver Chloride Anode (sensor element)
8) Platinum Cathode (sensor element)
9) Oxygen-permeable Teflon Membrane
10) Protective Cap
FUNCTIONAL DESCRIPTION -- METER
1) Battery compartment
2) Probe connector
3) Liquid crystal display
4) ON/OFF button
5) CAL button (to enter or exit calibration
mode)
6) FACTOR button (to select altitude F1
and salinity F2)
7) UP and DOWN arrow keys (to select F1
and F2 levels)
8) HOLD key (to freeze displayed value)
9) RANGE button (to select ppm or % of
saturation)
10) Power jack for 12VDC adapter
19) LOW BAT indicator
20) SAMPLE indicator (to indicate the meas-
urement mode)
21) F1 indicator (altitude factor)
22) F2 indicator (salinity factor)
23) % or ppm mode indicator
24) Temperature (and factor) display

Model GLI-9143 Portable D.O. Meter 4 Rev. 0-401
SPECIFICATIONS
Ran
g
e D.O.
% Sat.
Temp.
0.00 to 45.00 ppm
0.0 to 300.0%
0.0 to 50.0°C
Resolution D.O.
% Sat.
Temp.
0.01 ppm
0.1%
0.1°C
Accuracy D.O.
(@25°C/77°F) % Sat.
Temp.
± 1.5% full scale ppm
± 1.5% full scale %
± 0.5°C
Typical EMC D.O.
Deviation % Sat.
Temp.
± 0.3 ppm
± 3.5%
± 0.5°C
Calibration Automatic in saturated air
Temp. Compensation Automatic from 0 to 50°C
(32 to 122°F)
Altitude Compensation 0-13,123 ft. (0-4000 m) in
328 ft. (100 m) increments
Salinity Compensation 0-80 g/l in 1 g/l increments
Operating Conditions From 0 to 50°C (32 to
122°F); 100% relative
humidity
Power Requirement Four 1.5 volt AA alkaline
type batteries; 200 hours
continuous use; auto shut-
off after 4 hours of non-
use; power socket for 12
VDC adapter
Dimensions 7.7 x 3.1 x 2.4 inches
(196 x 80 x 60 mm)
Weight 15 oz. (425 g)
PROBE PREPARATION
All probes are shipped dry. To hydrate the
probe and prepare it for use, connect it to the
meter and proceed as follows:
1. Remove the red and black
plastic shipping cap which can
be discarded.
2 Wet the sensor by soaking the
bottom 2½cm (1 inch) of the
probe in electrolyte (GLI-7041S) for 5
minutes.
3 Take a membrane cap (GLI-76407A/P
supplied with the meter) and make sure
that the rubber O-ring sits properly inside
the membrane cap.
4 Rinse the mem-
brane cap with
electrolyte while
shaking it gently.
Refill with clean
electrolyte.
5 Gently tap the
sides of the mem-
brane cap with
your finger tip to
ensure that no air
bubbles remain
trapped. To avoid
damaging the membrane, do not tap the
membrane cap directly on the bottom.
6 With the sensor facing down, screw the
membrane cap clockwise. Some elec-
trolyte will over-flow.
When not in use, protect the mem-
brane by placing the protective cap
on it.
CALIBRATION
PROBE POLARIZATION
The probe is under polarization with a fixed
voltage of approximately 800 mV. Probe po-
larization is essential for stable meas-
urements with the same recurring degree of
accuracy.
With the probe properly polarized, oxygen is
continually "consumed" by passing through
the sensitive membrane and dissolving in the
electrolyte solution contained inside the
probe. If this operation is interrupted, the
electrolyte solution continues to be enriched
with oxygen until it reaches equilibrium with
the surrounding solution. Whenever meas-
urements are taken with a non-polarized
probe, the oxygen level indicated is that of
the test solution as well as any oxygen pres-
ent in the electrolyte solution. This reading is
obviously incorrect. The GLI meter automati-

Rev. 0-401 5 Model GLI-9143 Portable D.O. Meter
cally polarizes the probe when it is switched
on.
Calibration is simple and is recommended
every time the meter is switched on.
1. Make sure the probe is ready for meas-
urement (see PROBE PREPARATION),
i.e. the membrane is filled with electrolyte
and the probe is connected to the meter
and properly polarized.
2. Switch the meter on.
3. "COND" appears on the
display to inform you
that the probe is in auto-
conditioning (automatic
polarization) mode.
4. Once "COND" disappears, the probe is
polarized and the instrument can be cali-
brated.
5. For an accurate calibration, it is recom-
mended to wait an additional
5 or 10 minutes to ensure
optimum conditioning of the
probe.
6. Remove the protective cap.
7. Press CAL. "----" appears
on the larger LCD to-
gether with "CAL" to
indicate that the instru-
ment is in calibration mode.
8. The instrument will
automatically standard-
ize itself to the actual
saturation value. After
approximately 1 minute,
it will show "100%" on
the LCD and a small
"SAMPLE" to indicate
that the calibration is complete.
9. Press FACTOR and ensure F1 and F2
are set to the appropriate altitude and
salinity values (see ALTITUDE and
SALINITY COMPENSATION).
NOTE: The instrument must be calibrated
whenever the probe, membrane or
the electrolyte is changed.
To exit the calibration mode
during calibration, press CAL.
The display may be switched
from readings in % saturation
to ppm without re-calibration,
by simply pressing RANGE.
MEASUREMENT
Make sure the meter has been cali-
brated and the protective cap has
been removed. Immerse the tip of
the probe in the sample to be tested
and ensure that the temperature
sensor is also immersed.
To display values in % satura-
tion, press RANGE.
For accurate dissolved oxygen measure-
ments, a water movement of at least 30 cm
(12 inches)/sec is required. This is to ensure
that oxygen depleted on the membrane sur-
face is constantly replenished. A moving
stream will provide adequate circulation.
During field measurements, this condition
may be obtained by manually stirring the
probe. Accurate readings are not possible
while the liquid is stationary.
During laboratory measurements, the use of
a magnetic stirrer to ensure a certain agita-
tion of the fluid is recommended. This way,
any errors due to the presence of air bubbles
on the membrane surface are minimized.

Model GLI-9143 Portable D.O. Meter 6 Rev. 0-401
For an accurate measurement, allow suffi-
cient time for thermal equilibrium between the
probe and the measurement sample (a few
minutes if the temperature difference is sev-
eral degrees).
ppm READINGS
The ppm readings make it possible to read
the concentration of the dissolved oxygen di-
rectly.
If the sample contains significant salinity or if
the measurement is taken at a higher altitude
than sea level, the readout values must be
corrected (by taking into account the lower
degree of oxygen solubility in such conditions
-- see below).
Set the altitude and/or the salinity before cali-
bration and taking ppm measurements. The
meter will automatically compensate for these
factors.
% O
2
SATURATION READINGS
The % O2saturation reading provides the
rate of oxygen saturation with reference to
100.0% at sea level.
TEMPERATURE READINGS
The lower part of the dis-
play will show the
measured temperature in
degrees Celsius.
Allow the probe to reach thermal equilibrium
with the sample before taking any measure-
ment. The greater the difference between the
ambient temperature and the temperature of
the sample, the longer it will take the probe to
equilibrate to the sample.
ALTITUDE COMPENSATION
Press FACTOR and “F1”
will be displayed. Use the
UP and the DOWN keys to
set the altitude from 0-4000
m (0-13,123 ft.), in steps of
100 m (328 ft.).
SALINITY COMPENSATION
Press FACTOR twice and
“F2”will be displayed.
Press UP and DOWN to
set the salinity between 0
and 80 g/l. Press FACTOR
again to display the tem-
perature.
PROBE AND MEMBRANE MAINTENANCE
The dissolved oxygen probe body is made of
reinforced polypropylene for maximum dura-
bility. A built-in thermistor measures the
temperature of the sample. It is recom-
mended that the protective cap always be
kept on the probe when the probe is not in
use.
To replace the membrane cap or refill it with
electrolyte, proceed as follows:
1. Remove the protective
cap by gently twisting
and pulling it off the
probe (see Figure 1).
FIGURE 1

Rev. 0-401 7 Model GLI-9143 Portable D.O. Meter
2. Unscrew the membrane cap by turning it
counterclockwise (see Figure 2).
3. Wet the sensor by
soaking the bottom 2½
cm (1 inch) of the
probe in electrolyte
(GLI-7041S) for 5 min-
utes.
4. Rinse a new mem-
brane cap (GLI-76407
A/P) with electrolyte
while shaking it gently.
Refill with clean elec-
trolyte.
5. Gently tap the sides of
the membrane with
your finger tip to en-
sure that no air
bubbles remain trap-
ped. Do not directly
tap the bottom as this may cause irrepa-
rable damage to the membrane.
6. Make sure that the rubber O-ring is
seated properly inside the membrane
cap.
7. With the sensor facing down, screw the
membrane cap clockwise. Some elec-
trolyte will overflow.
CLEANING PLATINUM CATHODE
The platinum cathode (item # 8 in the
FUNCTIONAL DESCRIPTION - PROBE on
page 3) should always be bright and untar-
nished. If it is tarnished or stained, which
could be due to contact with certain gases or
extended use with a loose or damaged mem-
brane, the cathode should be cleaned:
1. Use a clean, lint-free cardboard or cloth
and rub the cathode very gently side to
side 4-5 times. This will be enough to
polish and remove any stains without
damaging the platinum tip.
2. Rinse the probe with deionized or dis-
tilled water.
3. Install a new membrane cap and fill it
with fresh electrolyte following the previ-
ous instructions.
4. Recalibrate the instrument.
CLEANING MEMBRANE
In order to have accurate and stable meas-
urements, it is important that the surface of
the membrane is in perfect condition. This
permeable membrane isolates the sensor
elements from the environment but allows
oxygen to enter. If any dirt is deposited on the
membrane:
1. Rinse it carefully with distilled or deion-
ized water.
2. If any imperfections are observed, or any
damage is evident (such as wrinkles,
tears or holes), the membrane cap
should be replaced.
3. Make sure that the O-ring is properly
seated in the membrane cap.
FIGURE 2

Model GLI-9143 Portable D.O. Meter 8 Rev. 0-401
BATTERY REPLACEMENT
When the batteries are run
down "LOBAT" is displayed
on the Liquid Crystal Dis-
play.
This is to inform the user that the display will
be shut-off after about 4 hours of use to pre-
vent erroneous measurements due to low
voltage.
Battery replacement
must only take place in
a non-hazardous area
using 1.5V alkaline AA
type batteries. To
replace run-down bat-
teries, simply remove
the two screws on the
rear cover of the in-
strument and replace
the four 1.5V AA bat-
teries with new ones,
observing correct po-
larity.
A 12 VDC power adapter can also be used to
power the unit.
NOTE: The instrument uses the following
configuration.
It is recommendable to purchase the GLI
voltage adapters that use the proper polarity
configuration. However, the meter can be
used with other adapters. In this case, re-
member to check the correct polarity of your
adapter before connecting it to the meter.
WARRANTY
GLI International, Inc. warrants the Model
GLI-9143 Hand-held/Portable Dissolved Oxy-
gen Meter to be free from defects in material
or workmanship for a period of one year (12
months) from the date of shipment of this
product from our facility. The GLI-76407/4 or
GLI-76407/10 Dissolved Oxygen Sensor is
warranted for a period of 6 months. A war-
ranty claim will not be honored if defects are
not reported within the warranty period, or if
GLI International determines that defects or
damages are due to normal wear, misappli-
cation, lack of maintenance, abuse, improper
installation, alteration or abnormal conditions.
GLI International’s obligation under this war-
ranty shall be limited to, at its option,
replacement or repair of this product. The
product must be returned to GLI International,
freight prepaid, for examination. The product
must be thoroughly cleaned and any process
chemicals removed before it will be accepted
for replacement or repair. GLI International’s
liability shall not exceed the cost of the prod-
uct. Under no circumstances will GLI
International be liable for any incidental or
consequential damages, whether to person
or property. GLI International will not be liable
for any other loss, damage or expense of any
kind, including loss of profits, resulting from
the installation, use, or inability to use this
product.
Table of contents
Other GLI International Measuring Instrument manuals

GLI International
GLI International P53 Instruction Manual

GLI International
GLI International GLI-98144 User manual

GLI International
GLI International GLI-93711 User manual

GLI International
GLI International P33 Instruction Manual

GLI International
GLI International C53 Instruction Manual

GLI International
GLI International Accu4 Instruction Manual

GLI International
GLI International F53 User manual