Global Industrial 293079 User manual

User’s Manual
globalindustrial.ca
Assembly Instructions Instrucciones de Ensamblaje Directives d’assemblage
Customer Service
US: 1-800-645-2986
Servicio de atención al Cliente
US: 1-800-645-2986
Service à la clientèle
Canada: 888-645-2986
TM
WINDOW AIR CONDITIONER
REMOTE CONTROL
293079 - Window Air Conditioner 18,500BTU Cool 16,000BTU Heat, 208/230V
293080 - Window Air Conditioner w Heat 25,000BTU Cool 16,000BTU Heat 208/230V
293081 - Casement Window Air Conditioner 8,000BTU Cool, 115V
293082 - Casement Window Air Conditioner 10,000 BTU Cool 115V
Read this manual thoroughly prior to
installation, operation or maintenance.
Keep these instructions in a safe
location for future reference. For
questions, visit globalindustrial.com or
contact Customer Service atco
1-800-645-2986.


IMPORTANT:
Thank you for your purchase. Please read this manual carefully before operating.
Make sure to save this manual for future reference.

CONTINUED
Remote Control Specications ......................................................................................................
Handling the Remote Control ........................................................................................................
Remote Functions .........................................................................................................................
Remote Display Icons ..................................................................................................................
Operating Instructions ..................................................................................................................
3
4
6
7
8
TABLE OF CONTENTS

REMOTE CONTROL SPECIFICATIONS
Rated Voltage 3.0V (Dry Batteries R03/LR03×2)
Signal Receiving Range 26 Ft. (8 Metres)
Remote Operating Temperature 23°F-140°F (-5°C-60°C)
Quick Start Guide
PLACE BATTERIES
PRESS POWER BUTTON
SELECT MODE
POINT REMOTE TOWARD UNIT
SELECT TEMPERATURE
SELECT FAN SPEED
1
6
2
5
3
4
Note
• Button designs on your unit may dier slightly from the example shown.
• If the indoor unit does not have a particular function, pressing that function’s
button on the remote control will have no eect.
AUTO
COOL
DRY
HEAT
FAN
AUTO
LOW
MED
HIGH
Refer to Operating Instructions section of this manual for a detailed description of each setting.
ATTENTION
CONTINUED
3

HANDLING THE REMOTE CONTROL
1. To insert batteries, slide down back cover of the remote control to expose the battery compartment.
2. Insert batteries accordingly matching the (-) and (+) terminals of the battery.
3. Slide cover in the upward position to close battery compartment.
Inserting and Replacing Batteries
•2 AAA batteries are included.
•Remove batteries from packaging and place batteries into the remote.
ATTENTION
For optimum product performance:
• Do not mix old and new batteries, or batteries of dierent types.
• Do not leave batteries in the remote control if you don’t plan on using the device for more than 2 months.
Note
4

Battery Disposal
Tips
• The remote control must be within 26 ft (8m) of the unit.
• The unit will beep when remote signal is received.
• Curtains, direct sunlight, amongst other objects may interfere with the IR signal receiver, assure there are no
objects between remote and unit.
• Remove batteries if the remote will not be used more than 2 months.
Do not dispose of batteries as unsorted municipal waste. Refer to local laws for proper disposal
of batteries.
The device should comply with the local national regulations.
• In Canada, it should comply with CAN ICES-3(B) NMB-3(B).
• In USA, this device complies with part 15 of the FCC Rules. Operation is subject to the following
two conditions:
1. This device may not cause harmful interference, and
2. This device may receive unwanted interference that may aect operation.
This equipment has been tested and found to comply with the limits for a Class B digital device, pursuant
to part 15 of the FCC Rules. These limits are designed to provide reasonable protection against harmful
interference in a residential installation. This equipment generates, uses and can radiate radio frequency
energy and, if not installed and used in accordance with the instructions, may cause harmful interference
to radio communications. However, there is no guarantee that interference will not occur in a particular
installation. If this equipment does cause harmful interference to radio or television reception, which can be
determined by turning the equipment o and on, the user is encouraged to try to correct the interference by
one or more of the following measures:
•Reorient or relocate the receiving antenna. Increase the separation between the equipment and receiver.
•Connect the equipment into an outlet on a circuit dierent from that to which the receiver is connected.
•Consult the dealer or an experienced radio/TV technician for help.
•Changes or modications not approved by the party responsible for compliance could void user’s authority
to operate the equipment.
CAUTION
HANDLING THE REMOTE CONTROL
5

TEMP
ON/OFF
MODE
FOLLOW ME
°C/°F
LED DISPLAY
TIMER OFF
TIMER ON
FAN SPEED
TEMP
ENERGY SAVER
LOCK
SLEEP
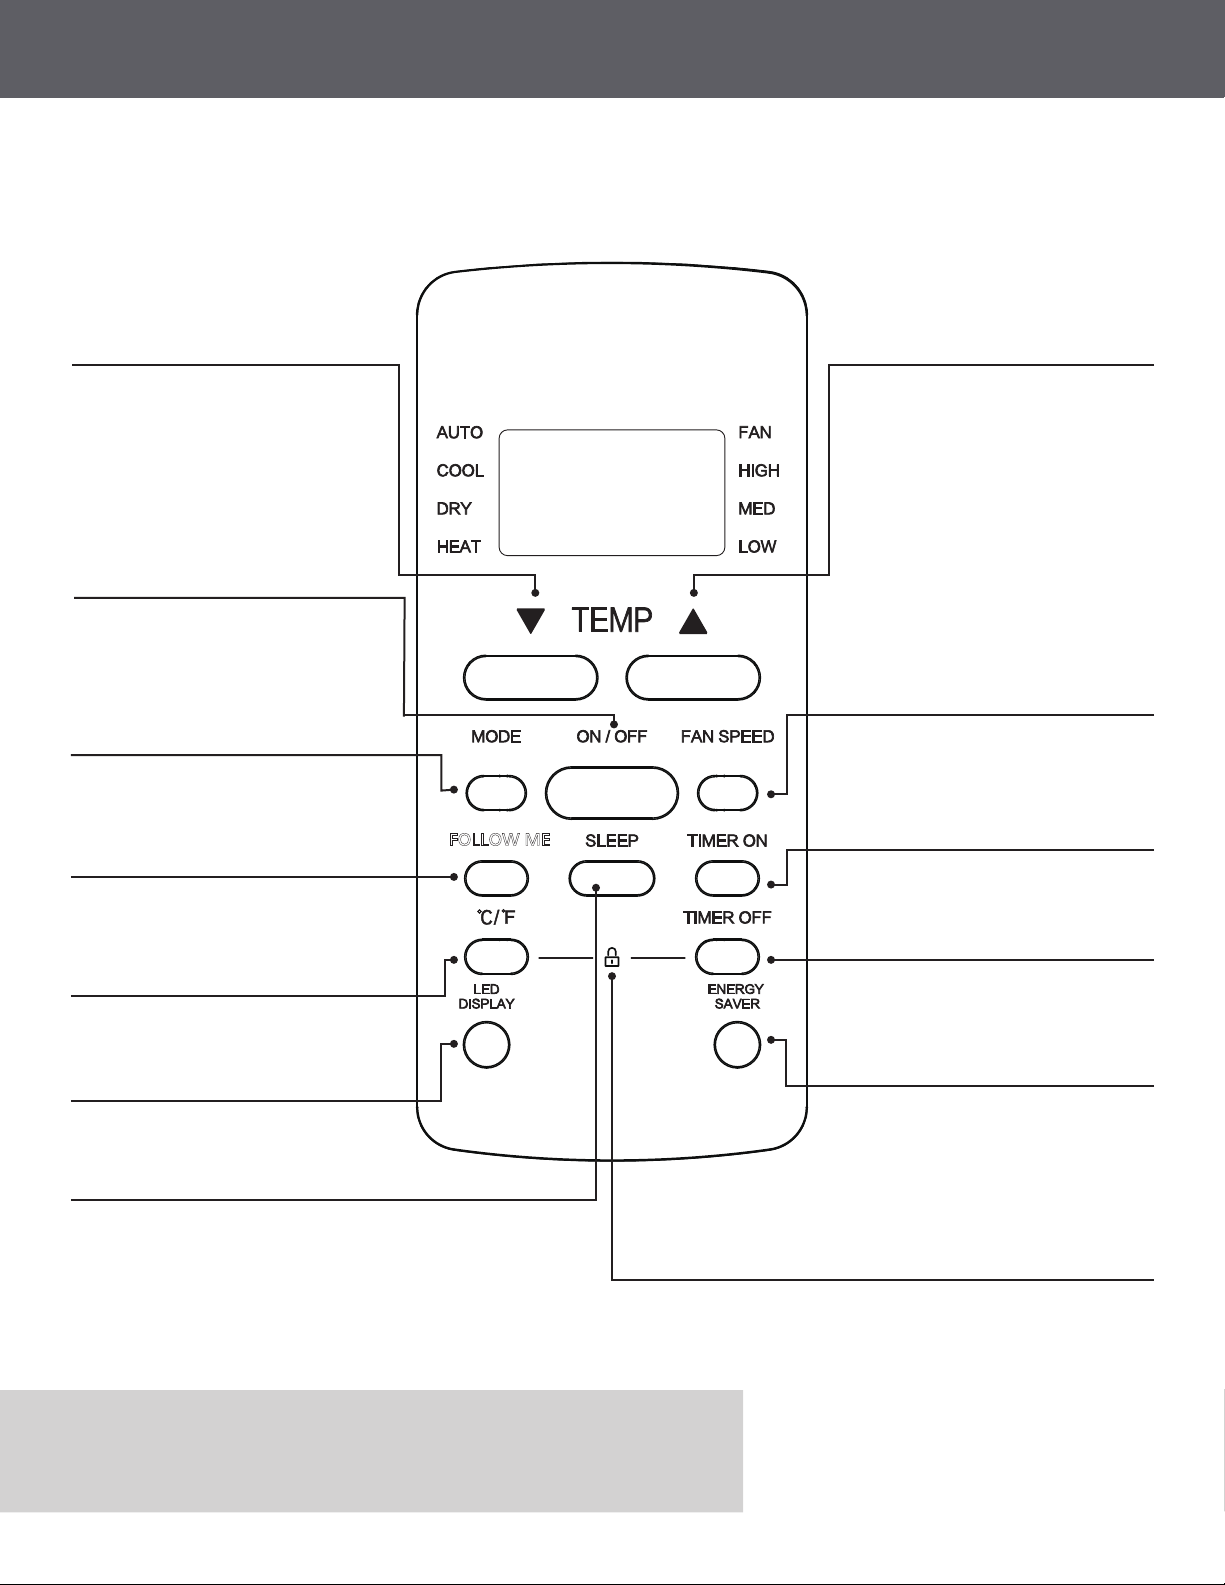
Decreases temperature in 1°F (1°C) increments.
Minimum temperature is 62°F (17°C).
Powers the unit ON/OFF.
Scrolls through operation modes as follows:
AUTO -> COOL -> DRY -> HEAT -> FAN
FOLLOW ME will work as a thermostat and display
room temperature in which the remote is in.
Remote must always be within range of the unit.
Switch the temperature display between °C & °F.
Allows you to turn the unit’s LED display OFF/ON.
Will power the unit ON at desired set time (see
Operating Instructions for detailed instructions).
Selects fan speeds in the following order:
AUTO -> LOW -> MED -> HIGH
Increases temperature in 1°F (1°C) increments.
Maximum temperature is 86°F (30°C).
Will power the unit OFF at desired set time (see
Operating Instructions for detailed instructions).
Fan will run for 3 minutes after compressor shuts
o, Fan will then cycle ON/OFF every 2 and 10
minutes until the room temp is above the set
temp. Once room temp rises, the compressor
will resume to cool. Available in COOL, DRY,
and AUTO mode.
1. Press the °C/°F & TIMER OFF button
together for 5 seconds to lock remote.
No buttons or features will be accessible.
2. Repeat procedure to Unlock.
Unit will increase the temperature by 2°F (2°C) every 30 minutes for the rst hour.
Will maintain the same temperature for the next 6 hours and then restore
to the original setting. In Heat mode, the unit will decrease the temperature 2°F
(2°C) every 30 minutes for the rst hour and maintain the same temp for 6 hours.
(Only for COOL & HEAT mode).
Note
•Remote will not have HEAT button if the air conditioner does
not have a HEAT feature.
REMOTE FUNCTIONS
Before you begin using your new air conditioner, make sure to familiarize yourself with its remote control.
The following is a brief introduction to the remote control itself. For instructions on how to operate your air
conditioner, refer to the Operating Functions section of this manual.
FOLLOW ME
6
CONTINUED

REMOTE DISPLAY ICONS
AUTO
COOL
DRY
HEAT
FAN
Displayed when signal is being transmitted
Displayed when unit is turned ON
Displayed when TIMER ON time is set
Displayed when TIMER OFF time is set
Will show set temperature, room temperature and TIMER ON/OFF desired time
Displayed when the remote is locked
Displayed when the FOLLOW ME feature is activated
Displayed when SLEEP feature is activated
HIGH - High speed
MED - Medium speed
LOW - Low speed
NO Arrow
Displayed Auto fan speed
The following icons will appear upon powering the remote.
AUTO
COOL
DRY
HEAT
FAN
HIGH
MED
LOW
Mode Display
Fan Speed Indication
Note
• All icons shown in the gure above are for visualization purposes only. During operation, only the
selected icons will be displayed.
7
Model: RG51G(1)/CEFU1
RG51G(1)/EFU1

OPERATING INSTRUCTIONS
Before powering on, assure the unit is plugged in the correct outlet conguration.
The operating temperature range for the unit is
62-86°F (17-30°C).
You can increase or decrease desirable temperature
in 1°F (1°C) increments.
ATTENTION
COOL Mode
AUTO Mode
Temperature Range
1. Press the MODE button to select COOL mode.
2. Set your desired temperature using
the TEMP or TEMP button.
3. Press FAN button to select the fan speed:
AUTO, LOW, MED or HIGH.
4. Press the ON/OFF button to start the unit.
In AUTO mode, the unit will automatically select
between COOL, FAN, DRY, and HEAT mode based
on the room and set temperature.
1. Press the MODE button to select AUTO mode.
2. Set your desired temperature using the
TEMP or TEMP button.
3. Press the ON/OFF button to start the unit.
Note
•FAN SPEED cannot be changed in AUTO mode.
FOLLOW ME
8
CONTINUED

OPERATING INSTRUCTIONS
FAN Mode
HEAT Mode (Select Models)
DRY Mode (Dehumidifying)
1. Press the MODE button to select HEAT mode.
2. Set your desired temperature using the
TEMP or TEMP button.
3. Press FAN button to select the fan speed:
AUTO, LOW, MED or HIGH.
4. Press the ON/OFF button to start the unit.
1. Press the MODE button to select DRY mode.
2. Set your desired temperature using the
TEMP or TEMP button.
3. Press the ON/OFF button to start the unit.
1. Press the MODE button to select FAN mode.
2. Press FAN button to select the fan speed:
AUTO, LOW, MED or HIGH.
3. Press the ON/OFF button to start the unit.
Note
Note
Note
• When in FAN mode the set temperature cannot
be changed. There will be no number displayed
on the remote LCD screen.
•FAN SPEED cannot be changed in DRY mode.
• As outdoor temperature drops, the unit’s heating
eciency will slowly decrease. In such instances,
this unit should not to be used as a main source
of heating.
FOLLOW ME
9

Press TIMER ON button to initiate the
ON time sequence.
Press TIMER OFF button to
initiate the OFF time sequence.
Use the TEMP UP and DOWN button
to set desired time.
Use the TEMP UP and DOWN button
to set desired time.
With the remote pointed at the unit,
wait for 1 second until a beep is heard.
This indicates the setting has been set.
With the remote pointed at the unit,
wait for 1 second until a beep is heard.
This indicates the setting has been set.
Note
• The timer setting will allow you to set the unit with increments of 30 minutes up to 10 hours followed by hourly
increments up to 24 hours for both the ON and OFF timer setting.
• To cancel the TIMER ON/OFF setting, while in the TIMER ON or OFF function use the DOWN or UP arrow to set
the timer at 0.0 hours.
TIMER ON Setting
TIMER OFF Setting
OPERATING INSTRUCTIONS
TIMER ON
TIMER OFF
1sec
1sec
x5
x10
10
CONTINUED

TIMER ON & OFF Setting (Example)
The Timer function can be programmed for both ON and OFF in current time as shown in the example below.
Ex. If current time is 1:00 PM and the TIMER ON is set to 2.5Hr, and TIMER OFF at 5.0Hrs, the unit will turn
on at 3:30 PM and o at 6:00 PM.
TIMER ON
TIMER OFF
xn xnxn
Current
Time 1PM 2:00PM 3:00PM 4:00PM 5:00PM 6:00PM
Timer starts Unit turns
ON
Unit turns
OFF
2.5 hours later
5 hours later
3:30PM
OPERATING INSTRUCTIONS
11


The design and specications are subject to change without prior notice for
product improvement. Consult with the sales agency or manufacturer for details.

This manual suits for next models
3
Table of contents
Popular Remote Control manuals by other brands

Spycentre Security
Spycentre Security 6809 quick start guide

Map
Map KF297 Programming instructions

RANCHO
RANCHO myRide RS999705 Installation instruction

Carrera RC
Carrera RC 370301010 Assembly and operating instructions

Acumen
Acumen RCK-K L Installation and operation instructions

One Remote
One Remote beolink 1000 Operation manual