Global Phoenix MID NB716A User manual

1
Table of Contents
Table of Contents............................................................................................................................1
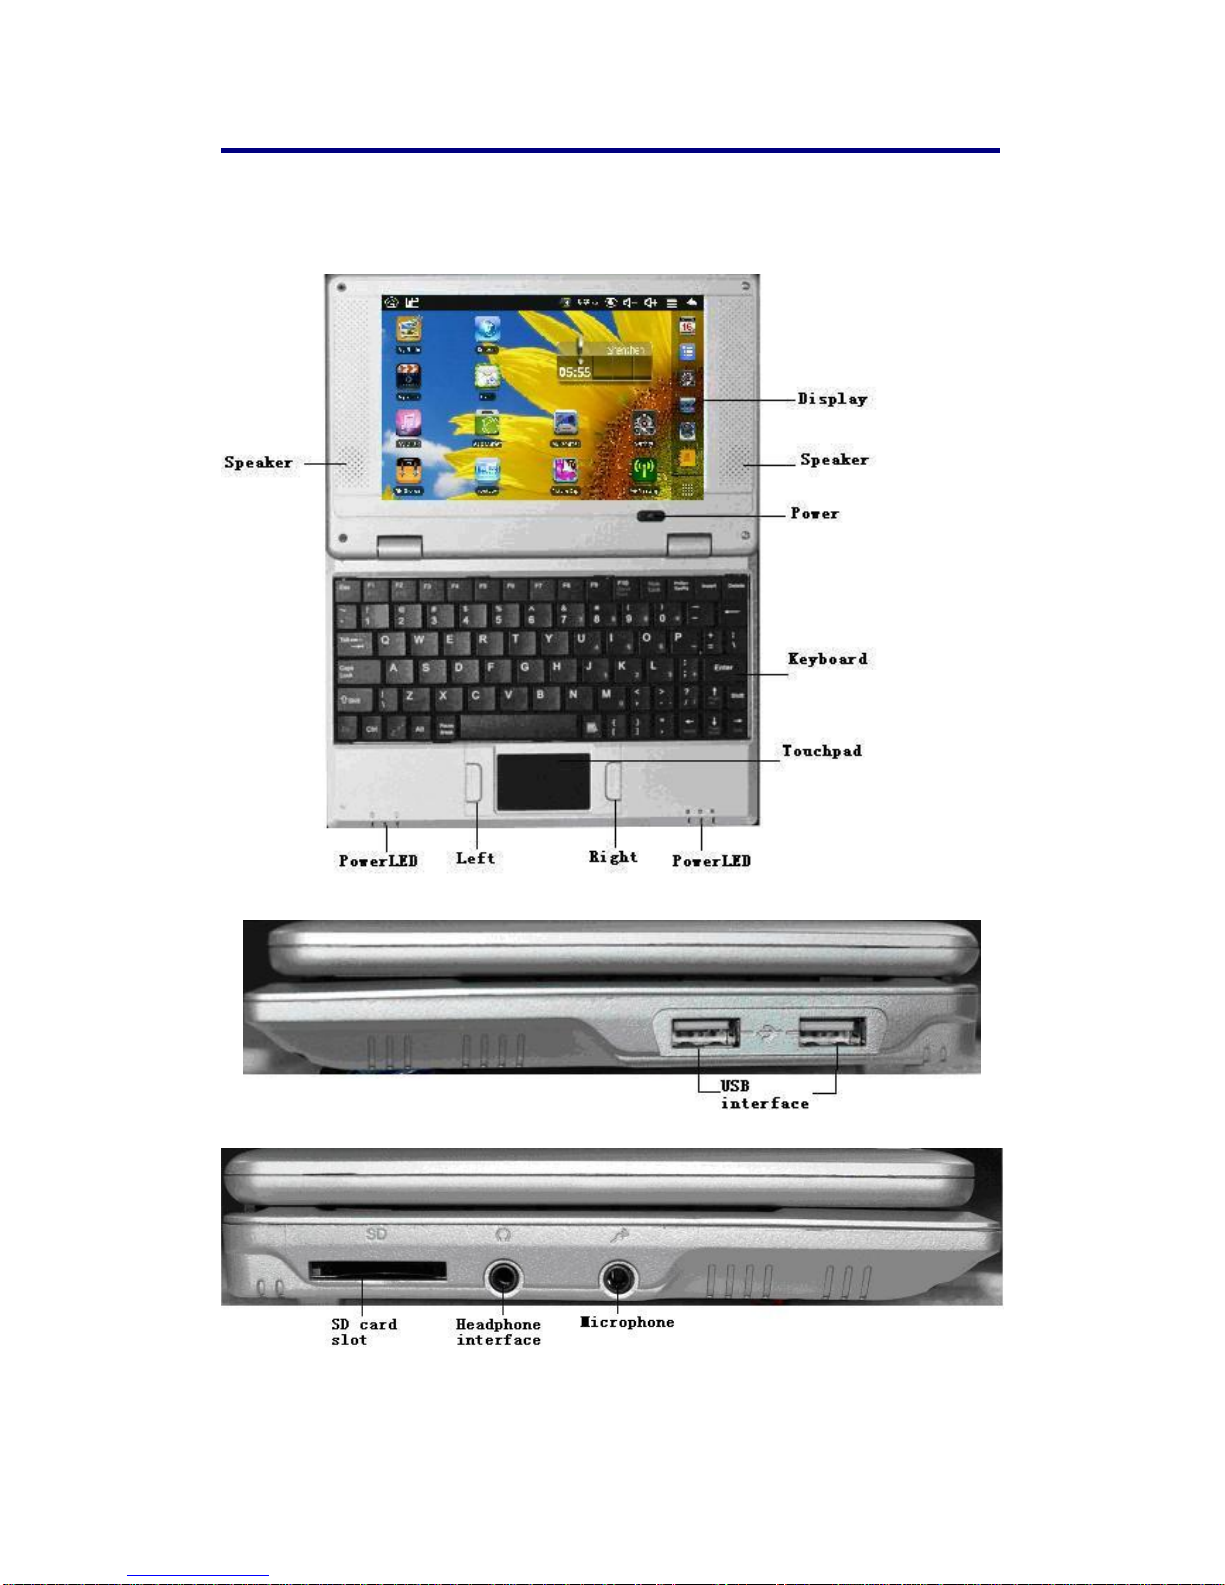
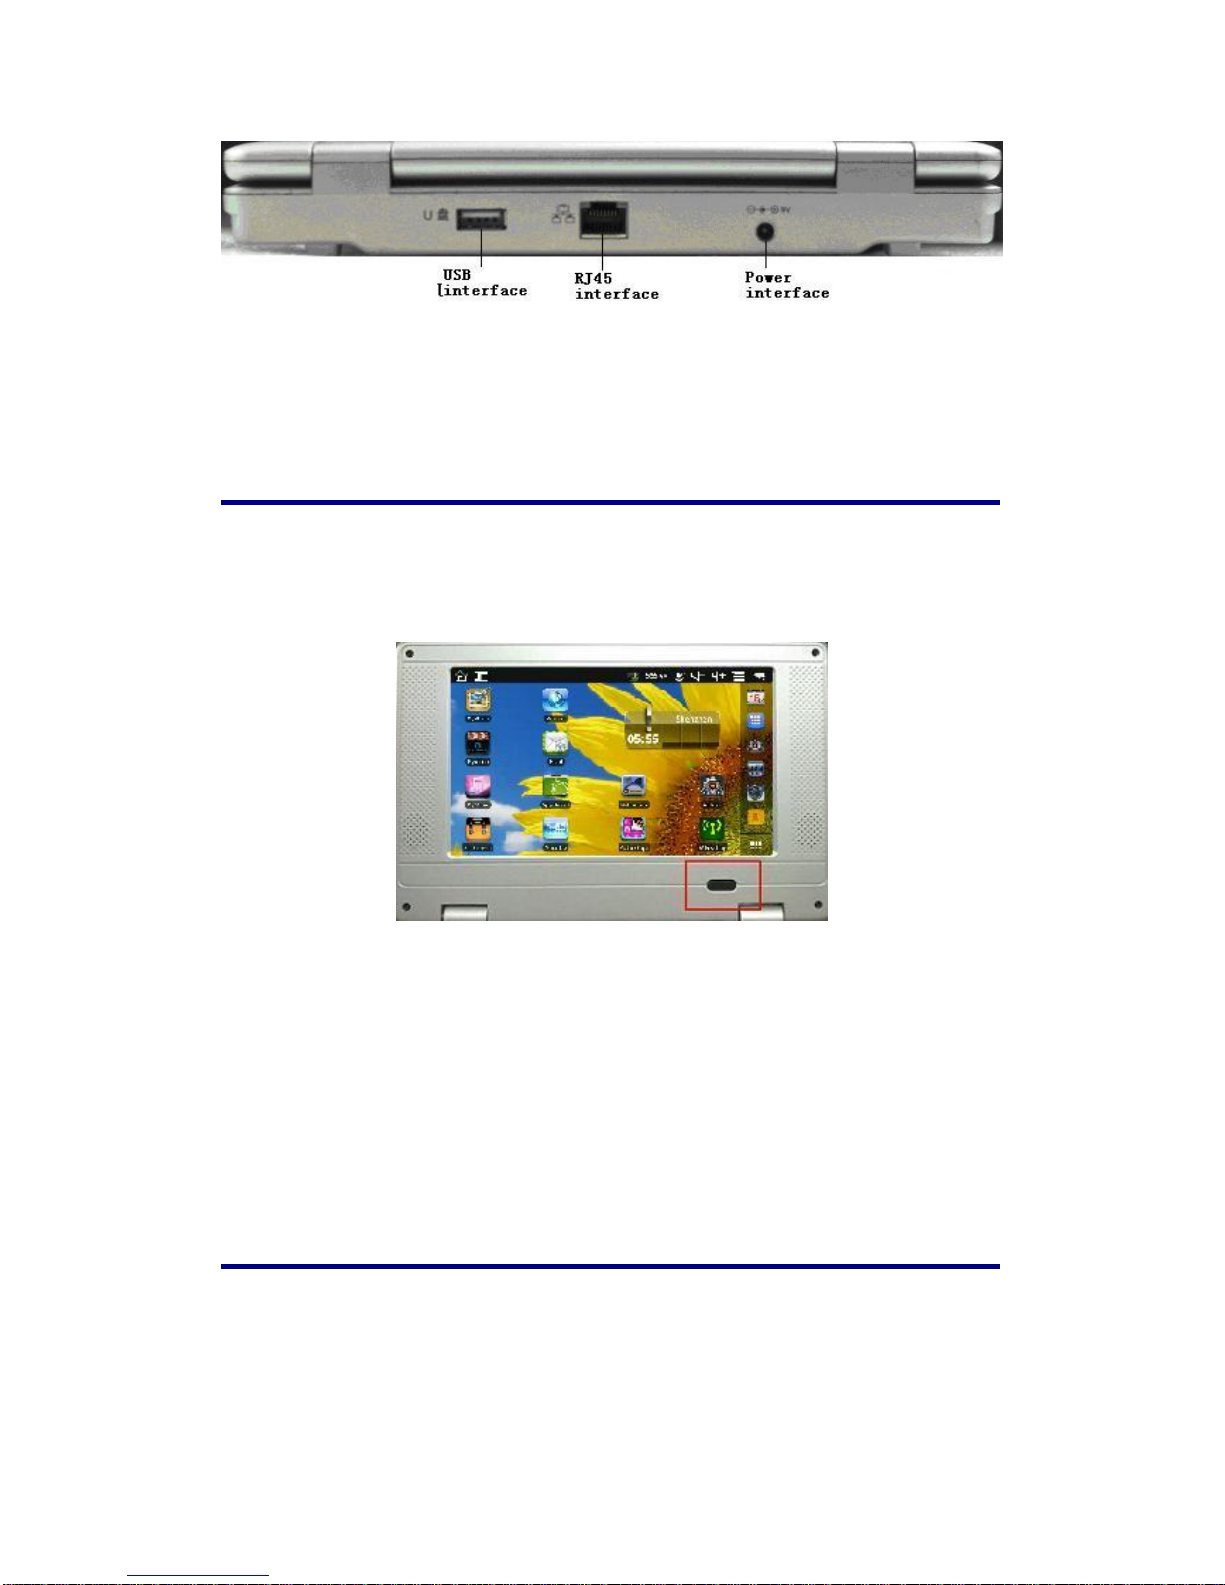
1 Outlook Description.....................................................................................................................3
2 Power Button Usage.....................................................................................................................4
3 USB interface................................................................................................................................4
4 Using microSD Card....................................................................................................................5
5 Keyboard ......................................................................................................................................5
6 Touchpad......................................................................................................................................7
7 Getting Started.............................................................................................................................7
Charge the device....................................................................................................................7
Turn the device on...................................................................................................................7
Wi-Fi Network Setup..............................................................................................................7
8 DESKTOP ....................................................................................................................................8
9 Screen Lock..................................................................................................................................8
10 Pre-loaded Applications ............................................................................................................9
11 Desktop Function Menu..........................................................................................................11
12 Application Management........................................................................................................12
InstallAndroidApplications ................................................................................................12
Download AndroidApplications direct from a Website ....................................................13
UninstallingAndroidApplications ......................................................................................13
13 WmtWeather............................................................................................................................13
14 CLOCK.....................................................................................................................................14
Alarm .....................................................................................................................................14
15 APP MARKET.........................................................................................................................15
Download Applications.........................................................................................................15
App Market Function Menu................................................................................................15
16 BROWSER...............................................................................................................................15
17 CALENDAR.............................................................................................................................16
Add Event..............................................................................................................................16
18 RECORDER.............................................................................................................................16
19 CALCULATOR.......................................................................................................................17
20 EMAIL......................................................................................................................................17
Add Email accounts..............................................................................................................17
Email Inbox ...........................................................................................................................17
Edit EmailAccount...............................................................................................................18
Delete EmailAccounts..........................................................................................................18
21FILE BROWSER......................................................................................................................19
Copy Media between Computer and Tablet.......................................................................19
Delete files..............................................................................................................................20

2
22 MY MUSIC...............................................................................................................................20
Play Music..............................................................................................................................20
The Operation with Music and Playlist...............................................................................20
23 MY VIDEO...............................................................................................................................21
Play Video..............................................................................................................................21
The Operation with Video and Playlist...............................................................................21
24 MY PHOTO .............................................................................................................................22
Doodle.....................................................................................................................................22
25CONTACTS ..............................................................................................................................23
Add New Contacts.................................................................................................................23
Add Contact to Favorites......................................................................................................23
Edit Contacts.........................................................................................................................23
Delete Contacts......................................................................................................................23
26PICTURE CAPTURE ..............................................................................................................23
27TASK MANAGER....................................................................................................................24
Stopping Applications...........................................................................................................24
UninstallApplications...........................................................................................................24
28 YouTube....................................................................................................................................24
29 Wi-Fi Settings...........................................................................................................................25
30 3G Settings................................................................................................................................25
31 ADSL Settings ..........................................................................................................................26
32 Ethernet ....................................................................................................................................26
33 SETTINGS................................................................................................................................26
Frequently Asked Questions........................................................................................................28
Battery Management....................................................................................................................29
Important Safety Precautions......................................................................................................30
Appendix: The Optional parts and models.................................................................................30

3
1 Outlook Description
Front:
Right side:
Left side:
Top:

4
2 Power Button Usage
Turn On: Press the power button and hold for 2 seconds.
Turn Off: Press the power button and hold for 2 seconds, →tap power off→tap OK.
Sleep Mode On/Off: Press & release the power button quickly to turn sleep mode on and off.
Force Off: If device does not respond, press and hold the power button for 5seconds.
Note: If it is necessary, we don’t suggest use Force Off. You should follow the steps to perform
the shutdown.
Reset Button: Press the reset button to reset the device. Reset will erase all data on the device,
please caution this feature. (Note: Current the reset function can not be restart, so after reset you
need to press the power button to re-boot.)
3 USB interface
Insert U-Disk
Insert your U-disk into the Tablet. When ready for use, it will directly into the File

5
Browser to open U disk folder.
Remove U-Disk
Close all applications or documents which have been opened on the U-disk. Tap
→Settings →SD card, U-disk & device storage →Unmount U-disk. And then
you can unplug the U-disk.
☆Wireless Book has three main USB Interface
☆Don’t insert and remove the U-disk repeatedly in a short time, as this may cause
damage to the U-disk.
4 Using SD Card
☆The device supports a maximum 32GB SD card.
Insert your card into the SD slot until it clicks into place. it’s OK
Remove SD Card
Close all applications or documents which have been opened on the card. Tap
→Settings →SD card, U-disk & device storage →Mount SD card. Press the
card lightly; it is partially ejected allowing you to pull the card out.
☆Don’t insert and remove the U-disk repeatedly in a short time, as this may cause
damage to the card.
☆We recommend using major brands of memory cards to avoid incompatibility.
5 Keyboard
Wireless Book was used 80 keys of standard keyboard template.
There are some functions of key combination

6
Home
Lock Screen
Num keyboard
Users press to change Num mode and than they can input The corresponding number by
Num key.Press it again to get back normal mode.
Commonly used buttons:
Esc: Back
Enter: OK
Arrow keys:Corresponds to the direction of(up down left right)
F1: Browser
F2: My Music
F3: My Video
F4: My Photo
F5: Calculator
F6: WmtWeather
F7: My Recorder
F8: Clock
F9: Calendar
F10: File Browser
F11(Fn+F1): Task Manager
F12(Fn+F2): Settings

7
6 Touchpad
Touchpad is a mouse device it can be used as a regular mouse. Touch pad buttons on both sides of
the left and right mouse buttons and common features with the same.
Note:
Do not place heavy objects on the touchpad to avoid being scratched or deformed
☆Do not plug the frequent U disk, it may be damaged.
7 Getting Started
Charge the device
☆You cannot charge the battery using the USB cable.
☆You can use the device while the battery is charging, although the charging time is
longer when operating and charging at the same time.
Plug the power adapter into an electrical wall outlet, and then connect to the device to fully
charge the battery before use (approx. 4hour).
While charging, the battery indicator light is red. When fully charged, the battery indicator
light is green.
Turn the device on
Press the power button and hold for 2 seconds.
Wi-Fi Network Setup
Since many features require a Wi-Fi connection, we recommend you set up your Wi-Fi
network now.
1. Tap , →Settings, →Wireless & network.
2. Select Wi-Fi to turn on.
The device automatically scans and lists all local Wi-Fi Network found. A
indicates secure networks that require login name/password to connect.
3. Tap the desired network to which you want to connect, →enter the Network
Password if applicable, →tap Connect.
4. Tap to return to the Desktop screen.
☆If your Wi-Fi network is set as hidden, it won’t be found
by the auto scan. Tap Add Wi-Fi network and follow the prompts
to add your network.

8
8 DESKTOP
①Return to Desktop from other apps
②Battery charge status
③Current Time
④Picture capture icon
⑤Volume reduction icon
⑥Volume increase icon
⑦Function Menu icon
⑧Back icon
⑨Tap to view the applications screen
☆Tap on any application icon to launch it.
☆Touch, hold and then slide icons to reposition then on the screen.
☆Touch, hold and slide icons onto to remove them from the
Desktop screen.
9 Screen Lock
Can be set to automatically lock screen or quickly press the power button to manually lock
screen. Lock screen displays the following:

9
Drag the icon to turn on or turn off silent mode.
Drag the icon to unlock the screen.
10 Pre-loaded Applications
Wmtweather
Display the weather.
Clock
Use as alarm clock with scheduled alarms.
App Market
Downloaded applications quickly & easily.
Browser
Access the Internet and “surf the web”whenever desired.
Calendar
Calendar with ability to set events.
Calculator
Do calculation.

10
Email
Send/Receive email using your existing email addresses.
File Browser
File manager application for viewing and managing files and apps.
Use to install Android apps, and to backup files to your SD card.
My Music
Play and manage audio files.
My Video
Play and manage video files.
My Photo
View and manage photo files.
Contacts
Create a list of personal contacts, which can also be linked with
your email.
Picture
Capture
Capture image of the screen.
PK
Manager
Application manager for managing processes.
YouTube
Quick launch to YouTube.com videos.
Settings
Multiple settings for personalizing and enhancing your Device.
Wi-Fi Settings
Set Wi-Fi network.
3G Settings
Set 3G network.
ADSLSettings
Set ADSL network.
Ethernet
Configure Ethernet.
☆To move an icon to the Desktop screen, touch & hold on the icon,
and then release it when it appears on the Desktop screen.

11
☆Touch, hold and then slide icons to reposition then on the screen.
☆Touch, hold and slide icons onto to remove them from the Desktop
screen.
11 Desktop Function Menu
On the Desktop screen, you can tap to display the Function Menu.
Add
The viewable portion of the Desktop screen allows only 16 icons. In
order to add more items, finger slide the screen horizontally to
expose available space, and then tap the Add icon again. If the
screen is full, the Add icon won’t response.
Shortcuts
Add quick launch shortcuts on the Desktop to
applications, bookmarks or settings.
☆If you select items that are
shortcuts already on the Desktop
screen, they will be duplicated,
resulting in multiple icons for the
same item.
Widgets
Analog clock: Add a round analog clock.
Calendar: Add a calendar widget to display current
date & events.
Music Player: Add a music widget to quickly begin
playing music without launching the music

12
application.
Folders
New Folder: Add a folder into which you can add
applications as desired. To move applications on the
Desktop screen into the folder, touch, hold & drag
the icons directly on top of the folder icon.
To add applications from the All Application
screen, first tap on the folder to open it, open the All
Application screen, and then touch & hold on an
application icon. It is copied into the folder.
Wallpaper
Select wallpaper from Picture and Wallpapers.
Search
Perform a quick Google search.
Tap in the entry field, →enter the desired search
text, →tap .
Notifications
List any pending notifications (i.e., new email,
calendar events, etc).
Settings
See “Settings”on page 25.
12 Application Management
Install Android Applications
☆There are many interesting and free Android applications that can be found on the
web. Just launch your web browser and do a search for “Android applications”.
Purchased or free Android applications that you have downloaded to your computer can
be installed quickly & easily on your Tablet using the File Browser application.
1. Copy the .apk files that you want to install onto a SD card or USB device, →
insert or connect to your Device.

13
2. Tap the File Browser application icon.
3. Tap or and locate the folder in which the .apk application files were
saved.
4. Tap on a .apk file →Install.
The application is installed and the application icon is added to the Applications
screen.
5. Tap Open to launch the application now, or tap Done to return to the File Browser
screen.
Download AndroidApplications direct from a Website
You can download Android applications directly from websites, and then quickly and
easily install them on your device.
1. Tap the Web application icon to launch the internet browser.
2. Enter the desired website URL, and tap the download link for the application you
want to install on your device.
3. After the download is complete, touch & hold on the download file (in the
Download history screen), →tap Open →Install.
Uninstalling Android Applications
You can also quickly and easily uninstall the Android applications that you have
installed.
1. Tap →Settings →Applications →Manage applications.
2. Tap the application you want to uninstall, →Uninstall.
3. Tap OK to confirm the Uninstall.
13 WmtWeather
Tap the WmtWeather application icon.
General setting
You can set Temperature Unit(℃), Update frequency and Auto Wallpaper.
My cities
You can add city and set it to be my city.
You can make the weather displayed on the Desktop through adding widget. The way is: tap
→Add →Widgets →WmtWeather。

14
14 CLOCK
Tap the Clock application icon. You can see the time and date.
Alarm
You can use your device as an alarm clock by setting multiple alarms.
☆This clock icon displayed at the top of screens indicates
that one or more alarms have been set and are active.
Add Alarm
1. Tap the Clock application icon.
2. Tap →Add alarm.
3. Set up your alarm as desired.
☆If you don’t select a repeat, the alarm is automatically
deleted after it is activated.
4. Tap Turn alarm on.
5. Tap Done.
Shut Off Alarm Alert
When a scheduled alarm is activated, a pop-up window with the alarm title appears.
Tap Snooze if you want to be reminded again in 10 minutes.
Tap Dismiss to cancel the alert.
Turn Alarm on
On alarms that you have set to repeat, you may want to temporarily turn on alarms
rather than delete them.
1. In the Alarm screen, tap on the alarm(s) you want to turn on.
2. Tap to turn on again.
Edit Alarm
1. Tap the Clock application icon.
2. Tap on the alarm you want to edit, →make desired edits.
Delete Alarm
1. Tap the Clock application icon.
2. Tap on the alarm you want to delete.
3. Tap →Delete alarm.

15
Tap to return to the Desktop screen.
15 APP MARKET
The App Market has many applications that you can quickly and easily download to your
Tablet.
Download Applications
1. Tap the App Market application icon.
☆The first time, you are prompted for your App Market login information. If you
have not yet registered an account, tap Register.
Otherwise, tap Login and enter your login information and then tap Login
again.
2. You can select applications from the default Featured group, by Categories, Top
(latest, hottest, random), or search by name.
3. Tap on an application, →Download.
4. After the app is downloaded, tap Install.
5. Tap Open to launch now, or Done to return to the App Market screen.
History
After downloading apps, tap on History to manage the installed applications. You
can add and/or view comments from other users, launch apps, and uninstall them.
App Market Function Menu
Tap to display the App Market Function Menu.
Profile
Tap to access your profile information. You can Change Password, Change Email
and Save Password. Tap Logout on the top right corner of Profile to exit your
account.
About
Displays App store version and support information.
16 BROWSER
Users can connect to the Internet through a browser.
Click the browser icon on the Desktop , and then you can open the Web browser.

16
17 CALENDAR
Tap the Calendar application icon.
For the first time using the Calendar, you need to add an Exchange account. Enter account
email address and password. Click Next and follow the prompts to complete the account
configuration. Then you can use the Calendar.
Add Event
1. On the Calendar screen, tap on the date to which you want to add an event.
2. Tap on the event time, →tap in each entry field to enter the desired event
information.
3. Tap Done.
4. Tap to select desired Calendar screen.
☆Dates with green bars indicate scheduled events.
18 RECORDER
1.Tap the recorder icon.
2.Tap the record icon to record
3.Tap the record icon to stop record

17
4.Tap the play button to listen the voice of recording
19 CALCULATOR
1. Tap the Calculator application icon.
2. Tap the numbers and sign of operation to do the calculation.
3. Tap CLEAR to clear the result one by one, tap and hold CLEAR to clear all.
20 EMAIL
☆POP3 and SMTP accounts are supported.
Add Email accounts
You can enter one or more personal email addresses that you would like to access
through your Tablet.
1. Tap the Email application icon.
2. On the Your Accounts screen, tap Next.
3. Tap in the Email address entry field, →enter your email address.
4. Tap in the Password entry field, →enter your email password.
5. Tap Done.
6. Manual Setup (optional): The server settings are automatically populated based on
your email account provider (i.e., gmail.com, etc). However, if you need to change
the server settings tap Manual Setup and make necessary changes.
7. Tap Next.
8. Optional: Enter a name for the account.
9. Enter name for outgoing message, →tap Done.
☆After setup, if you are unable to connect to a free email account, check with your
email provider to make sure their servers support free accounts on Post Office
Protocol (POP) or Simple Mail Transfer Protocol (SMTP).
Email Inbox
1. Tap the Email application icon.
2. If you set up only one email account, it opens immediately. If you set up multiple
accounts, they are listed in the Accounts screen.
3. Tap on the desired email account, →tap Inbox.

18
Open Email Message
1. On the Inbox screen, tap on an email to open it.
2. For attachments, tap Open to launch appropriate application, or tap Save to
save attachment to a SD card.
3. To replay, tap Reply or Reply all.
a. Tap in the Compose Mail entry field to enter your reply message.
b. Tap Send to send immediately, Save as draft to save without send or Discard
to discard without saving or sending.
4. To delete the email immediately, tap Delete.
Compose New Email Message
1. On the Inbox screen, tap →Compose.
2. Tap in the To entry field and then enter the recipient’s email address.
3. Optionally, if you want to add Cc or Bcc recipients, tap →Add
Cc/Bcc, and then enter the recipient’s email address.
4. Tap in the Subject entry field to enter your desired subject title.
5. Tap in the Compose Mail area to enter your personal message.
6. If desired, tap →Add Attachment to attach a file.
7. When ready to send the email, tap →Send.
Edit Email Account
1. Tap the Email application icon.
2. On the Inbox screen, tap →Account settings.
3. Set your desired preferences to customize your email account.
4. Tap to return to the Inbox screen.
Delete Email Accounts
☆If you have multiple accounts, and you delete the account designated as the default
account, the next email listed is automatically set as the default.
1. Tap the Email application icon.
2. On the Inbox screen, tap →Accounts.
3. Touch & hold on the account you want to delete.
4. In the pop-up Account options window, tap Remove account.
5. Tap OK to confirm the deletion.
Set Default EmailAccount
You must always have one account designated as the default account, so if you have
multiple email accounts, you can select any one as the default.

19
1. Tap the Email application icon.
2. On the Inbox screen, tap →Account Settings.
3. Tap Default Account to select it.
If you delete the account that was designated as the default account, the next email listed
is automatically designated as the default.
21 FILE BROWSER
Tap the File Browser application icon to view the files on all storage devices
(Internal memory, SD card, USB device), and to quickly & easily install Android application
on your Tablet.
Use the icons across the top of the screen as follows:
Local disk (Internal memory)
Your SD card
U-disk/USB flash drive
Display precious folder
Create a new folder
Allows you to multi-select items
Copy Media between Computer and Tablet
You can use the File Browser to copy files between an external storage devices and your
computer. You can first copy the desired files onto a SD card or USB device or directly
use an USB cable to connect the device and the computer and then copy files.
☆The internal device storage is titled “LocalDisk”, a memory
card “sdcard”, and a USB storage device is titled “udisk”.
☆The instructions below are for copying from a SD card or USB
storage device into the device. You can use the same method
to copy from the device to a SD card or USB storage device,
and then connect the storage device to your computer to
transfer the files into the desired folder on your computer.
1. Tap the or to display the contents of your storage device.
2. Tap and hold in the folder/file you want to copy, →tap Copy.

20
3. Tap on the Internal Memory, →tap on the folder into which you want to
copy the file, →tap Paste.
Delete files
Tap and hold on the folder/file you want to delete, →tap Delete →OK to confirm
the deletion.
22 MY MUSIC
☆Audio file formats supported: MP2, MP3, WAV, AAC, WMA.
Play Music
1. Tap the My Music application icon.
2. Select an audio file from All/Albums/Artists/Directories/My Favourites/User
Defined Playlists to play it.
3. To stop the music, tap the Pause icon.
4. To leave the music playing and return to previous screens, tap or tap
to return to the Desktop screen.
Tap the photo on the left corner can enter the Music Player interface. It shows like:
At this interface, you can do: view the lyrics, play / pause, switch to the previous / next,
added to favorites, loop and random operation etc.
The Operation with Music and Playlist
This manual suits for next models
1
Table of contents
Other Global Phoenix Tablet manuals

Global Phoenix
Global Phoenix SX9700 User manual

Global Phoenix
Global Phoenix MID M830 User manual

Global Phoenix
Global Phoenix MID M1006S User manual

Global Phoenix
Global Phoenix MID M9000 User manual

Global Phoenix
Global Phoenix MID M762 User manual

Global Phoenix
Global Phoenix MID M709 User manual

Global Phoenix
Global Phoenix MID M730 User manual

Global Phoenix
Global Phoenix MID M1050S User manual

Global Phoenix
Global Phoenix MID NB726A User manual

Global Phoenix
Global Phoenix MID M1060W User manual