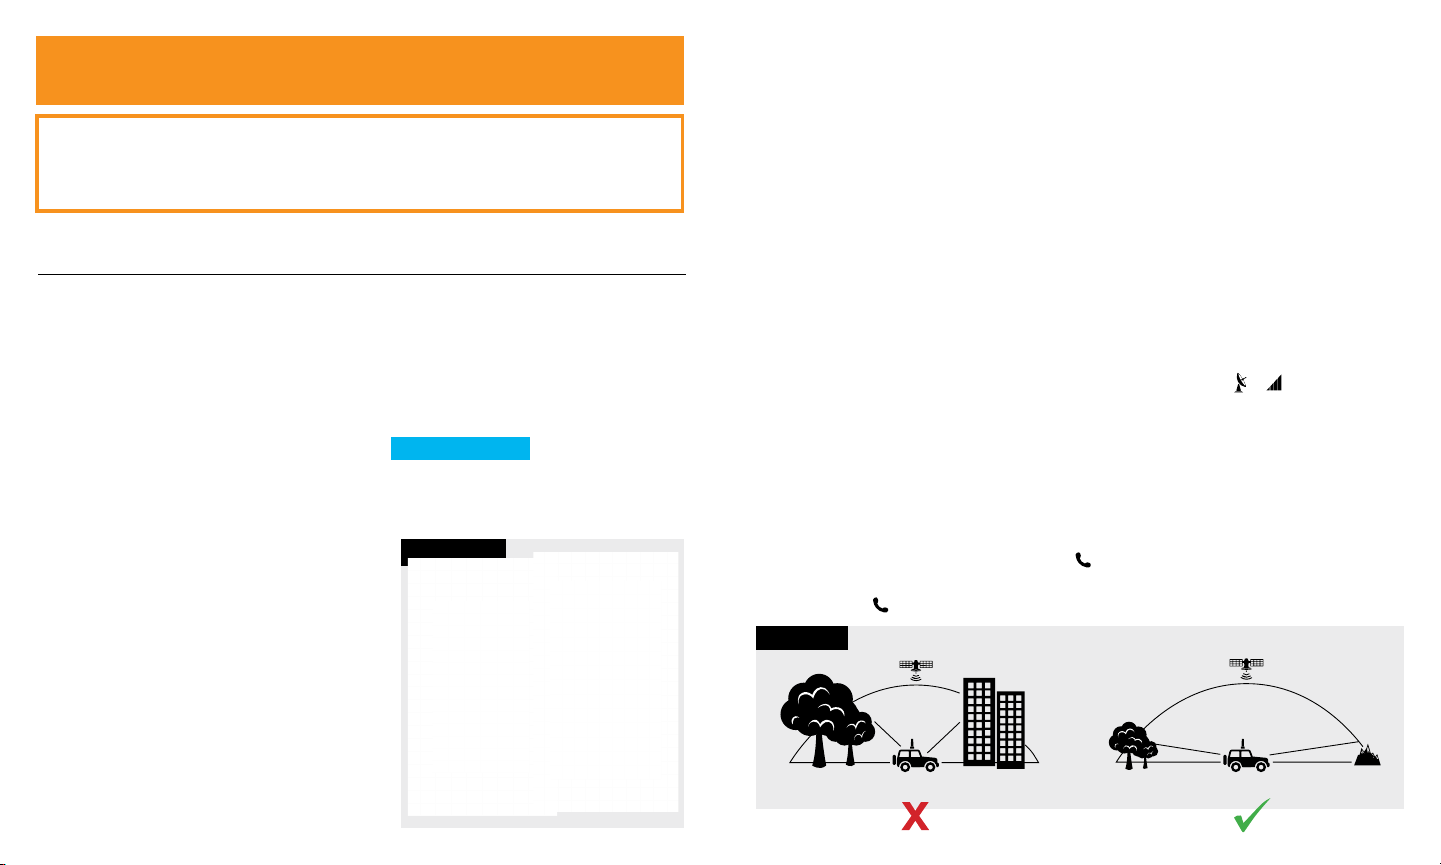
Globalstar Sat Fi2 User manual


STEP 1: REGISTER YOUR ACCOUNT
1. To register your account, open the Welcome to Globalstar e-mail from
message-noreply@globalstar.com and click Register Now .
2. Follow the on-screen instructions to register your account.
STEP 2: SETTING UP THE SAT-FI2 APP
1. On your iOS or Android device, download
and install the Sat-Fi2 App from either the
Apple App Store or Google Play Store.
2. Ensure your device has an LTE or Wi-Fi
connection and open the Sat-Fi2 App. The
App will require the downloading of internal
applications necessary for setup. Do not
close the Sat-Fi2 App during this process.
3. A WELCOME screen will be displayed,
select LET’S GET STARTED. Start the
configuration process by selecting QUICK
START OR ADVANCED SETUP and follow
the on-screen instructions (see Figure 1).
Wi-Fi and Password Information
• Default Wi-Fi name: satfi2_<xxxxxx>
(where xxxxxx is the last 6 digits of the ICCID)
• Default Wi-Fi Password: satfi1234
NOTE: A new firmware update may be available upon activation. An Advanced Setup profile
with admin privileges is required to check for and perform firmware updates. See User Guide
for instructions on how to make a user profile an admin.
STEP 3: TEST THE SAT-FI2 REMOTE ANTENNA STATION CONNECTION
Make a satellite call to test and confirm the Sat-Fi2 Remote Antenna Station system is
configured and operational.
1. With the Sat-Fi2 RAS fully installed and powered in your vehicle, move the vehicle to an
area where the Magnetic Mount Helix antenna has a 360° clear view of the sky with no
obstructions (buildings, trees, etc.). See Figure 2.
2. Open the Sat-Fi2 App and verify that both the and icons are displayed on the Status
Bar. If the icons are not displayed you may not have a clear view of the sky.
NOTE: The Sat-Fi2 RAS can take up to 3 to 5 minutes to power on, boot up, and begin
establishing a satellite/ gateway connection. All three LED’s will sequentially blink green
while powering on/booting up. Once the Sat-Fi2 RAS has booted up, the Satellite LED
will blink RED until the Sat-Fi2 RAS is registered with a gateway. A GPS fix is needed to
register with the gateway.
3. In the Application Menu select .
4. Enter the telephone number you wish to call, or choose a contact, and select .
MOBILE DEVICE NUMBER (MDN) AND ICCID
In order to activate your Sat-Fi2 RAS and register your Globalstar My Account Profile, you will
need to have access to the ICCID number found on the Sat-Fi2 RAS - Right Panel. Your MDN
(telephone number) will be assigned during activation.
ACTIVATE THE SAT-FI2 REMOTE ANTENNA STATION (RAS)
Sat-Fi2 Remote Antenna Station requires activation, please make
sure you have an active subscription. If you do not have an active
subscription or encounter issues with your device, please access
the User Guide by going to Globalstar.com/Sat-Fi2RASSupport.
FIGURE 1
AndroidiOS
NOTE: For initial setup, a home/business Wi-Fi Internet connection
will be required to complete Step 1 and Step 2.
FIGURE 2
RESTRICTED VIEW
OF THE SKY
MAY NOT FUNCTION PROPERLY
CLEAR VIEW OF THE SKY
CORRECT

iOS Android
FIGURE 4
iOS Android
FIGURE 3
INITIATING AN S.O.S.
1. From the Sat-Fi2 App Home screen, select
S.O.S., slide the globe to the right and
follow the on-screen instructions (see
Figure 3).
For best results, while S.O.S. is active, the
Sat-Fi2 RAS Magnetic Mount Helix Antenna
should have a clear view of the sky with no
obstructions in order to maintain network
connectivity.
2. Once S.O.S. is initiated and GEOS IERCC
has received acknowledgment of your
request, the Sat-Fi2 RAS will continuously
send S.O.S. notifications with your GPS
position to GEOS IERCC every 5 minutes
until S.O.S. is cancelled or the Sat-Fi2 RAS
is powered off.
3. Sat-Fi2 RAS will then enable you to talk or
text with GEOS IERCC via the Sat-Fi2 App.
CANCELLING AN S.O.S.
From the Sat-Fi2 App S.O.S. screen, slide the
globe to the left and follow the on-screen
instructions (see Figure 4).
NOTE: The Sat-Fi2 RAS will remain in S.O.S. mode until cancelled by the user.
The S.O.S. notification to GEOS will not be cancelled if the device is powered
off or if the Sat-Fi2 App is turned off.
LED PATTERN DEFINITIONS
1. Normal Blinking - Slow blink rate
2. Forward/Reverse - LED pattern scrolls green from the Power - Satellite - S.O.S. LEDs then
all three blink green
3. Solid On - LED stays continuously illuminated
S.O.S. SAT-FI2 REMOTE ANTENNA STATION LEDS
LED STATUS POWER LED SATELLITE LED S.O.S. LED
POWERING ON All LEDs blink Green in forward/reverse direction until the Sat-Fi2 RAS
powers on
CONNECTED
TO SATELLITE
Normal
Blinking Green
Normal
Blinking Green Off
NOT CONNECTED
TO SATELLITE
Normal
Blinking Green Normal Blinking Red Off
S.O.S.
CONNECTING MODE
Normal
Blinking Green
Normal Blinking
Green or Red Solid Green
S.O.S.
ESTABLISHED MODE
Normal
Blinking Green
Normal Blinking
Green or Red
Normal
Blinking Green
CANCEL S.O.S. MODE Normal
Blinking Green
Normal Blinking
Green or Red Normal Blinking Red

FIGURE 2
VUE RESTREINTE
DU CIEL
PEAUT NE PAS FONCTIONNER CORRECTEMENT
VUE DÉGAGÉE DU CIEL
CORRECT
NUMÉRO D’APPEL MOBILE (MDN) ET ICCID
Pour effectuer la mise en service de votre récepteur Sat-Fi2 avec antenne distante RAS et
l’enregistrement de votre profil “Mon compte Globalstar”, vous devrez avoir accès au numéro ICCID
apparaissant sur le panneau avant du Sat-Fi2 RAS. Votre MDN (numéro de téléphone) vous sera
attribué lors de la mise en service.
EFFECTUER LA MISE EN SERVICE DU RÉCEPTEUR SAT-FI2
AVEC ANTENNE DISTANTE (RAS)
Le récepteur Sat-Fi2 avec antenne distante devant être mis en service, veuillez vous assurer
que vous disposez d’un abonnement en règle. Si vous n’avez pas un abonnement actif ou
éprouvez des difficultés avec votre appareil, veuillez consulter le guide de l’utilisateur en vous
rendant au Globalstar.ca/Sat-Fi2RASSoutien.
NOTE: Pour la configuration initiale, une connexion internet Wifi à la
maison ou au bureau est nécessaire pour compléter les étapes 1 et 2.
Wifi et mot de passe
• Nom du Wifi par défaut: satfi2_<xxxxxx>
(xxxxxx = les 6 derniers chiffres de l’ICCID)
• Mot de passe Wifi par défaut: satfi1234
NOTE: Une nouvelle version du micrologiciel peut être disponible lors de la mise en service. Un
profil de configuration avancée avec des privilèges d’administrateur est nécessaire pour rechercher
et effectuer les mises à jour du micrologiciel. Consultez le Guide de l’utilisateur pour savoir comment
modifier un profil d’utilisateur pour celui d’un administrateur.
ÉTAPE 3: VÉRIFIER LA CONNEXION DU RÉCEPTEUR SAT-FI2
AVEC ANTENNE DISTANTE
Placer un appel via satellite pour vérifier et confirmer que le système du récepteur Sat-Fi2 avec
antenne distante est bien configuré et fonctionnel.
1. Avec le récepteur Sat-Fi2 avec antenne distante complètement installé et connecté dans votre
véhicule, déplacez celui-ci vers un endroit où l’antenne à montage magnétique hélicoïdale
profite d’une vue circulaire complètement dégagée vers le ciel sans aucune obstruction
(édifices, arbres, etc.) Voir Figure 2.
2. Ouvrez l’appli du Sat-Fi2 et assurez-vous que les deux pictogrammes et sont affichés dans
la barre d’état. Si les pictogrammes n’apparaissent pas, il est possible que la vue vers le ciel ne
soit pas complètement dégagée.
NOTE: L’allumage, le démarrage et l’établissement de la connexion satellite / passerelle du
récepteur Sat-Fi2 avec antenne distante peut prendre entre 3 et 5 minutes. Les trois voyants
DEL clignotent en vert de manière séquentielle lors de la mise sous tension et du démarrage.
Lorsque le Sat-Fi2 RAS est démarré, le voyant DEL Satellite clignote en rouge jusqu’à ce
qu’il soit relié à une passerelle. Un repère GPS est nécessaire pour enregistrer auprès de la
passerelle.
3. Dans le menu de l’application, sélectionner .
4. Saisissez le le numéro de téléphone que vous souhaitez appeler, ou choisissez un contact et
sélectionner .
ÉTAPE 1: ENREGISTRER VOTRE COMPTE
1. Pour enregistrer votre compte, ouvrez le courriel “ Welcome to Globalstar” reçu de
“message-noreply@globalstar.com” et cliquez su Enregistrer maintenant .
2. Suivre les directives à l’écran pour enregistrer votre compte.
ÉTAPE 2: CONFIGURATION DE L’APPLI DU SAT-FI2
1. Sur votre appareil iOS ou Android, téléchargez et
installez l’application Sat-Fi2 à partir de l’Apple
Store de Apple ou du Google Play Store.
2. Assurez-vous que votre appareil dispose d’une
connexion LTE ou Wifi et ouvrez l’application
du Sat-Fi2. L’appli nécessite le téléchargement
d’applications internes nécessaires à la
configuration. N’éteignez pas l’appli du Sat-Fi2
pendant cette opération.
3. Un écran de bienvenue apparaîtra. Sélectionnez
COMMENCER. Amorcez le processus de
configuration en sélectionnant DÉMARRAGE
RAPIDE ou CONFIGURATION AVANCÉE et
suivez les directives à l’écran (voir Figure 1).
FIGURE 1
AndroidiOS

ENVOYER UN SOS
1. À partir de l’écran d’accueil de l’appli du
Sat-Fi2, sélectionnez SOS, glissez le globe
vers la droite et suivez les directives à
l’écran (Voir figure 3).
Pour obtenir de meilleurs résultats pendant
que la fonction SOS est activée, l’antenne à
montage magnétique hélicoïdale du Sat-Fi2
RAS devrait avoir accès à une vue dégagée
vers le ciel sans aucune obstruction afin de
maintenir la connectivité réseau.
2. Aussitôt que la fonction SOS est activée et
que le CICSU de GEOS ait accusé réception
de votre demande, le Sat-Fi2 RAS enverra
continuellement des alertes SOS avec les
données de votre géolocalisation au CICSU
de GEOS à toutes les 5 minutes jusqu’à ce
que la fonction SOS soit annulée ou que
l’appareil Sat-Fi2 RAS soit éteint.
3. Le Sat-Fi2 RAS vous permettra de parler
ou d’expédier des messages textes avec le
CICSU de GEOS à partir de l’appli du Sat-Fi2.
ANNULER UN SOS
À partir de l’écran de l’appli du Sat-Fi2, glissez
le globe vers la gauche et suivez les directives à
l’écran (Voir Figure 4).
NOTE: Le Sat-Fi2 RAS demeurera en mode SOS jusqu’à son annulation par
l’utilisateur. L’alerte SOS envoyée à GEOS ne sera pas annulée si l’appareil
est éteint ou si l’appli du Sat-Fi2 est fermée.
SOS
SIGNIFICATIONS DES MODÈLES DE VOYANTS
1. Clignotement normal - Rythme de clignotement lent
2. Toutes directions - Le modèle des voyants défile à partir de Alimentation - Satellite et SOS.
Les trois voyants DEL clignotent ensuite en vert
3. Allumé en continu - Les voyants DEL sont allumés en permanence
LES VOYANTS DU RÉCEPTEUR SAT-FI2
AVEC ANTENNE DISTANTE
ÉTAT DES
VOYANTS DEL
VOYANT
D’ALIMENTATION
DEL
DEL SATELLITE DEL S.O.S
MISE EN MARCHE Tous les voyants clignotent en vert dans toutes les directions jusqu’à ce que le
Sat-Fi2 RAS soit sous tension
CONNECTÉ AU
SATELLITE Clignotement
normal en vert
Clignotement
normal en vert Éteint
NON CONNECTÉ
AU SATELLITE Clignotement
normal en vert
Clignotement rapide
en rouge Éteint
MODE DE
CONNEXION SOS Clignotement
normal en vert
Clignotement normal en
vert ou rouge Vert en continu
MODE SOS ÉTABLI Clignotement
normal en vert
Clignotement normal en
vert ou rouge
Clignotement normal
en vert
ANNULATION DU MODE
SOS Clignotement
normal en vert
Clignotement normal en
vert ou rouge
Clignotement rapide
en rouge
iOS Android
FIGURE 4
iOS Android
FIGURE 3

AIDE SUPPLÉMENTAIRE RÉCEPTEUR SAT-FI2 AVEC ANTENNE DISTANTE
Pour de plus amples informations afin d’accéder à votre compte de messagerie, envoyer
un message S.O.S., configurer un compte de média social, consulter la météo, naviguer
sur l’internet, consulter votre messagerie vocale ou d’autres informations plus détaillées,
veuillez visiter le site Globalstar.ca/Sat-Fi2RASSoutien.
CE GUIDE D’UTILISATEUR SERA MODIFIÉ SANS PRÉAVIS. Certaines informations dans
ce guide sont désuètes à cause de mises à jour du micrologiciel.
Veuillez visiter le site Globalstar.ca/Sat-Fi2RASQSG pour avoir accès à la plus récente
version du Guide de démarrage rapide.
ADDITIONAL SAT-FI2 REMOTE ANTENNA STATION SUPPORT
For more information on how to access your personal e-mail, send an S.O.S.,
set up social media, check the weather, browse the web, check your voicemail
and more detailed information on how to use your Globalstar Sat-Fi2 RAS,
please visit Globalstar.com/Sat-Fi2RASSupport.
THIS QUICK START GUIDE IS SUBJECT TO CHANGE WITHOUT NOTICE.
Some information on this guide may be outdated due to firmware updates.
Please visit Globalstar.com/Sat-Fi2RASQSG for the latest version of the
Quick Start Guide.
© 2019 Globalstar. All rights reserved.
All trademarks, service marks, trade names, trade dress, product names and logos appearing
in this Quick Start Guide are the property of their respective owners.
Globalstar © 2019. Tous droits réservés.
Toutes les marques commerciales, marques de service, noms commerciaux, habillages commerciaux, noms de
produits et logos apparaissant dans ce Guide de démarrage rapide appartiennent à leurs propriétaires respectifs.
R-1
Table of contents
Languages:
Other Globalstar Antenna manuals
Popular Antenna manuals by other brands

stellar labs
stellar labs 30-2440 installation guide

Patriot Antenna
Patriot Antenna Rx Installation & assembly instructions

TERK Technologies
TERK Technologies FDTVO owner's manual

Sennheiser
Sennheiser AC 3 - ANNEXE 748 instruction manual

M2 Antenna Systems
M2 Antenna Systems 7-10-30LP8 UP-KIT manual

Televes
Televes TFORCE 108380 quick start guide