GLP YPOC PRO 250 User manual

Instruction Manual
from software version 1.0
(instruction version 1.05)
Internet: http://www.glp.de

GLP German Light Products GmbH (instruction version 1.05) 2
Notes:

GLP German Light Products GmbH (instruction version 1.05) 3
Table of contents
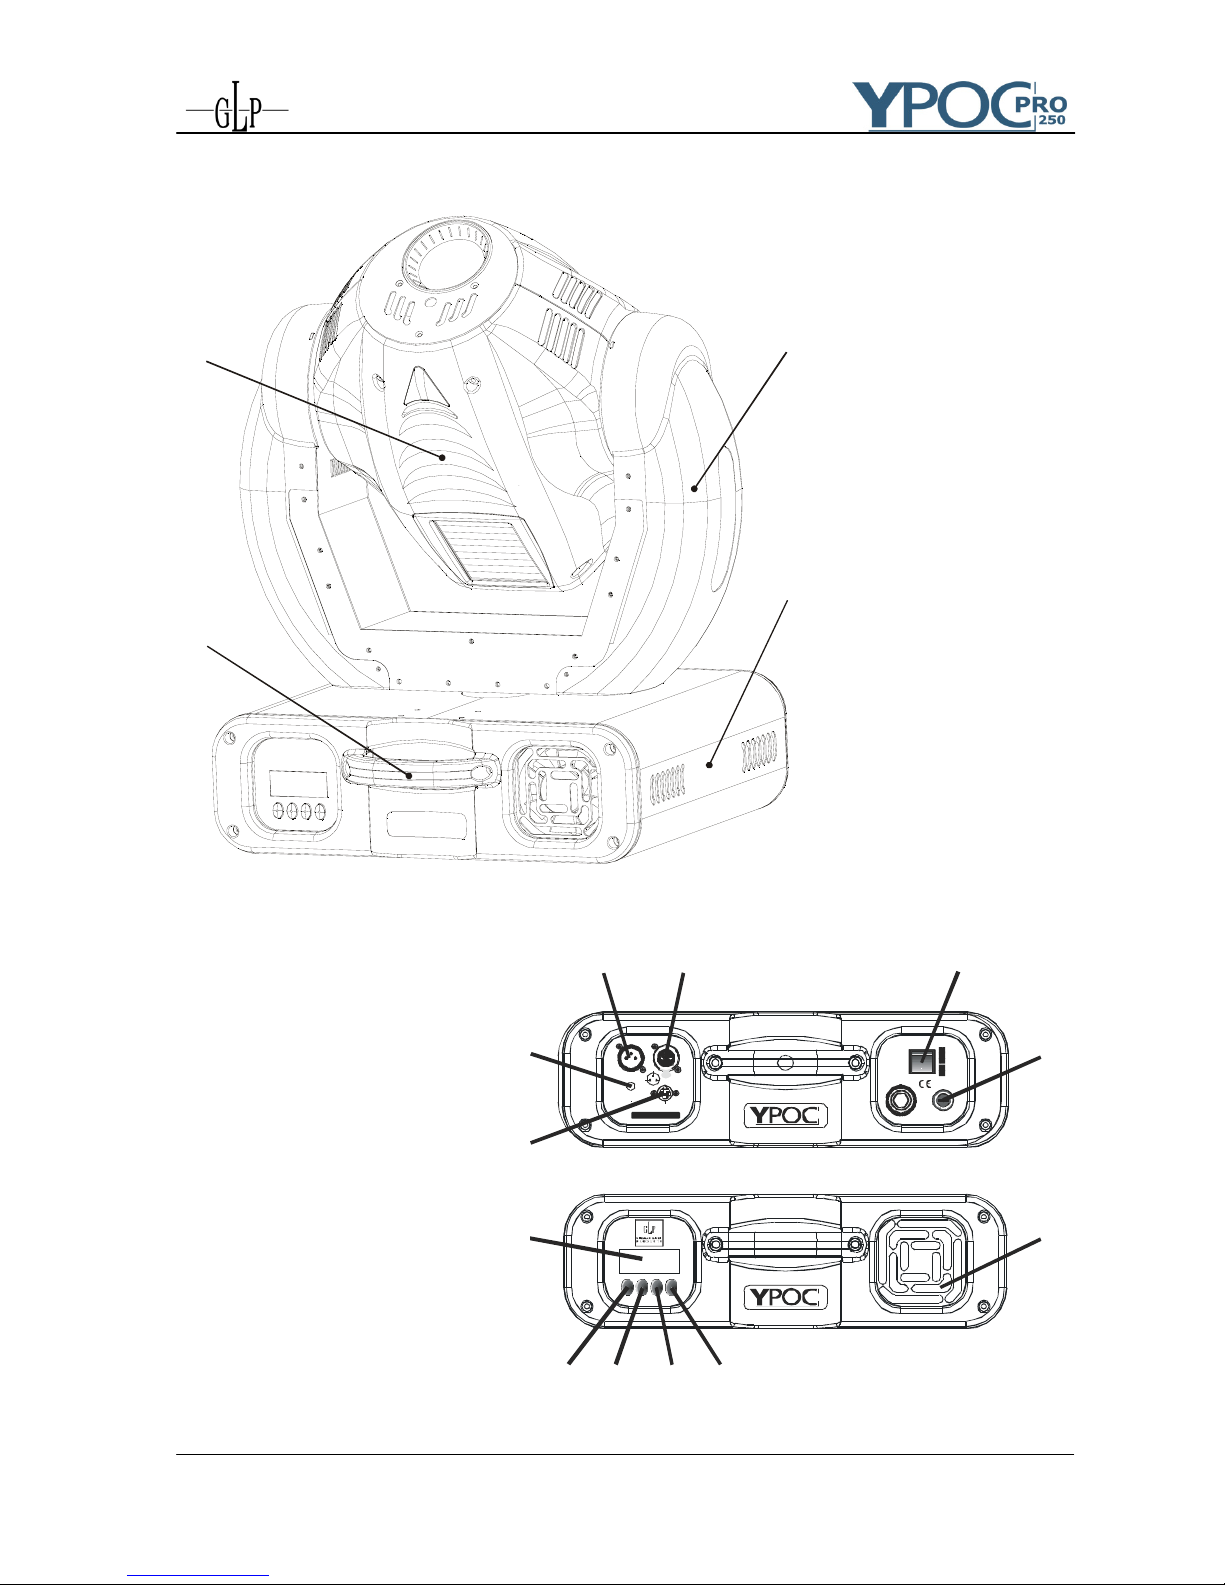
1Description of Device..............................................................................................5
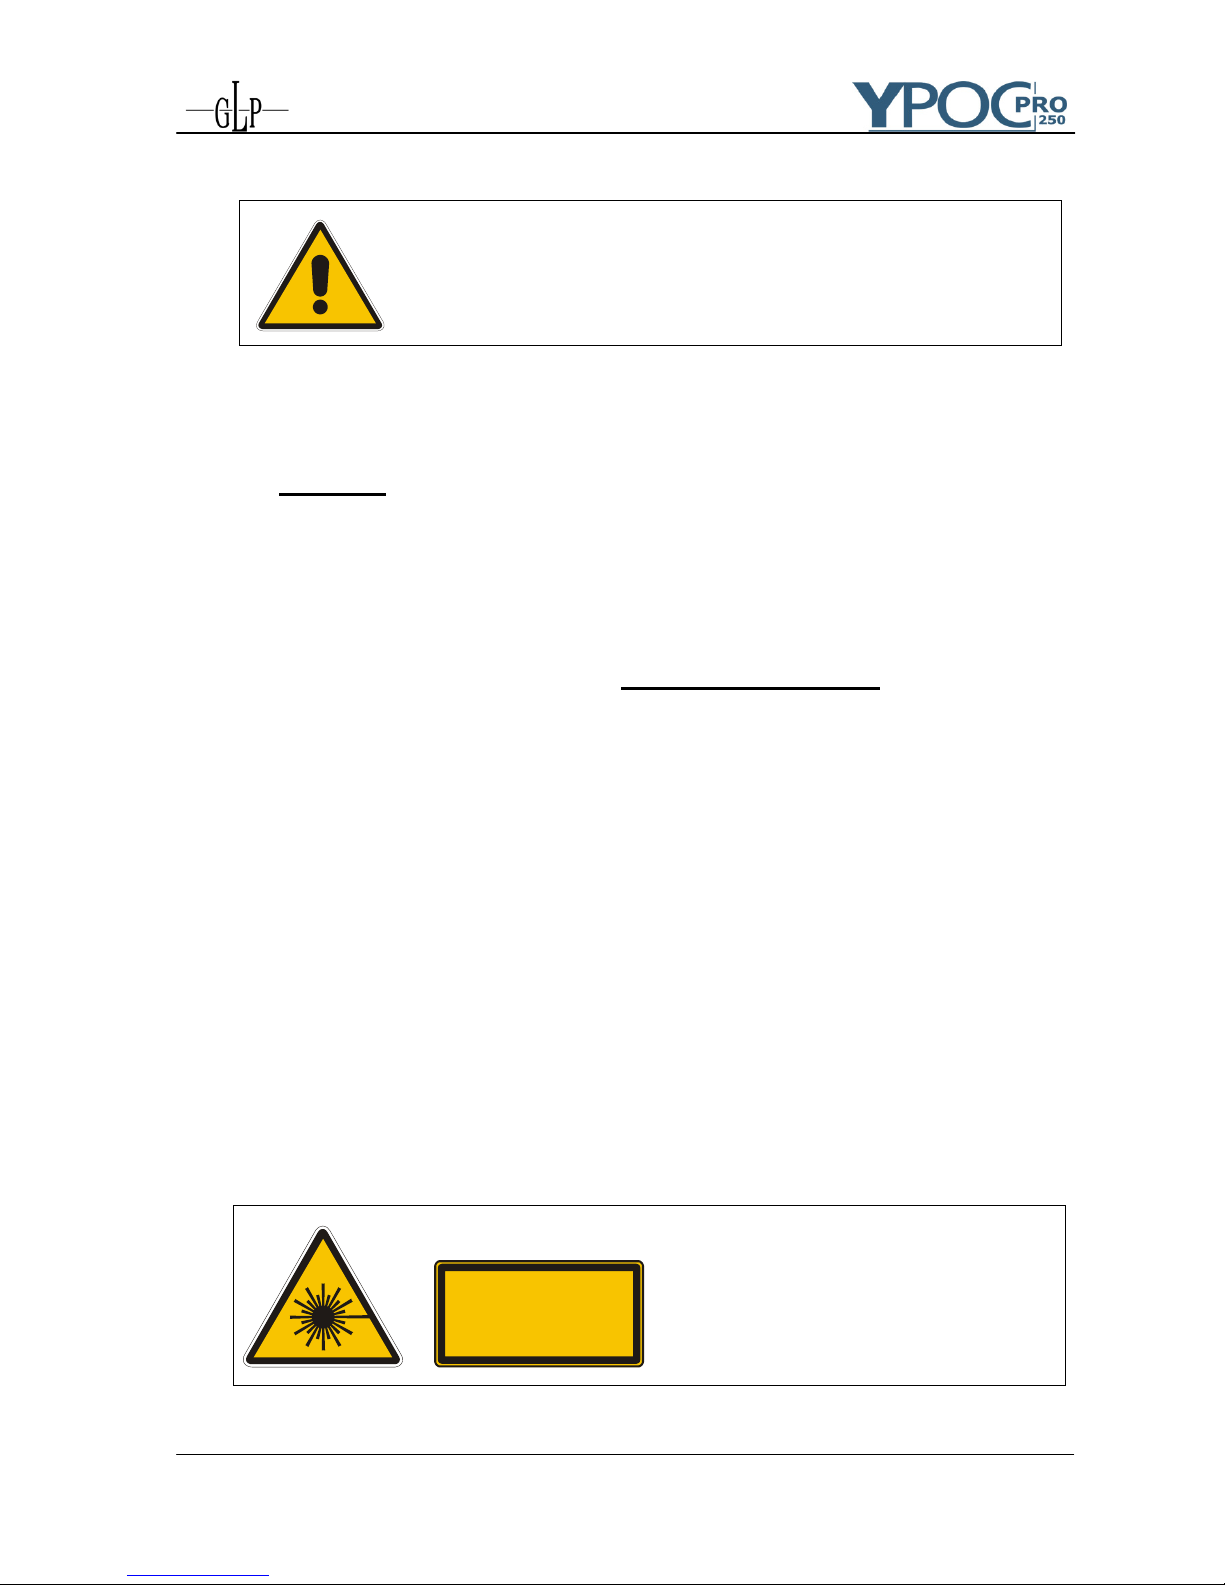
1.1 Safety Instructions ............................................................................................6
2Preparation and Installation ...................................................................................7
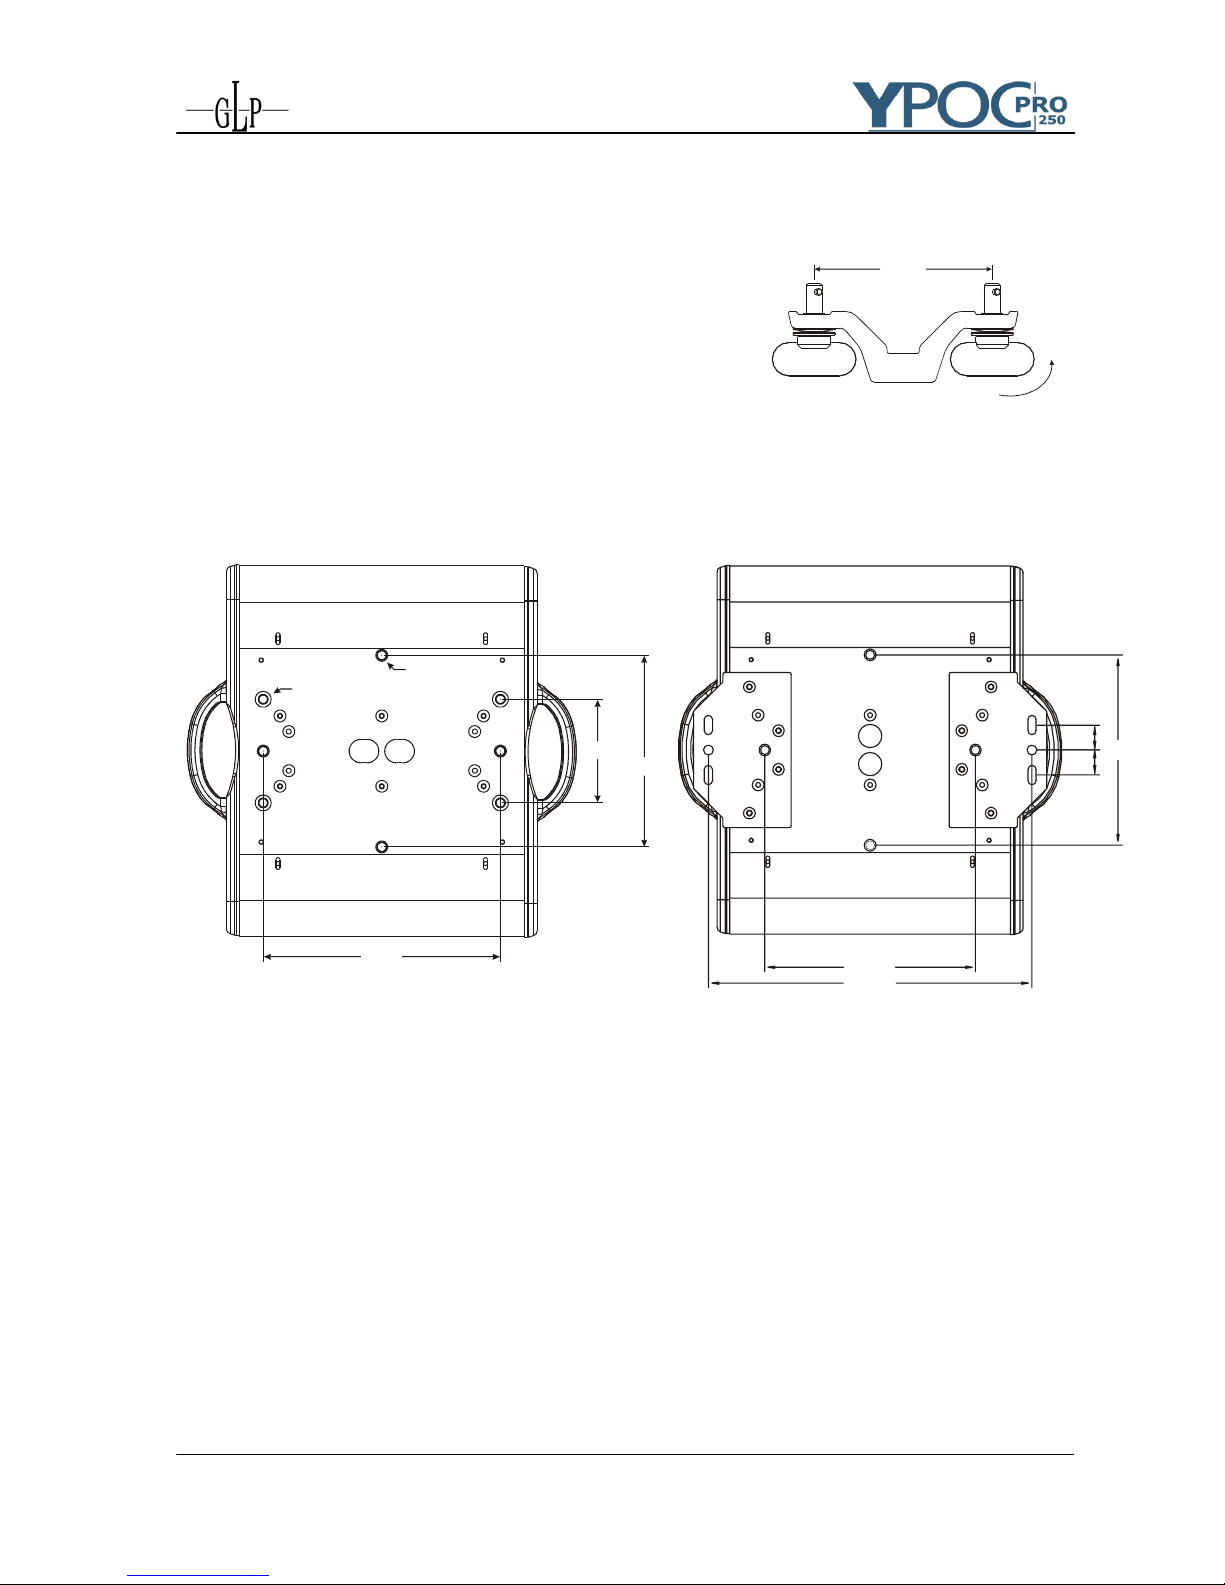
2.1 Mounting...........................................................................................................7
2.1.1 Clamps ...................................................................................................7
2.1.2 Mounting plate........................................................................................8
2.2 Secure the Y
YP
PO
OC
C
2
25
50
0
P
PR
RO
O .............................................................................8
2.3 Connections......................................................................................................9
2.3.1 Power supply..........................................................................................9
2.3.2 DMX .......................................................................................................9
2.4 Fuse..................................................................................................................9
3The Menu Field ......................................................................................................10
3.1 Adjust the DMX- Address (D001)..................................................................11
3.2 The Test Program (TEST).............................................................................11
3.3 The Audio Program (AUDI)...........................................................................11
3.4 Lamp On/Off (LAMP) .....................................................................................12
3.5 Reset (RESE) ................................................................................................12
3.6 Operating time of lamp and unit (TIME)........................................................12
3.7 Invert Pan Movement (RPAN)........................................................................12
3.8 Invert Tilt Movement (RTLT) .........................................................................13
3.9 Special Functions (SPEC)..............................................................................13
3.9.1 Manual Drive (MANU) ..........................................................................13
3.9.2 Lamp On automatically (LAAU)...........................................................13
3.9.3 Lamp Off via DMX (DLOF) ..................................................................14
3.9.4 DMX Input (DMXI) ..............................................................................14
3.9.5 Display (DISP)....................................................................................15
3.9.6 Fixture Temperature (TEMP)...............................................................15
3.9.7 Fan Control (FANS).............................................................................15
3.9.8 Adjustments and Calibrations (ADJU).................................................16
3.9.9 Default Settings (DFSE) ......................................................................16
3.9.10 Feedback (FEED)................................................................................17
3.9.11 Correction of faults (EFLG) .................................................................17
3.10 Error and Information Messages.....................................................................17

GLP German Light Products GmbH (instruction version 1.05) 4
4DMX Channel Selection (DMX Protocol) .............................................................18
5Changing the Lamp...............................................................................................22
5.1 Safety Regulations..........................................................................................22
5.2 Realize the Lamp Change ..............................................................................22
5.3 Lamp adjustment ............................................................................................23
6Changing a Gobo ..................................................................................................24
6.1 Safety Regulations..........................................................................................24
6.2 Realize the Gobo Change ..............................................................................24
7Maintenance and Cleaning the Y
YP
PO
OC
C
2
25
50
0
P
PR
RO
O..................................................25
7.1 Safety Regulations..........................................................................................25
7.2 Circumference and Interval (rule-of-thumb) ....................................................25
7.3 Cleaning the Optical System ..........................................................................26
8Technical Specification ........................................................................................27
9Index.......................................................................................................................28
Annexes........................................................................................................................29
A) Chassis Ground..................................................................................................29
B) Dimensions and Views .......................................................................................29

GLP German Light Products GmbH (instruction version 1.05) 5
1 Description of Device
1
2
3
4
1. Moving Head
2. Carrying handles
3. Base casing
4. Arm
5. Up- button
6. Down- button
7. Enter- button
8. Mode- button
9. LED- Display
10.Software- Update
connector
11.Microphone- intensity
12.DMX- Input
13.DMX- Output
14.Power ON/OFF
15. Micro fuse
16.Fan (air inlet)
MaxMin
DMX IN DMX OUT
Software
1. Gr oun d
2. Da
t
a -
3. Da
t
a +
POWE
R
210V~
230V~
250V~
50Hz
60Hz
Power
FUSE:
T3.1 5A
L
A
MP:
MSD 25 0W
Seria
nu
m
ber:
Fuse
Mic
1 2
3
PUSH
FUS
MODE ENTER UPDOWN
MODE ENTE
R
UPDOWN
8 7 6 5
9
10
11
12 13 14
15
16

GLP German Light Products GmbH (instruction version 1.05) 6
1.1 Safety Instructions
The
Y
YP
PO
OC
C
2
25
50
0
P
PR
RO
O
is a High-Tech Product. To guarantee a
smooth operation, it is necessary to keep following rules.
The manufacturer of this device will not take responsibility of
damages through disregard of the information in this manual.
Warranty adjustments will be cancelled.
1. Make sure before putting into operation, that the fan and the air inlets are
clean and not blocked by anything.
2. Attention: Don’t touch the device during the operation. This can cause injuries
or damages.
3. Unplug the
Y
YP
PO
OC
C
2
25
50
0
P
PR
RO
O
from the AC outlet before any service.
4. It is necessary to wait at least 30 minutes after disconnecting the AC before
you open the Y
YP
PO
OC
C
2
25
50
0
P
PR
RO
O. Please do not touch the bulb of the lamp if you
are not absolutely sure it is cold. -- Danger of BURNING --
5. Never look directly into the beam of the lamp. You risk injury of your retina and
blindness.
6. Pay attention of the maximum lamp operation time. You have to change it if
the lamp shows any deformations or damages. The same is with all glass
components, color filters, lenses and mirrors.
7. To allow a secure operation, follow also the Installation guide described in
chapter 2. Operating the Y
YP
PO
OC
C
2
25
50
0
P
PR
RO
O
without suited safety aids like Safety
cables or clamps/hooks can increase the risk of an accident.
8. The installation should be done by qualified staff only. You need to pay
attention to the common rules of technology that are not explicit mentioned in
this manual.
9. Use only original spare parts. Any structural modification will cancel all
warranty adjustments.
LASERSTRAHLUNG
NICHT IN DEN STRAHL BLICKEN
LASER KLASSE 3R
NACH DIN-EN 60825-1/11:2001
P 5mW; = 635-650 nm
0
λ
Attention: Laser of class 3R may
injure your retina after a short resi-
dence time even without any optical
instrument. Avoid any direct ex-
posure of your eyes!

GLP German Light Products GmbH (instruction version 1.05) 7
2 Preparation and Installation
2.1 Mounting
The Y
YP
PO
OC
C
2
25
50
0
P
PR
RO
O
is fully operational whether it hangs or is mounted to the wall.
It can also be operated while standing on the floor. Keep a safety distance of 0.5
m towards any easy inflammable materials (decoration etc.). Install a safety wire
that can hold at least 10 times the weight of the fixture. Never use the carrying
handles for secondary attachment.
Pay attention to the regulations of: BGV C1 (former VBG 70)
and DIN VDE 0711-217. Regulations of show laser BGV B2
(11.2001), E DIN 56912 part 6, DIN-EN 60825 part 1+2.
The installation should be done by qualified staff only.
2.1.1 Clamps
There are two major possibilities to mount the Y
YP
PO
OC
C
2
25
50
0
P
PR
RO
O. A so called
Camlock system or direct mounting of clamps. In both cases you have to
regard a sufficient stability of the system. For installation instructions please
see also printing on the backside of the case.

GLP German Light Products GmbH (instruction version 1.05) 8
90°
106.0
a) Camlock system: This system allows you a fast and efficient setup of
clamps. Attach the two camlocks to the designated position C1 and C2
on the backside of the case and close the locks by turning them 90°.
Verify the secure fit of the camlock
system. The clamps themselves are
directly attached permanently on the
camlocks.
b) Use two clamps direct on the backside of the Y
YP
PO
OC
C
2
25
50
0
P
PR
RO
Oto mount
the unit on a truss (each two opposite threads A1/A2 or A3/A4 max.
M10x20).
4x M10x20mm
4x Camlock
106.0
196.0
240.0
C1
C1
C2
C2
B1
B2
A3 A4
A1
A2
B1
B2
196.0
26.0
26.0
333.0
240.0
A3 A4
A1
A2
B1
B2
B1
B2
2.1.2 Mounting plate (optional)
For a permanent installation of the Y
YP
PO
OC
C
2
25
50
0
P
PR
RO
Oyou can use an
optional mounting plate to fix the unit directly onto a wall. The plate is
screwed on the system at the positions B1/B2 with screws M6x20.
2.2 Secure the
Y
YP
PO
OC
C
2
25
50
0
P
PR
RO
O
Regardless of the rigging of the Y
YP
PO
OC
C
2
25
50
0
P
PR
RO
O
you have to use a stipulated
safety wire. Therefore you have to thread to safety wire through to two provided
holes on the backside of the fixture and connect it with the truss-support. Pay
attention to a safe and proper fastening.

GLP German Light Products GmbH (instruction version 1.05) 9
2.3 Connections
2.3.1 Power supply
230 Volt, two-pin earthed plug 50 Hz,
Connected load 500W <=> 2,2 A (blind current compensated).
2.3.2 DMX
DMX 512 Standard input/output. See also printing on the case for the right
pin assignment.
[+] = Pin 3 / [-] = Pin 2 / [Ground] = Pin 1
The DMX- Addressing starts at the DMX- Address [001].
2.4 Fuse
The Y
YP
PO
OC
C
2
25
50
0
P
PR
RO
Oelectronic system is protected by a 5x20 mm micro-fuse
T3,15A.
Please see also the printing on the Y
YP
PO
OC
C
2
25
50
0
P
PR
RO
O
casing for more details.
Attention:
• Disconnect AC mains supply before changing a fuse!
• Use only the original declared fuse type!

GLP German Light Products GmbH (instruction version 1.05) 10
3 The Menu Field
You’ll find the control board on the side part of the base. It allows you to
make all necessary adjustments of the Y
YP
PO
OC
C
2
25
50
0
P
PR
RO
O.
.With the Mode-key
you get into the main menu. Afterwards you can navigate through the menu
with the Up/Down-keys. Push the Enter-key to get in the next menu level
or to confirm your settings. Make them and set functions ON/OFF with the
Up/Down-keys. Confirm and save it with the Enter-key (the display shows
OK). Push the Mode-key to cancel the entry and go back to the main menu.
MODE ENTER UPDOWN
M
O
D
EE
N
T
E
RUPD
O
W
N
LED-Displa
y
Mode-Taste Enter-Taste Down-Taste Up-Taste
ÅMODE - ENTER Æ
Level 1 Level 2 Level 3 Remark
D001 Define the DMX start address
TEST Test program of all functions
AUDI ASLW Self-running audio program (slow)
AFST Self-running audio program (fast)
MSTR Master for the audio program
SVPT Basic position for the audio program
SIZE Size for the audio program (NORM-BIG-MIDL-SMAL)
LAMP Switch on/of the lamp direct at the Y
YP
PO
OC
C
2
25
50
0
P
PR
RO
O
RESE Reset
ÅDOWN - UP Æ
TIME POWR Running time of the fixture (no destructible)
LA1 Running time of the lamp (erasable)
LA2 Running time of the lamp (no destructible)
RPAN Reverse Pan-direction
RTLT Reverse Tilt-direction
SPEC MANU Manual drive of all device functions
LAAU Automatic lamp start
DLOF Switch off lamp via DMX
DMXI Reed out actual DMX-values
DISP D ON Display On/Off
REV Twist the display
TEMP Reed out internal temperature
FANS HIGH Maximum cooling fan velocity
REG Automatic cooling fan control
LOOF Low cooling fan speed Ælamp off
LOHI Low cooling fan speed Æautomatic
ADJU CODE
xxxx
Use the code for entering the calibration menu (for authorized
persons only)
COLO Calibration of the color wheel
GOB1 Calibration of the gobo wheel 2
GOB2 Calibration of the gobo wheel 2
SHTR Calibration of the shutter
PRIS Calibration of the prism wheel
ÅDOWN - UP Æ
IRIS Calibration of the iris
POFS Calibration of the Pan-Offsets
TOFS Calibration of the Tilt-Offsets
CLRE Settings in the internal memory (super-user only)
ARES Adjust Reset (wheels stand still after the reset)
VTIL Software version Tilt-board
VTR1 Software version driver board 1
VTR2 Software version driver board 2
VTR3 Software version driver board 3
DFSE Call on the default function values
FEED Pan/Tilt feedback (error correction) On/Off
EFLG Correction of faults

GLP German Light Products GmbH (instruction version 1.05) 11
3.1 Adjust the DMX- Address (D001)
Right after turning on the Y
YP
PO
OC
C
2
25
50
0
P
PR
RO
O
you can see the current DMX- Address.
If there is no DMX- Signal the display flashes.
D001
For the address setting please follow this procedure:
1. Switch On the Y
YP
PO
OC
C
2
25
50
0
P
PR
RO
O
and wait until the fixture reset has finished
('RESE'is flashing in the display).
2. Press the Mode-key in order to access the main menu. Browse through the
menu by pressing the Up/Down-keys until the display shows D001. Confirm by
pressing the Enter-key (the decimal point is flashing)
3. Use the Up/Down-keys to select the desired address. Confirm the setting by
pressing the Enter-key (the display shows OK) or press the Mode-key to
cancel.
The DMX- Address is stored also while switching off the Y
YP
PO
OC
C
2
25
50
0
P
PR
RO
O!
3.2 The Test Program (TEST)
test
The Test-Program allows you to run a complete self test procedure of all
functions. Press Enter to confirm or Mode to cancel.
3.3 The Audio Program (AUDI)
Audi
The Audio-menu allows you to run a stand alone audio program. This chaser can
run either fast or slow. AFST: Every sound impulse on step of the chaser. Aslw:
Every second sound impulse one step of the chaser.
In addition you can choose a basic position for this audio chaser. Use either the
internal manual mode or an external controller to set the desired Pan/Tilt position.
Confirm this setting in the SVPT menu by pressing the Enter-key.
You can also set the size of the audio chaser in the SIZE menu. Choose between:
NORM (no basic position has to bee chosen), BIG, MIDL or SMAL).

GLP German Light Products GmbH (instruction version 1.05) 12
If you want to run the systems simultaneously, one of the Y
YP
PO
OC
Cs
smust be
switched as the master. All others must be "Slave" Master = OFF. Notice: The
Audio function is only working if no DMX is connected. This function can work e.g.
on small events or as an emergency program.
3.4 Lamp On/Off (LAMP)
LAMP
Use the Up/Down-keys to select lamp On or lamp Off Press Enter to confirm or
Mode to cancel and return to the main menu. (The lamp OFF command is only
working if the shutter is closed at the same time. Use an external controller or the
manual drive mode, see 3.9.1)
3.5 Reset (RESE)
RESE
Press the Enter-key to run a reset of all fixture functions (RST is shown in the
display).
3.6 Operating time of lamp and unit (TIME)
TIME
By this option can read out three different operating times of the fixture.
POWR Operating time of the fixture (no destructible).
LA 1 Operating time of the lamp (erasable). Push the Up/Down-keys at one
time to delete this operating time.
LA 2 Operating time of the lamp (no destructible).
3.7 Invert Pan Movement (RPAN)
RPAN
This function allows you to invert the Pan movement. Use the Up/Down-keys to
select invert On or Off. Press Enter to confirm or Mode to cancel and return to
the main menu.

GLP German Light Products GmbH (instruction version 1.05) 13
3.8 Invert Tilt Movement (RTLT)
RTLT
This function allows you to invert the Tilt movement. Use the Up/Down-keys to
select invert On or Off. Press Enter to confirm or Mode to cancel.
3.9 Special Functions (SPEC)
SPEC
This menu allows you to enter further special functions of the Y
YP
PO
OC
C
2
25
50
0
P
PR
RO
O.
.
In detail they are:
3.9.1 Manual Drive (MANU)
MANU
This function allows you to drive all the fixture functions manually. Select
the desired function with the Up/Down-keys and confirm with Enter. Now
choose the desired value with the Up/Down-keys and confirm again with
Enter or cancel and return to the menu with the Mode-key.
Function Value Remark
PAN 000 -255 Pan Position
TILT 000 -255 Tilt Position
COLO 000 -255 Color wheel
GOB1 000 -255 Gobo wheel 1
GROT 000 -255 Gobo rotation
GOB2 000 -255 Gobo wheel 2
SHUT 000 -255 Shutter / Strobe function (the lamp strikes at
DMX 255 if dimmer is "open" = DMX 255)
DIMR 000 -255 Dimmer
FOCU 000 -255 Focus
PRIS 000 -255 Prism (000 – 127) / Stop / Prism- rotation
ORIS 000 -255 Iris
SPEC 000 -255 Lamp Off, Reset, Laser, ...
3.9.2 Lamp On automatically (LAAU)
LAAU
This function enables to switch On the lamp automatically after switching
On the fixture. Use the Up/Down-keys to select ON if you want to switch on

GLP German Light Products GmbH (instruction version 1.05) 14
the lamp automatically after switching on the fixture or Off if you don't want
this function. Press Enter to confirm or Mode to cancel and return to the
menu.
If you have chosen off you have the possibility to start the lamp either via
DMX or direct at the Y
YP
PO
OC
C
2
25
50
0
P
PR
RO
Oin the Lamp menu.
3.9.3 Lamp Off via DMX (DLOF)
DLOF
This function enables to switch off the lamp via DMX or not. Use the
Up/Down-keys to select ON if you want to switch off the lamp via DMX or
Off if you don't want this function. Press Enter to confirm or Mode to
cancel and return to the menu.
If you have chosen off you have the possibility to switch off the lamp
either direct at the Y
YP
PO
OC
C
2
25
50
0
P
PR
RO
Oin the Lamp menu or switch off the
main switch.
3.9.4 DMX Input (DMXI)
DMXI
Readout DMX values of each channel received by the fixture. Use the
Up/Down-keys to select desired channel and press Enter to read its value.
Function Value Remark
PAN 000 -255 Pan Position
TILT 000 -255 Tilt Position
COLO 000 -255 Color wheel
GOB1 000 -255 Gobo wheel 1
GROT 000 -255 Gobo rotation
GOB2 000 -255 Gobo wheel 2
SHUT 000 -255 Shutter / Strobe function
DIMR 000 -255 Dimmer
FOCU 000 -255 Focus
PRIS 000 -255 Prism wheel
IRIS 000 -255 Iris
SPEC 000 -255 Lamp Off, Reset, Laser, ...
MOVE 000 -255 Movement
SPED 000 -255 Speed Pan/Tilt

GLP German Light Products GmbH (instruction version 1.05) 15
3.9.5 Display (DISP)
DISP
Use this function to choose between different display indications. Use the
Up/Down-keys to select desired function and press Enter to confirm or
Mode to cancel and return to the menu.
D ON Display On/Off (If you've chosen off, the display will go out with-
in 15 seconds after the last input. The next key touch will re-
activate the display).
REV Turn around the display (reverse).
Note: You can also do this by pushing the Up/Down-keys at the
same time.
3.9.6 Fixture Temperature (TEMP)
TEMP
This function allows you to read out the actual temperature of the Y
YP
PO
OC
C
2
25
50
0
P
PR
RO
O. Press Enter to confirm or Mode to cancel. Inside temperatures
below 80°C are not critical. 80°C and more lead the lamp being switched
off at a critical point. Please note for a save operation that the outside
temperature should not exceed 45°C.
3.9.7 Fan Control
(FANS)
FANS
By using this function you can choose between 4 types of fan speed
operations. Use the Up/Down-keys to select desired function and press
Enter to confirm or Mode to cancel and return to the menu.
HIGH The cooling fan works continuously at max. speed.
REG The fan automatically raises its speed in order to control inside
temperature of the fixture.
LOOF The fan keeps the adjusted low speed until the temperature
exceeds max. inside temperature, then the Y
YP
PO
OC
C
2
25
50
0
P
PR
RO
O
automatically switch off the lamp.
LOHI The fan keeps the adjusted low speed until the temperature
exceeds max. inside temperature, then the Y
YP
PO
OC
C
2
25
50
0
P
PR
RO
O
automatically switch from low to high fan speed.

GLP German Light Products GmbH (instruction version 1.05) 16
In addition to these settings, you can set to fan speed to minimum via DMX
(Special channel, DMX value 224..229). This will last until a temperature of
90° is reached.
3.9.8 Adjustments and Calibrations (ADJU)
ADJU
By this function you can adjust and calibrate the positions of the different
wheels and other motors. This can be necessary after a service or repair
work.
For this function you have to entry the fixture code. This work should be
done only by authorized persons.
Use the Up/Down-keys to select desired function and press Enter to
confirm or Mode to cancel and return to the menu. Use now the Up/Down-
keys to set the adjustment values and confirm once more with the Enter-
key or cancel with the Mode-key.
Function Value Remark
ADJU CODE xxxx Adjustments in the internal setup are code protec-
ted (for authorized persons only).
COLO -99 -+ 99 Adjustment of the Color wheel
GOB1 -99 -+ 99 Adjustment of the Gobo wheel 1
GOB2 -99 -+ 99 Adjustment of the Gobo wheel 2
SHTR -99 -+ 99 Adjustment of the Shutter
PRIS -99 -+ 99 Adjustment of the Prism wheel
IRIS -99 -+ 99 Adjustment of the Iris
POFS -99 -+ 99 Adjustment of the Pan-Offsets
TOFS -99 -+ 99 Adjustment of the Tilt-Offsets
CLRE Adjustments in the internal circuit.
ARES -99 -+ 99 Adjust Reset (wheels stand still after the reset)
VTIL -99 -+ 99 Software version of Tilt-board
VTR1 -99 -+ 99 Software version of Head- board
VTR2 -99 -+ 99 Software version of Base- board
3.9.9 Default Settings (DFSE)
DFSE
Press Enter to reset all fixture personalities (not the adjusted functions) to
the default values. On the display will appear ok to indicate that the de-
faults are set.

GLP German Light Products GmbH (instruction version 1.05) 17
Function Display Default Settings
DMX Address D001 D001
Pan reverse RPAN ON OFF 9
Tilt reverse RTLT ON OFF 9
Automatic lamp on LAAU ON OFF 9
Lamp on via DMX DLOF ON 9OFF
Display DISP D ON 9
Cooling fan FANS HIGH REG 9LOOF LOHI
Feedback FEED ON 9OFF
3.9.10 Feedback (FEED)
FEED
The Y
YP
PO
OC
C
2
25
50
0
P
PR
RO
Ois provided with a automatic position correction
(feedback) for the Pan and Tilt movement. Use the Up/Down-keys to select
ON if you want to enable the feedback function or Off if you don't want this
function. Press Enter to confirm or Mode to cancel and return to the menu.
3.9.11 Correction of faults (EFLG)
EFLG
(Function available for authorized persons only)
3.10 Error and Information Messages
HEAt This message appears if you try to switch on the lamp within 5 minutes
after having switched off (lamp too hot). The message will appear on
the display if the lamp doesn’t ignite within 20 seconds. The fixture will
store this command and automatically ignite the lamp after 5 minutes.
LAER
A
fter the ignition of the lamp was two times not successful the display
will show LAER. That means the lamp could be damaged or even
missed, the fixture is overheating or there could be a failure on the
igniter or ballast. Switch off the power supply and solve the possible
problem.
OTMP This error message informs you that the fixture was overheating and
that the relay switches off the lamp. Pleas look for possible reasons (fan
faulty, air in/outlets blocked or very dirty, lamp broken or very old, too
high ambient temperature. Switch off the power supply and solve the
possible problem.

GLP German Light Products GmbH (instruction version 1.05) 18
RsER This message informs you that one of the fixture function wasn’t able to
do its reset correct (magnetic sensor, stepping motor, driver on the
PCB, cables, etc.). Repair the defect and start the fixture again.
4 DMX Channel Selection (DMX Protocol)
Channel Function Time and Value DMX HEX %
1) PAN-
coarse
0 .. 530° min. 2,65 s 0..255 00..FF 0..100
2) PAN-fine High- Pos ... High- Pos + 2,1° (16 Bit) 0..255 00..FF 0..100
3) Tilt-
coarse
0 .. 285° min. 1,8 s 0..255 00..FF 0..100
4) Tilt-fine High- Pos … High- Pos + 1,1° (16 Bit) 0..255 00..FF 0..100
5) Color open (fast) 0..1 00..01 0,2
open / color 1 (fast) 2..3 02..03 1,0
color 1, Brilliant Blue (fast)
Chaser from color to
color max. 140 BPM
=> 0,43 s 4..5 04..05 1,8
color 1 / color 2 (fast) 6..7 06..07 2,5
color 2, Blue (fast) 8..9 08..09 3,3
color 2 / color 3 (fast) 10..11 0A..0B 4,1
color 3, Blue Purple (fast) 12..13 0C..0D 4,9
color 3 / color 4 (fast) 14..15 0E..0F 5,7
color 4, Magenta (fast) 16..17 10..11 6,5
color 4 / color 5 (fast) 18..19 12..13 7,3
color 5, Pink (fast) 20..21 14..15 8,0
color 5 / color 6 (fast) 22..23 16..17 8,8
color 6, Orange (fast) 24..25 18..19 9,6
color 6 / color 7 (fast) 26..27 1A..1B 10,4
color 7, Yellow (fast) 28..29 1C..1D 11,2
color 7 / color 8 (fast) 30..31 1E..1F 12,0
color 8, Cyan (fast) 32..33 20..21 12,7
color 8 / color 9 (fast) 34..35 22..23 13,5
color 9, Turquoise (fast) 36..37 24..25 14,3
color 9 / color 10 (fast) 38..39 26..27 15,1
color 10, Green (fast) 40..41 28..29 15,9
color 10 / color 11 (fast) 42..43 2A..2B 16,7
color 11, Red (fast) 44..45 2C..2D 17,5
color 11 / open (fast) 46..47 2E..2F 18,2
open (fast) 48..63 30..3F 19,0
open (slow) 64..65 40..41 25,3
open / color 1 (slow) 66..67 42..43 26,1
color 1, Brilliant Blue (slow)
Chaser from color to
color max. 70 BPM
=> 0,86 s 68..69 44..45 26,9
color 1 / color 2 (slow) 70..71 46..47 27,6
color 2, Blue (slow) 72..73 48..49 28,4
color 2 / color 3 (slow) 74..75 4A..4B 29,2
color 3, Blue Purple (slow) 76..77 4C..4D 30,0
color 3 / color 4 (slow) 78..79 4E..4F 30,8
color 4, Magenta (slow) 80..81 50..51 31,6
color 4 / color 5 (slow) 82..83 52..53 32,4
color 5, Pink (slow) 84..85 54..55 33,1
color 5 / color 6 (slow) 86..87 56..57 33,9
color 6, Orange (slow) 88..89 58..59 34,7

GLP German Light Products GmbH (instruction version 1.05) 19
Channel Function Time and Value DMX HEX %
color 6 / color 7 (slow) 90..91 5A..5B 35,5
color 7, Yellow (slow) 92..93 5C..5D 36,3
color 7 / color 8 (slow) 94..95 5E..5F 37,1
color 8, Cyan (slow) 96..97 60..61 37,8
color 8 / color 9 (slow) 98..99 62..63 38,6
color 9, Turquoise (slow) 100..101 64..65 39,4
color 9 / color 10 (slow) 102..103 66..67 40,2
color 10, Green (slow) 104..105 68..69 41,0
color 10 / color 11 (slow) 106..107 6A..6B 41,8
color 11, Red (slow) 108..109 6C..6D 42,5
color 11 / open (slow) 110..111 6E..6F 43,3
open (slow) 112.127 70..7F 44,1
color rotation STOP 128..129 80..81 50
color rotation, slow-fast, CW min. 1,4 turns/h 130..191 82..BF 51..75
color rotation, fast-slow, CCW max. 2,9 turns/sec. 192..253 C0..FD 76..98
Audio color chaser slow each 4th sound impulse
Ænew color
254 FE 99
Audio color chaser fast each sound impulse Æ
new color
255 FF 100
6) Gobo 1 Gobo 1 (open, fast) 0..7 0..7 0..2,9
Gobo 2 (fast) 8..15 8..F 3..5,9
Gobo 3 (fast)
Chaser from gobo to
gobo max. 100 BPM
=> 0,6 s 16..23 10..17 6..8,9
Gobo 4 (fast) 24..31 18..1F 9..11,9
Gobo 5 (fast) 32..39 20..27 12..14,9
Gobo 6 (fast) 40..47 28..2F 15..17,9
Gobo 7 (fast) 48..55 30..37 18..20,9
Gobo 8 (fast) 56..63 38..3F 21..23
Gobo 1 (open, slow) 64..71 40..47 24..26,9
Gobo 2 (slow) 72..79 48..4F 27..29,9
Gobo 3 (slow)
Chaser from gobo to
gobo max. 40 BPM
=> 1,51 s 80..87 50..57 30..33,9
Gobo 4 (slow) 88..95 58..5F 34..36,9
Gobo 5 (slow) 96..103 60..67 37..39,9
Gobo 6 (slow) 104..111 68..6F 40..42,9
Gobo 7 (slow) 112..119 70..77 43..45,9
Gobo 8 (slow) 120..127 78..7F 46..49
Gobo rotation STOP 128..129 80..81 50
Gobo rotation, slow-fast, CW min. 1,4 turns/h 130..191 82..BF 51..75
Gobo rotation, fast-slow, CCW max. 1.0 turns/sec. 192..253 C0..FD 76..98
Audio gobo chase, slow each 4th sound impulse
Ænew gobo
254 FE 99
Audio gobo chase, fast each sound impulse Æ
new gobo
255 FF 100
Gobo position 0 ... 540° 0..127 00..7F 0..49
Gobo rotation STOP 128..129 80..81 50
7) Gobo 1
Posi./Rot
Gobo rotation, slow-fast, CW min. 2,0 turns/h 130..191 82..BF 51..75
Gobo rotation, fast-slow, CCW max. 3,8 turns/sec. 192..253 C0..FD 76..100
Audio gobo rotation, slow each 4th sound impulse
Ænew position
254 FE 99
8) Gobo 2 Gobo 1 (open, fast) 0..3 0..3 0..1
Gobo 2 (fast) 4..7 4..7 2..2,9
Gobo 3 (fast)
Chaser from gobo to
gobo max. 100 BPM
=> 0,6 s 8..11 8..B 3..4
Gobo 4 (fast) 12..15 C..F 5..5,9
Gobo 5 (fast) 16..19 10..13 6..7
Gobo 6 (fast) 20..23 14..17 8..8,9
Gobo 7 (fast) 24..27 18..1B 9..10,9

GLP German Light Products GmbH (instruction version 1.05) 20
Channel Function Time and Value DMX HEX %
Gobo 8 (fast) 28..31 1C..1F 11..12
Gobo 9 (fast) 32..35 20..23 13..13,9
Gobo 10 (fast) 36..63 24..3F 14..24,9
Gobo 1 (open, fast) 64..65 40..41 25..25,9
Gobo 1 (open, slow) 66..67 42..43 26..26,9
Gobo 2 (slow) 68..71 44..47 27..27,9
Gobo 3 (slow)
Chaser from gobo to
gobo max. 40 BPM
=> 1,51 s 72..75 48..4B 28..29
Gobo 4 (slow) 76..79 4C..4F 30..30,9
Gobo 5 (slow) 80..83 50..53 31..32
Gobo 6 (slow) 84..87 54..57 33..34
Gobo 7 (slow) 88..91 58..5B 35..35,9
Gobo 8 (slow) 92..95 5C..5F 36..37
Gobo 9 (slow) 96..99 60..63 38..38,9
Gobo 10 (slow) 100..127 64..7F 39..50
Gobo rotation STOP 128..129 80..81 50
Gobo rotation, slow-fast, CW min. 1,4 turns/h 130..191 82..BF 51..75
Gobo rotation, fast-slow, CCW max. 1.0 turns/sec. 192..253 C0..FD 76..98
Audio gobo chase, slow each 4th sound impulse
Ænew gobo
254 FE 99
Audio gobo chase, fast each sound impulse Æ
new gobo
255 FF 100
Audio gobo rotation, fast each sound impulse Æ
new position
255 FF 100
9) Shutter Shutter closed Lamp OFF Æch. 14 0..15 00..0F 0..6
Random Strobe (different pattern) 16..31 10..1F 7..11,9
Strobe Pulse effect , slow - fast min. frequent 0,7 Hz 32..47 20..2F 12..12,9
Strobe effect , slow - fast max. frequent 10 Hz 48..239 30..EF 13..93
Shutter open (lamp start) 240..255 F0..FF 94..100
10) Dimmer Dimmer closed - open (0% - 100%) 0..255 0..FF 0..100
11) Focus In - out full distance 1,5 sec. 0..255 0..FF 0..100
12) Prism Prism swing out 0..5 00..05 0..2
Prism position 0 ... 540° 6..127 06..7F 0..49
Prism rotation stop 128..129 80..81 50
Prism rotation, slow-fast, CW min. 1,6 turns/h 130..191 80..BF 51..75
Prism rotation, fast-slow, CCW max. 4,4 turns/sec. 192..253 C0..FD 76..100
Audio prism rotation, slow each 4th sound impulse
Ænew prism
254 FE 99
Audio prism rotation, fast each sound impulse Æ
new prism
255 FF 100
13) Iris Iris open – closed 0..127 00..7F 0..50
Ascend with Shutter, random 128..143 80..8F 51..56
Descend with Shutter, random 144..159 90..9F 57..62
Ascend with Shutter, audio 160..175 A0..AF 63..68
Descend with Shutter, audio 176..191 B0..BF 69..75
Ascend with Shutter 192..207 C0..CF 76..81
Descend with Shutter 208..223 D0..DF 82..87
Pulse - effect 224..239 E0..EF 88..93
Ascend - descend effect 240..253 F0..FD 94..99
Iris closed 254..255 FE..FF 100
14) Special No function 0..15 00..0F 0..6
Gobo-shake +/- 10°
slow – fast
3,5 moves / min. up to
60 moves / max.
16..31 10..1F 7..12
Gobo-shake +/- 20°
slow – fast
3,5 moves / min. up to
60 moves / max.
32..47 20..2F 13..18
This manual suits for next models
1
Table of contents
Other GLP Spotlight manuals
Popular Spotlight manuals by other brands

ETC
ETC ColorSource Spot installation manual

Coopers
Coopers G362 Instructions for use

Electroconcept
Electroconcept MATRIX 430 instruction manual

LightPro
LightPro Onyx 30 Manual and safety instructions

LED Group
LED Group ROBUS MUSTER instruction manual

Larson Electronics
Larson Electronics HML-5M-RC user manual

Braun
Braun 64757 Owner's manual & safety instructions

Challenger
Challenger SLFLF15P2 Installation instruction

Hubbell
Hubbell prescolite RLF6 instruction sheet

Robert Juliat
Robert Juliat ARAMIS 1013+ Technical guide

Hunza
Hunza BS/L installation instructions

Larson Electronics
Larson Electronics HUL-P10WR-DM-ILS-1227 quick start guide