How to set the time and date.
1. Check that the meter is off. (If not, press for 3 seconds)
2. Press 4 seconds to enter the setting menu.
3. Press or to scroll the setup menus and press to access the
various menus.
4. Use or to select the value. Press to confirm and go to the
next step: year, month, day, time format, hour, minute.
5. After confirming the minutes (by pressing ) will return to
the Setup menu.
How you measure your blood sugar.
Time and date are preset, please check that this is correct the first time you use
the meter.
1. Wash hands with soap and water.
2. Take a new test strip from the bottle and replace the cap immediately.
3. Place the sole of the test strip that has a metallic contact surface, into
the meter opening.
4. The meter shows a blinking blood drop and is now ready for measurement.
5. Stick with the sampler.
6. Put the blood drop against the short side of the stick that absorbs the right
amount of blood. A beep sounds and countdown starts on the display.
7. Read the test results. A beep sounds (if enabled) when the result is
displayed on the screen.
8. Press the eject button to eject the used test strip.The meter turns off
automatically.
How to select a measured value.
1. When your test result appears, press until the selection symbols
starts flashing. With the arrow keys ( ), select the desired mark
(before meal), (after meal), (training) or (general).
2. Confirm your selection by pressing the button.You can select
multiple selections (but only when you select the or ),
repeat steps 1 and 2.
3.
6.
The opening
of the test
Contact Area
How to manage the measurement results in memory.
Your meter stores up to 730 results with date, time and marks.
1. Make sure the meter is off. (If not, press for 3 seconds).
2. Press for 2 seconds to start (”mem” appears on the screen).
3. The latest test results with the time, date and selections are shown.
4. Press or to scroll to the memory.
5. Press for more than 3 seconds to turn off the meter.
View average results for the 1, 7, 14, 30, 60 or 90 days.
1. Press for 2 seconds to turn on the meter. Press again (”AVG”
is displayed on the screen).The meter shows the day’s average.
2. Continue to press to display the average for 1, 7, 14, 30, 60 or
90 days.
3. Press for more than 3 seconds to turn off the meter.
How to replace the battery in GlucoMen
®
Areo.
The meter is powered by two CR2032 3V batteries. When the symbol low
battery is lit, it is time to change.You do not have to set the date and time if you
insert the new batteries within 2 minutes after the old is removed. How to use:
1. Make sure the meter is off.
2. Open the battery cover on the back of the meter and remove the batteries.
3. Insert the new batteries in the battery holder with the ”+”- side up.
4. Close the battery cover.
Wireless transmission via NFC
(Near Field Communication)
Your saved test results can be transferred to an NFC-enabled device (such as
a smartphone) with an NFC-compatible application installed (eg GlucoLog).
The first time, you must turn on your meter NFC function (found in the
setup menus) by pressing the or to select ON or OFF. Press to
confirm and leave.
1. Activate the NFC-transfer in the app in your smartphone.
2. Place your meter close to your smartphone (<1 cm).
3. The meter starts automatically and the data is transferred ( flashes
on the screen).
4. When the data transfer is completed, ”End” appears on the screen
along with the symbol , and a beep sounds.
5. Press the button for 3 seconds to turn off the meter.
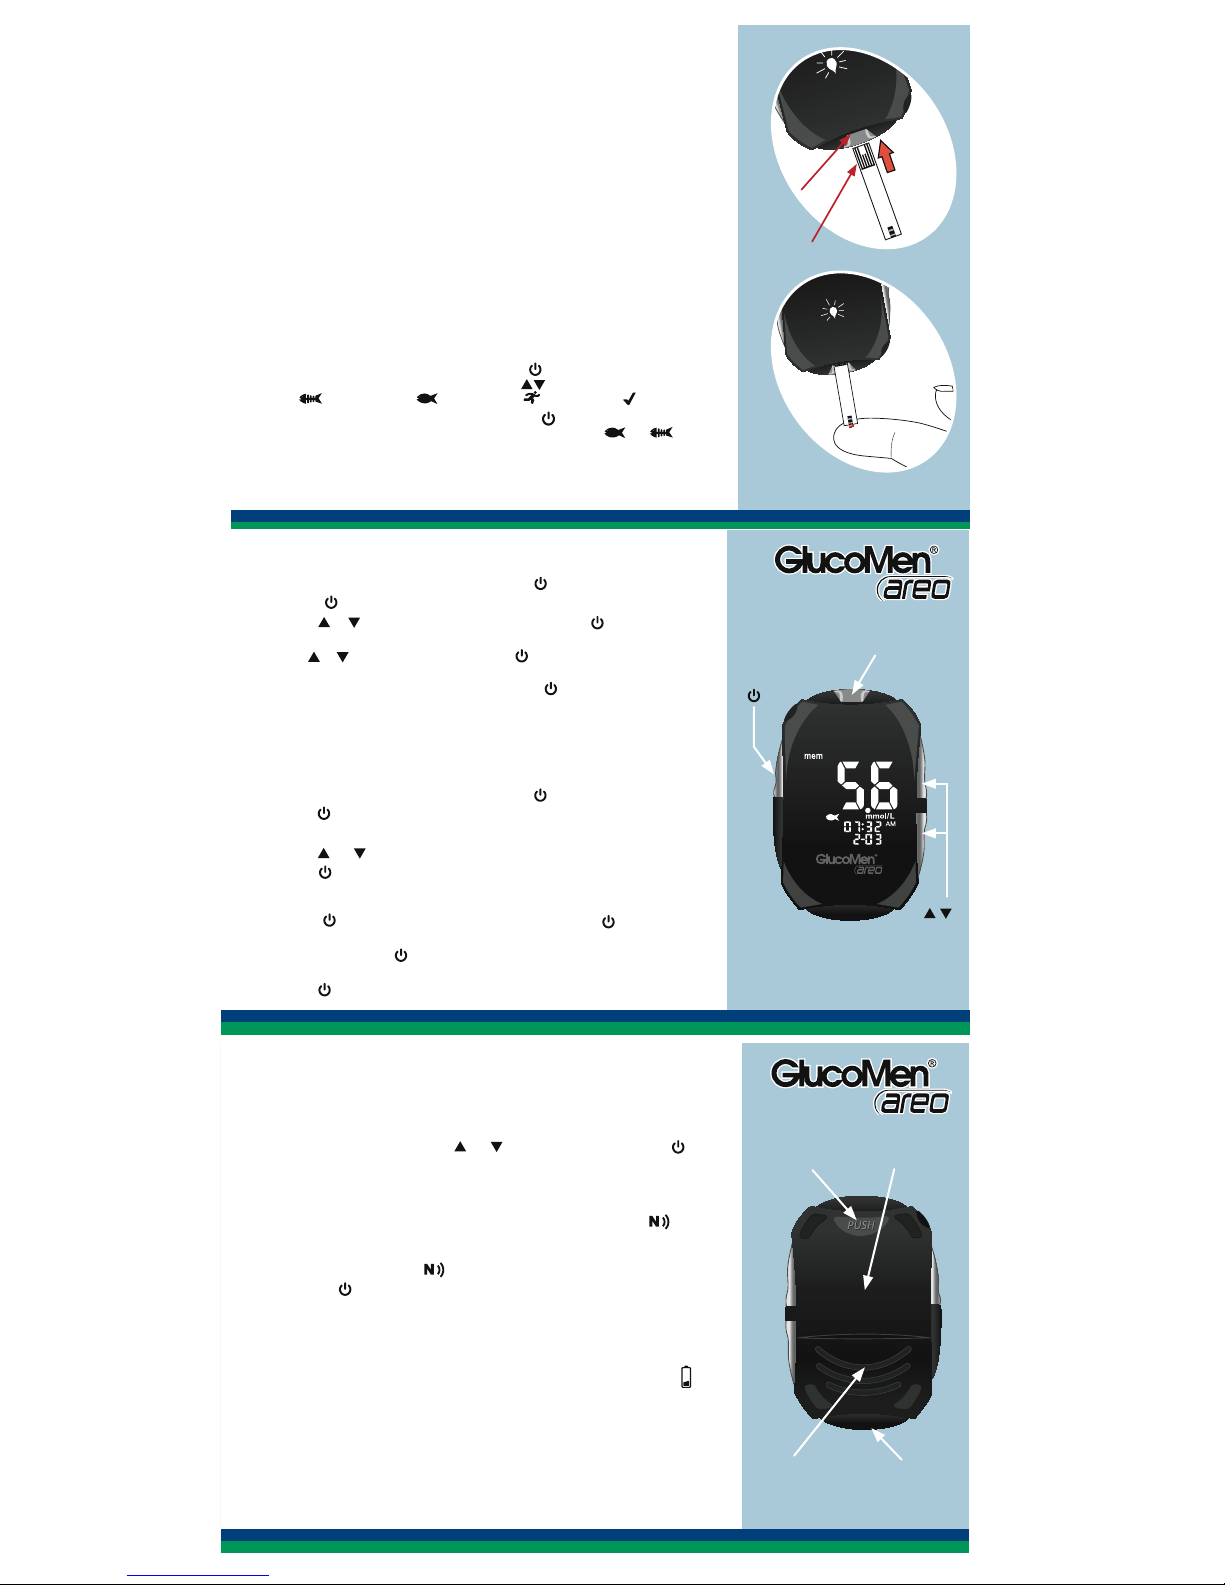
Test Strip Port
Button for
On/Off/Enter
Buttons
Up/Down
Eject button Antenna (NFC)
Battery Cover Data Transfer
Port
How to set the time and date.
1. Check that the meter is off. (If not, press for 3 seconds)
2. Press 4 seconds to enter the setting menu.
3. Press or to scroll the setup menus and press to access the
various menus.
4. Use or to select the value. Press to confirm and go to the
next step: year, month, day, time format, hour, minute.
5. After confirming the minutes (by pressing ) will return to
the Setup menu.
How you measure your blood sugar.
Time and date are preset, please check that this is correct the first time you use
the meter.
1. Wash hands with soap and water.
2. Take a new test strip from the bottle and replace the cap immediately.
3. Place the sole of the test strip that has a metallic contact surface, into
the meter opening.
4. The meter shows a blinking blood drop and is now ready for measurement.
5. Stick with the sampler.
6. Put the blood drop against the short side of the stick that absorbs the right
amount of blood. A beep sounds and countdown starts on the display.
7. Read the test results. A beep sounds (if enabled) when the result is
displayed on the screen.
8. Press the eject button to eject the used test strip.The meter turns off
automatically.
How to select a measured value.
1. When your test result appears, press until the selection symbols
starts flashing. With the arrow keys ( ), select the desired mark
(before meal), (after meal), (training) or (general).
2. Confirm your selection by pressing the button.You can select
multiple selections (but only when you select the or ),
repeat steps 1 and 2.
3.
6.
The opening
of the test
Contact Area
How to manage the measurement results in memory.
Your meter stores up to 730 results with date, time and marks.
1. Make sure the meter is off. (If not, press for 3 seconds).
2. Press for 2 seconds to start (”mem” appears on the screen).
3. The latest test results with the time, date and selections are shown.
4. Press or to scroll to the memory.
5. Press for more than 3 seconds to turn off the meter.
View average results for the 1, 7, 14, 30, 60 or 90 days.
1. Press for 2 seconds to turn on the meter. Press again (”AVG”
is displayed on the screen).The meter shows the day’s average.
2. Continue to press to display the average for 1, 7, 14, 30, 60 or
90 days.
3. Press for more than 3 seconds to turn off the meter.
How to replace the battery in GlucoMen
®
Areo.
The meter is powered by two CR2032 3V batteries. When the symbol low
battery is lit, it is time to change.You do not have to set the date and time if you
insert the new batteries within 2 minutes after the old is removed. How to use:
1. Make sure the meter is off.
2. Open the battery cover on the back of the meter and remove the batteries.
3. Insert the new batteries in the battery holder with the ”+”- side up.
4. Close the battery cover.
Wireless transmission via NFC
(Near Field Communication)
Your saved test results can be transferred to an NFC-enabled device (such as
a smartphone) with an NFC-compatible application installed (eg GlucoLog).
The first time, you must turn on your meter NFC function (found in the
setup menus) by pressing the or to select ON or OFF. Press to
confirm and leave.
1. Activate the NFC-transfer in the app in your smartphone.
2. Place your meter close to your smartphone (<1 cm).
3. The meter starts automatically and the data is transferred ( flashes
on the screen).
4. When the data transfer is completed, ”End” appears on the screen
along with the symbol , and a beep sounds.
5. Press the button for 3 seconds to turn off the meter.
Test Strip Port
Button for
On/Off/Enter
Buttons
Up/Down
Eject button Antenna (NFC)
Battery Cover Data Transfer
Port


