GlucoMen Day PENCAP User manual

User Guide

Innovation Zed Ltd.
NovaUCD, Beleld Innovation Park,
Beled, Dublin 4,
Ireland
Thank you for using GlucoMen Day PENCAP. This User Manual
provides important information to help you use your GlucoMen
Day PENCAP properly. Before using the product, please read it
carefully.
If you have any questions about this product, please consult our
website www.glucomenday.com
CAUTION
Read all instructions and warnings before use.
A. Menarini Diagnostics only accepts responsibility for the equipment’s
safety, usability and performance if:
• The equipment is used in accordance with its intended use.
• The equipment is used in accordance with the product documentation.
CAUTION
Do not use GlucoMen Day PENCAP to make decisions about your
injection regime.

/Table of contents
/ 1 Introduction
1.1 Denitions
1.2 General description
1.3 Intended use
1.4 Intended Users
1.5 Normal use
1.6 Symbols
/ 2 Description of the Device
2.1 Package contents
2.2 General safety instructions
2.3 GlucoMen Day PENCAP terminology
2.4 Insulin pen terminology
2.5 Supported pens
2.6 Performance
/ 3 Operating instructions
3.1 First time use
3.2 Injection
3.3 Low dose injections
3.4 Checking battery status
3.5 Charging
3.6 Bluetooth® pairing
3.7 Maximum number of pairings
3.8 Clearing paired devices
3.9 Changing Pen
3.10 Factory reset
3.11 Powering o
3.12 Powering on
3.13 Cleaning and care
3.14 Long-term storage
1
1
1
1
1
1
1
2
2
3
3
4
4
5
5
5
5
6
6
7
7
8
8
8
9
10
10
10
11
English
3.15 Disposal
3.16 General safety advice
/ 4 Description of the Device
4.1 Injection not detected
4.2 Blinded sensor
4.3 Spillage
4.4 System error
4.5 Unsuccessful pairing
/ 5 Display guide
/ 6 Contact information
6.1 Support
6.2 Manufacturer
6.3 Warranty
6.4 Disclaimers
/ 7 Technical specication
7.1 Specications
7.2 Environment and operating conditions
7.3 Declarations
11
11
11
11
12
12
12
12
12
14
14
14
14
15
15
15
16
16

1
Introduction /
English
/ 1 Introduction
/ 1.1 Denitions
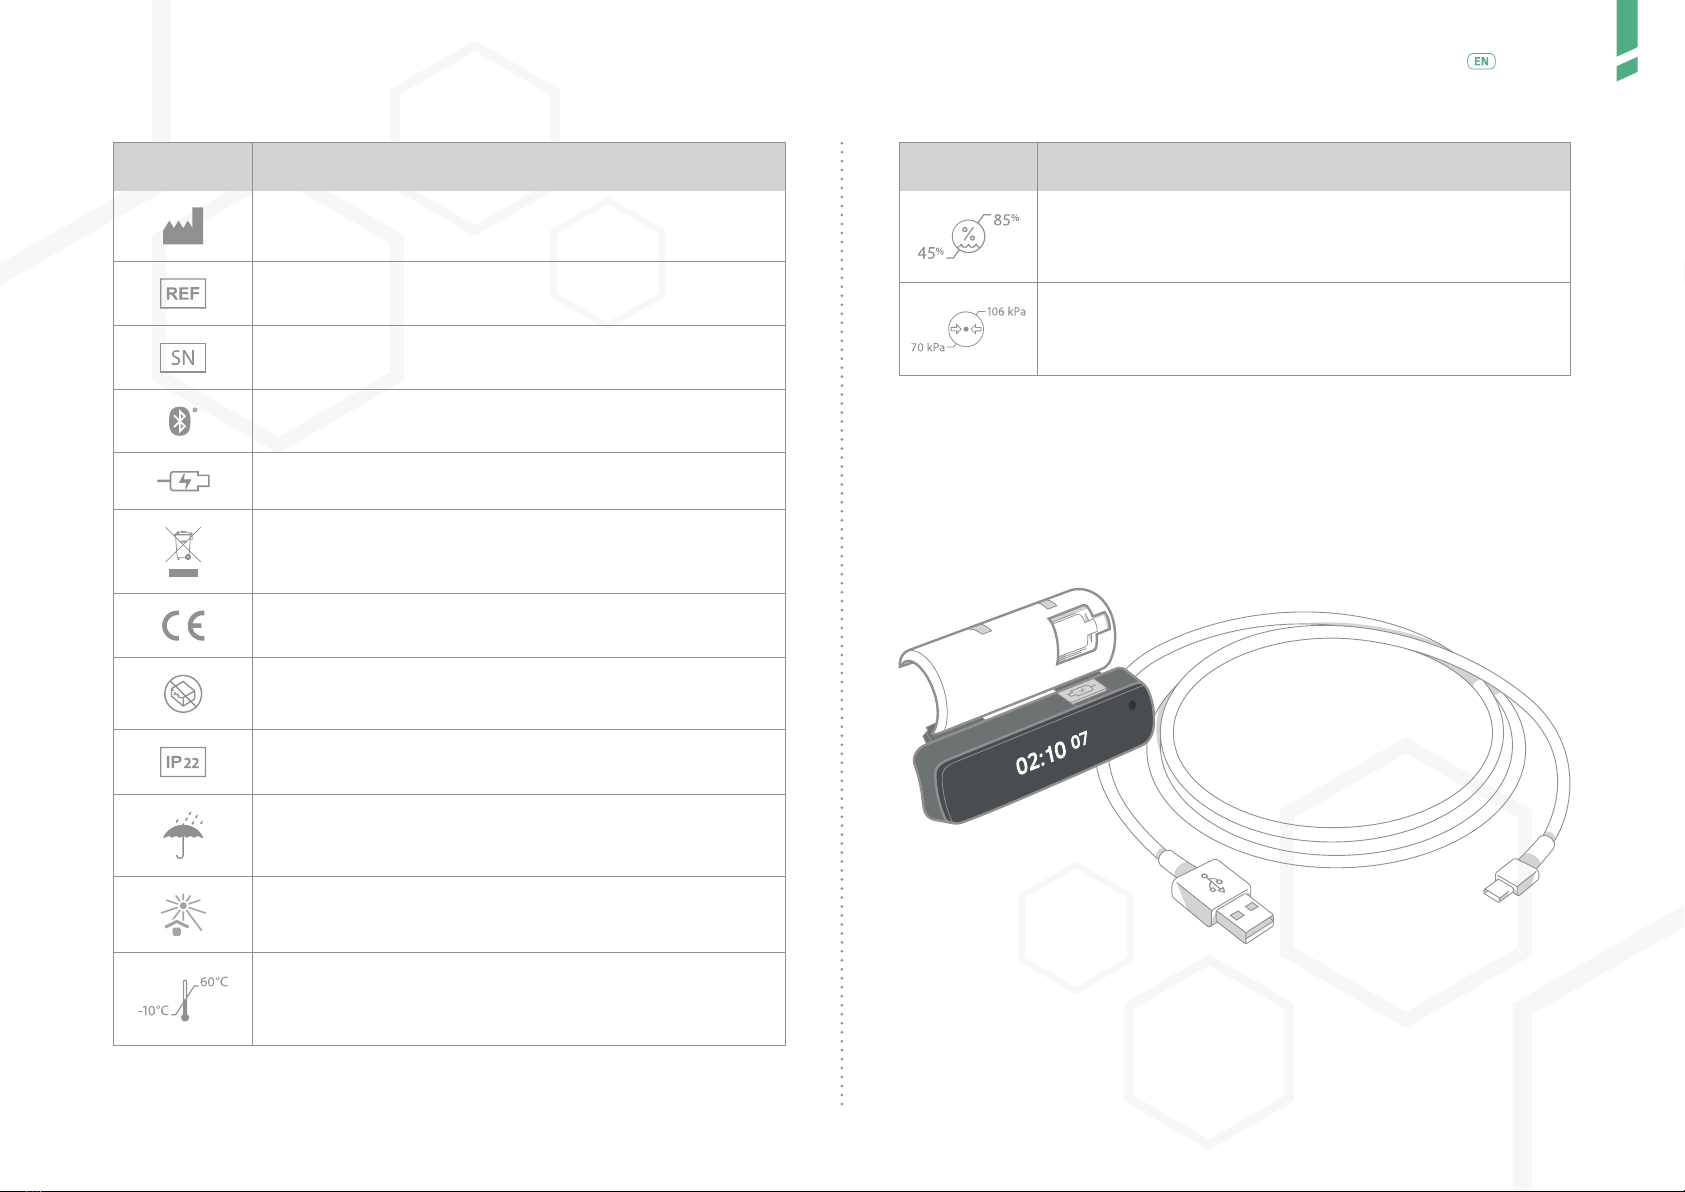
•Device GlucoMen Day PENCAP
•User Insulin pen user, Patient or Operator
•App GlucoLog RapidCalc app
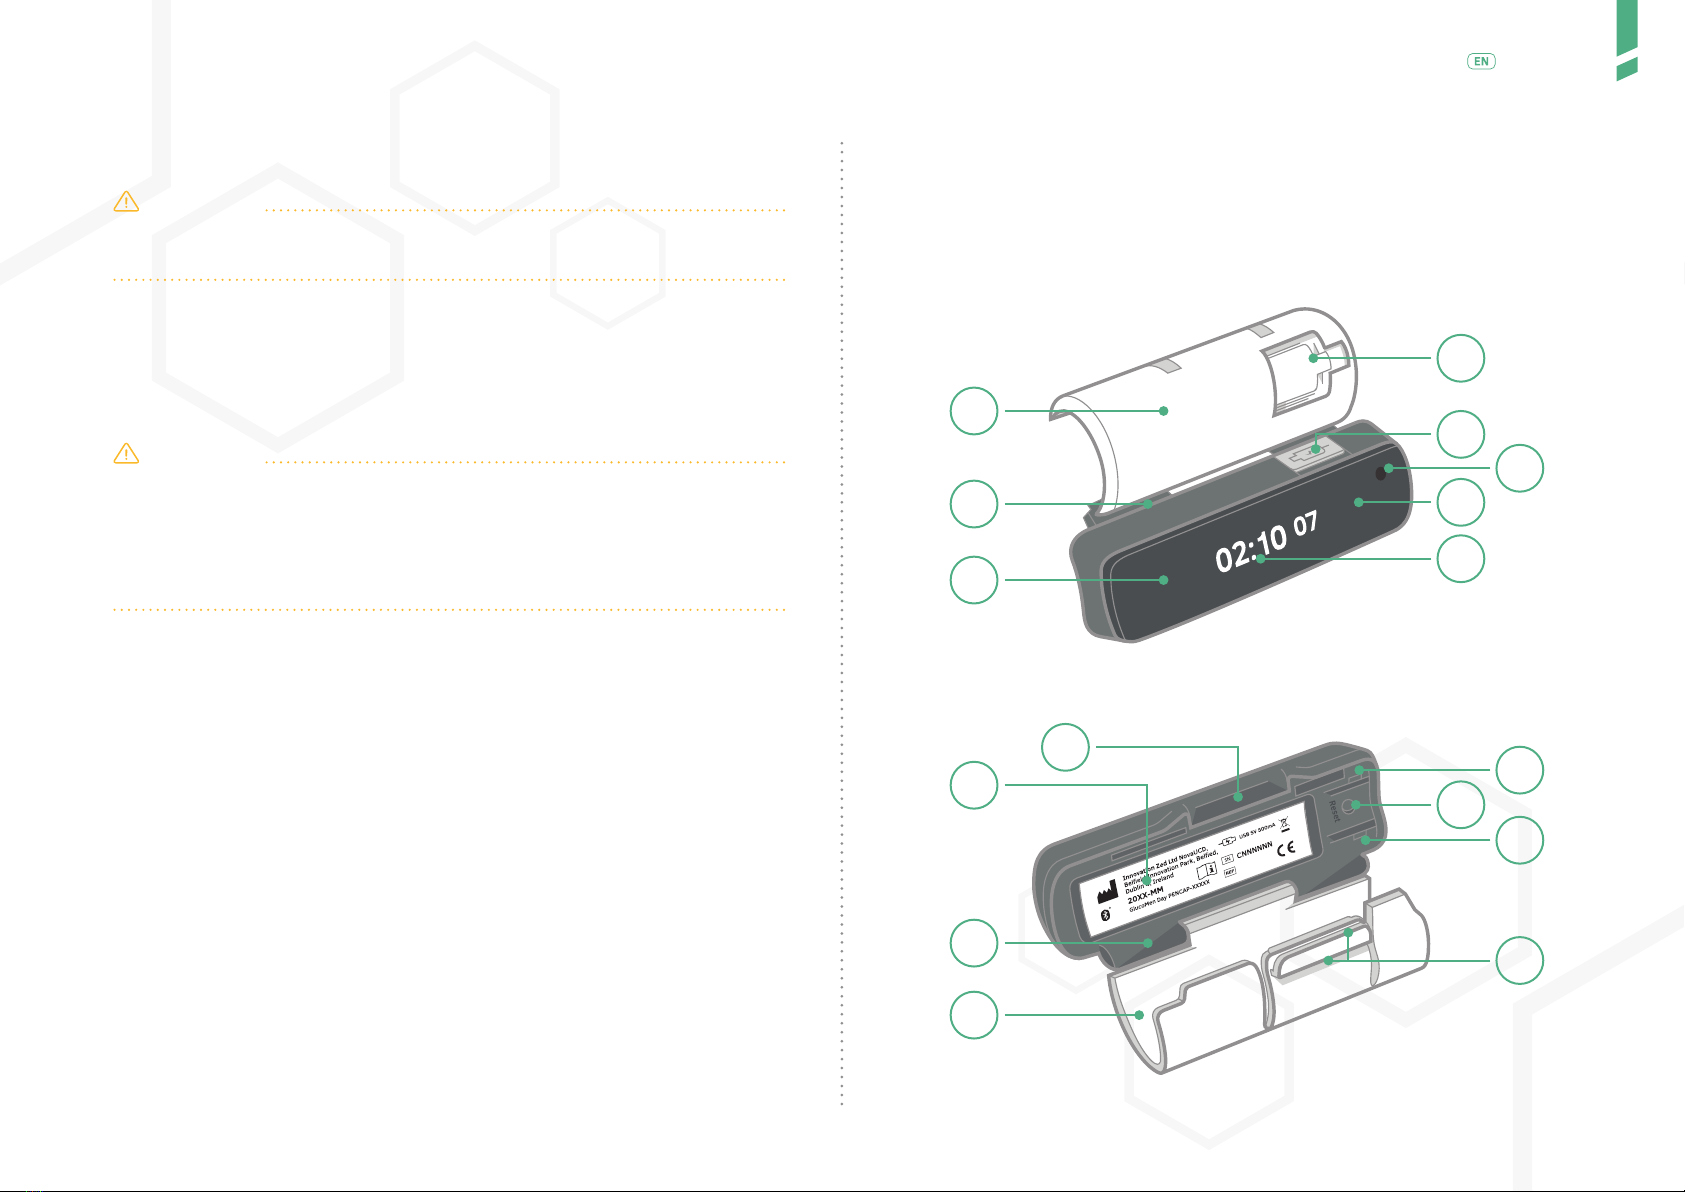
/ 1.2 General description
GlucoMen Day PENCAP helps you track your insulin injections. It can stre-
amline your diabetes management by automatically logging injections into
a diabetes management app. You can also easily see the time since last
injection on the display, helping you to stay on top of your injection routine.
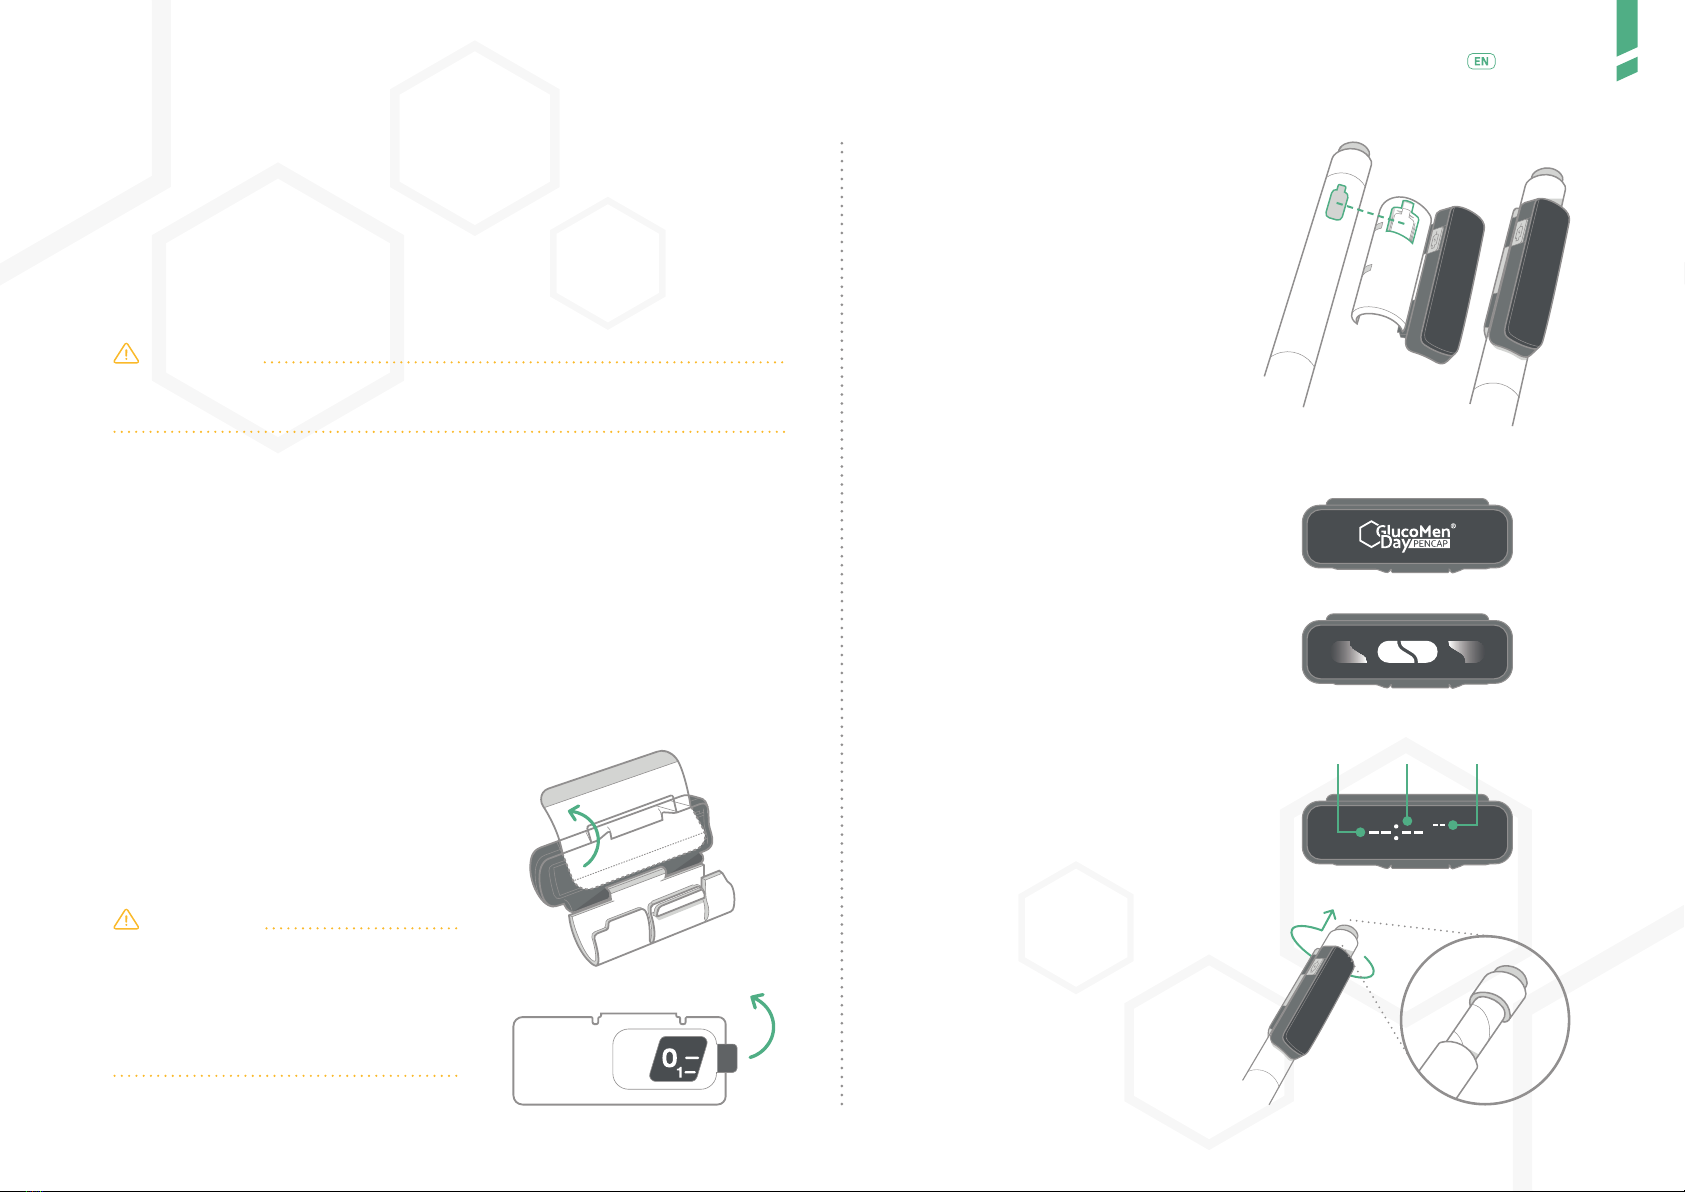
GlucoMen Day PENCAP is clipped-on to your insulin injection pen. Once moun-
ted on the pen, it automatically detects when you dial-out a dose and perform
an injection. The Device starts counting up the time after you have injected.
To use the GlucoMen Day PENCAP you need to install the GlucoLog RapidCalc
app (available for both Android on the Play Store, and iOS on the Apple
Store) on your smartphone.
/ 1.3 Intended use
GlucoMen Day PENCAP is a long-term secondary aid in diabetes manage-
ment, by providing information about the timing of injections of insulin.
The timer on the GlucoMen Day PENCAP must NOT be used as the
only indicator to decide when to inject insulin. You must rely on your own
memory and common sense, your blood glucose level and other informa-
tion you have to decide when to perform an insulin injection.
The Device is designed to be used in common domestic environments
such as your home, oce or school.
/ 1.4 Intended Users
GlucoMen Day PENCAP is intended for insulin pen users who are familiar
with the use of these pens.
GlucoMen Day PENCAP should NOT be used as the sole or main method
of managing the timing of injections or by users who are unable to ma-
nage their treatment without the use of the Device.
CAUTION
The User must be able to safely use all functions of the Device.
/ 1.5 Normal use
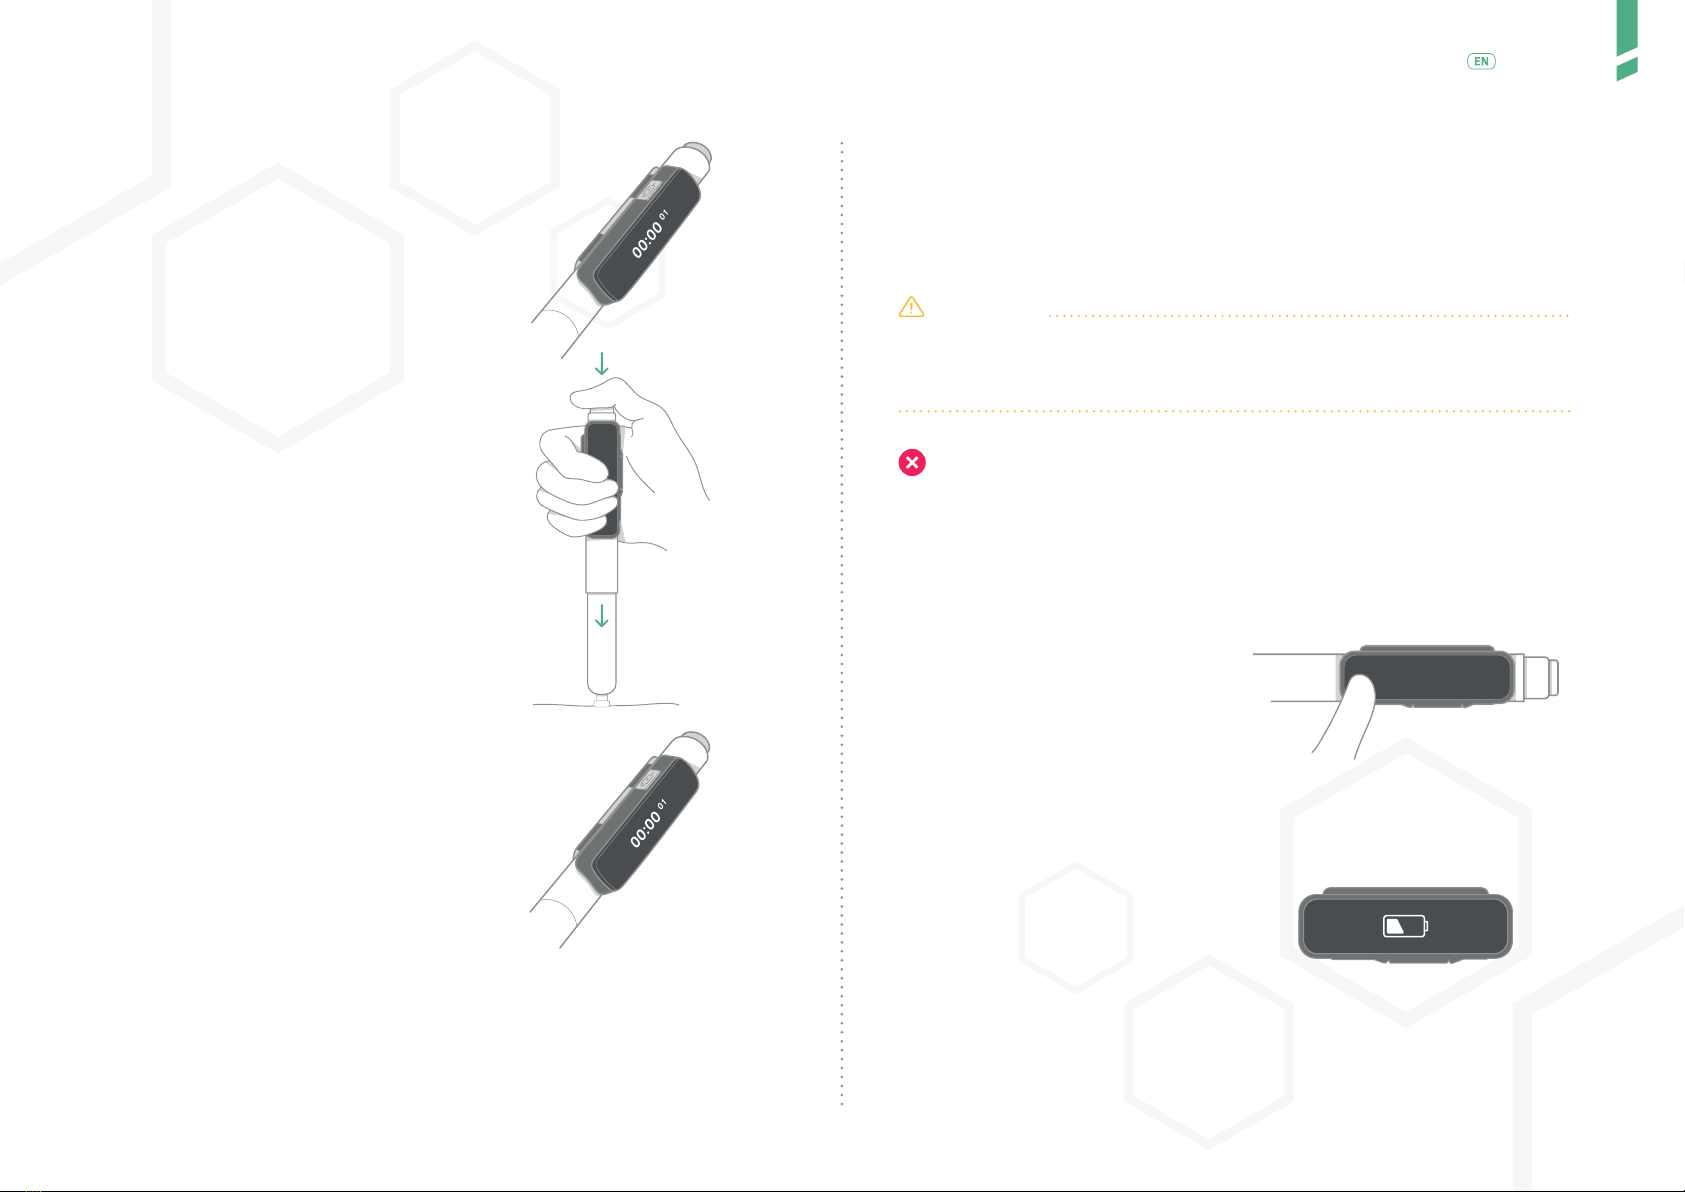
GlucoMen Day PENCAP is mounted on the insulin pen by the user. The
Device is on the pen when injecting. The time since previous injection is
displayed on the display screen. Using Bluetooth® technology, data from
the Device can be transferred to a connected app (GlucoLog RapidCalc app).
Once mounted, the Device need not be removed from reusable pens.
When used with disposable pens, once the insulin runs out, the Device
is removed and mounted on a new disposable pen. GlucoMen Day PEN-
CAP has a lithium-ion battery that is rechargeable when a low battery is
indicated.
/ 1.6 Symbols
The following table describes the meaning of the symbols used in the
User Manual, the Packaging and the Label on the bottom of the Device.
Symbol Meaning
This action is prohibited. User should read very
carefully.
Important information, warning or precaution. User
should read carefully.
Read User Manual before use.

2
Description of the Device /
English
/ 2 Description of the Device
/ 2.1 Package contents
Symbol Meaning
Name and address of manufacturer. Year-month of
manufacture.
Model number of the Device.
Serial number of the Device.
BLE (Bluetooth® Low Energy) name of the Device.
Rating of the USB charger.
Do not dispose as normal household waste. Dispose
separately as Electronic Equipment waste.
CE mark.
Do not use the Device if packaging is damaged
or opened.
Degree of enclosure protection.
Protect Device from moisture.
Avoid using the Device under direct sunlight.
Range of temperature (upper and lower limit) to which
the Device can be safely exposed to during transporta-
tion and storage.
Symbol Meaning
Range of humidity (upper and lower limit) to which the
Device can be safely exposed to during transportation
and storage.
Range of atmospheric pressure (upper and lower limit)
to which the Device can be safely exposed to during
transportation and storage.
Included in the box is:
• GlucoMen Day PENCAP (Device)
• USB charging cable (Charger not included)

3
Description of the Device /
English
/ 2.2 General safety instructions
CAUTION
• Do not use the Device if packaging is damaged or opened.
• Do not use GlucoMen Day PENCAP if any part looks broken or damaged.
GlucoMen Day PENCAP supports a variety of insulin pens with each De-
vice designated to work with only one specic pen model (see SECTION
2.5 for supported pens). GlucoMen Day PENCAP cannot detect that it is
tted on a wrong pen.
CAUTION
• Before using, please check that you have purchased the Device designated
for the model of pen you use.
• It is your responsibility to ensure that you are using the correct Device
with your pen. Consult your healthcare provider if you are unsure which
insulin pen model you are using.
/ 2.3 GlucoMen Day PENCAP terminology
The following images describe the key components of Insulcheck Connect.
1. Display screen. Timer and other information is displayed on it.
2. Charging indicator. Displays the charging status.
3. Touch button. Used to turn on the display screen. Both areas labelled
3a and 3b are part of the same touch button.
4. Sleeve. The sleeve can only be tted properly on a specic pen model.
5. Dose. Indicator window (in the sleeve).
6. Dust Cover. Protects the charging inlet.
7. Hinge mechanism. Simplies mounting of the Device on a pen.
8. Reset button. Hole for accessing the reset button using a paperclip
or similar.
9. Bottom label. Carries Device identication and other important information.
10. Mounting mechanism. Press (click) together to fasten. Push down the
clasp to release.
11. Optical sensor. Senses the change in position of the dose-knob on the
insulin pen.
1
2
3b
3a
4
5
6
7
8
9
10 11
11
10
4
7

4
Description of the Device /
English
/ 2.4 Insulin pen terminology
12. Dose-knob. the knob at the end of the insulin pen which is dialled to
adjust the desired dosage of insulin.
13. Dose-indicator. the number of dialled-out insulin units. After moun-
ting the GlucoMen Day PENCAP on a pen, the dose-indicator is visible
through the window in the sleeve.
/ 2.5 Supported pens
GlucoMen Day PENCAP is clipped onto the insulin pen using the sleeve,
hinge mechanism and mounting mechanism.
The unique design of the sleeve means that the Device will only t properly
and operate correctly on the designated model of pen.
The abbreviation for the pen name the Device is designated for, is embos-
sed on the sleeve.
The following table provides a list of pen models supported by GlucoMen
Day PENCAP together with their abbreviations. The detection threshold
(i.e. the lowest dose injection the Device can detect) for each pen model is
also given in the table. For information on how to handle dose units below
this threshold, please see SECTION 3.3.
Pen model Meaning Detection threshold
FlexPen®
by Novo Nordisk
Disposable pen
FP 3 dose units
SoloSTAR®
by Sano
Disposable pen
SS 2 dose units
KwikPen®
by Lilly
Disposable pen
KP 2 dose units
NovoPen® 5
by Novo Nordisk
Reusable pen
NP5 2 dose units
NovoPen® 4
by Novo Nordisk
Reusable pen
NP4 2 dose units
ECHO®
by Novo Nordisk
Reusable pen
EC 3 dose units
12
13

5
Operating instructions /
English
/ 2.6 Performance
When the operating instructions, safety regulations and care requiremen-
ts are properly followed, GlucoMen Day PENCAP will continue to automati-
cally detect and record injections, display the timer, respond to tapping of
touch button, recharge and transfer data to the App, as described in this
manual during its service life.
CAUTION
Do not to use the Device if you observe a deterioration in any of these
functions.
A decrease in charging interval can be expected due to normal battery
degradation.
Contact A. Menarini Diagnostics Customer Service (reported on the box) if
the Device does not behave as specied in this manual, especially if pro-
per screens are not displayed or the detection threshold increases.
/ 3 Operating instructions
/ 3.1 First time use
1. Peel o the labels.
a. First from underneath the Device
and then from the touch area and di-
splay.
CAUTION
Part of this label prevents acciden-
tal powering-on of the Device during
shipping. The label must be comple-
tely removed for the Device to fun-
ction properly.
b. Then from the dose-indicator window.
2. Mount the Device on your
injection pen.
a. Align the dose-indicator window
on the sleeve with the dose-indicator
on the pen.
b. Check that the optical sensor is
positioned near the dose-knob.
c. Push the sleeve onto the pen.
d. Press (click) together the moun-
ting mechanism to fasten the Device
on the pen.
3. The Device powers on and the
GlucoMen Day PENCAP insignia is
displayed.
4. Then, the mounted on pen
animation is displayed.
5. Then, the dashed timer is
displayed since no injection has
been detected.
To save power, the screen will
turn o after a few seconds. The
Device remains powered on and
keeps sensing.
/ 3.2 Injection
1. Dial out dose.
hrs min sec

6
Operating instructions /
English
2. The timer stops counting up.
3. Perform the injection
according to your therapy.
4. The timer resets due to the
new injection and starts counting
up.
/ 3.3 Low dose injections
Depending on the pen model, the Device cannot detect injections for
doses below 2 or 3 units.
To make sure that injections are detected for doses below these thre-
sholds:
1. Dial out a higher dose, for example 6 units. This will trigger the
dose-knob sensing.
2. Dial the dose-knob back in to the actual low dose to be taken
(e.g. 1 or 2 units) and then complete the injection.
CAUTION
GlucoMen Day PENCAP does not detect actual injections. Its operation
is based on sensing the changes in the position of the dose-knob when
the user interacts with it during injections.
Playing or “ddling” with the dose-knob of the pen is not allowed
when the Device is mounted on the pen. Such unwanted actions, for
example, dialling out and then in a dose without injecting, can cause the
Device to display and record incorrect timing information.
/ 3.4 Checking battery status
1. Tap the touch button to turn
on the screen and activate
Bluetooth®.
2. If the battery is low, a battery
warning1 is displayed for a few
seconds.
Keep your Device charged for
smooth operation. Your injection
time will be detected even after a
battery warning is displayed, but
it will shut down soon after the
blinking critical battery warning.
1
Refer to the display guide in SECTION 5.

7
Operating instructions /
English
3. Timer is displayed and is
counting up time since previous
injection, Bluetooth® is active.
/ 3.5 Charging
1. Open the dust cover
protecting the charging inlet.
2. Connect the micro-USB
charging cable.
CAUTION
STOP. Do not inject while charging.
/ 3.6 Bluetooth®pairing
The information on time intervals between injections is stored on the De-
vice for up to 30 days. You can transmit this information to the GlucoLog
RapidCalc app via Bluetooth®.
1. On your app or phone,
activate Bluetooth® and scan for
available devices.
2. Tap the touch button to turn
on the screen.
3. On the app or phone, select
the Device from the list of avai-
lable devices. The BLE name of
your Device is written on the la-
bel on the underside of the Devi-
ce and also on the packaging.
4. Wait for the Device to display
the passkey.
Blinking orange
(Charging in progress)
Constant green
(Fully charged)

8
Operating instructions /
English
5. Type the passkey into the
prompt on your app or phone.
a. If pairing is successful, an ani-
mation of a closed padlock will be
displayed.
b. If pairing is unsuccessful, a pa-
dlock crossed by a blinking bar is di-
splayed.
Full instructions how to pair with the GlucoLog RapidCalc app are reported
on the GlucoLog RapidCalc guide available at www.glucomenday.com.
/ 3.7 Maximum number of pairings
GlucoMen Day PENCAP can be paired with a maximum of 3 dierent client
devices (e.g. dierent smartphones or apps). When you pair with a four-
th client device your GlucoMen Day PENCAP will automatically drop the
rst client device you connected with to accommodate the new client.
You can clear all paired devices.
/ 3.8 Clearing paired devices
1. Unmount the Device
from the pen.
2. Turn the Device around so that
the hole for accessing the reset
button is exposed.
3. Push the reset button with a
paper clip or similar tool for less
than 3 seconds.
4. After the pairing data is clea-
red, the animation of an opening
padlock is displayed on the scre-
en.
CAUTION
Pushing reset button for more than
10 seconds will trigger a factory re-
set.
/ 3.9 Changing Pen
1. Open the clasp and remove
the Device from the current pen.

9
Operating instructions /
English
2. When the clasp is opened, the unmounted from pen animation2
is displayed on the screen.
3. Mount the Device on your new injection pen.
4. If the Device is correctly
mounted, the mounted on pen
animation is displayed.
5. After the change, the timer-
continues to count up the time.
/ 3.10 Factory reset
All the data stored in the GlucoMen Day PENCAP memory as well as the
pairing data can be deleted by doing a Factory Reset. GlucoMen Day
PENCAP also reboots as a result of a factory reset.
1. Unmount the Device from the
pen.
2. Turn the Device around so
that the hole for accessing the
reset button is exposed.
3. Push the reset button with
a paper clip or similar tool and
keep it pressed for more than 10
seconds.
4. The Device reboots and the
GlucoMen Day PENCAP insignia
is displayed conrming that a
factory reset has been triggered.
2
Refer to the display guide in SECTION 5.

10
Operating instructions /
English
/ 3.11 Powering o
To power o your GlucoMen Day
PENCAP:
1. Unmount the Device from
the pen.
2. Turn the Device around so
that the hole for accessing the
reset button is exposed.
3. Wait for the screen to turn o.
4. Tap the touch button to turn
on the screen.
5. Push the reset button with
a paper clip or similar tool and
keep it pressed for more than 20
seconds. The screen must remain
on during this time.
6. After about 20 seconds the screen will turn o. If the Devi-
ce is powered o, tapping the touch button will not turn on the
screen.
CAUTION
Make sure that the screen stays on during the reset button press for
powering off.
/ 3.12 Powering on
A powered o device can be powered on by the following methods:
• Connecting the Device to a charger.
• Mounting the Device on a pen.
• Clicking the sleeve (without pen) to engage the mounting mechanism.
/ 3.13 Cleaning and care
Clean your GlucoMen Day PENCAP by wiping it gently with a clean cloth
lightly moistened with water. The cloth should not leave any water droplets
on the surface of the Device.
Do not use any other liquids or solvents when cleaning the Device.
CAUTION
• Make sure that no excessive dust, moisture, water or other agent bu-
ilds-up on the optical sensor of the Device. Clean the optical sensor with
a clean dry or slightly moistened cloth if any build-up appears.
• Keep the Device within the specied temperature, humidity and atmo-
spheric pressure ranges.
•Do not expose the Device to open ame or put it too close to a he-
ated surface.
• Never pour water or other liquids on the Device. Never submerge the

11
Troubleshooting /
English
Device in water or other liquids. If this occurs, dry o quickly with a cle-
an cloth.
• Do not store the Device in a freezer.
• Do not use the Device if abnormal heat, odour, discolouration, defor-
mation, or other abnormal condition is detected during use, charging,
or storage.
/ 3.14 Long-term storage
If you decide not to use your GlucoMen Day PENCAP and wish to store it for
future use:
1. Fully charge the battery.
2. Power o the Device (follow steps in SECTION 3.10).
a. Do not mount the Device on a pen after powering o.
b. Do not click the sleeve (without pen) to engage the mounting mecha-
nism – this will power on the Device.
3. Store the Device at temperatures between -10 to 60 °C (14 to
140 °F) in Relative Humidity of 45-85%, at altitudes of < 3000 m
(< 9840 ft.) and at normal Atmospheric Pressure.
/ 3.15 Disposal
At the end of the Device’s service life it should be disposed as electrical
waste according to local regulations.
/ 3.16 General safety advice
CAUTION
• Only use a certified 5V USB charger from a legitimate supplier with
the Device (for example, CE marked etc.) to minimise the risk of electric
shock and damage to the Device.
• In the unlikely event of deterioration in the functionality of nearby equipment
in the presence of GlucoMen Day PENCAP, remove the Device from the vicinity.
• To avoid degradation in performance of GlucoMen Day PENCAP, radio
equipment (such as phones, computers, wireless devices, antennas, an-
tenna cables etc.) should not be used closer than 30 cm (12 inches)
from the Device. This distance should also be observed for the charging
cable if it is plugged-in to the Device.
• To reduce the risk of interference from outside sources, avoid using
GlucoMen Day PENCAP near strong sources of electromagnetic radiation
(e.g. CT, MRI, X-ray equipment etc.).
• To ensure proper operation of the Device, avoid using it adjacent to or
stacked with other electrical equipment.
Do not use the Device in oxygen rich environments.
/ 4 Troubleshooting
/ 4.1 Injection not detected
The main cause for injections not detected is that the optical sensor in
the Device is not working properly. The following can be helpful in xing
the issue:
• Make sure that the Device is designated for the pen model it is mounted
on (see SECTION 2.5).
• Make sure that the Device is tted and positioned correctly on the pen
i.e. the optical sensor is positioned close to the dose-knob after moun-
ting (see SECTION 3.1).
• Press the mounting mechanism together to ensure that the Device is
properly mounted on the pen. The ‘mounted on pen’ animation appears
when the Device is properly mounted (see SECTION 3.1).
• Make sure that there is no build-up of dirt etc. on the optical sensor
(see SECTION 3.12 for cleaning instructions).
• If it is still not working, unmount and re-mount the Device on the pen
(see SECTION 3.8).
• If injections are still not detected contact A. Menarini Diagnostics Cu-
stomer Service (reported on the box).

12
Display guide /
English
/ 4.2 Blinded sensor
The optical sensor of the Device is
blinded when exposed directly to
intense light (e.g. bright sunlight)
and cannot detect the activity of the
dose- knob. The screen will display
the blinded sensor warning.
If this happens, take the device out
of the intense light until the warning
is no longer displayed. The Device
can now be used normally.
/ 4.3 Spillage
Should an accident occur exposing GlucoMen Day PENCAP to a liquid
(e.g. a cup getting knocked over causing spillage), remove it from the
pen, dry it by wiping gently with a clean dry cloth, and set the Device
aside for several hours before resuming its use.
CAUTION
The Lithium-Ion battery should not be exposed to water or other liquids.
/ 4.4 System error
If the InsulCheck insignia is di-
splayed periodically on the screen,
this means that the Device has a re-
peating system error which it cannot
recover from. If that happens, stop
using the Device and contact A. Me-
narini Diagnostics Customer Service
(reported on the box).
/ 4.5 Unsuccessful pairing
There are a number of reasons for an
unsuccessful Bluetooth® pairing.
The most common reasons are:
1. It may be that the passkey was mistyped into the app or pho-
ne. Repeat the process or follow the instructions on your phone
or app.
2. Check that your smartphone supports connection to your
GlucoMen Day PENCAP, and that you are using the GlucoLog
RapidCalc app.
3. The Bluetooth® functionality is implemented in dierent ways
by mobile device manufacturers. There may be a incompatibility
issue which cannot be resolved.
If you still cannot pair with the desired client device, please contact
A. Menarini Diagnostics Customer Service (reported on the box).
/ 5 Display guide
Graphic Reference
GlucoMen Day PENCAP insignia is displayed
on the screen for a few seconds after the De-
vice is powered on. It is also displayed after
a factory reset. The insignia is generally fol-
lowed by displaying the Firmware Version on
the Device for a few seconds.
When the screen is turned on, the timer is di-
splayed on it. The timer counts up the time
since the previous dialling-in of the dose- knob
(during injection) was detected. The timer di-
splays the time since the previous injection.
Insigna displayed
periodically

13
Display guide /
English
Graphic Reference
If no injections have been detected, the screen
displays dashed lines.
Timer value up to 24 hours (1 day) is di-
splayed in HH : MM SS format (Hours : Minutes
Seconds).
If the time since previous injection is more
than 1 day, the number of days is shown wi-
thin the calendar symbol followed by HH : MM
(Hours : Minutes).
After an injection, the timer resets to 00 :
00 00 (Hours : Minutes Seconds) and starts
counting up.
When the screen is turned on, if the battery is
low, the low battery warning is displayed for
a few seconds before the timer is displayed.
CAUTION
Charge the Device fully if a battery warning
is displayed.
When the battery is very low, a blinking critical
battery warning is displayed for a few seconds
before displaying the timer.
When a charger is connected to the Device
and the battery is not fully-charged, this ani-
mation is displayed for a few seconds before
displaying the timer.
Graphic Reference
Charging is nished when the battery is fully
charged. This graphic is displayed for a few
seconds before displaying the timer.
The charging indicator will light when a char-
ger is connected to the Device. Blinking oran-
ge indicating charging is in progress.
Constant green indicates the battery is ful-
ly-charged and charging is nished.
When GlucoMen Day PENCAP is properly
mounted on the pen it is designed for, the sle-
eve clicks, the mounting mechanism is enga-
ged, the display shows the two closing compo-
nents on the screen.
Unmounting a properly mounted Device di-
sengages the mounting mechanism and the
two opening components is displayed on the
screen.

14
Contact information /
English
Graphic Reference
When pairing GlucoMen Day PENCAP to an app
(e.g. smartphone app), a passkey is displayed
on the screen. Enter the passkey displayed on
the Device in your app to complete the pairing
process.
CAUTION
The passkey is only valid for a short time. If
it is not entered in the app, it will disappear,
and the pairing sequence must be repeated.
A closing padlock is display indicates succes-
sful pairing.
If pairing is unsuccessful a padlock crossed by
a blinking bar is displayed.
An opening padlock is displayed when attemp-
ting to clear the pairing data of the Device.
/ 6 Contact information
/ 6.1 Support
A. Menarini Diagnostics Customer Support informations are reported on
the box.
/ 6.2 Manufacturer
Manufactured for Innovation Zed Ltd., NovaUCD, Beleld Innovation
Park, Beled, Dublin 4, Ireland By Scandinavian Healthcare Ltd. Taiwan.
/ 6.3 Warranty
Your GlucoMen Day PENCAP is guaranteed to be free of material and
workmanship defects for 2 years from the date of purchase (except as
noted below). If at any time during the rst 2 years after purchase, your
GlucoMen Day PENCAP does not work for any reason (other than as de-
scribed below), it will be replaced with a new GlucoMen Day PENCAP, or
substantial equivalent, free of charge.
Graphic Reference
When the Device detects (any activity) mo-
vement of the dose knob during charging, a
USB connector crossed by a blinking bar is
displayed.
STOP. Do not inject while the device is
charging.
The optical sensor of the Device can be blin-
ded when exposed directly to intense light
(e.g. bright sunlight) and cannot detect the
(activity) movement of the dose- knob. When
the screen is turned on and the sensor is blin-
ded, the blinded sensor warning is displayed.

15
Technical specication /
English
/ 7 Technical specication
/ 7.1 Specications
Name GlucoMen Day PENCAP
Model no. IC-Connect
Service life 2 years
Typical operation time
Supports continuous use. Typical
operation time - ve activations
per day of 30 seconds each
Dimensions
With mounting mechanism engaged 62 x 22 x 28 mm
Weight 20 grams
Accuracy of the timer
Time since previous injection
15 second drift over one day
(24 hours)
Data Storage Approximately 30 days
Battery
Li-ion rechargeable battery,
3.7VDC (nominal), 40mAh,300
recharge cycles
Power consumption Max. 105 mWatt
Charger rating USB 5VDC, min. 500mA C
Maximum internal working
voltage 9VDC
The warranty is subject to the following exceptions and limitations:
• This warranty is only applicable to original purchaser.
• This warranty does not apply to units which malfunction or are da-
maged due to obvious tampering, misuse, alteration, neglect, unau-
thorized maintenance or failure to operate the GlucoMen Day PENCAP in
accordance with the instructions.
• There is no other express warranty for this product. The option for
replacement, described above, is the warrantor’s only obligation under
this warranty.
The original purchaser must contact the A. Menarini Diagnostics Cu-
stomer Care number reported on the GlucoMen Day PENCAP box.
A. Menarini Diagnostics is committed to using your personal infor mation
responsibly and in compliance with the law. You have our pledge that
we will not disclose or sell your personal information with third-parties.
The information you voluntarily provide will be used to help us serve you
better in the future.
/ 6.4 Disclaimers
CAUTION
• The manufacturer is not responsible for any problems, damages or mal-
functions arising from unforeseeable circumstances.
• Modication and taking apart the Device is not allowed and may inter-
fere with performance and safety.

16
Technical specication /
English
RoHS Directive 2011/65/EU - IEC 62321:2008
Electromagnetic compatibility
CFR 47: part 15 sub part b (Radio Module FCC ID: WAP4008 see FCC
NOTICE below)
ICES 003of 2016; IC (Industry Canada)
Radio Module IC ID: 7922A-4008 see note below
ANSI 63.4 of 2014
RED – Radio Equipment Directive 2014/53/EU – pre-certied by supplier
The full text of the EU Declaration of Conformity is available at the fol-
lowing internet address: www.red.menarinidiagnostics.com
FCC (USA) - Radio Module FCC ID: WAP4008 FCC NOTICE:
This Device complies with Part 15 of the FCC Rules. The Device meets the
requirements for modular transmitter approval as detailed in FCC public
Notice DA00-1407.Transmitter Operation is subject to the following two
conditions:
(1) This Device may not cause harmful interference.
(2) This device must accept any interference received, including interfe-
rence that may cause undesired operation.
IC (Industry Canada) Radio Module IC ID: 7922A-4008
The Device meets the requirements for modular transmitter approval as
detailed in RSS-GEN. Operation is subject to the following two condi-
tions:
(1) This Device may not cause harmful interference.
(2) This Device must accept any interference received, including interfe-
rence that may cause undesired operation.
/ 7.3 Declarations
This device has been tested to meet the electrical and safety require-
ments of:
Medical Electrical Equipment
EN61000-6-3 : 2007+A1:2011, EN61000-6-1 : 2007, EN61000-4-2 : 2008,
IEC61000-4-3 : 2006+A1:2007+A2:2010, IEC61000-4-6 : 2013
IEC61000-4-8 : 2009, EN62479:2010,
EN55142:1997+A1:2001+A2:2008
Radio
Certied Bluetooth® Module FCC
ID: WAP4008 Tx & Rx freq.: 2400
-2800 MHz Max. Tx power:3dBm
/ 7.2 Environment and operating conditions
Normal operation 0 to 40 °C (32 to 104 °F),
45-85% RH
Transport and storage -10 to 60 °C (14 to 140 °F),
45-85% RH
Charging 10 to 45 °C (50 to 113 °F),
45-85% RH
Altitude & Atmospheric Pressure < 3000 m (< 9840 ft.)
& 70-106 kPa
Degree of enclosure protection IP22
Vibration / Shock / Bump / Drop
/ Free fall
Transportation worldwide by air,
road, ship and train

www.glucomenday.com
51971-09/20-EN
Table of contents
Other GlucoMen Blood Glucose Meter manuals
Popular Blood Glucose Meter manuals by other brands

True
True METRIX AIR owner's booklet

Accu-Chek
Accu-Chek ADVANTAGE owner's booklet

Bayer HealthCare
Bayer HealthCare Contour next EZ user guide

EPS Bio Technology
EPS Bio Technology EasyMax LTC Long term care manual

GlucoPlus
GlucoPlus Blood glucose monitoring system user manual

Freestyle
Freestyle Libre 14 day user manual