S
TEP
1:
S
TEP
3:
Following programming—
On your Wireless Keypad:
Enter your PIN.
O
PERATING
D
OOR
O
PENERS
Proceed to Section 3 - Mounting Instructions.
For answers to questions, call 1-800-35-GENIE , or visit
www.geniecompany.com
A
The Genie Company, 22790 Lake Park Blvd., Alliance, Ohio 44601
dditional Genie® products can be ordered through your local
SECTION
2
FOR CONVENIENCE
Program Keypad BEFORE mounting.
M
ULTIPLE
©2010 GMI Holdings, Inc. D.B.A.The Genie Company
FCC and IC CERTIFIED
This device complies with FCC Part 15 and RSS 210 of Industry Canada. This equipment has been tested and
found to comply with the limits for a Class B digital device, pursuant to Part 15 of the FCC Rules. These limits are
designed to provide reasonable protection against harmful interference in a residential installation. This
equipment generates, uses and can radiate radio frequency energy and, if not installed and used in accordance
with the instructions, may cause harmful interference to radio communications. However, there is no guarantee
that interference will not occur in a particular installation. If this equipment does cause harmful interference to
radio or television reception, which may be determined by turning the equipment OFF and ON, the user is
encouraged to try to correct the interference by one or more of the following measures:
•Re-orient or relocate the receiver antenna.
•Increase the separation between the opener and receiver.
•Connect the opener into an outlet on a circuit different from that to which the receiver is connected.
•Consult your local dealer.
NOTE
•
If the Door does not move,check the LED on Keypad.
If the LED is blinking rapidly,the PIN was entered
incorrectly. After the LED stops blinking,re-enter
your PIN and try again.
•
Any Keypad Button will control the Door for 30 seconds
after the Door starts moving.
•
Rapid blinking of the red LED indicates an error. After a
few seconds the LED will turn off. Start over.
•Press in order .
•Press .
•Enter your PIN (3 to 8 characters).
•
•Close keypad cover and wait 30 seconds.
Press .
3 5 7
S
TEP
1: C
REATING
Y
OUR
W
IRELESS
K
EYPAD
PIN
(P
ERSONAL
I
DENTIFICATION
N
UMBER
)
1 2 3
•Pressthe number ofthe door you wishto
operate or .
•Pressany keytooperatethedoor.
•
•
Press .
S
TEP
3: O
PERATING
O
NE
D
OOR
O
PENER
ATo open or close the Garage Door.
•Enter your PIN.
•Press .
FOR CONVENIENCE
Program Keypad BEFORE mounting.
SECTION
1
Proceed to Section 3 - Mounting Instructions.
NOTE
•
If the Door does not move,check the LED on Keypad.
If the LED is blinking rapidly,the PIN was entered
incorrectly. After the LED stops blinking,re-enter
your PIN and try again.
•
Any Keypad Button will control the Door for 30 seconds
after the Door starts moving.
•
Rapid blinking of the red LED indicates an error. After a
few seconds the LED will turn off. Start over.
Wait until Keypad Backlight turns off (approximately 30 seconds).
S
TEP
1: C
REATING
Y
OUR
S
TEP
2:
P
ROGRAMMING
S
INGLE
D
OOR
O
PENER
W
IRELESS
K
EYPAD
PIN
(P
ERSONAL
I
DENTIFICATION
N
UMBER
)
•Press in order .
•Press .
•Enter your PIN (3 to 8 characters).
•
•Close keypad cover and wait 30 seconds.
Press .
3 5 7
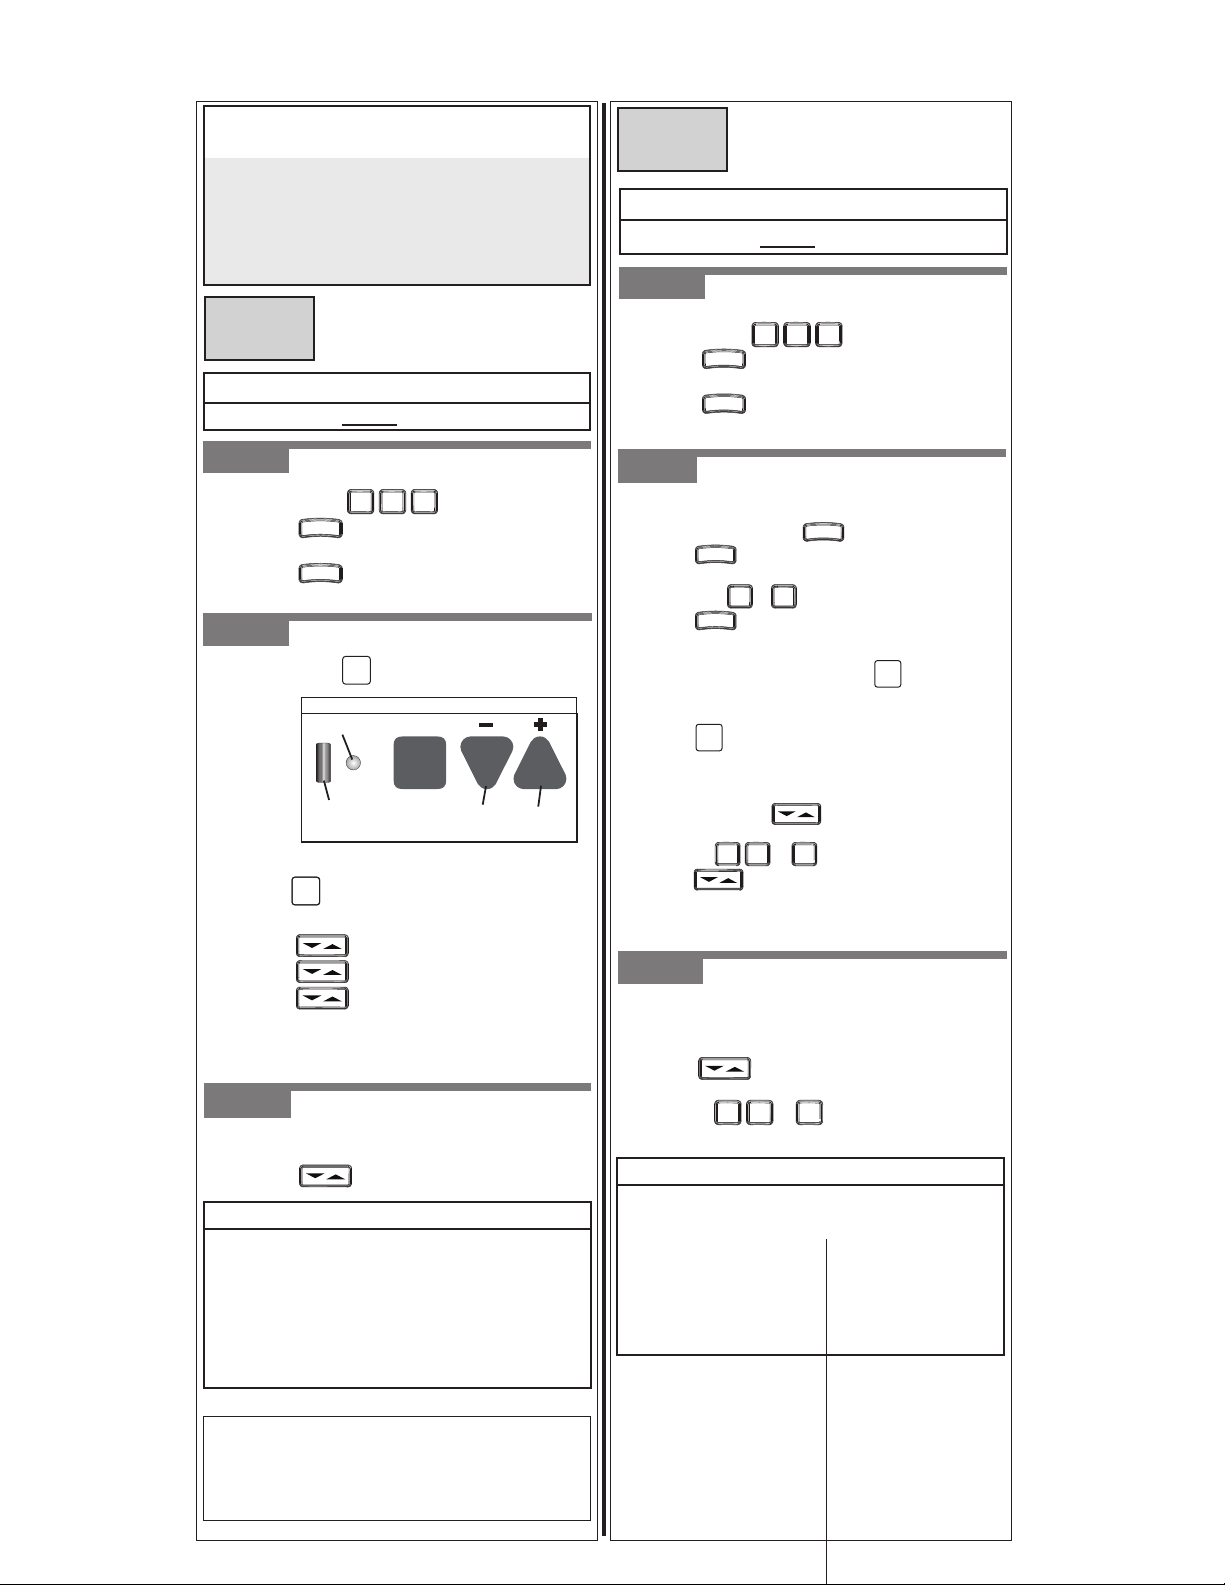
Figure 1
Press and hold until both LEDs turn BLUE.
• On the Wireless Keypad—enter your PIN.
•Press . LEDs will stay on solid.
•Press again. LEDs will turn off.
•Press again. Door opener should run.
•Press any key to stop opener. (It will automatically
stop at the fully open or fully closed position.)
PROGRAM
SET
•Pres
s ,
release again. Long
LED should blink PURPLE.
• Release button. Only round LED will be BLUE.
Figure 1
SET
PROGRAM
Open
Travel
Button
ROUND LED
LONG LED Close
Travel
Button
ON THE OPENER
PROGRAM
PROGRAM
PROGRAM
PROGRAM
B
ASIC
P
ROGRAMMING FOR
O
NE
D
O
INTELLICODE®
OR
O
PENERS
D
O
INTELLICODE®
OR
O
P
M
ULTIPLE
ENERS
PROGRAMMING FOR
PROGRAM
SET
PROGRAM
SET
Genie®
Professional Dealer. To locate a dealer near you,
call 1-800-OK-GENIE.
This page is for Intellicode® 2 Only:
If you have an Intellicode® 1 opener
or openers, go to the reverse side
of this instruction.
WIRELESS KEYPAD INTELLICODE® 2 MODE
S
TEP
2:
P
ROGRAMMING
M
ULTIPLE
D
OOR
O
PENERS
Wait until Keypad Backlight turns off (approximately 30 seconds).
PROGRAM
SET
1 2 3
On your Wireless Keypad:
On your opener’s power head:
•Select first opener and press and hold until
both LEDs turn BLUE.
•Press and release again.
LEDs should blink PURPLE.
•Enter PIN andpress .
•Pressthe numberthat youhavepickedfor
thisdoor or .
•Press 3times — opener will run.
•
Repeat procedure below dotted line for remaining openers.
• Release button. Only round LEDwill be BLUE.
PROGRAM
SET
All Door Openers will use the same PIN.
On your keypad:
•Enter your PIN and press .
•Press again.
•Press the number of Doors (total) you wish
to control ( or ).
•
••••••••••••••••••••••••••••••••
Press .
2 3
PROGRAM
PROGRAM
PROGRAM
Decide which Door will be Door #1,#2 and #3.


