manuals.online logo
Brands
  1. Home
  2. •
  3. Brands
  4. •
  5. Go Easy
  6. •
  7. Automobile Accessories
  8. •
  9. Go Easy SH-5313 User manual

Go Easy SH-5313 User manual

Install front supporting rack through
the frame holder as illustrated.
1)
Open the wheel attachment, and then insert the wheels. Use
the spinning wheels at front side of frame holder , and fixed
wheels at the rear side of frame holder as illustrated.
Install tube and frame
holder by pressing
down on the spring button
until it clicks together.
4)Insert the bolt pin to secure the front and rear forks; place the
front/rear forks on the supporting rack.
5)
6)
7)
Before removing the rear wheel, select the gear that uses the
least amount of chain; To make sure your front and rear gear
are in the smallest chain.
Open the brake if necessary.
Remove quick release units from wheel and then install them
into frame holder as show on figure 1. (Do not tighten the
bicycle wheels yet, further adjustments will follow below)
1)Use schrader valve to pump the air until proper
pressure and secure with the cap.
Front Side
Rear Side
x1
x1
x4
Wheels x2
Wheels x2
x8
Velcro
Strap Detachable
frame holder
Derailleur Protector x1
Bike Carrying
Bag
x2Rectangle Air Pad
x4Trapezoid Air Pad
x1Reference Air Pad
Of Inflation x5
Bolt Pin x4(Small)
x2(Large)
Protection pads
This product may be adjusted to fit different bicycle sizes.
3)
45
5
6
6
7
8
7
4
1
1
1
3
3
4
x2Disk
Protector
x1Freewheel
Protector
x1
Shoulder
Strap
Air pad installation
<Front sdie> <Rear side>
Air pads, 3 pieces per side
※The cap with flat bottom is a
secured cap for the air valve.
※The cap with a pin in the
middle is for releasing air.
x1
Drawstring
Backpack
Air may be adjusted
from the air valves.
valve stem/ air valve
Schrader valve(A/V)
SH-53 3
Install wheel this way
2)Open the bicycle carrying
bag, insert the inflated air
pads in the appropriate
pockets and secure with the
velcro straps.
Follow The Detailed Diagram Instructions Max dimension of bag
*PLEASE READ AND SAVE THE INSTRUCTION*
Spinning
Fixed
2)
<Front side of frame holder>
use the spinning wheels
<Rear side of frame holder>
use the fixed wheels
figure 1.
3
3
1
front supporting rack
9
9
rear supporting rack
frame holder
wheel
attachment
wheel
attachment
frame holder
tube
tube
88cm
78cm
34cm25cm 80cm
139cm
110cm
Please do not inflate air into the air pads more than
1 psi or harder than reference air pads of inflation. It
may cause air pads broken. LOTUS do not take any
responsibility if users over inflate air to the air pads.
MADE IN TAIWAN
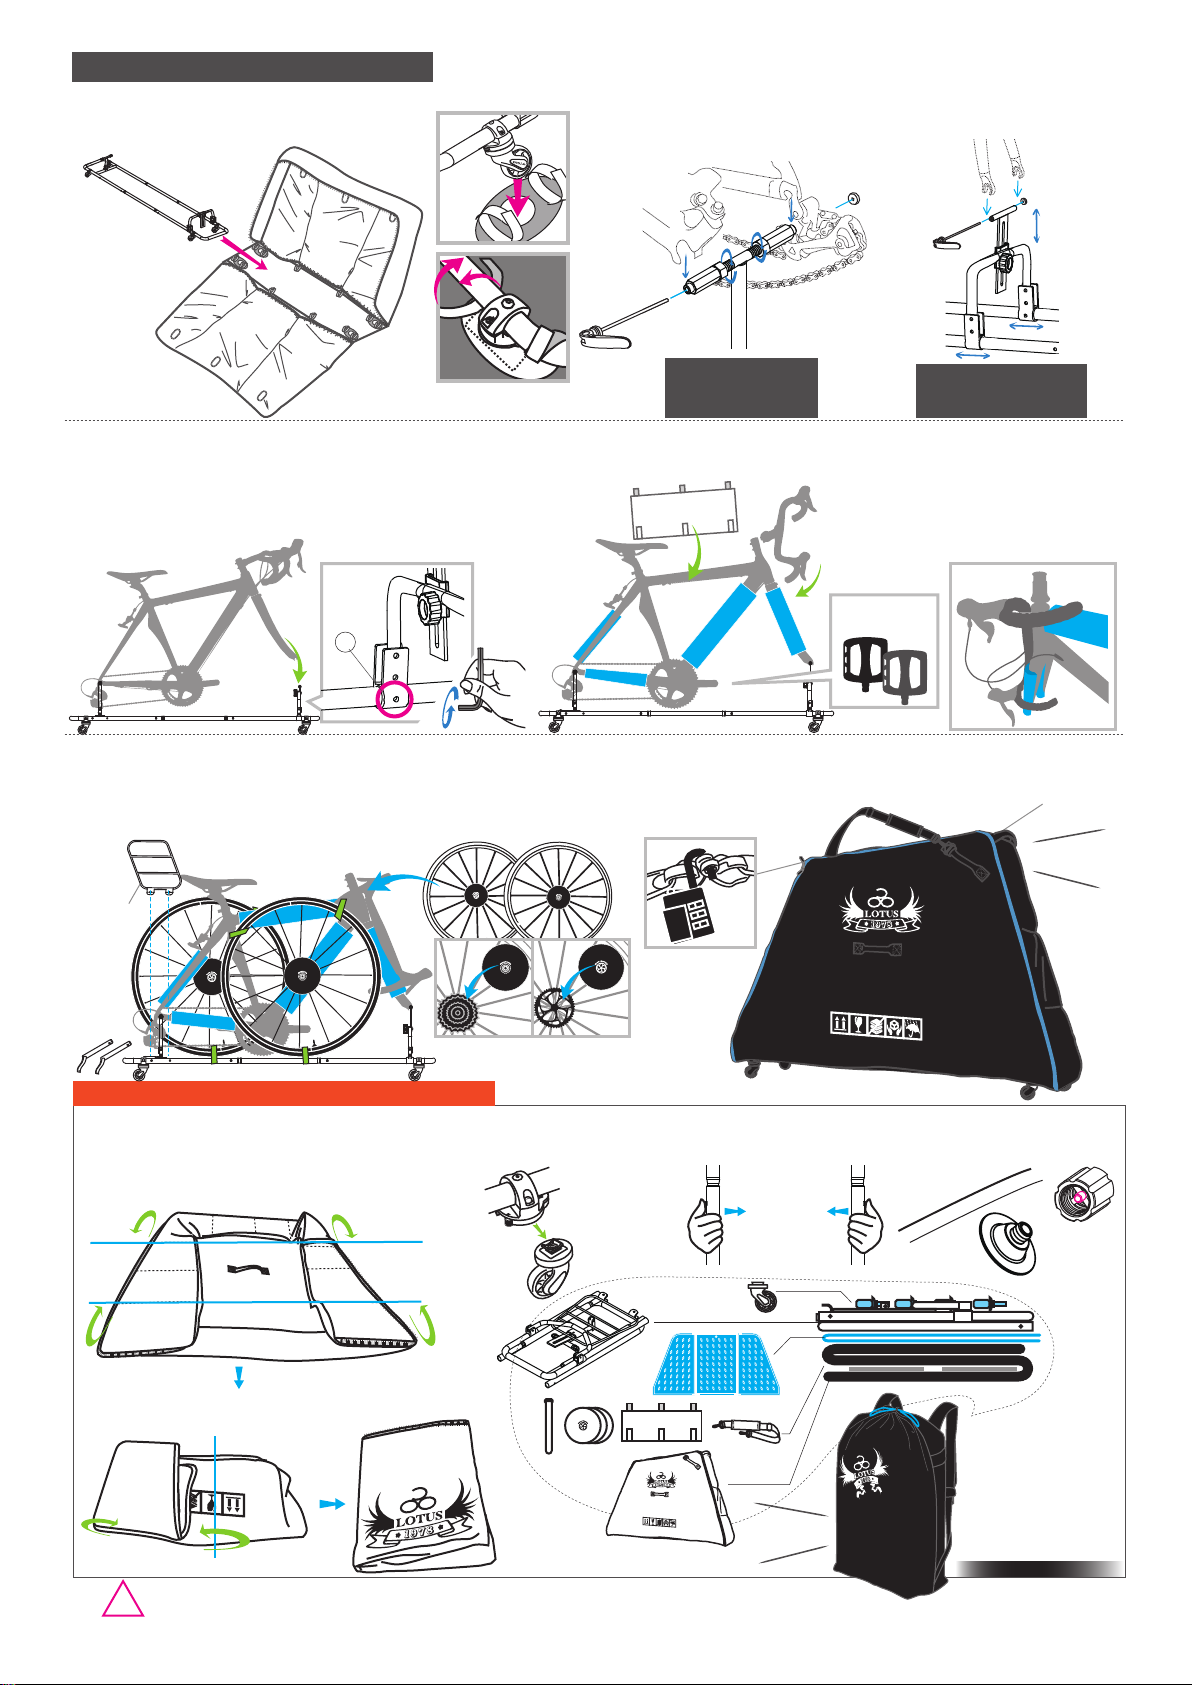
Secure bag with frame
holder by velcro.
Air Pad And Bike Rack/Bike Installation
Position the wheels on each side of the bike and
secure the wheels, bike and protector frame
holder with velcro straps.
Place gear protector as shown on the diagram.
Pin it down with the bolt pin.
8) Close the bag and you are ready to go.
Pull the rear fork to rear supporting rack and
front fork to the front supporting rack. Secure
the frame by using the quick release units.
Wrap the protection pad with the
frame, and secure it by velcro.
Handlebar, saddle, pedals may
be removed and stored apart
if necessary. The handlebar
can be secured on to the head
tube with velcro strap. The
other parts may be stored
away in the pockets.
It comes with lockable
zipper sliders for lock.
Lock not included
padded handle design.
Comfortable and easy to pull.
3)
6)
7)
4) 5)
8
5 6
8 9
3 4
1) Take air pads and frame holder off the
bicycle carrying bag.
2) Turn the bag upside down, follow the
blue line, fold the bag into 1/3.
3) As shown on the diagram,
fold the bag into 1/3 again.
4) Bag folded.
Finish it!
Ready to go
Only remove the rolling wheel
from the wheel set. Leave its
base on the frame holder.
5) 6) Press both spring
buttom to separate
frame holder.
7) Screw tight the cap
with a pin to deflate air.
Stack all the items
together as shown
in the diagram,
place them in the
draw string
backpack.
8)
Copyright © 2015 SHINE-HO KNAPSACK & BAG MFG. CO., LTD. All rights reserved.
2mm
Derailleur
Protector
How to store bicycle carrying bag into backpack
EN ver. 4.0 2015/9/4
•The GO EASY bike carrying bag can not be checked in as a carry on bag on the airplane.
•Keep the bicycle carrying bag, storage bag, and other parts away for children. They are not toys.
•Do not walk, stand, jump, or lying on the air pad.
•Do not use air pad on or near water, this is not a raft.
•All air pads are 100% tested before delivery. Do not over inflated, it may cause air pads blow out or leaking air.
Insert the installed rack inside the bag. The four
wheels go through the four openings on the
bottom. Use velcro straps to secure the rack.
1) Adjust the distance between rear/front forks
according to your bicycle size. To make sure your
front and rear gear are in the biggest chain.
2)
Use allen wrench to
secure the position of the
front supporting rack
between two openings.
《Front》
《Rear》
Put protector on Free
wheel / Disk if need.
The fork’s mount slides
fore/aft and up/down to
fit your bike.
Rear supporting rack
may be twisted to
adjust appropriate
width for the rear fork.
*ATTENTION*
!
※Please take
off the pedals.

Popular Automobile Accessories manuals by other brands

Parrot CK3300 Setup guide

Parrot

Parrot CK3300 Setup guide

Over Armour Offroad CA-MAVERICKX3-4-TC01 Instructions for Installation and Care

Over Armour Offroad

Over Armour Offroad CA-MAVERICKX3-4-TC01 Instructions for Installation and Care

Thule 39 manual

Thule

Thule 39 manual

Thule 1417 instructions

Thule

Thule 1417 instructions

BEARMACH VTK500010R Fitting instructions

BEARMACH

BEARMACH VTK500010R Fitting instructions

Yakima K893 instructions

Yakima

Yakima K893 instructions

Quadratec 11147.10 Series installation manual

Quadratec

Quadratec 11147.10 Series installation manual

Magneti Marelli OZON MAKER user manual

Magneti Marelli

Magneti Marelli OZON MAKER user manual

Phonocar 5/928 Mounting instructions

Phonocar

Phonocar 5/928 Mounting instructions

Akyga AK-CH-01 user manual

Akyga

Akyga AK-CH-01 user manual

MARDER SCHRECK 16277 operating instructions

MARDER SCHRECK

MARDER SCHRECK 16277 operating instructions

Toyota PZQ22-89320 installation instructions

Toyota

Toyota PZQ22-89320 installation instructions

Excalibur RF-50-EDP Operation guide

Excalibur

Excalibur RF-50-EDP Operation guide

AMT Motorsport C5 quick start guide

AMT

AMT Motorsport C5 quick start guide

Atera SIGNO 044 283 quick start guide

Atera

Atera SIGNO 044 283 quick start guide

Bestop HighRock 4x4 Element installation instructions

Bestop

Bestop HighRock 4x4 Element installation instructions

iDataLink maestro Rr install guide

iDataLink

iDataLink maestro Rr install guide

DV8 JK 4 installation manual

DV8

DV8 JK 4 installation manual

manuals.online logo
manuals.online logoBrands
  • About & Mission
  • Contact us
  • Privacy Policy
  • Terms and Conditions

Copyright 2025 Manuals.Online. All Rights Reserved.