Goddess LANZAROTE 2 User manual

LANZAROTE 2 / LANZAROTE 2 CE
LANZAROTE 2 ION / LANZAROTE 2 CE ION
NÁVOD K POUŽITÍ
NÁVOD NA POUŽITIE
INSTRUCTION MANUAL
Osobní infra
sauna
Osobnná infra
sauna
Personal infra
sauna

ENG
ENG - 28
Thank you for choosing our infrared sauna!
INDEX
Important safety guides ......................................................................................................... 29
Introduction, benets, highlights ............................................................................................ 30
Installation requirements ....................................................................................................... 31
Installation procedure ............................................................................................................ 31
Operation ............................................................................................................................... 36
Warnings ............................................................................................................................... 37
Trouble Shooting ................................................................................................................... 38
Maintenance .......................................................................................................................... 39
Transportation ....................................................................................................................... 39
Packing List ........................................................................................................................... 39

ENG
ENG - 29
IMPORTANT SAFETY GUIDES
READ AND FOLLOW ALL INSTRUCTIONS
A) A receptacle shall not be installed inside the heated room.
B) The door of the heated room do not include any locking or latching system,
malfunction of which could cause entrapment inside the heated room.
C) Keep the intended ventilation open when use the dry-bath bathing room.
D) CAUTION – Hyperthermia occurs when the internal temperature of the body reaches a level
several degrees above the normal body temperature of 98.6°F (37°C). The symptoms
of hyperthermia include an increase in the internal temperature of the body, dizziness,
lethargy, drowsiness, and fainting. The effects of hyperthermia include:
a) Failure to perceive heat;
b) Failure to recognize the need to exit the room;
c) Unawareness of impending hazard;
d) Fetal damage in pregnant women;
e) Physical inability to exit the room; and
f) Unconsciousness.
WARNING – The use of alcohol, drugs, or medication is capable of greatly increasing
the risk of fatal hyperthermia.
E) CAUTION – if the manually resettable temperature-limiting control trips frequently,
a qualied serviceman should be contacted.
F) WARNING – reduce the risk of electrocution and burns, do not operate unless guard is
in place.
G) CAUTION – excessive exposure can be harmful to health. Persons with poor health should
consult their physicians before using sauna.
H) CAUTION – reduce the rick of re, do not place combustible material on heater at any time.
I) Don´t take water or the other liquids into the sauna room, in order to prevent the injury from
the electric current.
J) WARNING – reduce the risk of overheating:
a) exit immediately if uncomfortable, dizzy, or sleepy, staying too long in a heated area is
capable of causing overheating.
b) supervise children at all times.
c) check with a doctor before use if pregnant, in poor health, or under medical care.
d) breathing heated air in conjunction with consumption of alcohol, drugs, or medication is
capable of causing unconsciousness.
K) WARNING – reduce the risk of electrocution, disconnect the supply connect before
servicing.
Save these Instructions

ENG
ENG - 30
INTRODUCTION
We welcomes you to the most affordable infrared sauna in the nation! We also congratulate
you on your new path to better health! Thousands of users enjoy the benets of infrared saunas
every day. Infrared saunas help you burn calories, reduce toxins, relieve pain and even clear
complexions. Now you can enjoy the great benets of far-infrared heat within the privacy of your
own home.
We strives to deliver superior ttness products at an affordable price. Our list of clients grows
daily and we believe that your success is our success. Our staff is ready to provide you with
excellent customer service.
HEALTH & BEAUTY BENEFITS
Relieve pain:
The far-infrared rays of a sauna accelerate the blood circulation and supply more oxygen to
the body. Increased blood circulation diminishes inammation, relieves pain, and speeds up
recovery. Infrared saunas have also been used to treat bursitis, rheumatism, arthritis,
and hemorrhoids. Increased blood circulation not only alleviates internal ailments, but also skin
conditions such as psoriasis, eczema and scars. Good circulation is essential for smooth
and rm skin.
Burn calories & fat:
The far-infrared rays of the sauna eliminate extra salt and subcutaneous fat. Burn up to 600
calories in one half hour session versus a half hour of jogging which burns 300 calories,
and a half hour of cycling burns 225 calories.
Relax your body and mind:
It supplies you for a special environment with 30˚C - 65˚C. The far infrared wave pass through
your body, speed the metabolism, accelerate the blood circulation, bring the fresh oxygen
and nutriment into the organization, the rubbish expel from body along with the sweat, renew
the energy quickly, then relieve tiredness. When enjoying the wave, you can listen to
the music in CD , it can relax your body .Besides, far infrared sauna can cure the insomnia,
and other other stress related disorders.
HIGHLIGHTS
A) High quality craftsmanship
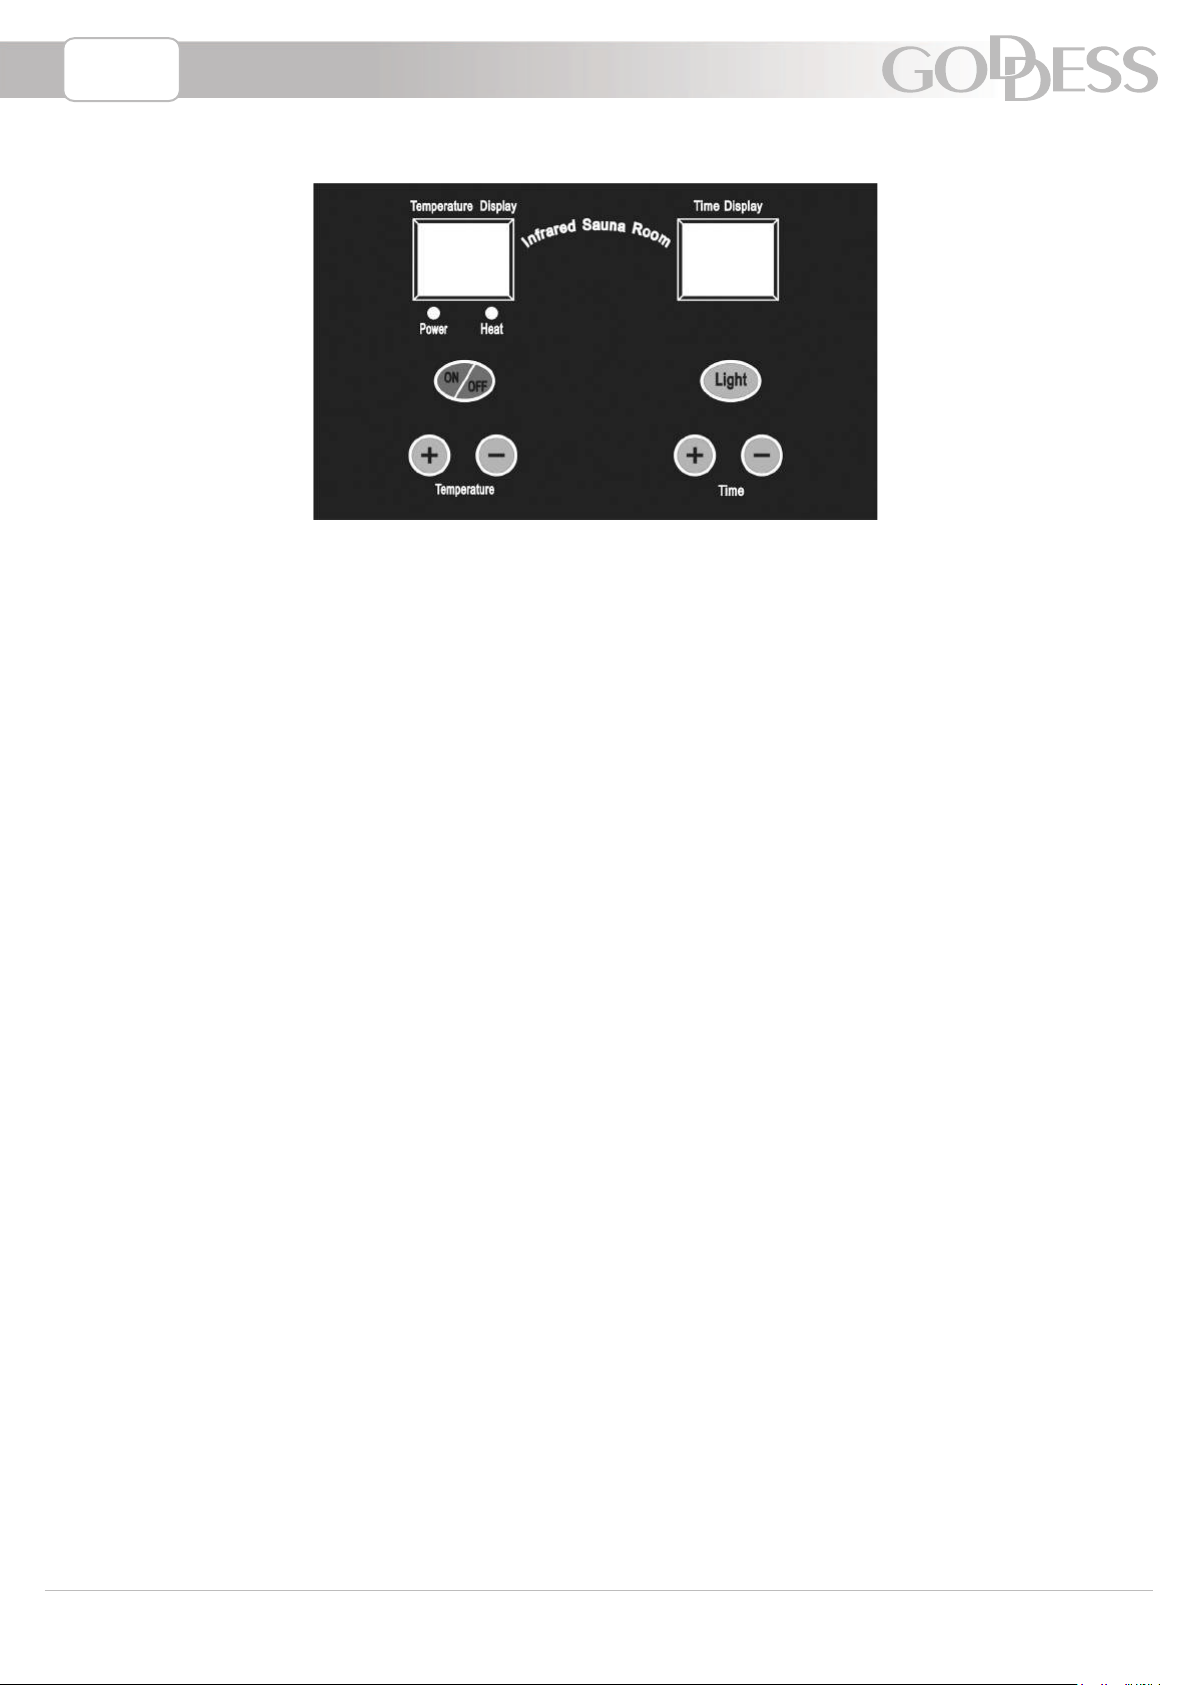
B) Automatic thermostat for constant temperature
C) Timer and buzzer: buzzer sounds 5 minutes before the end of session
D) Digital sensor and thermometer
E) Infrared heating pipes
F) AM/FM Car Stereo w/ CD player and speakers (room style model only)
G) Ionizer - by a large number of negatively charged ions (anions) refreshes the air, cleans it
from smoke, dust, pollen from flowers and other debris, kills bacteria and viruses.
(only for models with Ionizer: LANZAROTE 2 ION / LANZAROTE 2 CE ION)

ENG
ENG - 31
INSTALLATION
INSTALLATION REQUIREMENTS
A) Do not plug any other appliances into the outlet with your our infrared sauna.
(The outlet must be secured by current-balance protection)
B) Install the sauna on a completely level oor.
C) Do not spray the exterior with water. Keep the sauna installed in a high & dry place.
D) Do not store ammable objects or chemical substances near the sauna.
INSTALLATION PROCEDURE
SAUNA ROOM:
1) Structure of Infrared Sauna. See FIG-1
(ollustrative picture - differs as per the model NO.)
2) Study the package of the Far infrared Sauna as following chart:
For each set of 1-person sauna room, 2-person sauna room or 3-person sauna room is
packed in 3 cartons.
See FIG-2 as a reference:
C/NO: 002 1OF 3, C/NO: 002 2 OF 3 and C/NO: 002 3 OF 3 are of one unit.
FIG-2

ENG
ENG - 32
Please be noted that the C/NO should be same
3) Unpack the cartons, find all parts as following list
A) Manual instruction
B) Bottom panel
C) Back panel
D) Left panel
E) Right Panel
F) Bench
G) Backrest and Headrest
H) Front panel
I) Top panel
J) Ceiling cover
K) Door handle
L) Shelf
M) Connection Bar
N) Decoration Column
O) Ionizer
(only for models with Ionizer
LANZAROTE 2 ION / LANZAROTE
2 CE ION)
INSTALLATION STEPS
1) Place the bottom panel at a proper place and near a power supply as FIG-3
(Note: Please distinguish the front and back side)
FIG-3 Place bottom panel to the ground FIG-4 Place the back panel
2) Place the back panel
(Note: Align the back panel with bottom panel’s corresponding battens; make sure they are
in position. Refer to FIG-4)
3) Place left panel
(Note: Align the left panel with bottom panel’s corresponding battens and make sure
left panel ts into back panel’s groove, then lock the buckle. Refer to FIG-5 )
FIG-5 Place the left panel FIG-6 Place the right panel
4) Place right panel
(Note: Align the right panel with bottom panel’s corresponding battens and make sure
right panel ts into back panel’s groove, then lock the buckle. Refer to FIG-6)

ENG
ENG - 33
5) Install the headrest and backrest
(Note: Install the headrest into one of the hole on back panel as per your height,
place the backrest to a proper position, then tighten the screws.) Refer to FIG-7
FIG-7 Place the headrest and backrest FIG-8 Place the bench
6) Place the bench
(Note: Put the bench into position on the supports xed on left and right panel.
Refer to FIG-8)
7) Place the connection bar to the front panel
(Note: Place latch of front panel into connection bar, screw them tightly from the connection
bar side) Refer to FIG-9.
8) Place front panel
(Note: Place right panel’s latch and left panel’s latch into the xed connection bar, then
screw the front panel and the two sides panels tightly from the connection bar side).
Refer to FIG-10
FIG-9 Install the connection bar and the front panel FIG-10 Install front panel
9) Place the top panel
(Note: Make sure all the connection wires for heaters and digital devices go through
the corresponding holes of the top panel. Place the top panel properly and screw it tightly).
Refer to FIG-11

ENG
ENG - 34
10) Fix the decoration column to the connection bar
(Note: Put the decoration column into the right panel to front panel edge/left panel to front
panel edge, place them in position and make them looks same height and effect, then screw
them inside the sauna room from the connection bar.) Refer to FIG-12
FIG-11 Place top panel FIG-12 Place decoration column
11) Connect all the wires for heaters and digital devices on the top panel
(Note: Make sure all the wires for heaters and digital devices are connected with plugs
from the control box tightly).Refer to FIG-13
FIG-13 Connect all the wires for heaters and digital devices on the top panel
12) Place the ceiling cover
(Note: Make sure the ventilate hole in the ceiling cover is just over the control box,
then screw the ceiling to the panels tightly.) Refer to FIG-14.
FIG-14 Place the ceiling cover
13) Install the door handle
(Note: Place the door handles oppositely and into the hole of the glass door, then screw
them tightly). Refer to FIG-15

ENG
ENG - 35
14) Install the shelf
(Note: Insert the shelf correctly and rmly into wood frame in front panel).
Refer to FIG-16
FIG. 15 Install the door handle FIG. 16 Install the shelf
15) Install the ionizer
(Note: Insert the ionizer to the prepared frame from the top side and connect
the power connector). See FIG. 17
FIG. 17 Install the ionizer

ENG
ENG - 36
OPERATION
1) Precautions
a) Check all the circuitry and the plug meet all requirements.
b) Set the temperature and time to a comfortable level, normally, 60 minutes at
50-65ºC (122ºF-140ºF)
Note: If ambient temperature is lower than 18.3ºC (65ºF), please set the temperature at
about 122ºF (50ºC); and if ambient temperature is higher than 18.3ºC (65ºF), please set
the temperature at about 65ºC (140ºF).
c) Drink a cup of water before the sauna session.
d) After 2 hours of continuous use, shut the sauna down for one hour.
e) To avoid burns, do not touch the heating element.
2) Operation
a) plug the sauna into a wall outlet (220V-240 Volt) which is stated in nameplate.
Do not share the outlet with any other appliances.
Switch on the main switch at the ceiling of the sauna room and then activate the sauna
through the ON/OFF switch on the control panel.
Sauna should be unplugged when not in use.
b) Press the ‘temperature’ button ▲,▼ to increase or decrease the temperature. Every
time the “▲“ button is pushed. If pressed for three seconds, the setting will increase
quickly. Decrease the temperature in the same manner by pressing the “▼“ button.
After the sauna reaches the desired temperature, the “heat“ light turns off.
c) Press the ‘time’ button ▲,▼ to set the using time. The same operation as b.
When the display time is “05”,the buzzer will clew 1 minute.
d) Press the ‘light’ button to turn the interior light on and off.
(All on - white - red - green - blue - ash - all off)
e) After your sauna session, turn off, and unplug the power cable.
f ) To set the time press the “function“ button until the ‘time” button blinks. Press the “+“ and
“-“ buttons to set the timer from 5 to 60 minutes. If pressed for three seconds, the timer
will increase quickly. When the display reads “05“, the timer will buzzes then the
machine will shut off automatically after 5 minutes. To extend the sauna session, reset
the timer again.
g) The Fahrenheit and Centigrade display can be switched: press the temperature button “+“
and “-“ at the meantime, then press the button of „light“ to switch
h) If you want to activate (or deactivate) the ionizer, you can do it any time during the sauna
process by switching the ON (OFF) button on the ionizer.

ENG
ENG - 37
WARNINGS
Safety precautions
A) To avoid fire, do not dry clothes or leave any towels in the sauna.
B) To prevent burns or electric shocks, do not touch or use metal tools on the net cover
of the far infrared heater elements.
C) While in the sauna, do not touch the light bulb. If the bulb needs to be changed,
switch it off and wait until the sauna is shut off and the bulb is cool
D) Do not spray water on the far-infrared tube. This activity may result in electric shock
or damage to the heater elements.
E) Do not use the infrared sauna if you have any of the following conditions:
1) Open wounds
2) Eye diseases
3) Sever sunburns
4) Elderly & weak people, especially those suffering from a disease, pregnant women
and infants are prohibited. Children over the age of 6 years may use the sauna under
the supervision of adults.
5) If suffering from a disease directly related to temperature, seek the advice of a doctor before
using.
F) Do not place pets in the sauna.
G) Do not use the sauna if you are under the effects of alcohol.
H) Do not take wather or the liquids into the sauna room.

ENG
ENG - 38
TROUBLE SHOOTING:
PROBLEM POSSIBLE CAUSES SOLUTION
1“Power” indicator light not on
The connector is not
connected properly
Check the 7-pin connector or replace
a new one
No power supply input chick the circuitry ( especially check
if the power supply is turned on)
Indicator light is defected Replace the relative PCB.
2“Heat” Indicator light not on
The light is defected Replace the relative PCB.
The circuit panel
or components is defected Replace the relative PCB.
the temperature sensor
is defected check if the connection is loosen or replace it
3Infrared Heater not heating
up
The heater is broken Replace with a new one
The wire junction
or the heater’s wire is loosen Of the same specications
the temperature sensor
is broken Check and make them tight
the fuse in control box
is broken
check junction of the temperature
if the sensor is loosen or replace it
the circuit panel of the relay
is not work replace it with a new fuse
4Peculiar smell from
the sauna
1) there is something around
the heaters remove it
2) some heater’s
temperature is over high, Cut off the power supply and replace it
3) Some parts on the PCB
is burnt to broken replace it with a new PCB
5LED lamp not working
1) connection is loosen re-connection it tightly
2) LED bulb is broken replace a new one
3) power supply does not
work replace it with a new power supply
6Speaker does not work 1) speaker is defected Replace it with a new same mode
2) wire of speaker is loosen re-connection it tightly
7CD-Player not work
Power supply to CD-player
has problem
Check CD power supply wiring or replace
the power supply
CD-player is defective Replace the CD-player
Power connector is loose
or damage Check connector or replace it
8Sauna room not work
Power cord is unplug Plug back power cord to outlet
Outlet has no power Check outlet or circuit breaker
The switch power or PCB
has problem Replace the switch power or related PCB
9The temperature display
show "EP"
The connector
of temperature sensor
is loose or sensor damaged
Tighten the connector of temperature sensor
or change a new temperature sensor.
10 The temperature display
show "H"
The temperature inside
the sauna room is too high
Turn off the unit, and contact
the manufacture.

ENG
ENG - 39
USER MAINTENANCE INSTRUCTIONS
CLEAR AND MAINTENANCE
Cleaning
Clean the faceplate with a wet towel, or clean with a small amount of hand-soap mixed with
warm water if necessary. Clean the sauna room with a wet cotton towel, dry with a clean dry
towel.
Do no use benzene, alcohol, or strong cleaning chemicals on sauna.
NOTE: Any chemical that can damage wood material will damage the sauna
and the protection layer that is on the wood.
Suggest: do not leave the sauna or CD player on for more than 2 hours at a time.
(For giving heaters and CD player longer lifetime.)
TRANSPORTATION AND STORAGE
1) Avoid exposure to rain, snow or strong collisions during transport.
2) Do not store in damp environments.
PACKING LIST
Name Quantity Conrmation Name Quantity Conrmation
Front Panel 1pc Bench 1pc
Back Panel 1pc Backrest 1pc
Left Side Panel 1pc Headrest 1pc
Right Side Panel 1pc Connection Bar 2pcs
Bottom Panel 1pc Decoration Column 2pc
Top Panel 1pc Screw , bolt 1bag
Ceiling Cover 1pc Instruction manual 1pc
Ionizer 1 pc (only for models with Ionizer: LANZAROTE 2 ION
/ LANZAROTE 2 CE ION)
We reserve the right to change technical specifications.

ENG
ENG - 40
WARNING: Do not use this product near water, in wet areas to avoid re or injury
of electric current. Always turn off the product when you don’t use it or before
a revision. There aren’t any parts in this appliance which are reparable by consumer.
Always appeal to a qualied authorized service. The product is under a dangerous
atention.
Old electrical appliances, used batteries and accumulators disposal
This symbol appearing on the product, on the product accessories or on
the product packing means that the product must not be disposed as household
waste. When the product/ battery durability is over, please, deliver the product
or battery (if it is enclosed) to the respective collection point, where the electrical
appliances or batteries will be recycled. The places, where the used electrical
appliances are collected, exist in the European Union and in other European
countries as well. By proper disposal of the product you can prevent possible
negative impact on environment and human health, which might otherwise occur as
a consequence of improper manipulation with the product or battery/ accumulator. Recycling of
materials contributes to protection of natural resources. Therefore, please, do not throw the old
electrical appliances and batteries/ accumulators in the household waste. Information, where
it is possible to leave the old electrical appliances for free, is provided at your local authority,
at the store where you have bought the product. Information, where you can leave the batteries
and accumulators for free, is provided to you at the store, at your local authority.

WARRANTY CARD
GUARANTEE
The device supplied by our Company is covered by a 24 month guarantee starting
on the date of purchase (receipt). During the life of the guarantee any fault of the device
or its accessories ascribable to material or manufacturing defects will be eliminated free of
charge by repairing or, at our discretion, by replacing it. Proof of the guarantee is
provided by the proof of purchase. Without proof of purchase no free replacement
or repair will be carried out.
If you wish to make a claim under the guarantee please return the entire machine
in the original packaging to your dealer together with the receipt.
The guarantee lapses:
-in case of unauthorized tampering
-destroyed unit by natural disaster
-any changes in guarantee list by unauthorized person
-using this machine for other purpose that usual, especially for professional or other
commercial use
-with apparent mechanic defects
The guarantee does not apply on goods damaged due to unusual usage.
The damage of accessories is not an automatic reason for replacing the entire device free
of charge.
The manufacturer reserves the right to make minute changes to the standard model that
will have no effect on functionality of the product.
This device has been tested according to all relevant current CE guidelines, such as
electromagnetic compatibility and low voltage directives, and has been constructed
in accordance with the latest safety regulations.
After the expiry of the guarantee
After the expiry of the guarantee repairs can be carried by the competent dealer or repair
by the authorized service.
C
ENG
Match code: LANZAROTE 2 / LANZAROTE 2 CE
LANZAROTE 2 ION / LANZAROTE 2 CE ION
Date of sale: Serial number:
Seller and signature:

This manual suits for next models
3
Table of contents
Other Goddess Plumbing Product manuals
Popular Plumbing Product manuals by other brands

Hans Grohe
Hans Grohe Exafill S 58117 Series Instructions for use/assembly instructions

Rehau
Rehau AWADUKT PP SN10 Assembly instructions

American Standard
American Standard 8344.112 parts list

Viega
Viega 6161.52 Instructions for use

Gessi
Gessi OVALE 26975 manual

Glacier bay
Glacier bay HD67112W-8004 Installation and care guide

OVE
OVE ATHENA MILLY installation manual

American Standard
American Standard ARCH M968586 installation instructions

Heritage Bathrooms
Heritage Bathrooms Dartmouth SDABL01 Installation instructions & user guide

PEERLESS
PEERLESS P99196LF manual

Laufen
Laufen TWINPLUS HF905410100000 manual

Symmons
Symmons Dia 353SR-5 Operation & maintenance manual