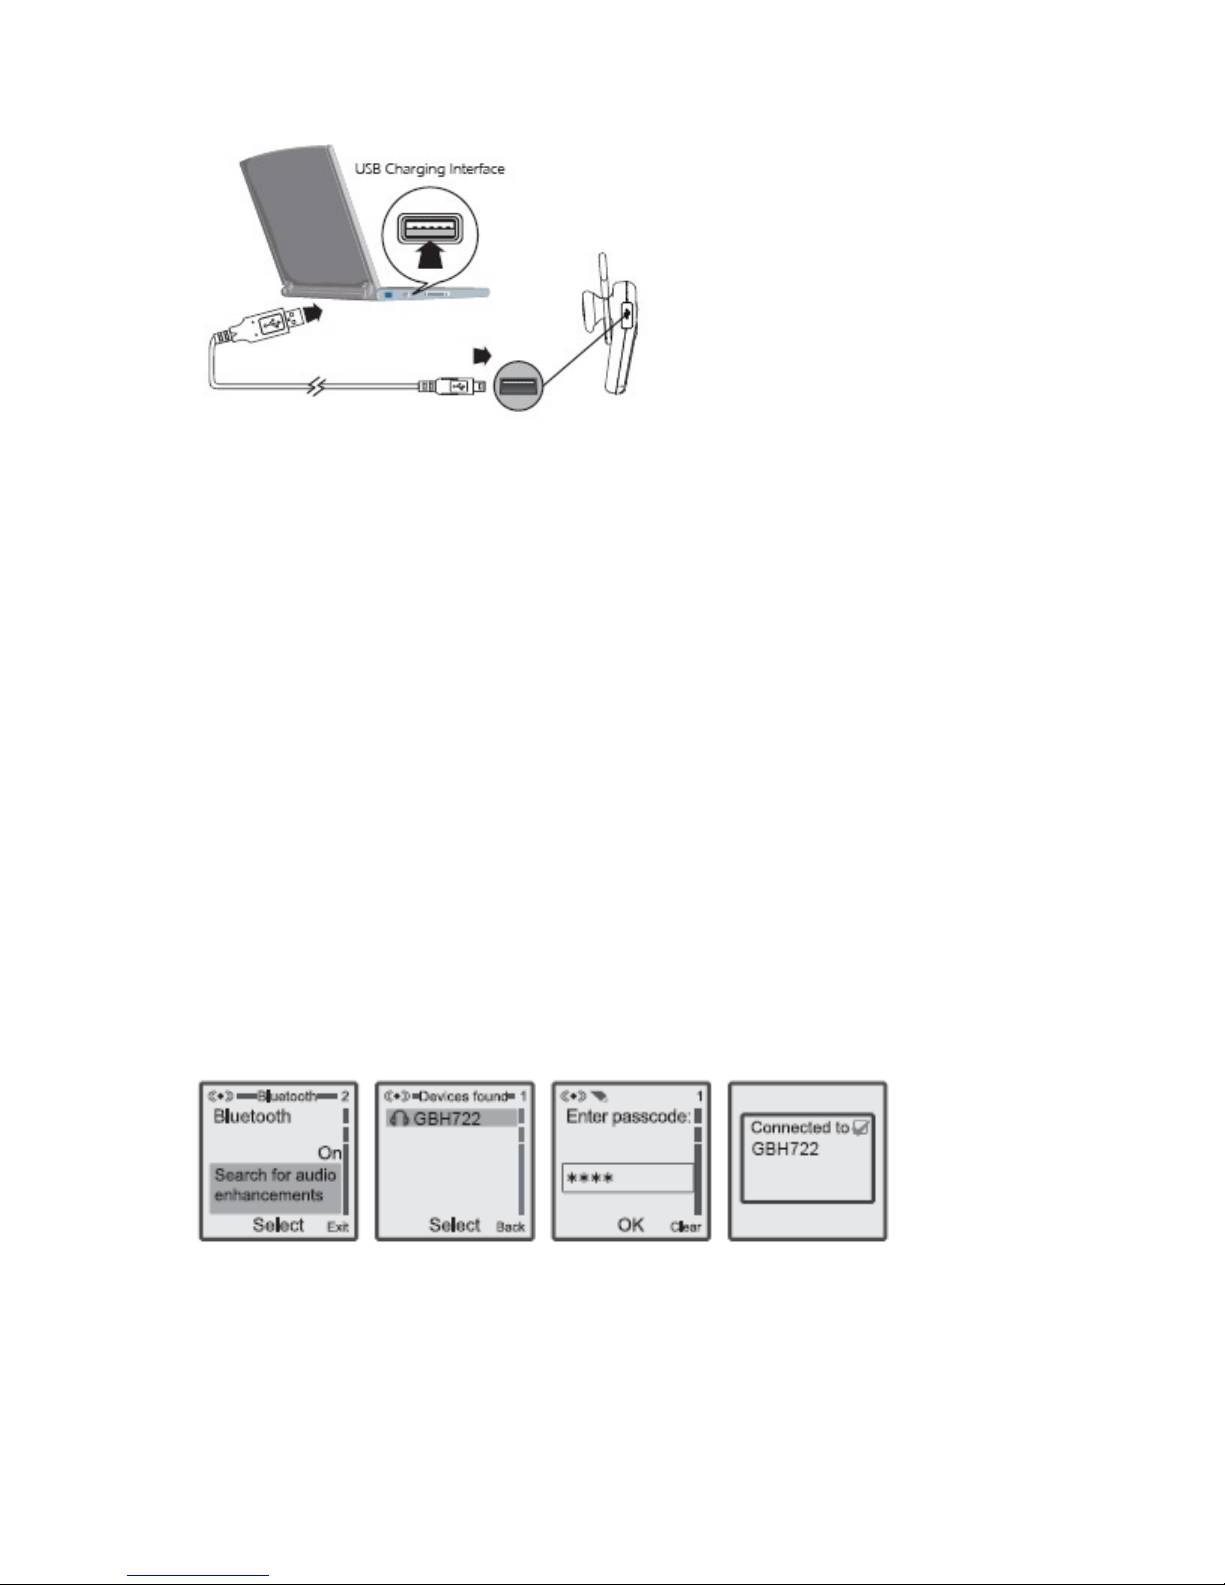
GoerTek GBH722 User manual

1. Safety information
Note: Please read this information before you use the headset.
Electronics Devices
To avoid electromagnetic interference, please turn off the headset in any place
where posted notices instruct you to do so.
Note: Most modern electronic devices are susceptible to electromagnetic
interference (EM ) if inadequately shielded, designed, or otherwise configured for
electromagnetic compatibility.
Aircraft
Turn off the headset when on board an aircraft. The use of this headset might
interfere with the electrical system of an aircraft.
Medical Instruments
f you use a medical device, such as a pacemaker, consult the manufacturer of
your medical device to determine if it is adequately shielded from
electromagnetic interference. Your physician can assist you in obtaining this
information.
Power Adapter
Only use the supplied power adapter with the headset.
Placement
You are advised to put the headset in a safe place where it will not be bent or
crushed when not in use otherwise it may bring harm to human body.
C ildren
Keep the headset away from children. Some small or detachable parts might be
swallowed and result in harm.
Repair or Service
Any attempt to modify or remove of any part of the headset will void the
warranty.
2. General Descriptions
GBH722 is a low cost Bluetooth mono headset, which through polish and matt
interlaced design to get realistic feel. GBH722 adheres to the Bluetooth
V2.1+EDR specifications and supports the Headset, Hands-free Bluetooth
profiles.
3.Getting started
3.1 Identifying parts

1. Multi-Function Button 2. Volume Up Button
3. Volume Down Button 4. Earloop
5. Mic 6. Receiver
7 Charging interface. 8. ndicator Light
3.2 Adjusting t e eadset for comfort
The light weight GBH722 can be worn comfortably on either ear. Adjust the headset
according to the following figures.
Note: You can adjust the earloop for comfortable wearing, but please be careful in
not to break the clip.
3.3 Status LED
He Headset Status Description
Powering on Blue LED Steady light for 1s
Powering off Red LED Steady light for 1s then off
Pairing Mode Red LED and Blue LED flash alternately
Standby Mode Blue LED flashes once every 5s
Ringing Red and Blue LED Flash once together every 1s
ngoing Call Blue LED flashes once every 2s
Low Battery Red LED flashes
Charging Red LED steady light
Charging complete ff
3.4 C arging t e built-in battery
GBH722 has a built-in battery, which must be charged fully before using the headset.
Charging takes about 2 hours. You can charge the headset through the AC adapter
(optional) or USB connector on computer.
Using USB charging adapter

Using USB cable
Note:
(1) Please make sure the max. Output voltage (including noise) of Adapter is ≤6V
(including empty load and full load), otherwise the damage is not responsible.
(2) GBH722 is reset when charging. The red LED is steady light when charging.
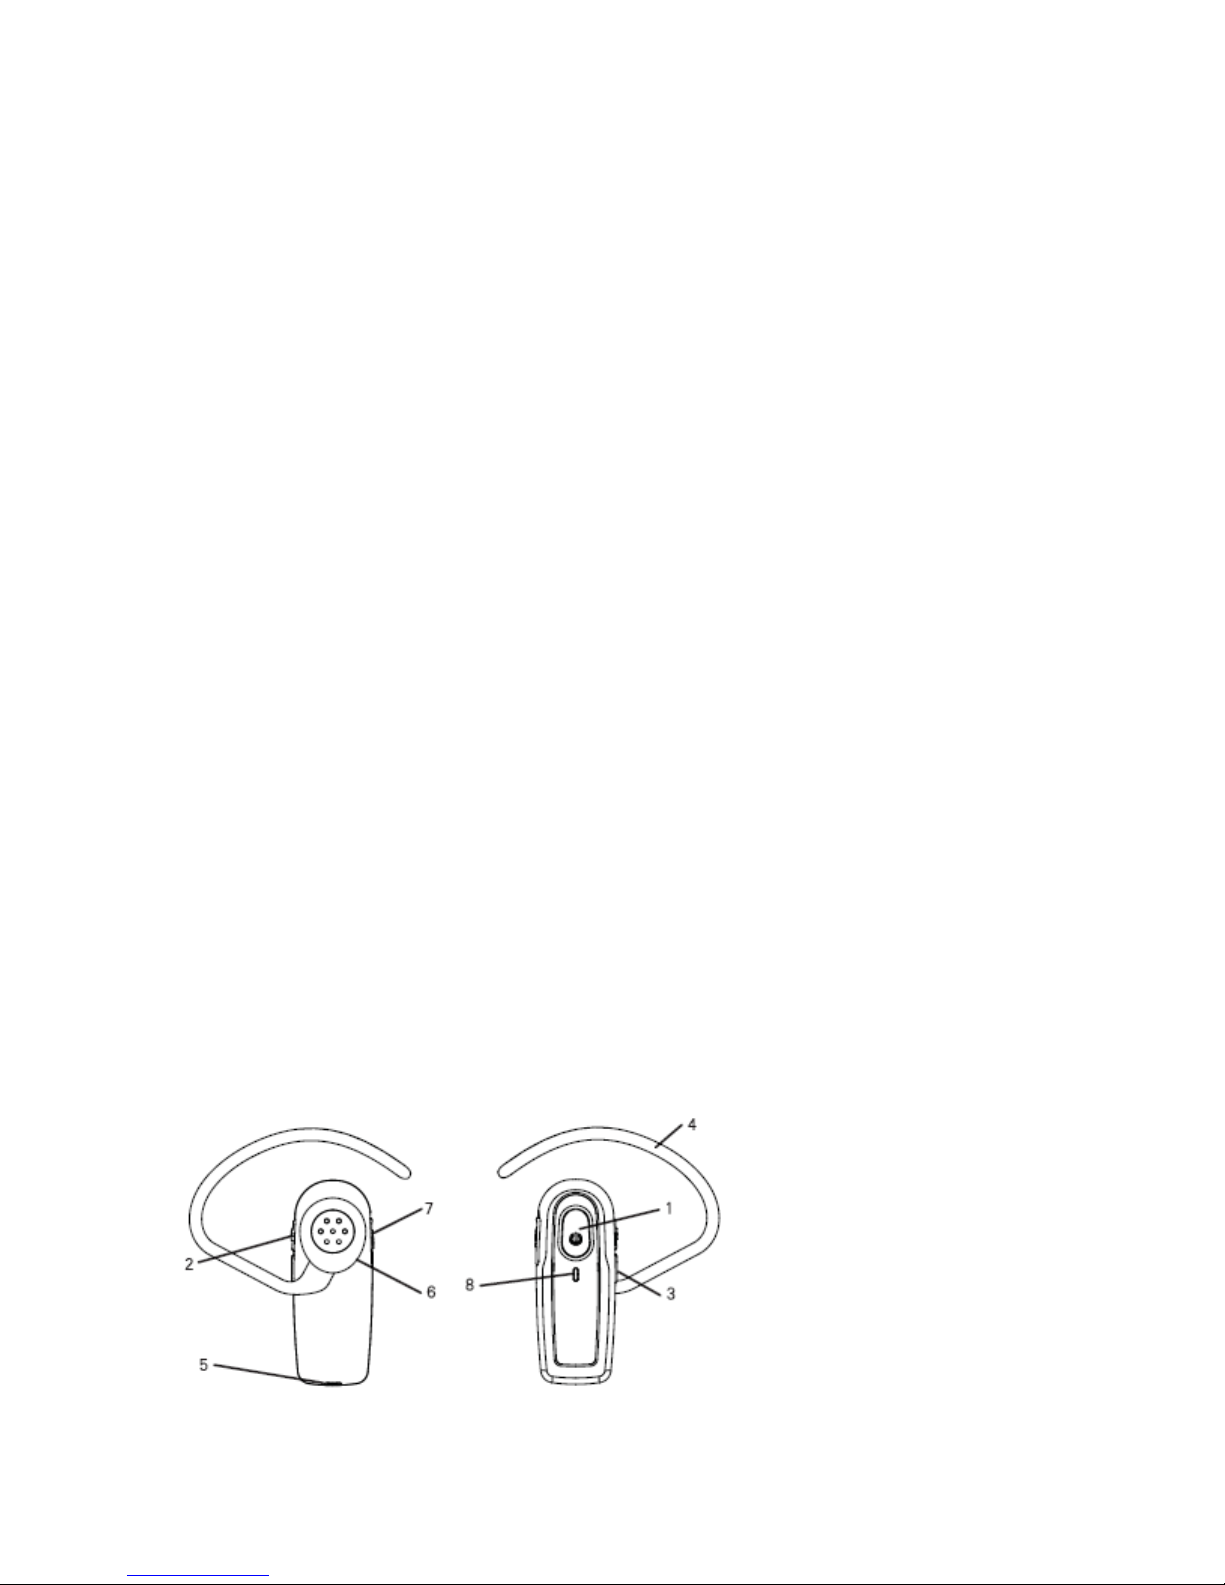
4.T e function at a glance
n this guide, "Short press" refers to a time period of less than 1 second during
which a functional button is being pressed. "Long press" refers to a time period of
more than 3 second during which a functional button is being pressed. "Press and
hold" refers to a time period of more than 5 second during which a functional button
is being pressed.
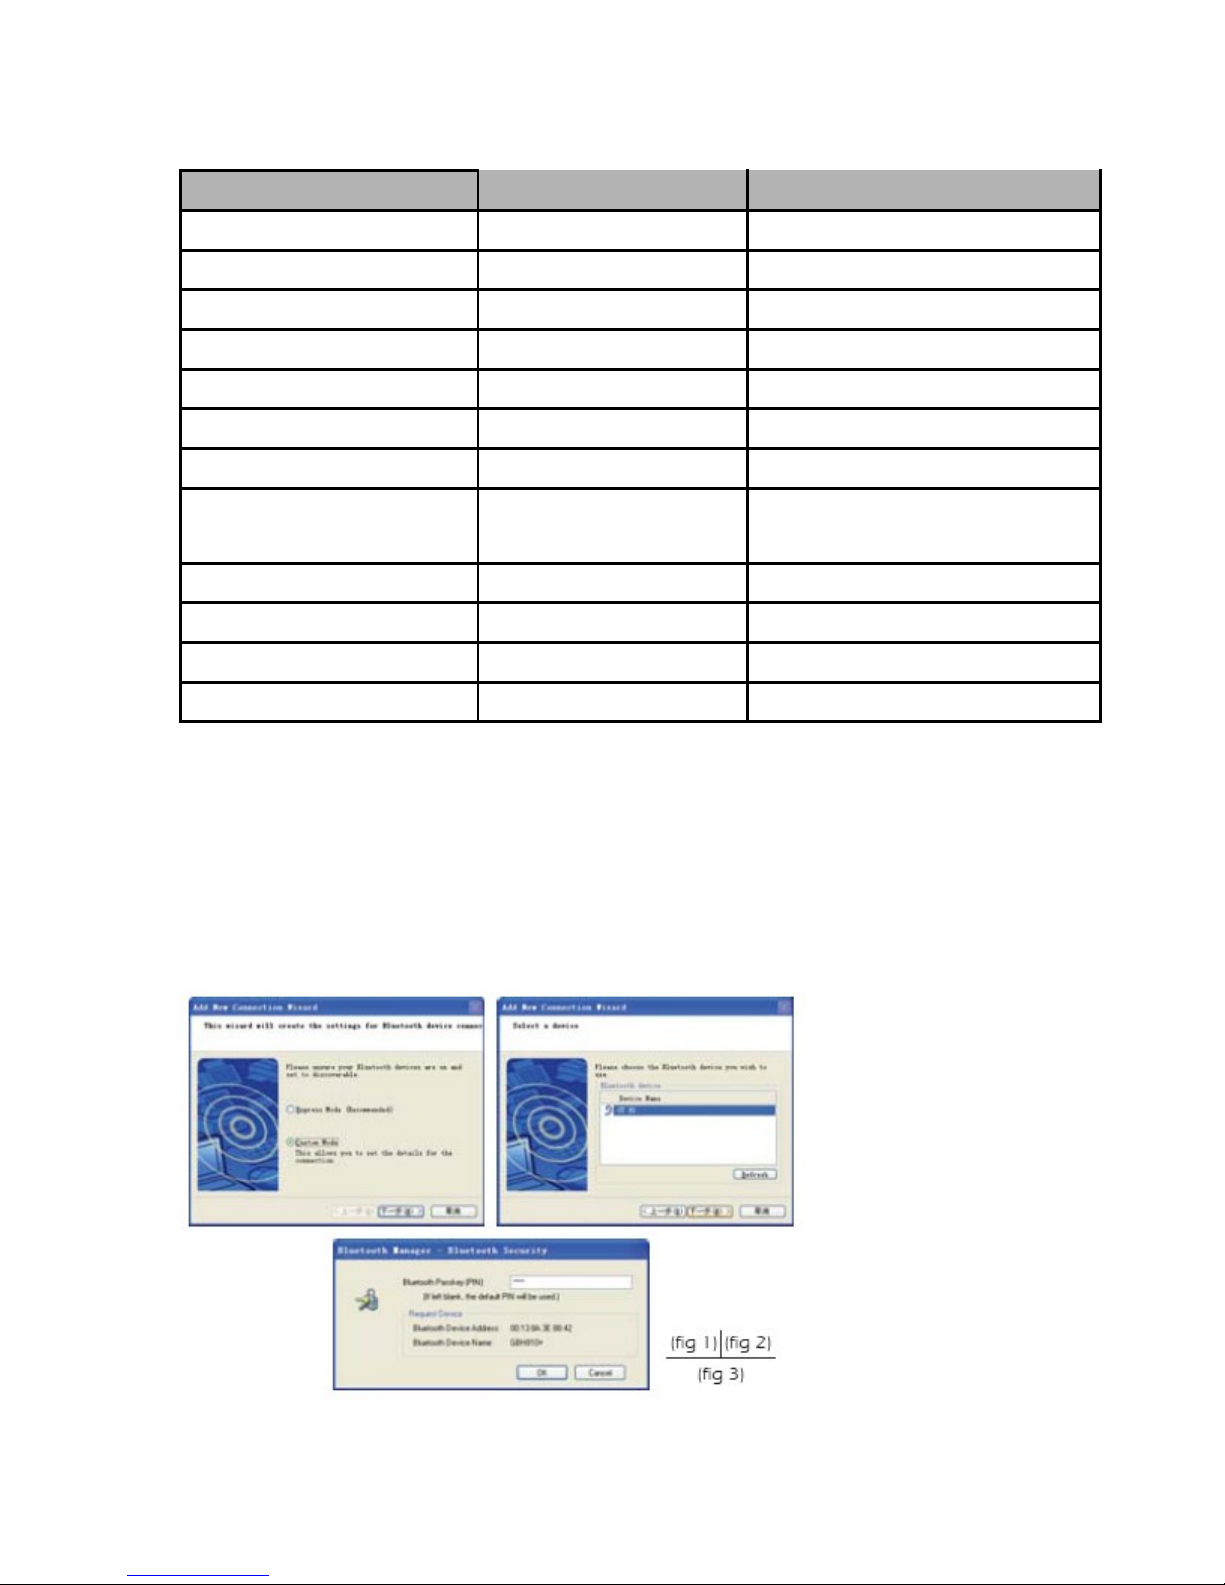
4.1 P one operation Pairing t e eadset wit a p one
Before you can use the headset to make calls, you must pair the headset with your
phone. Pairing creates a secure link between your phone and the unique D of the
headset. You only have to pair devices once.
(1) To put the headset in pairing mode, press and hold (over 5 seconds) the Multi-
function button until the LED flash red/blue.
(2) Scroll to the Bluetooth menu in you phone and search for active devices. (Refer
to you phone's user manual for details)
(3) When the search completes, a list of devices found is displayed. (The screen
examples here are from a Nokia 6230)
(4) Select “GBH722” and when prompted input the default passkey (0000). When
successfully paired, the red/blue LED on the headset changes to flashing blue.
Note: You can pair the headset with up to eight Bluetooth devices. When you
pair the device with a ninth device, the oldest-paired device is deleted.

P one functions at glance
Headset Function Headset Status Button Operation
Power on Power off Long press MFB
Power off Power on Very long press MFB
Pairing Power off Very long press MFB
Answer the call ncoming call Short press MFB
Reject the call ncoming call Long press MFB
End the call Ongoing call Short press MFB
Volume up/down Ongoing call Short press Vol+/Vol- button
Transfer the voice between
Mobile phone and
headset
Ongoing call Long press MFB
Voice dial Connected and standby Long press MFB
Cancel voice dial Dialing Long press MFB
Last number redial Connected and standby Double Short press MFB
Connecting actively Standby Short press MFB
4.2 Make internet p one calls
There are many internet phone services (Vo P) that let you make calls from your
computer. You must add a new connection for this function.
(1) To put the headset in pairing mode, press and hold (over 5 seconds) Multi-
function button until the LED flashes red/blue.
(2) Right-click the Bluetooth Manager icon in the system tray and click Add New
Connection (fig 1).
(3) Select the Custom Mode radio button and click Next. The wizard searches for
device and the following screen appears, select the GBH722 and click Next (fig 2).
(4) Type in the passkey (0000) and click OK (fig 3).

(5) Under Service Class, select headset and click Next (fig 4).
(6) When you hear a signal tone on the headset, short-press Multi-function button
(fig 5).
(7) Click Next.
(8) A registration confirmation screen appears, Click Finish to complete the
connection. The new connection is shown in the Bluetooth Settings window (fig 6).
(9) Right-click the headset icon and click Connect (fig 7).
(10) When you hear a single tone on the headset, short-press Multi-function button.
Once connected the icon changes to a handshake (fig 8).

Now you can make an internet phone call by using GBH722.
Note: The headset only controls volume, Use the Skype interface for all call
functions.
5.Specifications
Battery capacity 80 mAh
Talk time up to 5hours
Standby time up to 110 hours
Weight 9 g
Size 46.89*18.18*9.53 mm(not include earpiece)
6. FCC RF Radiation Exposure Statement
This device complies with Part 15 o the FCC Rules. Operation is subject to the condition that this
device does not cause harm ul inter erence.
15.105(b)
This equipment has been tested and ound to comply with the limiteds or a Class B digital device,
pursuant to part 15 o the FCC rules. These limites are designed to provide reasonable protection
against harm ul inter erence in a residential installation. This equipment generates, uses and can
radiate radio requency energy and, i not installed and used in accordance with the instructions, may
cause harm ul intererence to radio communications. However, there is no quarantee that inter erence
will not occur in a particular installation. I this equipment does cause harm ul inter erence to radio or

television reception, which can be determined by turning the equipment o and on, the user is
encouraged to try to correct the inter erence by one or more o the ollowing measures:
-Reorient or relocate the receiving antenna.
-Increase the separation between the equipment and receiver.
-Connect the equipment into an outlet on a circuit di erent rom that to which the receiver is
connected.
-Consult the dealer or an experienced radio/TV technician or help.
15.19 Warning Statement
THIS DEVICE COMPLIES WITH PART 15 OF THE FCC RULES. OPERATION IS SUBJECT TO
THE FOLLOWING TWO CONDICTIONS1) THIS DEVICE MAY NOT CAUSE HARMFUL
INTERFERENCE.AND (2) THIS DEVICE MUST ACCEPT ANY INTERFERENCE RECEIVED,
INCLUDING INTERFERENCE THAT MAY CAUSE UNDESIRED OPERATION.
15.21 Warning Statement
NOTE: THE MANUFACTURER IS NOT RESPONSIBLE FOR RADIO OR TV INTERFERENCE
CAUSED BY UNAUTHORIZED MODIFICATIONS TO THIS EQUIPMENT. SUCH
MODIFICATIONS COULD VOID THE USER’S AUTHORITY TO OPERATE THE EQUIPMENT.
Table of contents