GOKARTS USA JF120 User manual

JF120 • JF168 • JF200
Owner's Manual

CONTENTS
SPECIFICATIONS ........................................................................................................................ 1
IMPORTANTSAFETYINFORMATION ..................................................................................... 3
COMPONENT&CONTROLLOCATIONS ................................................................................ 4
BEFOREOPERATION ................................................................................................................ 5
GeneralConditionoftheEngine ...................................................................................... 5
ChecktheEngine............................................................................................................... 5
EquipmentPoweredbyEngine.......................................................................................... 5
SafeOperatingPrecautions............................................................................................... 5
OPERATION ................................................................................................................................. 6
StartingtheEngine............................................................................................................. 6
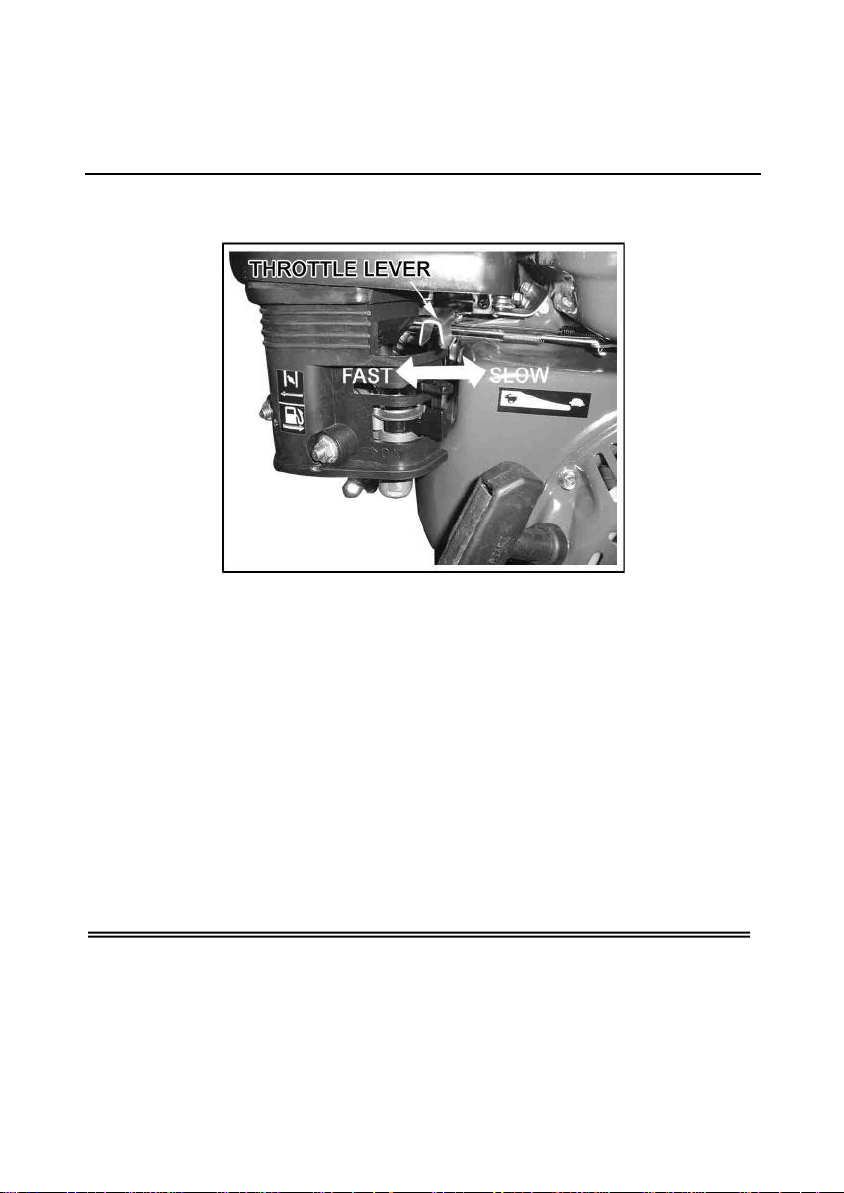
SettingtheEngineSpeed.................................................................................................. 8
STOPPINGTHEENGINE............................................................................................................. 9
SERVICINGTHEENGINE........................................................................................................... 10
MaintenanceSafety............................................................................................................ 10
SafetyPrecautions............................................................................................................. 10
MaintenancePrecautions................................................................................................. 11
Refueling .................................................................................................................... 12
FuelRecommendations .................................................................................................... 12
OilRecommendations ....................................................................................................... 13
OilLevel Check................................................................................................................... 13
OilChange........................................................................................................................... 14
Air Filter Inspection & Service .................................................................................... 15
SedimentCupCleaning..................................................................................................... 16
Spark PlugService ............................................................................................................ 17
IdleSpeedAdjustment....................................................................................................... 18
STORINGTHEENGINE .............................................................................................................. 19
Cleaning ............................................................................................................................. 19
Fuel ............................................................................................................... 19
AddingFuelStabilizer ................................................................................................ 19
Drainingthe Fuel................................................................................................................ 20
EngineOil............................................................................................................................ 20
StoragePrecautions........................................................................................................... 21
RemovalfromStorage........................................................................................................ 21
Transporting ............................................................................................................... 21
TROUBLESHOOTING............................................................................................................................ 22
REMOTE CONTROLLINKAGE(Optional) ................................................................................ 23
HIGHALTITUDEOPERATION.................................................................................................... 24
Replacement Parts .................................................................................................... 24

SPECIFICATIONS
JF120
Length x Widt h x Height
12.0 X13.4 X12.5 in
Dry Weig ht
28.7 Lbs
Eng ine Ty p e
4-S trok e, Ov erh ead Valv e, Sin gle Cy lind er
Displacem e nt
[Bore x Stroke]
7 . 3 c u - i n
[2.4 X1.7 in]
Valve clear a nce
IN: 0.15 ±0.02 mm (cold)
EX: 0.20+0.02 mm (cold)
Spa rk P lug
L D : F 7 R T C N G K : B P R 6 E S
Spa rk p lug g ap
0.028-0.031 in
Idle speed
1 , 4 0 0 * r p m
Max. Output
4.0 HP At 3,600 rpm
Max. Torque
5.4 ft-lbs At 2,500 rpm
Eng ine Oil
SAE 1 0W- 30, A P I S J or SL , for g e ner al u se
Eng ine O il C apac ity
0.63 qt
Fuel
Unl eaded gasoline w it h a p um p oct ane r at ing of 86 or hig her
Fue l Tan k C apac ity
0.55 gal
Fue l Consump t ion
0.51 GPH
Coo ling S yst em
Forced Air
Ignition System
Transisto r ize d M agne to
PTO Sha ft Rota tio n
Cou nter clo ckw i se
JF168
Length x Widt h x Height
12.3 X14.3 X 13.2 in
Dry Weig ht
33.1 Lbs
Engine Typ e
4 - St r o k e, O v e rh e ad V a l v e, S i n g l e C y li n d er
Displacem e nt
[Bore x Stroke]
9.9 cu-in
12.7X 1.8 in]
Valve clear a nce
IN: 0.15 ±0.02 mm (cold)
EX: 0.20±0.02 mm (cold)
Spa rk P lug
L D : F 7 R T C N G K : B P R 6 E S
Spa rk p lug g ap
0.028-0.031 in
Idle speed
1,400 T , r pm
Max. Output
5.5 HP At 3,600 rpm
Max. Torque
8.0 ft-lbs At 2,500 rpm
Engine Oil
SAE 1 0W- 30, A P I S J or SL , for g e ner al u se

SPECIFICATIONS
- 2 -
E n g i n e O i l C a p a c i t y
0.63 qt
Fuel
U n l e ad e d g a s o l in e w i t h a p u m p o c t an e r a t i n g o f 8 6 o r h i g h er
F u e l T a n k C a p a c i t y
0.7 9 ga l
F u e l C o n s u m p t i o n
0 . 5 1 G P H
C o o l i n g S y s t e m
F o r c e d A i r
Ign i ti o n Sy s tem
T r a n s i s t o r i z e d M a g n e t o
P T O S h a f t R o t a t i o n
C o u n t e r c l o c k w i s e
J F200
L e n g t h x W i d t h x H e i g h t
12.3 X14. 8 X 1 3.2 in
D r y W e i g h t
3 5 . 3 L b s
E n g i n e Ty p e
4 - S t r o k e , O v e r h e a d V a l v e , S i n g l e C y l i n d e r
u i s p i a c e m e n t
[Bore x S troke]
1 2 c u - i n
[2.7X 2.1 in]
V a l v e c l e a r a n c e
IN: 0.1 5 ±0.02 m m (cold)
EX: 0.20 ±0 . 02 m m ( col d )
S p a r k P l u g
L D : F 7 R T C N G K : B P R 6 E S
S p a r k p l u g g a p
0.0 28- 0 .03 1 in
Idl e sp eed
1,4 00T r pm
M a x . O u tp u t
6 . 5 H P A t 3 , 6 0 0 r p m
M a x . T o r q u e
9 . 7 6 f t - l b s A t 2 , 5 0 0 r p m
E n g i n e O i l
S A E 1 0 W - 3 0 , A P I S J o r S L , f o r g e n e r al u s e
E n g i n e O i l C a p a c i t y
0.6 3 qt
Fuel
U n l e ad e d g a s o l in e w i t h a p u m p o c t an e r a t i n g o f 8 6 o r h i g h er
F u e l T a n k C a p a c i t y
0.7 9 ga l
F u e l C o n s u m p t i o n
0 . 5 1 G P H
C o o l i n g S y s t e m
F o r c e d A i r
Ign i ti o n Sy s tem
T r a n s i s t o r i z e d M a g n e t o
P T O S h a f t R o t a t i o n
C o u n t e r c l o c k w i s e
SAVE THIS MANUAL
You will need this manual for the safety warnings and precautions, operating,
inspection, maintenance and cleaning procedures, parts list and assembly diagram.
Keep your invoice with this manual. Write the invoice number on the inside of the
front cover. Keep this manual and invoice in a safe and dry place for future
reference.

-3-
IMPORTANT SAFETY INFORMATION
Most accidents with engines can be prevented if you follow all instructions in this manual and on the
engine. Some of the most common hazards are discussed below, along with the best way to protect
yourself and others.
Read and understand this owner's manual before operating the engine. Failure to do so could
result in personal injury or equipment damage.
Know how to stop the engine quickly, and understand the operation of all controls. Never permit
anyone to operate the engine without proper instructions.
Do not allow children to operate the engine. Keep children and pets away from the area of
operation.
Do not operate engine in explosive atmospheres, such as in the presence of flammable liquids, gases,
or dust. Engines create sparks, which may ignite the dust or fumes.
Dress properly. Do not wear loose clothing or jewelry. Contain long hair. Keep your hair, clothing,
and
gloves away from moving parts. Loose clothes, jewelry, and long hair can be caught in moving parts.
Gasoline is extremely flammable, and gasoline vapor can explode. Refuel outdoors, in a well-
ventilated area, with the engine stopped. Never smoke near gasoline, and keep other flames and
sparks away. Always store gasoline in an approved container. If any fuel is spilled, make sure the
area is dry before starting the engine.
The muffler becomes very hot during operation and remains hot for a while after stopping the
engine. Be careful not to touch the muffler while it is hot. Let the engine cool before storing it
indoors.
To prevent fire hazards and to provide adequate ventilation for stationary equipment applications,
keep the engine at least 3 feet away from building walls and other equipment during operation. Do
not place flammable objects close to the engine.
Exhaust gas contains poisonous carbon monoxide. Avoid inhalation of exhaust gas. Never run the
engine in a closed garage or confined area.
Review the instructions provided with the equipment powered by this engine for any additional
safety precautions that should be observed in conjunction with engine startup, shutdown,
operation, or protective apparel that may be needed to operate the equipment.
Do not overload the engine. Use the correct engine for your application. The correct engine will do
the job better and safer at the rate for which it is designed.
The warnings, cautions and instructions discussed in this instruction
manual cannot cover all possible conditions and situations that ma y
occur. It must be understood by the operator that COMMON SENSE AND
CAUTION ARE FACTORS WHIC H CANNOT BE BUILT INTO T H IS
WARNING! PRODUCT, BUT MUST BE SUPPLIED BY THE OPERATOR.

COMPONENT & CONTROL LOCATIONS
MUFFLER
THROTTLE LEVER
RECOIL STARTER
FUEL TANK
ON/OFF SWITCH
- 4 -

-5-
BEFORE OPERATION
IS YOUR ENGINE READY TO GO?
For your safety, and to maximize the service life of your equipment, it is very important to take a few
moments before you operate the engine to check its condition. Be sure to take care of any problem
you find, or have your servicing dealer correct it, before you operate the engine.
Before beginning your pre-operation checks, be sure the engine is level and the engine switch is in
the OFF position.
CHECK THE GENERAL CONDITION OF THE ENGINE
Review the instructions provided with the equipment powered by this engine for any precautions and
procedures that should be followed before engine startup.
Carbon monoxide gas is toxic. Breathing it can cause unconsciousness and
even kill you. Avoid any areas or actions that expose you to carbon monoxide.
WARNING!
Improperly maintaining this engine, or failing to correct a problem before
operation, could cause a malfunction in which you could be seriously injured.
Always perform a pre-operation inspection before each operation, and correct
WARNING! any problem.
Look around and underneath the engine for • Look for signs of damage.
signs of oil or gasoline leaks.
Remove any excessive dirt or debris, • Check that all shields and covers are in place,
especially around the muffler and recoil starter. and all nuts, bolts, and screws are tightened.
CHECK THE ENGINE
Check the engine oil level. Running the
engine with a low oil level can cause engine
damage.
The oil sensor will automatically stop the
engine before the oil level falls below safe
limits. However, to avoid the inconvenience
of an unexpected shutdown, always check
the engine oil level before startup.
• Check the air filter. A dirty air filter will restrict
air flow to the carburetor, reducing engine
performance.
Check the fuel level. Starting with a full tank
will help to eliminate or reduce operating
interruptions for refueling.
CHECK THE EQUIPMENT POWERED BY THIS ENGINE

-6-
OPERATION
Before operating the engine for the first time, please review the
IMPORTANTSAFETY
INFORMATION on
page 3 and the above information.
Review the instructions provided with the equipment powered by this engine for any safety
precautions that should be observed in conjunction with engine startup, shutdown, or operation.
STARTING THE ENGINE
1. Move the fuel valve lever to the ON
position.
The fuel valve opens and closes the
passage between the fuel tank and the
carburetor.
The fuel valve lever must be in the ON
position for the engine to run.
2. To start a cold engine, move the choke
lever to the CLOSED position. To restart
a warm engine, leave the choke lever in
the OPEN position.
The choke lever opens and closes the
choke valve in the carburetor.
The CLOSED position enriches the fuel
mixture for starting a cold engine.
The OPEN position provides the correct
fuel mixture for operation after starting,
and for restarting a warm engine.
3. Move the throttle lever away from the
SLOW position, about 1/3 of the way
toward the FAST position.
The throttle lever controls engine speed.
Moving the throttle lever in one direction
or the other, makes the engine run faster
or slower.

- 7 -
4. Turn the engine switch to the ON position.
The engine switch enables and disables
the ignition system.
The engine switch must be in the ON
position for the engine to run.
Turning the engine switch to the OFF
position stops the engine.
5. Operate the RECOIL STARTER:
Pull the starter grip lightly until you feel
resistance, then pull briskly. Return the
starter grip gently.
Pulling the starter grip operates the recoil
starter to crank the engine.
6. If the choke lever has been moved to the
CLOSED position to start the engine,
gradually move it to the OPEN position as
the engine warms up.

-8-
SETTING ENGINE SPEED
Position the throttle lever for the desired engine speed.
Moving the throttle lever in the directions shown makes the engine run faster or slower.
Some engine applications use a remote-mounted throttle control rather than the engine-mounted
throttle lever shown here.
For engine speed recommendations, refer to the instructions provided with the equipment powered by
this engine.
A
WARNING!
Carbon monoxide gas is
toxic. Breathing it can cause
unconsciousness and even
kill you. Avoid any areas or
actions that expose you to
carbon monoxide.

-9-
STOPPING THE ENGINE
To stop the engine in an emergency, simply turn the engine switch to the OFF position. Under normal
conditions, use the following procedure.
1. Move the throttle lever to the SLOW
position
2. Turn the engine switch to the OFF position.
3. Turn the fuel valve lever to the OFF
position.
When the engine is not in use, leave the
fuel valve lever in the OFF position to
prevent carburetor flooding and to reduce
the possibility of fuel leakage.

-10-
SERVICING THE ENGINE
THE IMPORTANCE OF MAINTENANCE
Good maintenance is essential for safe, economical, and trouble-free operation. It will also help
reduce air pollution.
To help you properly care for your engine, the following pages include a maintenance schedule,
routine inspection procedures, and simple maintenance procedures using basic hand tools. Other
service tasks that are more difficult, or require special tools, are best handled by professionals and
are normally performed by a qualified mechanic.
The maintenance schedule applies to normal operating conditions. If you operate your engine under
unusual conditions, such as sustained high-load or high-temperature operation, or use in unusually
wet or dusty conditions, consult your servicing dealer for recommendations applicable to your
individual needs and use.
Maintenance, replacement or repair of emission control devices and systems may be done by any
engine repair establishment or individual, using parts that are "certified" to EPA standards.
MAINTENANCE SAFETY
Some of the most important safety precautions follow. However, we cannot warn you of every
conceivable hazard that can arise in performing maintenance. Only you can decide whether or not
you should perform a given task.
SAFETY PRECAUTIONS
Make sure the engine is off before you begin any maintenance or repairs. This will eliminate
several potential hazards:
> Carbonmonoxide poisoning from engine exhaust.
Be sure there is adequate ventilation whenever you operate the engine.
> Burns from hot parts.
Let the engine and exhaust system cool before touching.
> Injury from moving parts.
Do not run the engine unless instructed to do so.
Read the instructions before you begin, and make sure you have the tools and skills required.
To reduce the possibility of fire or explosion, be careful when working around gasoline. Use only a
nonflammable solvent, not gasoline, to clean parts. Keep cigarettes, sparks and flames away from
all fuel-related parts.
To ensure the best quality and reliability, use only new, original replacement parts or their equivalents
for repair and replacement.
Improperly maintaining this engine, or failure to correct a problem before
operation, can cause a malfunction in which you can be seriously hurt or
killed.
Always follow the inspection and maintenance recommendations and
schedules in this owner's manual.
WARNING!

MAINTENANCE SCHEDULE
REGULAR SERVICE
PERIOD (3) ITEM
Perform at every
indicated month or operating
hour interval, whichever comes first.
Each
use
First
month
or 20
Hours
Every 3
months
or 50
Hours
Every 6
months
or 100
Hours
Every
yearor Refer
300 topage
Hours
Engine oil
Check level
V
Change
Reduction gear oil
Check level
(applicable types)
Change
e
Air filter
Check
Clean
(1)
*(1)
Replace
*
Sediment cup
Clean
Sparkplug
Check-adjust
Replace
Spark arrester
Clean
(optional parts)
Idle speed
Check-adjust
(2)
•
Valve clearance
Check-adjust
(2) —
•
Combustion chamber
Clean
Afterevery500 Hours (2) —
Fuel tank & filter
Clean
(2)
—
•
Fuel tube
Check
Every 2 years (Replace if necessary) (2) —
Emission-related items.
* Internal vent carburetor (See page 7) with dual element type only.
** Replace paper element type only.
(1)Service more frequently when used in dusty areas.
(2)These items should be serviced by a qualified mechanic, unless you have the proper tools and are
mechanically proficient.
(3)For commercial use, log hours of operation to determine proper maintenance intervals.

- 12 -
REFUELING
With the engine stopped and on a level surface, remove the fuel tank cap and check the fuel level.
Refill the tank if the fuel level is low.
Refuel in a well-ventilated area before starting the engine. If the engine has been running, allow it to
cool. Refuel carefully to avoid spilling fuel. Do not fill the fuel tank completely. Fill tank to
approximately 1 inch below the top of the fuel tank to allow for fuel expansion. It may be necessary to
lower the fuel level depending on operating conditions. After refueling, tighten the fuel tank cap
securely.
Never refuel the engine inside a building where gasoline fumes may reach flames or sparks. Keep
gasoline away from appliance pilot lights, barbecues, electric appliances, power tools, etc.
Spilled fuel is not only a fire hazard, it causes environmental damage. Wipe up spills immediately.
NOTICE:
Fuel can damage paint and plastic. Be careful not to spill fuel when filling your fuel tank.
Damage caused by spilled fuel is not coveredunder warranty.
FUEL RECOMMENDATIONS
Use unleaded gasoline with a pump octane rating of 86 or higher.
These engines are certified to operate on unleaded gasoline. Unleaded gasoline produces fewer
engine and spark plug deposits and extends exhaust system life.
Never use stale or contaminated gasoline or an oil/gasoline mixture. Avoid getting dirt or water in the
fuel tank.
Occasionally you may hear a light "knocking" or "pinging" (metallic rapping noise) while operating
under heavy loads. This is no cause for concern.
If knocking or pinging occurs at a steady engine speed, under normal load, change brands or higher
octane of gasoline. If knocking or pinging persists, see an authorized qualified mechanic.
NOTICE:
Running the engine with persistent knocking or pinging can cause engine damage.
Running the engine with persistent knocking or pinging is considered misuse, and the
warranty does not cover parts damaged by misuse.
Gasoline is highly flammable and explosive.
You can be burned or seriously injured when handling fuel.
Stop the engine and keep heat, sparks, and flame
away.
Handle fuel only outdoors.
WARNING! • Wipe up spills immediately.
MAXIMUM
FUEL LEVEL
TOP OF
—FUEL TANK

- 13 -
OIL RECOMMENDATIONS
Oil is a major factor affecting performance and service life. Use 4-stroke automotive detergent oil.
SAE 10W-30 is recommended for general use. Other viscosities shown in the chart may be used
when the average temperature in your area is within the recommended range.
The SAE oil viscosity and service classification are in the API label on the oil container. The
manufacture recommends that you use API SERVICE category SJ or SL oil.
OIL LEVEL CHECK
Check the engine oil level with the engine stopped and in a level position.
1. Remove the filler cap/dipstick and wipe it clean.
2. Insert and remove the dipstick with out screwing it into the filler neck. Check the oil level shown on
the dipstick.
3. If the oil level is low, fill to the edge of the oil filler hole with the recommended oil.
4.
Screw in the filler cap/dipstick securely.
UPPER LIMIT
-20° 0° 20° 40° 60° 80° 100°F
AMBIENT TEMPERATURE
LOWER LIMIT

- 14 -
NOTICE:
Running the engine with a low oil level can cause engine damage.
The
oil sensor will automatically stop the engine before the oil level falls below safe limit. However, to
avoid the inconvenience of an unexpected shutdown, always check the engine oil level before
startup.

- 15 -
OIL CHANGE
Drain the used oil while the engine is warm. Warm oil drains quickly and completely.
1. Place a suitable container below the engine to catch the used oil, then remove the filler
cap/dipstick, drain plug, and washer.
2. Allow the used oil to drain completely, then reinstall the drain plug, washer, and tighten drain plug
securely.
Please dispose of used motor oil in a manner that is compatible with the environment. We suggest
you take used oil in a sealed container to your local recycling center or service station for
reclamation. Do not throw it in the trash; pour it on the ground, or down a drain.
3. With the engine in a level position, fill to the outer edge of the oil filler hole with the recommended oil.
NOTICE:
Running the engine with a low oil level can cause engine damage.
The oil sensor will automatically stop the engine before the oil level falls below the safe limit.
However, to avoid the inconvenience of an unexpected shutdown, fill to the upper limit, and check the
oil level regularly.
4. Screw in the filler cap/dipstick securely.
OIL/CAP
DIPSTICK
- WASHER
OILLEVEL
DRAINBOLT

-16-
AIR FILTER INSPECTION & SERVICE
A dirty air filter will restrict air flow to the carburetor, reducing engine performance. If you operate the
engine in very dusty areas, clean the air filter more often than specified in the MAINTENANCE
SCHEDULE.
1. Remove the wing nut, and remove the air
cleaner cover.
2. Carefully remove plastic grid from the
bottom of the cover.
3. Carefully remove the foam air filter from
the cover. Wash the filter in warm, soapy
water, rinse, and allow to dry thoroughly.
4. Wipe dirt from the inside of the air cleaner
base and cover, using a moist rag. Be
careful to prevent dirt from entering the air
duct that leads to the carburetor.
5. Insert the cleaned, dry or new foam air
filter in the cover and replace plastic grid.
6. Reinstall the air cleaner assembly. Be sure
the gasket is in place beneath the air filter.
7. Tighten the air filter wing nut securely.
NOTICE:
Operating the engine without an air
filter,
or with a damaged air filter, will allow dirt to
enter
the engine, causing rapid engine wear.
This type of damage is not covered by the warranty.
FOAM
FILTER

- 17 -
SEDIMENT CUP CLEANING
1. Move the fuel valve to the OFF position, then remove the fuel sediment cup and 0-ring.
2. Wash the sediment cup and 0-ring in nonflammable solvent, and dry them thoroughly.
3. Place the 0-ring in the fuel valve, and install the sediment cup. Tighten the sediment cup
securely.
4. Move the fuel valve to the ON position, and check for leaks. Replace the 0-ring if there is any
leakage.
DRAIN,
BOLT if'i m 4
0-RING UP
T
SEDIMENT
CUP
Gasoline is highly flammable and explosive.
You can be burned or seriously injured when handling fuel.
Stop the engine and keep heat, sparks, and flame
away.
Handle fuel only outdoors.
WARNING! • Wipe up spills immediately.

- 18 -
SPARK PLUG SERVICE
Recommended spark plugs: BPR6ES (NGK)
W20EPR-U (DENSO)
NOTICE:
An incorrect spark plug cancause engine damage.
1. Disconnect the spark plug cap, and remove any dirt from around the spark plug area.
2. Remove the spark plug with a 13/16-inch spark plug wrench.
3. Inspect the spark plug. Replace it if the electrodes are
worn, or if the insulator is cracked or chipped.
4. Measure the spark plug electrode gap with a suitable
gauge. The gap should be 0.028-0.031 in. Correct the
gap, if necessary, by carefully bending the electrode.
5. Install the spark plug carefully, by hand, to avoid cross-
threading.
6.
After the spark plug is seated, tighten with a 13/16-inch spark plug wrench to compress the
sealing washer.
SEALING
If reinstalling the used spark plug, tighten 1/8 —1/4 turn
WASHER
after the spark plug is seated.
If installing a new spark plug, tighten 1/2 turn after the
spark plug is seated.
NOTICE:
A loose spark plug can overheat and damage the
engine. Over-tightening the spark plug can damage
the threads in the cylinder head.
7. Attach the spark plug cap.
01
This manual suits for next models
2
Table of contents
Popular Engine manuals by other brands

Briggs & Stratton
Briggs & Stratton 140000 Professional 1000 Series Operator's manual

Siemens
Siemens SIMOTICS T-1FW6 Configuration manual

Briggs & Stratton
Briggs & Stratton 19E400 Operating & maintenance instructions

Mitsubishi Heavy Industries
Mitsubishi Heavy Industries L2E Operation & maintenance manual

Leadshine
Leadshine iSV2-CAN Series user manual

Isuzu
Isuzu AU-4LE1T Maintenance manual