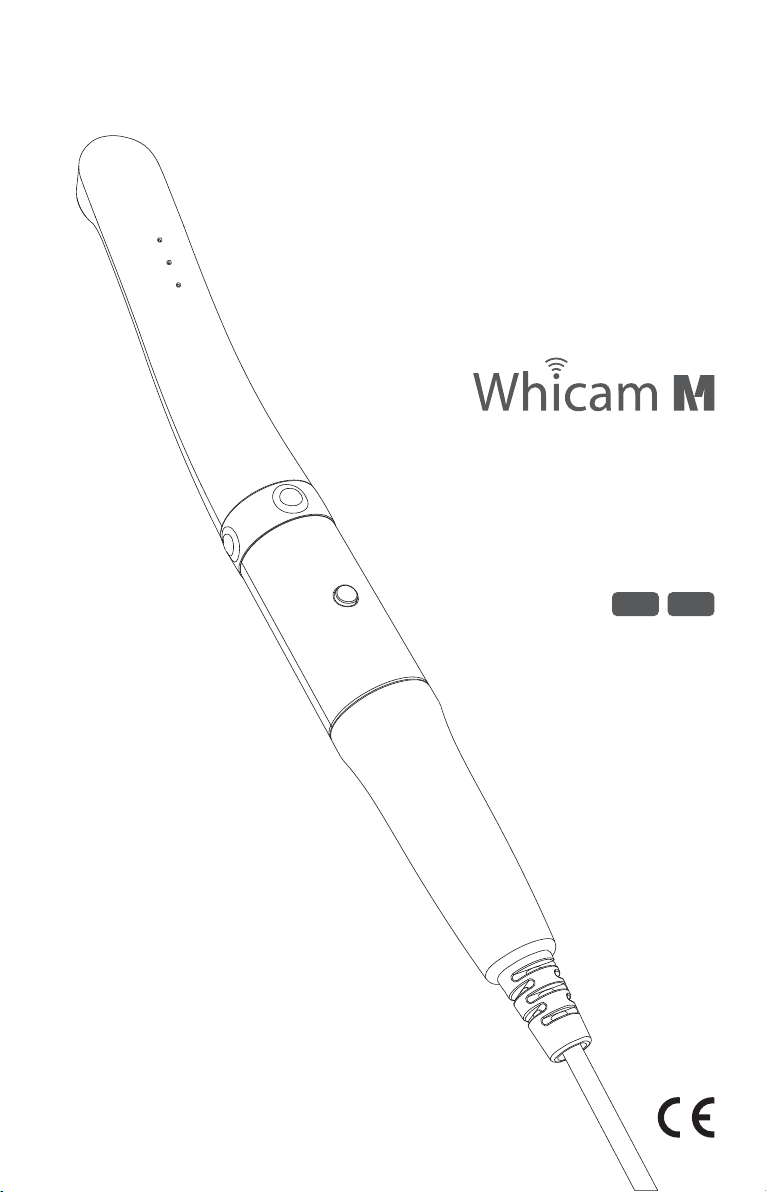
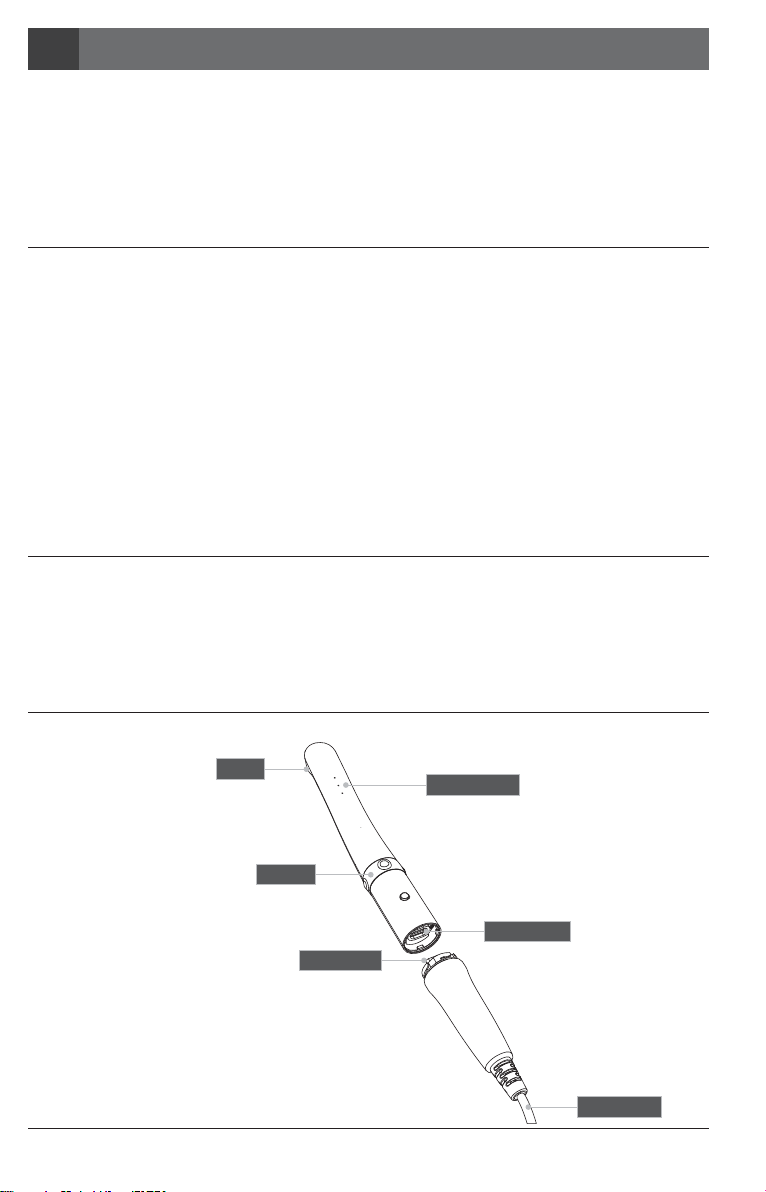
GoodDrs Whicam M User manual

Autofocus Dental Camera
User manual
KorEng
Macro to Infinity

Autofocus Dental Camera
User manual
Eng
Macro to Infinity

Contents
3. List of components 09
4. Parts and functions 10
5. Installation 11
6. How to use 12
7. Maintenance 14
8. Trouble shooting 15
9. Specification 16
10. Accessories 17
11. Warranty 17
12. Warranty card 18
2. Safety Information 05
- Warning and caution
- Notes and references
- Installation and connection
- Operation
- Maintenance
1. Introduction 04
- Features
- Description
- Overview
03

Introduction1
- Autofocus
- Adjustable LED brightness
- Software compatibility
- Mouse function
Features
04 Macro to Infinity
Thank you for purchasing the device. The instructions described below have been designed to provide the
necessary information for the successful operation, daily maintenance and safety for the use of this unit.
Description
This device is an intraoral camera used to take images of the inside of the mouth or oral cavity.
Overview
1) Camera
2) USB cable
Lens
LED indicator
Connect port
Connect pin
USB cable
Buttons

05
Safety information2
It is important to understand the following information to use this product safely.
Warning and caution
Indicates a potentially hazardous situation which, if not avoided, may result in
serious injury or death.
Indicates a potentially hazardous situation which, if not avoided, may result in
minor/moderate injury or in damage of property.
Caution
Warning
Warning and caution used in this manual are shown below.
Notes and references used in this manual are shown below.
Indicates that potential malfunctions may occur if the description is ignored.
Supplementary information to facilitate better operation.
Reference
Note
Notes and references

Macro to Infinity
- Before use, check that there is no dust or foreign particles in the USB cable or
connection part to avoid an electric shock.
- Keep away from sources of ignition.
- Protect the device from any liquid to avoid an electric shock or functional error.
- Place the device on a plate, stable surface, or cradle supplied.
Dropping the device could result in an internal defect that may cause overheating or fire.
- Do not place the USB cable near a gas burner or other sources of heat. Should the cable
catch on fire or become damaged, replace with a new one to avoid short-circuiting.
Warning
Safety information2
Installation and connection
06
- Do not use or leave the unit in areas of high temperature or exposed to direct sunlight.
Internal circuit faults may cause the device to overheat or catch on fire.
- Securely connect the dust-free USB cable. Use this device in well ventilated areas, as
overheating may cause ignition.
Caution

07
Safety information2
Operation
- Do not plug in the USB cable with wet hands. This may result in an electric shock.
- Do not use this product on a person with a pacemaker as it may cause malfunction
of the pacemaker.
- Use a disposable cover for each new patient to prevent cross-infection.
Warning
- Do not disconnect the USB cable by pulling on the cable. This may result in an electric
shock or fire.
- Avoid damage or use of unnecessary force on the USB cable.
This may result in an electric shock or fire.
- Remove the USB cable if the device is out of use for a long period of time.
- Do not use this product for any purpose other than dental use.
- This device is not waterproof. Use disposable covers to avoid wetting the device.
In case of malfunction due to this case, it is not covered by warranty.
Caution

Macro to Infinity
- Never disassemble or repair the product, this may cause injuries, electric shock, or fire.
- Avoid getting the unit wet to prevent an electric shock.
- Ensure that the USB cable is disconnected prior to cleaning.
Warning
Safety information2
Maintenance
08
- Do not use solvents oil, ethanol, or acetone to clean or disinfect.
- The user must be in charge of the operation and maintenance of the device.
Caution

09
List of components3
Please check the contents described below when removing the contents from the original packaging.
Disposable cover
(x 100 pcs by weight)
x 2ea
User Manual
Data CD
USB cable Cradle
Camera

① Lens
- Takes image and send to sensor
② LED indicator
- Show the device status
③ Capture button
- Image capture, focus adjusting
④ Left button
- Mouse left button
⑤ Right button
- Mouse right button
⑥ M button
- Mouse activation
⑦ USB Cable
- Connect with camera and PC.
① LED indicator
③ LED indicator
② LED indicator
⑦ USB Cable
② LED indicator
④ Left button ⑤ Right button
⑥ M button
① Lens
③ Capture button③ Capture button
① LED
LED indicator
② LED
③ LED
LED Color
Auto-focus
State
Color impression
Black & White mode
●
Original
Semi auto-focus
Normal mode -
-
●
WarmStandard
Full auto-focus
●
- Black & White mode
-
-
OFF
Macro to Infinity
Parts and functions4
10

②
①
11
Installation5
1. USB cable connection
Connect the USB cable with body as follow picture.
Be careful when connecting the USB cable to body. Do not force too much.
Caution
2. Capture key setting
- Capture key can be changed with "HIDDrs Manager" in the CD.
- Default value is “Space”
If software capture key value is unknown, contact technical support.
Reference

4. Brightness change
- Click M button with Left button for 1 sec. on live image.
Then LED brightness is changed.
- Turn off ⇒ Brightness LV1 ⇒ Brightness LV2 ⇒
Brightness LV3 is rotated.
Macro to Infinity
12
How to use
6
1. Turn on the device
- Connect the device to PC. Then the device is turned on with LED blink with beep sound.
3. Mouse function
- Click M button and hold. Mouse cursor on the PC moves as device
moves.
- Left / Right button works same as normal mouse button.
2. Image capture
2-1. Semi auto-focus mode
- Half click: Adjust focus
- Full click: Image capture
- Half click & stay: Image capture after focus adjust.
2-2. Full auto-focus mode
- half click: Image capture
Default setup is semi auto-focus. And capture key is “Space”
To use other company software, need to check capture key.
Or need to use twain driver.
Reference
5. Zoom function
x2
- Double click and hold M button. Then specific area is enlarged.
* Need to install "Zoom function" program on the PC.

① LED
LED indicator
② LED
③ LED
LED Color
Auto-focus
State
Color impression
Black & White mode
●
Original
Semi auto-focus
Normal mode -
-
●
WarmStandard
Full auto-focus
●
- Black & White mode
-
-
OFF
13
How to use
6
6. Black & White mode
- Click and hold M button with Right button for 1 sec.
Then LED turn off, and live image changed to black & white mode
with 1st LED indicator change
- ●: Normal mode
- OFF: Black & White mode
7. Color impression changing
- Click and hold M button with Capture button for 1 sec.
Then the color impression is changed with 2nd LED indicator change
- ●: Original
- ●: Standard
- ●: Warm
- Original ⇒ Standard ⇒ Warm color impression is rotated.
The functions work on live image on.
Reference
8. Focusing mode changing
- Click and hold up/bottom capture buttons for 1 sec.
Then the focusing mode is rotated Semi / Full auto-focus with
3rd LED indicator change.
- ●: Semi auto-focus
- ●: Full auto-focus

Macro to Infinity
14
Maintenance7
- Clean the camera gently with clean, soft, lint-free cloth.
- Avoid using solvents which contain ethanol or acetone.
- Do not use sharp or pointed tools to clean as they may damage or scratch the plastic.
- Be careful not to spill any liquid into the device.
- Use disposable covers when using the device to avoid cross-infection and spilling any
liquid into the device.
Cleaning and disinfection
- Do not disassemble the device for any purpose.
- To repair the device, please contact authorized dealer or manufacturer.
- Remove the USB cable from PC, if the device is not in use for long period.
Maintenance

15
Trouble shooting8
If the device doesn’t work normally, please refer to the following points.
Problem
Button doesn’t work
LED indicator
does not work
Power off while in
operation
Not able to capture
image
Live image is not shown
Cause and solution
If the button is pressed with excessive force, it would not work, try pressing
the button gently.
In case of installation or device setting is incorrect, the button could not work.
Check the 5. Installation and 6. How to use.
If the USB connection is not good, or USB electric power is not enough the
camera will not work. Check the USB connection and use other USB port.
If the USB cable is not connected properly, the device may turn off.
Check the USB cable connection.
Capture key-value will not match with other company dental imaging software.
Please check keyboard shortcut. If you don’t know please ask the dental
imaging software vendor and check the key-value of device.
If the device is not recognized well, live image is not shown.
Please check camera connection or imaging device of device manager.
If there is TV tuner in the PC. The image could be not shown.
Check “Disable” the TV tuner device on the device manager.
If you use other company dental viewer software, it would be related with
its setting. Please ask to the dental viewer software vendor.
If you use other company dental viewer software, other imaging device
(ex. Web-cam, etc.) should be checked for “Disable”.
Some codec makes block the live image shown. Uninstall the codec file.
(ex. klite codec and etc.)
* If the trouble is not fixed after following solution, please contact your local dealer or manufacturer.

Macro to Infinity
16
Specification9
■Equipment Class
Model:
Trademark:
Power supply:
Protection from ingress of liquids:
IC-WHMA90
Whicam M
5V USB power
IPX0 (ordinary equipment)
■Additional Information
Camera Operation voltage
Measurement
Weight
Resolution
Sensor type
5V
Approx. 128 x 21.5 x 32 mm
Approx. 61g
FHD (1920 x 1080)
CMOS
USB cable Length Approx. 3 M
Disposable cover Quantity
Raw material
Approx. 100 pcs by weight x 2ea
Polyethylene
■Minimum system requirement
PC system:
OS:
USB port:
* Upper specification is changeable without prior notice.
3.3GHz CPU, 4GB RAM
Windows 7 or higher
USB 2.0 or higher
■Operation, transport, and storage condition for the main unit
Storage
0~40C
0~80%
Transport
-10C~50C
0~80%
Temperature
Humidity
Atmospheric pressure
Operation
10~40C
10~80%
800 ~ 1060 hPa

17
Accessories10
Warranty11
This product is only shipped after strict inspection. Should the product incur any problems under normal
use conditions within one year from the date of purchase, the repair will be free of charge.
However, repair of consumables (Disposable Cover, and etc.) are not covered by the warranty.
For more information, refer to the 12. Warranty card attached.
Disposable cover
(x 100 pcs by weight)
(Item No. IC0206010)
Serial number check.
USB cable
(Item No. IC0409010)
Cradle
(Item No. IC0509010)
Gerhard-Domagk-Str.2, 53121 Bonn, Germany
TEL: +49(0)228/7077695 FAX: +49(0)228/7077696
Website: www.gooddrs.de
Gruneworld GmbH
#208, B-dong, 283 Bupyeong-daero, Bupyeong-gu
(Woolim Lions Valley, Cheongchoen-dong), Incheon,
21315, Republic of Korea
Tel : + 82 32 424 6325 Fax : + 82 32 424 6326
E-mail : info@gooddrs.com Website : www.gooddrs.com
Good Doctors Co., Ltd.
S/N : 11180001
MM YY
Serial

Macro to Infinity
18
Warranty card12
We guarantee the quality df the product as follows
< Assurance details >
1. If there is any defect of manufacturer or product
has any fault itself within the assurance period,
it will be replaced with the same product.
2. Below cases are not effective for the free refund.
- Malfunction and damage according to user’s carelessness.
- Malfunction and damage according to natural disaster such
as fire, earthquake and flood etc.
- Malfunction and damage according to user’s intention or accident.
- Malfunction and damage according to using incompaible product.
3. The manufacturer does not accept any liability resulting misuse.
Name of product :
Name of model :
Customer information
- Office name :
- Office phone :
Distributor
- Dealer name :
Assurance period
- Date of purchase : from , , 20
Product is for 1 year except accessories.
Good Doctors Co., Ltd.
#208, B-dong, 283 Bupyeong-daero, Bupyeong-gu (Woolim Lions Valley, Cheongchoen-dong), Incheon,21315, Republic of Korea
Tel: +82 32 424 6325 Fax: +82 32 424 6326

Autofocus Dental Camera
User manual
Kor
Macro to Infinity

목차
3. 내용물 27
4. 부품 및 기능 28
5. 설치 방법 29
6. 사용 방법 30
7. 유지 보수 32
8. 문제 해결 33
9. 기재 사항 34
10. 악세서리 35
11. 품질 보증 35
12. 품질 보증서 36
2. 안전에 관한 정보 23
- 경고와 주의
- 노트와 참조
- 설치 시
- 사용 시
- 유지보수 시
1. 소개 22
- 특징
- 사용목적
- 개요
21
Table of contents
Other GoodDrs Dental Equipment manuals