Goodmans GMSG User manual
GMSG OWNER’SMANUAL
SPLIT-SYSTEM ROOM AIR CONDITIONER
Please read the operating instructions and safety precautions carefully
and thoroughly before installing and operating your room air conditioner.
CONTENTS
SAFETY PRECAUTIONS 3
PARTS NAMES 5
OPERATING TEMPERATURE 6
MANUAL OPERATION 7
ADJUSTING AIRFLOW DIRECTION 8
HOW THE AIR CONDITIONER WORKS 10
MAINTENANCE 12
OPERATION TIPS 14
TROUBLESHOOTING TIPS 16

2
READ THIS MANUAL
Inside you will find many helpful hints on how to properly use and maintain your
air conditioner. Just a little preventative care on your part can save a great deal of
time and money over the life of your air conditioner. You’ll find many answers to
common problems in the chart of troubleshooting tips. If you review the chart of
Troubleshooting Tips first, you may not need to call for service.
! CAUTION
Contact an authorised service technician for repair or maintenance of this unit.
Contact the installer for installation of this unit.
The air conditioner is not intended for use by young children or invalids
without supervision.
Young children should be supervised to ensure that they do not play with the
air conditioner.
If the power cord is to be replaced, replacement work shall be performed by
authorised personnel only.
Installation work must be performed in accordance with the national wiring
standards by authorised personnel only.
•
•
•
•
•
•
Goodman Manufacturing Company, L.P., reserves the right to discontinue, or change at any time,
specifications or designs without notice or without incurring obligations.
Copyright © 2007 • Goodman Manufacturing Company, L.P. • Houston, Texas
Printed in the USA.

3
To prevent injury and property damage, the following instructions must be
followed. Incorrect operation due to ignoring of instructions may cause harm or
damage. The seriousness is classified by the following indications.
SAFETY PRECAUTIONS

4
SAFETY PRECAUTIONS
5
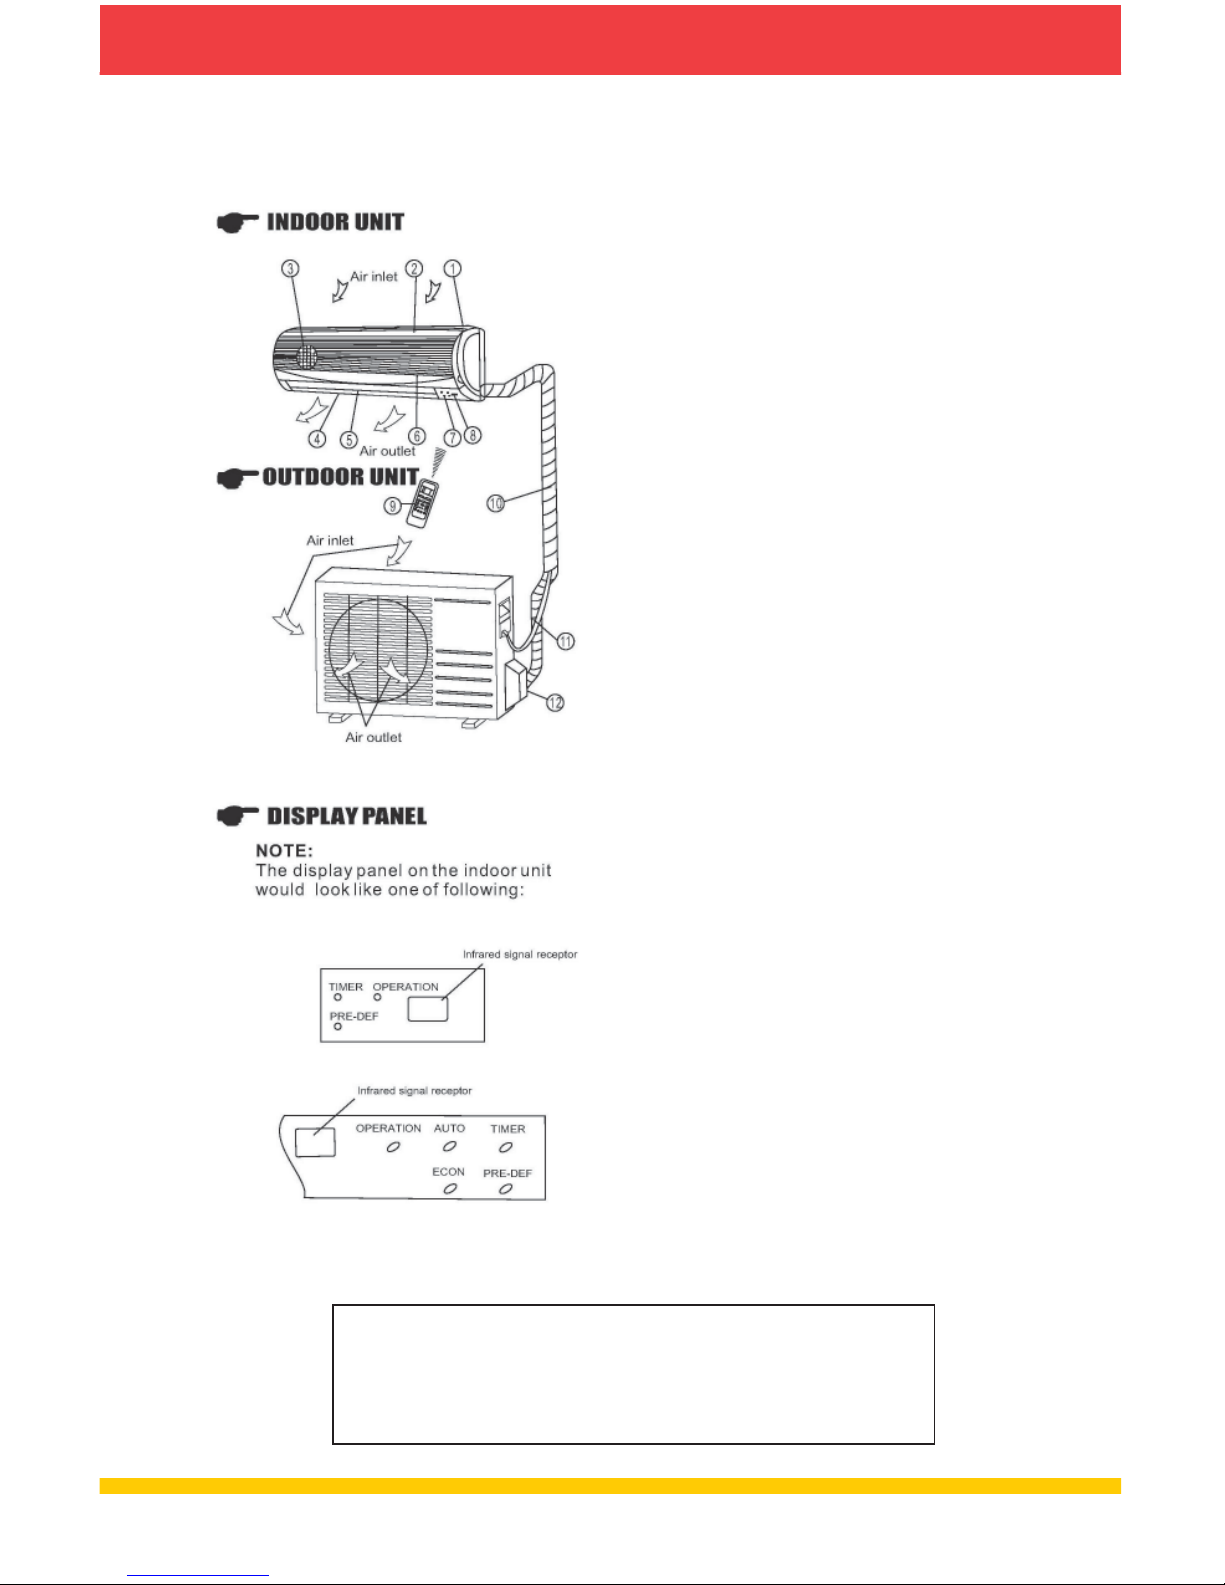
PARTS NAMES
INDOOR UNIT
Front panel frame
Front panel
Air filter
Horizontal airflow grille
Vertical airflow louver
Room temperature sensor
Display panel
Infrared signal receiver
Remote controller
Drain hose, refrigerant connecting pipe
Connective cable
Stop valve
DISPLAY PANEL
OPERATION INDICATOR flashes once every
second after power is on and illumi-
nates when the air conditioner is in
operation.
TIMER INDICATOR illuminates when TIMER is
set ON.
PRE-DEF. INDICATOR (FOR COOLING/HEATING MODEL
ONLY) illuminates when the air condi-
tioner starts defrosting automatically
or when the Anti-cold air function is
activated in heating operation.
AUTO INDICATOR flashes when the unit is in
AUTO operation.
ECON INDICATOR illuminates while the air
conditioner is in economic operation.
1.
2.
3.
4.
5.
6.
7.
8.
9.
10.
11.
12.
NOTE
All the pictures in this manual are for explanation purpose
only. They may be slightly different from the air conditioner
you purchased. The actual shape shall prevail.
6
Mode
Temp. Cooling
Operation Heating
Operation Drying
Operation
Room
Temperature 17C ~ 32C 0C ~ 30C 17C ~ 32C
Outdoor
Temperature
18C ~ 43C
-7C ~ 24C
11C ~ 43C
(-5C 43C: for models
with low temperature
cooling system) (21C ~ 52C: for
special tropical
models)
21C ~ 52C (for special
tropical models)
! CAUTION
If air conditioner is used outside of the above conditions, certain safety protection
features may be activated and cause the unit to function abnormally.
Room relative humidity less than 80%. If the air conditioner operates in excess
of this figure, the surface of the air conditioner may attract condensation.
Please set the vertical airflow louver to its maximum angle (vertically to the
floor), and set HIGH fan mode.
Optimum performance will be achieved within these operating
temperatures.
1.
2.
3.
OPERATING TEMPERATURE

7
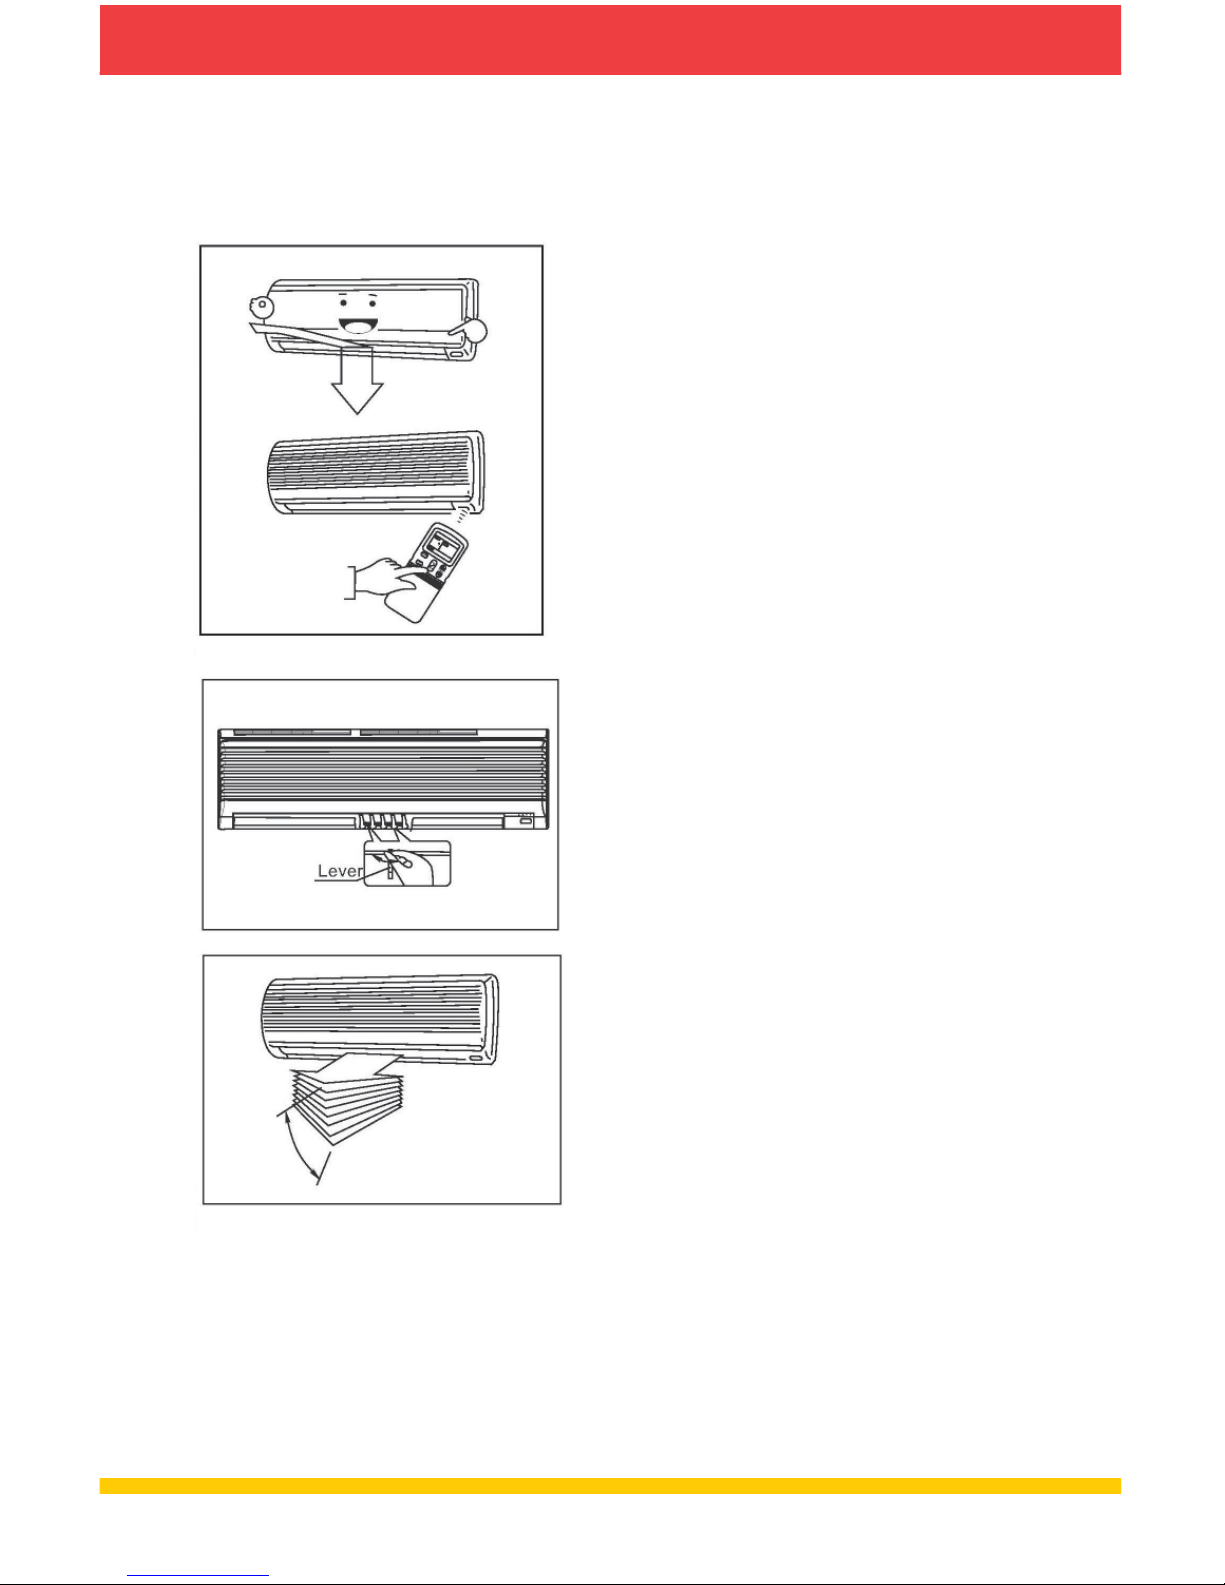
MANUAL OPERATION
Manual operation can be used temporarily in case you cannot find the remote
control or its batteries are exhausted.
Open and lift the front panel up
until it remains fixed with a clicking
sound.
Push the button until the AUTO
indicator is lit; the unit will work
in forced AUTO mode (the default
setting temperature is 24C).
Close the panel firmly to its original
position.
! CAUTION
Once you push the manual button,
the operation mode is shifted in
order as: AUTO, COOL, OFF.
Push the manual button until
the OPERATION indicator flashes
rapidly (five times per second); the
unit now is operating in forced
COOL mode. This is used for testing
purposes only.
When the OPERATION indicator
goes off, the air conditioner is OFF.
To restore the remote control
operation, use the remote control
directly.
1.
2.
3.
•
•
•
•
Open and lift the front panel up until it remains fixed with a clicking sound.
Push the AUTO button and the air conditioner will run in AUTO mode.
Close the panel firmly to its original position.
NOTE
The “COOL” mode on the control board is only provided for testing purposes.
1.
2.
3.
8
ADJUSTING AIRFLOW DIRECTION
Adjust the airflow direction prop-
erly; otherwise, it might cause
discomfort or cause uneven room
temperatures.
Adjust the horizontal louver using
the remote control.
Adjust the vertical louver manually.
Adjusting Vertical Airflow Direction (up-
down)
The air conditioner automatically
adjusts the vertical airflow direction in
accordance with the operating mode.
Setting Vertical Airflow Direction
Perform this function while the unit
is in operation. Keep pressing the
AIR DIRECTION button on the remote
control to move the louver to the desired
direction.
Adjust the vertical airflow direction
to the desired direction.
In subsequent operations, press the
AIR DIRECTION button to automati-
cally set the vertical airflow.
Setting Horizontal Airflow Direction (left-
right)
Adjust the vertical louver manually
using the lever on the left or right side
of the vertical louver arm (depending on
model). Take care not to catch fingers on
the fan, horizontal louver, or to damage
vertical louvers. When the air conditioner
is in operation and the horizontal louver
is in a specific position, move the lever
at left (or right, depending on model)
end of the air outlet to the desired
position.
•
•
•
•
•

9
Automatic Swing Airflow Direction (up-down)
Perform this function while the air
conditioner is in operation.
Press the SWING button on the remote
control.
To stop the function, press the SWING
button again.
Press AIR DIRECTION button to lock
louver in desired position.
•
•
•
•
! CAUTION
The AIR DIRECTION and SWING buttons will be disabled when the air condi-
tioner is not in operation (including when the TIMER ON is set).
Do not operate the air conditioner for long periods with the airflow direction
set downward in cooling or dry mode. Otherwise, condensation may occur on
the surface of the horizontal louver causing moisture to drop on to the floor
or on furnishings.
Do not move the horizontal louver manually. Always use the AIR DIRECTION
or SWING button. If you move this louver manually, it may malfunction dur-
ing operation. If the louver malfunctions, stop the air conditioner once and
restart it.
When the air conditioner is started immediately after it was stopped, the
horizontal louver might not move for approximately 10 seconds.
Open angle of the horizontal louver should not be set too small, as COOLING
or HEATING performance may be impaired due to too restricted airflow area.
Do not operate unit with horizontal louver in closed position.
When the air conditioner is connected to power (initial power), the horizontal
louver may generate a sound for 10 seconds; this is a normal operation.
•
•
•
•
•
•
•
ADJUSTING AIRFLOW DIRECTION (CONT.)
10
HOW THE AIR CONDITIONER WORKS
AUTOMATIC OPERATION
When you set the air conditioner in
AUTO mode, it will automatically
select cooling, heating (cooling/
heating models only), or fan-only
operation depending on what tem-
perature you have selected and the
room temperature.
The air conditioner will control
room temperature automatically
around the temperature point set
by you.
If the AUTO mode is uncomfortable,
you can select desired conditions
manually.
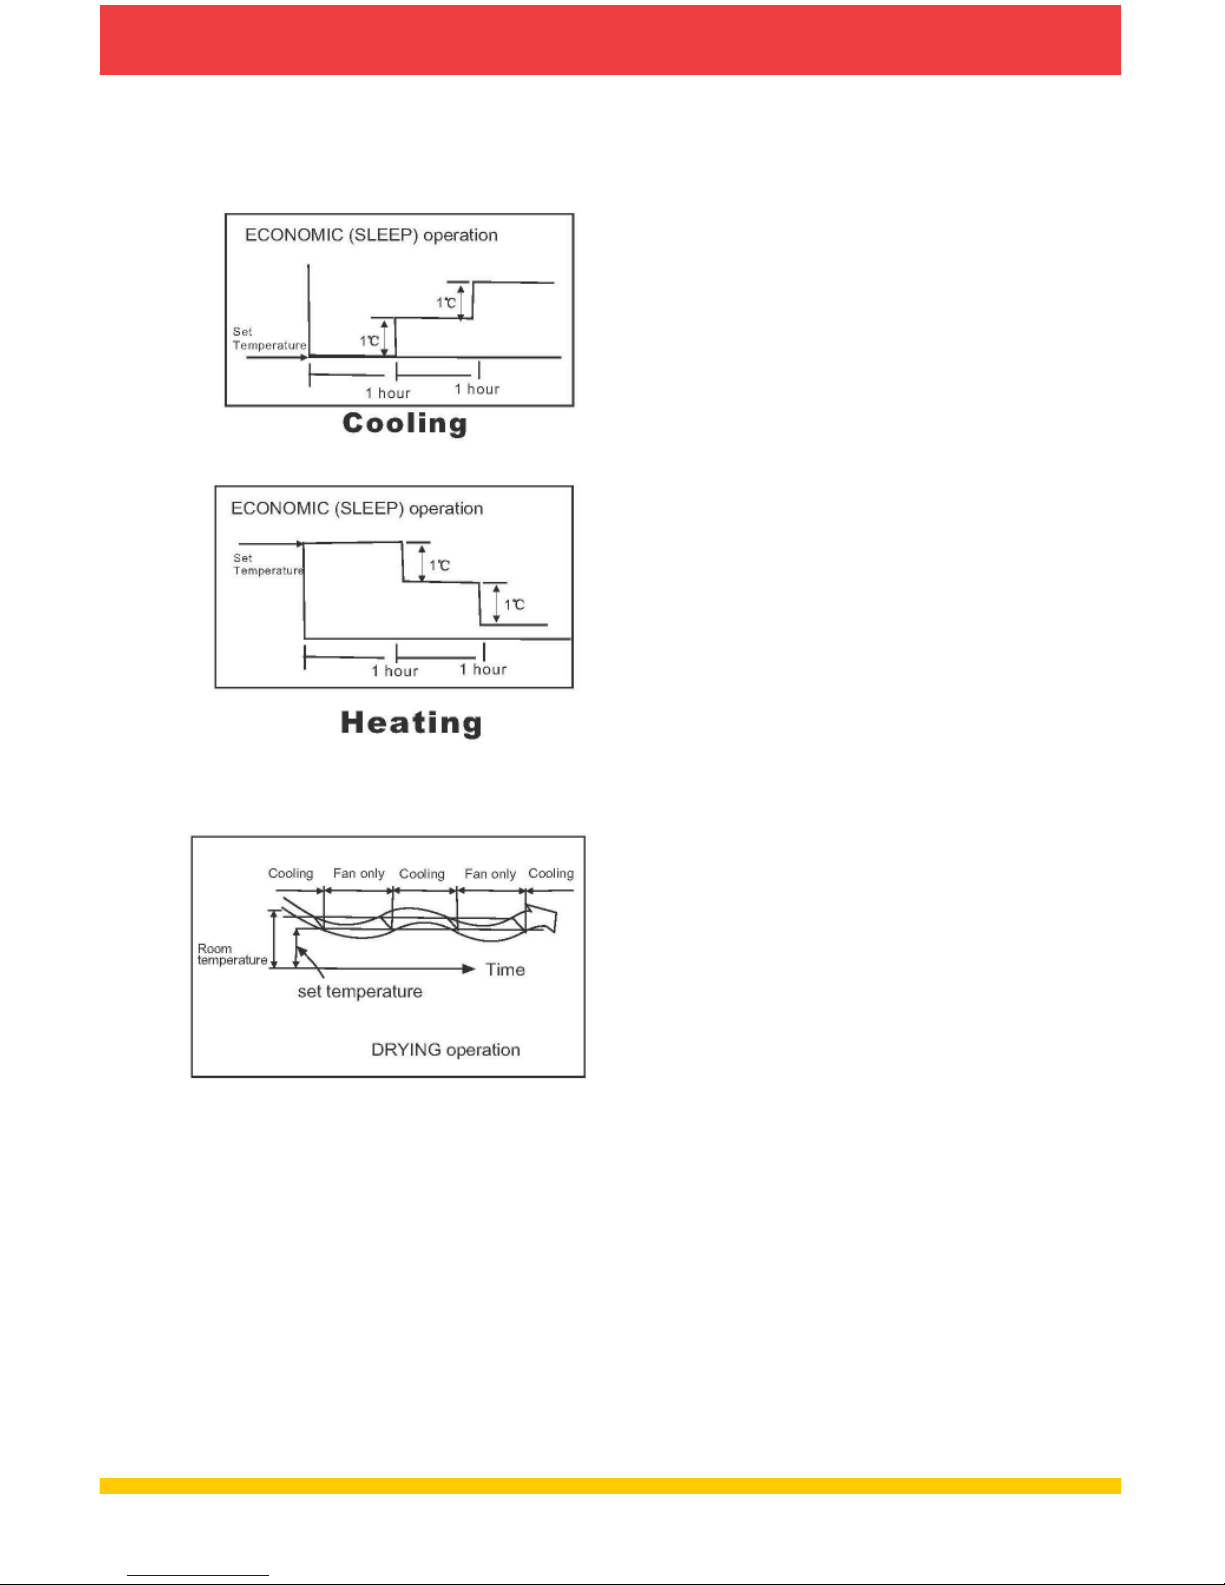
ECONOMIC (SLEEP) OPERATION
When you push the ECONO (SLEEP)
button on the remote control
during cooling, heating, or AUTO
operation, the air conditioner will
automatically increase (cooling) or
decrease (heating) one (1) per hour.
The set temperature will be steady
two (2) hours later. The fan speed
will be automatically controlled.
This feature can maintain the most
comfortable temperature and save
more energy for you.
•
•
•
•
DRYING OPERATION
The dry mode will automatically select the DRY operation based on the dif-
ference between the set temperature and the actual room temperature.
The temperature is regulated while dehumidifying by repeatedly turning on
and off the cooling operation or fan only. The fan speed indicator will display
AUTO and low speed will be used.
•
•
This manual suits for next models
1
Table of contents
Other Goodmans Air Conditioner manuals


Popular Air Conditioner manuals by other brands


Fujitsu
Fujitsu Inverter ASBA30JFC operating manual

Toshiba
Toshiba RAS-M10SMUV-E installation manual

Daikin
Daikin FXLQ20MAVE Operation manual

Hitachi
Hitachi RAS-E24CAK instruction manual

CIAT
CIAT Magister 2 Series Installation, Operation, Commissioning, Maintenance

Bestron
Bestron AAC6000 instruction manual


