Goodmans G-SHOT 3027 User manual

Table of contents
Introduction
Features . . . . . . . . . . . . . . . . . . . . . . . . . . . . . . . . . . . . . . . . . . . .1
Package contents . . . . . . . . . . . . . . . . . . . . . . . . . . . . . . . . . . . . .2
Camera overview . . . . . . . . . . . . . . . . . . . . . . . . . . . . . . . . . . . . .2
Getting Started
Attaching the hand strap. . . . . . . . . . . . . . . . . . . . . . . . . . . . . . . .5
Inserting the batteries . . . . . . . . . . . . . . . . . . . . . . . . . . . . . . . . . .5
Turning the camera on and off . . . . . . . . . . . . . . . . . . . . . . . . . . .6
Inserting and removing an SD card . . . . . . . . . . . . . . . . . . . . . . .6
Using the LCD display . . . . . . . . . . . . . . . . . . . . . . . . . . . . . . . .7
Changing LCD settings . . . . . . . . . . . . . . . . . . . . . . . . . . . . . .7
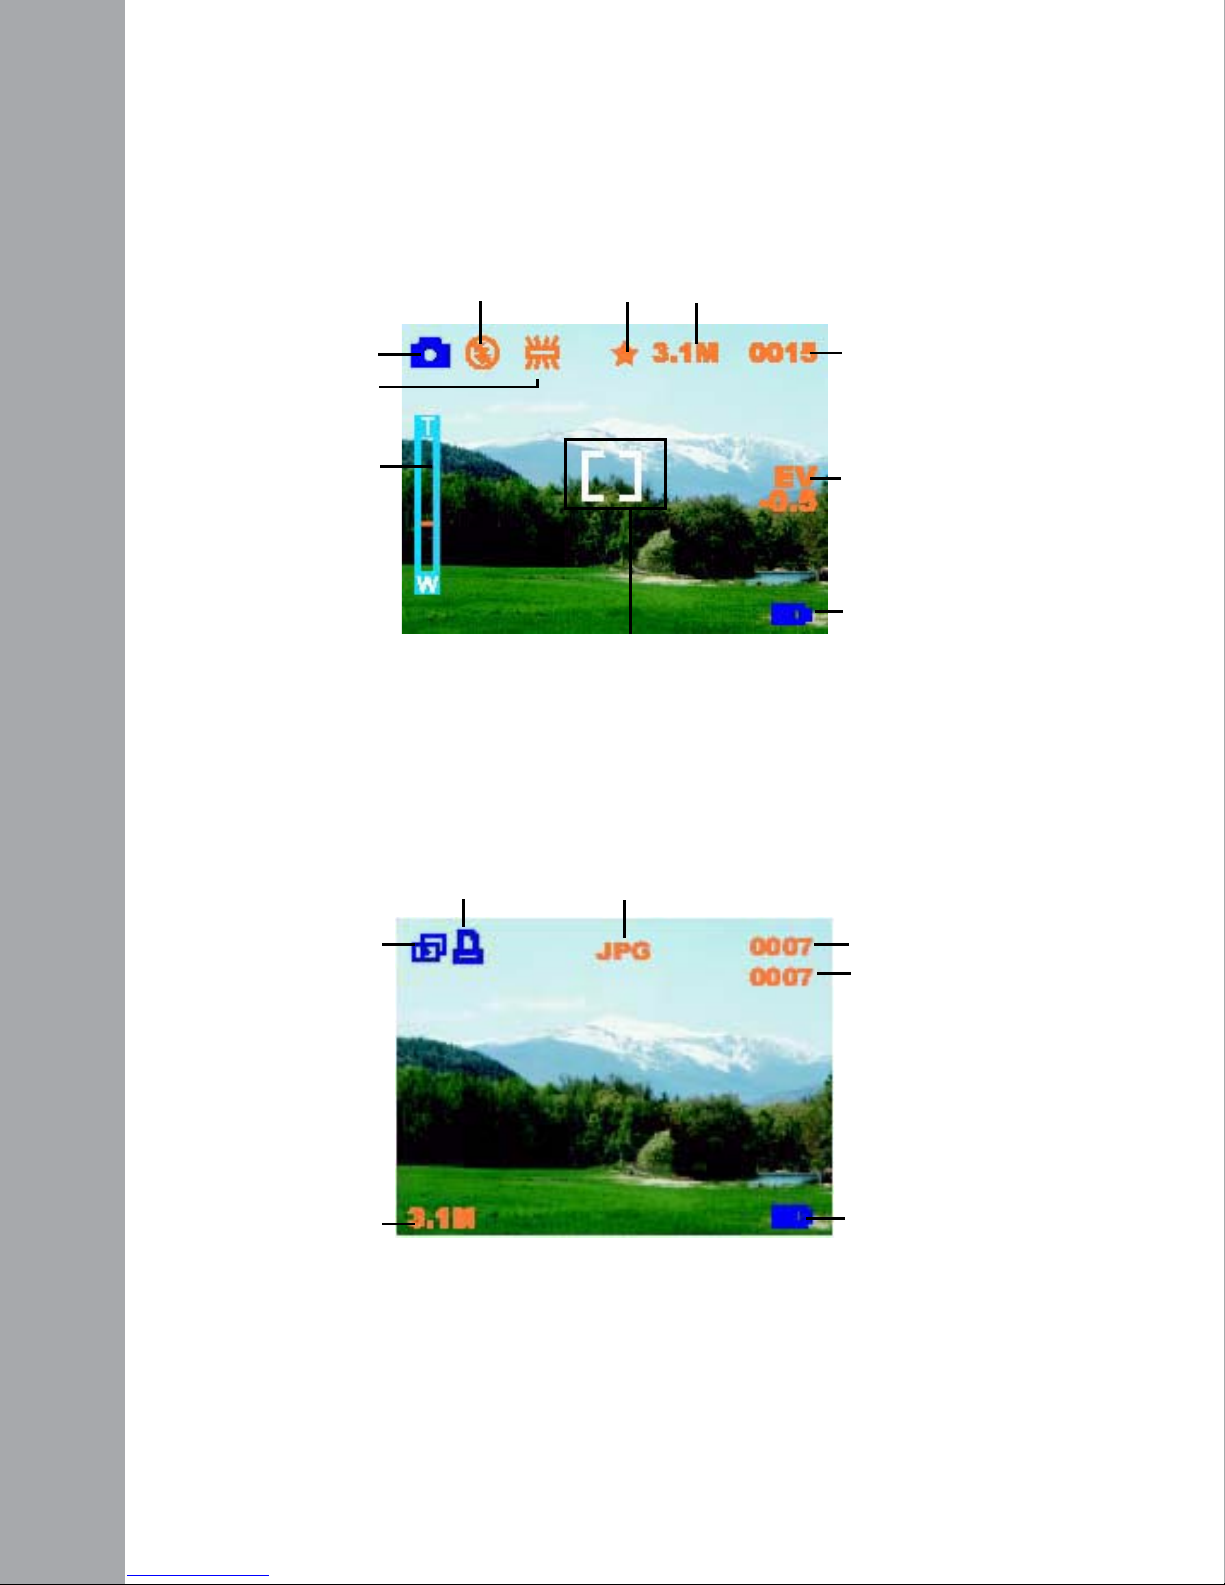
Understanding the LCD icons . . . . . . . . . . . . . . . . . . . . . . . . .8
Taking still images or videos
Selecting the camera mode . . . . . . . . . . . . . . . . . . . . . . . . . . . .11
Taking pictures . . . . . . . . . . . . . . . . . . . . . . . . . . . . . . . . . . . . .11
Adjusting the camera settings using the camera buttons . . . . . .12
Using the digital zoom . . . . . . . . . . . . . . . . . . . . . . . . . . . . .12
Using the flash . . . . . . . . . . . . . . . . . . . . . . . . . . . . . . . . . . .12
Using the self-timer . . . . . . . . . . . . . . . . . . . . . . . . . . . . . . . .13
Taking sequences . . . . . . . . . . . . . . . . . . . . . . . . . . . . . . . . .13
Changing the focus setting . . . . . . . . . . . . . . . . . . . . . . . . . .14
Recording videos . . . . . . . . . . . . . . . . . . . . . . . . . . . . . . . . . . . .14
Adjusting the camera settings using the menus . . . . . . . . . . . . .15
Using the scene settings . . . . . . . . . . . . . . . . . . . . . . . . . . . .15
Setting the resolution . . . . . . . . . . . . . . . . . . . . . . . . . . . . . .16
Setting the white balance . . . . . . . . . . . . . . . . . . . . . . . . . . .16
Setting the quality . . . . . . . . . . . . . . . . . . . . . . . . . . . . . . . . .18
Setting the EV adjust . . . . . . . . . . . . . . . . . . . . . . . . . . . . . .19
Setting the ISO . . . . . . . . . . . . . . . . . . . . . . . . . . . . . . . . . . .20
Setting the USB options . . . . . . . . . . . . . . . . . . . . . . . . . . . .20
Setting the frequency . . . . . . . . . . . . . . . . . . . . . . . . . . . . . .21
Setting the language . . . . . . . . . . . . . . . . . . . . . . . . . . . . . . .22
Restoring defaults . . . . . . . . . . . . . . . . . . . . . . . . . . . . . . . . .23
Formatting the memory . . . . . . . . . . . . . . . . . . . . . . . . . . . . .23

User Manual
ii
Reviewing photos or movie clips
Deleting files . . . . . . . . . . . . . . . . . . . . . . . . . . . . . . . . . . . . . . .26
Protecting files . . . . . . . . . . . . . . . . . . . . . . . . . . . . . . . . . . . . . .27
Editing images . . . . . . . . . . . . . . . . . . . . . . . . . . . . . . . . . . . . . .28
Resizing images . . . . . . . . . . . . . . . . . . . . . . . . . . . . . . . . . .28
Rotating images . . . . . . . . . . . . . . . . . . . . . . . . . . . . . . . . . .28
Using the slideshow function . . . . . . . . . . . . . . . . . . . . . . . . . . .29
Setting the starting point . . . . . . . . . . . . . . . . . . . . . . . . . . . .29
Setting the slideshow interval . . . . . . . . . . . . . . . . . . . . . . . .30
Setting the direction . . . . . . . . . . . . . . . . . . . . . . . . . . . . . . .30
Repeating the slideshow . . . . . . . . . . . . . . . . . . . . . . . . . . . .31
Starting the slideshow . . . . . . . . . . . . . . . . . . . . . . . . . . . . . .31
Ordering prints . . . . . . . . . . . . . . . . . . . . . . . . . . . . . . . . . . . . . .32
Using DPOF . . . . . . . . . . . . . . . . . . . . . . . . . . . . . . . . . . . . .32
Connecting to a PC
Installing the software . . . . . . . . . . . . . . . . . . . . . . . . . . . . . .33
Changing the USB setting . . . . . . . . . . . . . . . . . . . . . . . . . . .34
Connecting the USB cable . . . . . . . . . . . . . . . . . . . . . . . . . .34
Appendix
Specifications . . . . . . . . . . . . . . . . . . . . . . . . . . . . . . . . . . . . . . .35
Error Messages . . . . . . . . . . . . . . . . . . . . . . . . . . . . . . . . . . . . .36

Chapter 1 Introduction
Congratulations on purchasing the digital camera. Your digital
camera is compact and ergonomic and capable of taking pictures
at resolutions as 3.1 megapixels The digital camera can also record
movies and has an 4x digital zoom.
Features
Compact, stylish design
Digital zoom 4×
3.1 megapixel CMOS (2074 × 1540 pixels)
IMPORTANT: For Best results always use Duracell M3 AAA batteries.
Video capture resolution of 640 x 480 or 320 x 240
Convenient 1.5-inch LCD
Supports SD card media
Built-in 16 MB memory
Self-timer mode
Continuous shooting mode
USB 2.0 port full speed

3
M
O
P
T
I
C
A
L
L
E
N
S
t
=
8
.
6
m
m
1
:
3
0
Lens
Flash
LED
Sliding cover
Package contents
User Manual
2
Package contents
Make sure that your package contains the following components. If
anything is missing or damaged, contact your dealer immediately.
Retain the packaging in case you need to ship the digital camera in
the future.
• Digital camera
•Handstrap
• Quick start guide
• User manual (on CD)
•AAAbatteries × 2
• USB cable
• CD-ROM including drivers and software
Camera overview
Familiarize yourself with the controls of the digital camera with the
illustrations below.
Front view

LED
LCD
Menu button
Zoom
buttons
5-way
button
LCD button
Mode button Flash button
Focus button
Right Left
USB
port
Hand strap
eyelet
Chapter 1 Introduction
3
Camera overview
Rear View
Side Views

Shutter
button
Power
button
Tripod
mount
Battery com-
partment
SD card
compartment
Camera overview
User Manual
4
Top View
Bottom View

Chapter 2 Getting Started
Attaching the hand strap.
1. Thread the short loop of the hand strap
through the hand strap eyelet on the
camera
2. Thread the long loop of the hand strap
through the short loop.
3. Pull the long loop tight.
Inserting the batteries
1. Slide the battery/cover on the
underside of the camera in
the direction of the arrow.
2. Open the cover.
3. Insert the batteries into the
compartment observing correct
polarity.
4. Close the cover and snap it into place
in the direction of the arrow.

Power button
Turning the camera on and off
User Manual
6
Turning the camera on and off
Press and hold the Power button on top of the camera for 2 seconds
Press the Power button again to turn the camera off.
Inserting and removing an SD card
1. Insert the SD card into the slot,
with the label facing the same
direction as the front of the
camera until it clicks into place.
Note: SD cards can only be inserted facing
one direction. If the card does not enter
the slot easily, do not force it. Make
sure the card is facing the correct
direction.
1. To remove the SD card, push it in
until it clicks.
2. Pull the SD out.
to turn camera on.

LCD button
Chapter 2 Getting Started
7
Using the LCD display
The LCD functions as a view finder, allowing you to frame pictures
and video in Picture or Video mode, and view pictures and videos in
Playback mode. The LCD allows you to adjust the camera’s settings
through the on-screen menus.
The LCD displays icons to indicate camera settings.
Changing LCD settings
The LCD starts in normal setting. In Picture or Video mode:
• Press the LCD button once to turn on the framing
grid.
• Press the LCD button again to turn off the icons.
• Press the LCD button again to turn off the LCD.
• Press the LCD button again turn the LCD on and
display the icons.
In Playback mode:
• Press the LCD button again to turn off the LCD.
• Press the LCD button again to turn the LCD on.

Remaining number
of pictures you can
take on the current
memory
EV adjust settings
Battery status icon
ResolutionImage quality
Flash icon
Picture mode icon
White balance
setting
Zoom
Focus bracket
Current file
number
Battery status icon
Resolution
Playback mode
icon
File type
DPOF icon
Total file number
Using the LCD display
User Manual
8
Understanding the LCD icons
Each mode has different icons to indicate settings.
Picture mode
Playback mode

Video mode icon
Zoom
Video resolution
Video length
EV adjust setting
Battery status icon
White balance setting
Chapter 2 Getting Started
9
Using the LCD display
Video mode


Chapter 3 Taking still images or videos
Selecting the camera mode
The digital camera has two capture modes: Picture and Video. Use
Picture mode to capture still images. Use Video mode to capture
video.
Use the third mode, Playback mode, to view pictures and videos.
Use the Mode switch to change modes.
• Move the switch to the left to select Picture mode.
• Move the switch to the center to select Playback
mode.
• Move the switch to the right to select Video mode.
Taking pictures
1. Turn the camera on.
Make sure the camera is
in Picture mode.
2. Frame the picture using
the LCD.
3. Press the Shutter
button.
Mode switch

Icon Description
Flash is fired automatically if required.
Flash is enabled.
Flash is disabled.
Adjusting the camera settings using the camera buttons
User Manual
12
Adjusting the camera settings using the camera buttons
You can use adjust the camera settings to take better pictures.
Using the digital zoom
The camera has an 4× digital zoom, allowing you to take enlarge
the subject without moving closer.
1. Turn the camera on. Make sure the camera is in Picture or
Video mode.
2. Frame the picture using the LCD.
3. Press the Zoom in button to
increase the zoom and take a
close up picture of the subject
with more detail. Press the
Zoom out button to decrease
the zoom and take a wider pic-
ture with less detail.
4. Press the Shutter button to
take the picture.
Using the flash
The flash has three settings for different lighting conditions. Press
the flash button repeatedly to cycle through the different flash
settings.

Chapter 3 Taking still images or videos
13
Adjusting the camera settings using the camera buttons
Using the self-timer
The self-timer allows you to take hands-free pictures and videos
such as self portraits or group photos.
1. Turn the camera on. Make sure the camera is in Picture
mode.
2. Set the camera on a stable surface such as a tripod or table
and frame the picture.
3. Frame the picture, making any zoom or flash settings nec-
essary
4. The self-timer has two delay set-
tings.
Press the Right arrow once turn
on the self-timer with a two sec-
ond delay. The icon appears.
Press the Right arrow again to
set the delay to 10 seconds. The
icon appears.
5. Press the Shutter button. The
counter begins counting down
on the LCD. The LED on the front of the camera flashes
once a second to count down.
Note: To cancel the self timer, press the Right button until no icon is
displayed.
Taking sequences
You can take sequences of pictures very quickly one after the other
using the sequence setting. You can use this to make an action
series.
1. Turn the camera on. Make sure the camera is in Picture
mode.
2. Press the Right arrow three
times to turn on the Sequence
setting. The icon appears.
3. Frame the picture using the
LCD.
4. Press the Shutter button.

Icon Description
Adjusts the focus setting for
subjects very close to the lens.
Adjusts the focus setting for
subjects close to the lens.
Adjusts the focus setting for
subjects distant from the lens.
Recording videos
User Manual
14
Changing the focus setting
You can change the focus setting of the digital camera for different
conditions. Change the setting using the Focus switch.
Recording videos
1. Turn the camera on. Make sure
the camera is in Video mode.
2. Frame the picture using the
LCD.
3. Press the Shutter button. The
video begins to record.
4. Press the Shutter button when
you have finished to stop
recording.

Chapter 3 Taking still images or videos
15
Adjusting the camera settings using the menus
You can adjust settings using the on-screen menu. This enables you
to configure the camera settings and capture pictures with
optimum quality.
Note: The LCD must be switched on to access the on-screen menu.
Using the scene settings
Use this menu item to specify a setting according to the light
environment in which you are taking pictures. To set the scene, do
the following:
1. Turn on the camera and switch to picture mode.
2. Press Menu.
3. Move the 5-way button left or right to
navigate to the Capture menu.
4. Move the 5-way button up or down to
highlight the Scene submenu.
5. Move the 5-way button right to open
the Scene menu
6. Move the 5-way button up or down to
select from the scene options:
–Auto
–Portrait
–Scenery
– Sepia
– Natural Green
– Black and white
– Setting Sun
–Flower
7. Press OK when finished.
– Old Day
– Pink
– Blue

Adjusting the camera settings using the menus
User Manual
16
Setting the resolution
Use this menu item to select the resolution of the image as follows:
1. Turn on the camera and switch to picture or video mode.
2. Press Menu.
3. Move the 5-way button left or right to
navigate to the Capture menu (Skip
this step for video mode).
4. Move the 5-way button up or down to
highlight the Resolution submenu.
5. Move the 5-way button right to open
the Resolution submenu
6. Move the 5-way button up or down to
select from the scene options:
Picture mode
- VGA
- 1.3M
- 3.1M
Video mode
- CIF
- VGA
7. Press OK when finished.
Setting the white balance
The white balance enables you to change the preset white balance
setting to suit the lighting conditions in which the picture is taken.
1. Turn on the camera and switch to picture mode.
2. Press Menu.
3. Move the 5-way button left or right to
navigate to the Capture menu.
4. Move the 5-way button up or down to
highlight the White balance
submenu.
5. Move the 5-way button right to open
the White balance submenu.

Chapter 3 Taking still images or videos
17
Adjusting the camera settings using the menus
6. Move the 5-way button up or down to
select from the options:
–Auto
– Daylight
–Cloudy
–Tungsten
– Fluorescent
7. Press OK when finished.

Adjusting the camera settings using the menus
User Manual
18
Setting the quality
Do the following to specify the picture quality:
1. Turn on the camera and switch to picture mode.
2. Press Menu.
3. Move the 5-way button left or right to
navigate to the Capture menu (Video
menu in Video mode).
4. Move the 5-way button up or down to
highlight the Image quality
submenu in the picture mode or Video Quality submenu
in the video mode.
5. Move the 5-way button up or down to
select from the quality options:
• Picture mode
– Basic 1:16
– Better 1:12
– Best 1:8
6. Press OK when finished.
Table of contents
Other Goodmans Digital Camera manuals