Goodmans G-SHOT2027TFT User manual

Digital Still Camera “DSC-2000” Size : 105mm x145mm
GB-1
1. INTRODUCTION
Overview
Your new digital camera delivers high quality, 1600 x 1200 resolution
images (after interpolation) using a 2 Megapixel CMOS image sensor.
Using either the optical viewfinder or the 1.5“ TFT color monitor, you
can compose images and then examine them in detail. An auto-flash
sensor automatically detects the shooting (lighting) conditions and
determines whether the flash should be used. This feature helps
ensure that your images turn out right.
16MB internal (built-in) memory lets you capture and store images
without the need for an additional memory card. However, you may
wish to extend the memory capacity (up to 512MB capacity) by
using an external memory card.
In addition to still images, you can record short movie clips by using
the movie function.
Images you have taken can be downloaded to your computer using
the USB cable (USB driver required for Win98SE/ME and Mac OS 9
o r above). You can enhan ce a nd retou ch your images on your
computer by using the provided editing software, or image editing
software you may already own. You may share your images with
your friends via e-mail, in a report or on a website.
nBuilt- in 16 MB f la sh m emor y, wh ich ca n sto re up to minimum 104 pictu re s
(Smallsize -800 x600 pixels @Fine mode)orminimum39 seconds for
movie clips
n24 bit true color
nMa ximum o u tpu t pict ure r eso lut io n is 16 00 x 12 0 0 (S XG A)
nFocus Range is 20 cm to infinity (Fixed focus)
nElectronic shutter (1/15 - 1/2000 sec.)
nErase images : All pictures or selected one picture can be erased.
nAuto power off to extend battery life
nUSB cable can be interfaced to PC for data transfer.
nBatteries: AA size Alkaline cells x 2 pcs. (included)

Digital Still Camera “DSC-2000” Size : 105mm x145mm
GB-2
2. CONTENTS
1. Introduction
2 Contents
3. Notice
We lcome
A bo ut B at tery
Trademark Information
Read This First
4. Unpack your Digital Camera
5. Controls
6. Preparations
Installing the Batteries
Checking Batteries
In stalling th e S D Me mory Card
Attching the Strap
7. Operations
Record
Taking Ph oto s
Opt ion al Men u Fea tur e Se ttin gs
Imag e Size
Quality
White Balance
Exposure
Date Stamp
Using the Macro Mode
Using th e Fla sh Ligh t
Di g it al Zo om
Using the Self-Timer
Takin g Movie s
Playback
V iewing I ma ge s on B uilt-in Mon itor
V iewing Imag es on TV Scre en
Viewing Video Clips

Digital Still Camera “DSC-2000” Size : 105mm x145mm
GB-3
Playback
Zooming Images
Displaying ThumbnailImages
Erasing One File
Erasing All Files
Pr ot ectin g O ne Imag e / Vid eo Clip
Print Order
(DPOF - Digital Print Order Format)
SET Menu Settings
Set ting S ET-UP Me nu mo de
Sett ing AUTO POWER O FF
Setting 50Hz/60Hz Frequency
Memory Format
Beep
Setting the Date and Time
Choosing the Language
Rese t tin g t o Def a ult
8. Software Installation
Driver Software Installation
SystemRequirement
I nsta llat io n CD Con ten ts
I nsta lling t he Camera Drive r S oft ware
I nsta lling th e PC Ca mera Drive r S oft ware
9. Transferring Your Images
Transferring Pictures/Movies to the Computer
Connecting the Camera to Your Computer
Downloading Pictures/Movies
10. Operating PC Camera
Setting theCamera to PC Camera mode
Connecting the Camera to Your Computer
Starting the PC Camera Software
11. Specification Table
2. CONTENTS

Digital Still Camera “DSC-2000” Size : 105mm x145mm
GB-4
3. NOTICE
Welcome
Thank you for choosing the G-SHOT2027TFT Digital Camera. Please read the
following precautions carefully before using the product.
•This camera is not water-resist ant and should not be used outdoors in
snow or rain. If accident ally dropped in w ater, please quickly pour out the
water. Dry it with sunlight or an air-blower.
•Protect the camera from excessive humidity. It will fog the lens and images
will beblurred.
•Do not expose the camera to sand or dust
•Do not attempt to disassemble the camera yourself. Always send it to an
authorized service facility for repair.
•To store the camera, wrap it in a clean, soft cloth and place it in a cool,
dry, dust -free place. Do not place the camera directly under the sun or in
extreme heat.
•Take care of the lens. Use a soft, damp cloth to clean it.
•Do not scratch the Lens, Stat us LC D Panel, LCD Monitor or Viewfinder.
•If the Status LCD Panel or LCD Monitor is damaged, do not touch it.
•Condensation is a problem when bringing cold equipment into a warm
room. Place the camera in a plastic bag so condensation forms on the
outside of the bag.
A bout Batteries
•Battery life is shorter for poor quality alkaline batteries. If you frequently
use the LCD monitor and flash, you should use good quality batteries (e.g.
Energizer alkaline batteries). High power NiMH rechargeable batteries
(1300mAH or higher) are recommended.
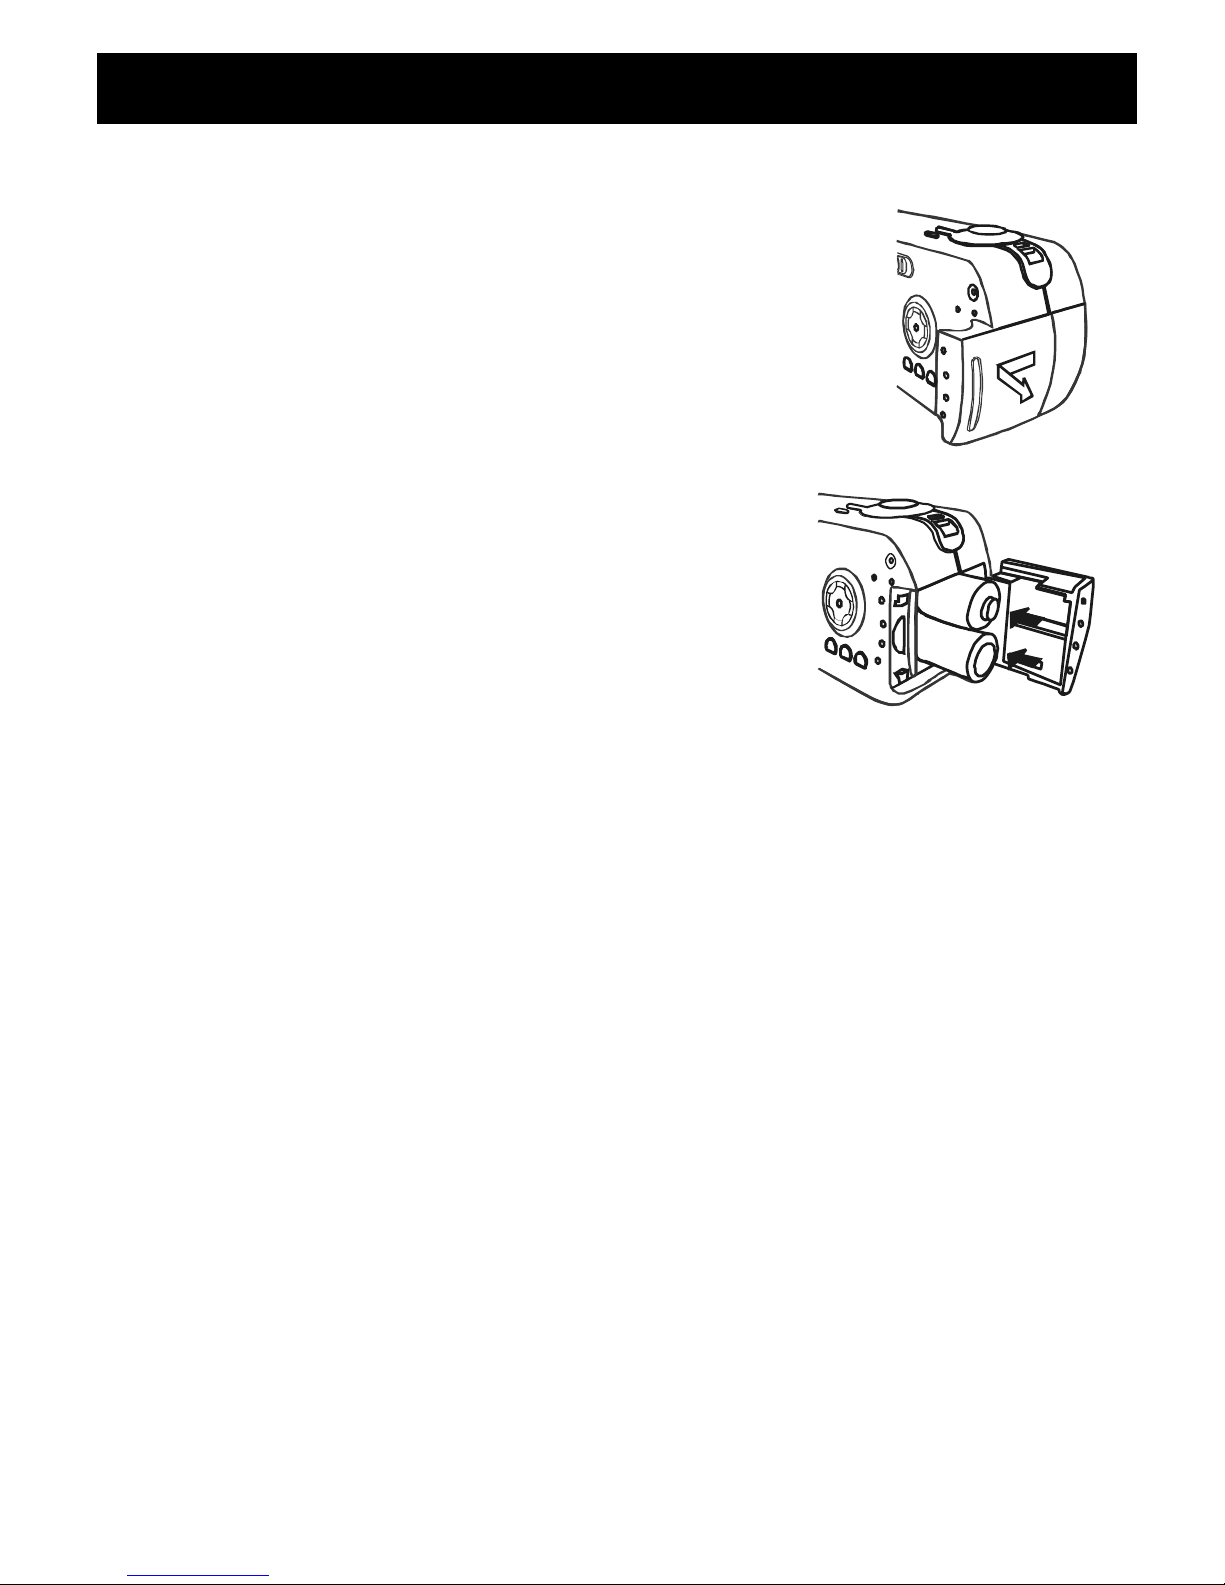
•If the camera fails to start after inserting new batteries (nothing appears
on the Status LCD panel), the batteries may be inserted in wrong orientation.
•The batteries may explode or cause burns if disassembled, recharged,
shorted, exposed to high temperature, or disposed of in a fire.
•Alkaline or NiMH batteries can be used with this camera. The camera may
not function properly if you use poor quality batteries.
•Make sure all batteries are fresh, or fully charged.
•Ensure that the battery orientation is correct when placing them in the
camera.
•Batteries may feel warm after being used for some time.
•Remove the batteries if you will not use the camera for one mont h or
longer.

Digital Still Camera “DSC-2000” Size : 105mm x145mm
GB-5
Trademark Information
nMicrosoft® and Windows® are U.S. registered trademarks of Microsoft
Cor po ratio n.
nPentium® is a registered trademark of Intel Corporation.
nMa cint osh is a trad emark of A pp le Compu te r, In c.
nSDTM is a tr ad ema rk.
nOth er name s a nd prod uct s may b e trad emarks or regist ered t ra de marks
of their respective owners.
Read This First
P lea se st art b y rea ding th e impo rtan t me ssag es b elo w firs t.
1. The bundled driver, software, specifications and user’s manual that
were packaged with the camera are subject to change without notice.
2. We are not liable whatsoever for any compensation arising from errors
in descriptions in this user’s manual.
3. NOTICE

Digital Still Camera “DSC-2000” Size : 105mm x145mm
GB-6
4. UNPACK YOUR DIGITAL CAMERA
Please confirm that the following items are packed in the Digital Camera
box. They are provided to help you use or set up your Digital Camera.
1pc. Digital Camera 1 pc. USB Cable
1pc. CD-Rom of Driver Software 1 pc. Video Cable
for Windows
2pc. AA size alkaline batteries
Microsoft, Windows 98SE/ME/2000/XP are registered trademarks of
Microsoft in the United States and other countries. All product / brand
names are trademarks or registered trademarks of the respective
holders.

Digital Still Camera “DSC-2000” Size : 105mm x145mm
GB-7
5. CONTROLS
3-3 Descriptions of components
Self-ti mer Indicat or
Built -in Flash
Shutter Butt on ON/ OFF B ut ton
View Finder
Lens
Normal /Macro
Selector
BatteryCompartmentCover
SD/ MMC Card Slot
Video Out
Lens
USB
Record / Play Selector
StatusIndicator
Moni tor
Menu Display
Set
Multi-functiona l
Cursor Contro l
U SB V ID EOOU T
IMAGE
SI ZE
MEN U SE T
DI S P.

Digital Still Camera “DSC-2000” Size : 105mm x145mm
GB-8
6. PREPARATIONS
Inserting the Batteries
1. Push the Battery Compartment on the right side of
t he un it wh en loo kin g at th e un it fro m ba ck.
2. Insert two AA batteries(included).
3. Close the Battery Compartment.
• Be sure to use only AA-size(LR6) Alkaline batteries.
Ne ver use ma nga ne se b att erie s.
• Make su re th at the po sitive a nd ne ga tive p ola rities ar e cor re ctly
facing.
• Re mo ve the ba tte rie s from t he un it whe n you d o n ot pla n t o u se it
for more than two weeks.
• Ne ver mix an o ld one with a ne w o ne.
• Ne ver mix bat ter ies o f d if feren t t ypes.
• De ad b att erie s are susce pt ib le to lea kag e, which ca n ca use se ri-
ou s da ma ge to yo ur camera. Re mo ve b att eries fr om th e ca me ra
as soo n a s you n otice t he y a re de ad .
• Do no t e xpo se b att eries t o d ire ct h eat or d ispo se o f th em b y b ur n-
in g.
Do in g so ca n ca use th e d ang er of e xplosio n.

Digital Still Camera “DSC-2000” Size : 105mm x145mm
GB-9
Checking Batt eries
Th e B at tery Sta tu s In dica tor is a ctive a t a ll t ime s in t he mo nit or while t he
monitor is on. The number of pictures that can be taken varies according to
t he pe rforman ce an d u sa ge con dit io ns of th e b at terie s. Po wer is co ns umed
by the following operations and these will reduce the number of images
that can be recorded.
nTaking photos with Flash light
nTa king ph oto s wit h mon itor on
nExtensive of the monitor in the Playback mode
B at tery L ife Ind icat or:
Full Battery Power
Lo w B att ery Powe r
No B att ery Po wer
Note:
I t is r e commen de d th at you d o n ot u se the Flas h o r Aut o-Flash f ea tur e s
while battery power is low.
To extend battery life, turning the Monitor Off is recommeded.
When you switch on the camera, the monitor automatically comes on and
shows live images or recorded photos.
S ince the mo nit or con sume s ba tte ry p owe r f ast, you m a y temp orarily tu rn
off the monitor and use optical viewfinder instead when taking pictures.
To turn the monitor off or back on, just press once again the DISPLAY
button.
6. PREPARATIONS
Me diu m B at ter y Po wer

Digital Still Camera “DSC-2000” Size : 105mm x145mm
GB-10
Inserting theSD(or MMC) Memory Card (not included)
Th e camera co me s with 1 6MB of inte rna l m emor y, a llo wing yo u t o store
images and video clips in the camera. However, you can expand the memory
capacity by using an optional SD(or MMC) memory card so that you can
st ore a dd ition al ima ge s an d vide o clips.
1 . Ma ke sure th e camera is O FF.
2. Slide the battery/SD card compartment cover in the direction of the
O PEN arrow.
3 . In sert the SD (or M MC) memor y car d (no t inclu ded ).
The front side of the memory card (printed
arrow) should face towards the front side of
t he camera .
If the card cannot be inserted, check the
orientation.
4. Close the battery/SD card compartment cover.
To remove the SD(or MMC) memory card, make
su re th e camera is OFF.
O pe n t he ba tte ry/S D c ar d c ove r a n d p ull o ut t he
SD memory card with fingers.
A ttach ing the St rap
1 . Insert the small loop at the end of the Strap
under the Strap Eyelet.
2 . Insert the other end of the Strap through
the loop to tie the Strap
onto the Strap Eyelet.
6. PREPARATIONS

Digital Still Camera “DSC-2000” Size : 105mm x145mm
GB-11
Please note tha t Movie mode will not record audio.
Taking Photos
1 . Turn on the unit by pressing and holding the ON/OFF button.
2 . Set the RECORD mode by sliding the RECORD /PLAY
selector to left.
3 . Press the MENU button to select optional Menu features, if
ne cessary.
(Refer to the next pages for details of Menu setting)
Note:
The unit is preset at FULL AUTO mode when manufactured.
4 . Compose the image by the optical viewfinder or Monitor, then
press the SHUTTER button.
In a few seconds the image will be recorded into the internal
memory or SD memory card. During processing image, the
STATUS LED indicator will flash. When LED indicator stops
flashing, it is ready for the next picture.
Note:
If there is no memory space in the internal memory or SD memory
card, “MEMORY FULL” appears on the Monitor.
Erase pictures or movies to make memory space or replace the
memory card with a new one.
5 . Turn off the unit by pressing ON/OFF button if you won’t use
for awhile.
7. OPERATIONS - Record

Digital Still Camera “DSC-2000” Size : 105mm x145mm
GB-12
7. OPERATIONS - Record
Optional Menu Feature Setting
IMAGESIZE - Press the MENU button. The cursor will point “IMAGE
SIZE”.
Press the cursor control to select image size as desired.
L(La rge) 16 00 x 12 00 M(Medium) 1280 x 960 S(Small ) 800 x 600
Press the SET button to exit or press cursor control to continue
Menu Setting.
QUALIT Y - Press the MENU button, then press repeatedly until
the cursor wi ll poi nt “QUALITY”.
Press the cursor control to select picture quality as desired.
Super Fine Fine Normal
Lowest compression Medium Compresstion Highest Compression
Note:
For quick change of resolution in Record mode, press the cursor
control repeatedly until the desired resolution letter, L(1600 x
1200 pixels), M(1280 x 960 pixels) or S(800 x 600 pixels) appears
on the screen.

Digital Still Camera “DSC-2000” Size : 105mm x145mm
GB-13
7. OPERATIONS - Record
WHITE BAL(White Balance) - Press the MENU button, then press
the cursor control repeatedly until the cursor w ill point “WHITE
BAL”.
Press the cursor control to select lighting condition as desired.
AWB :Auto White Balance
:Outdoor - Sunny day
:Outdoor - Cloudy day
:Tangsten Light Bulb
:Fluorescent
EXPOSURE - Press the MENU button, then press the cursor control
repeatedly until the cursor wi ll point “EXPOSURE”.
The exposure can be compensated manually to make the image brighter
or darker by setting the exposure compensation value. The range of the
exposure compensation is from –1.5 EV to +1.5 EV at 0.3 EV step.
P r ess th e cu rsor con trol or to adjust the desired exposure setting.

Digital Still Camera “DSC-2000” Size : 105mm x145mm
GB-14
DATE STAMP - If you set imp rin t fu nctio n, your imag e will be disp la yed
with date on it.
1. To enable this function, press the MENU
button, then press the cursor control
button repeatedly until the cursor wi ll
point “D AT E STAMP ”.
2 . Press the cursor control to set YY MM
D D, MM DD YY or DD MM YY.
Yo u can se lect th e da te typ e th at is imp rint ed
o n you r ima ge.
7. OPERATIONS - Record
Using the macro mode
Use the macro mode to shoot a close-up of the subject, such as flowers or
insects.
The effective range is between 0.2m and 0.3m.
1. Set the unit in RECORD mode.
2 . Select the MACRO (0.2m to 0.3m) mode by the MACRO /
NORMAL selector on the left side of the unit.
The icon appears on the monitor .
3. Compose the picture.
4. Press the SHUTTER button.
To disable macro photography, slide the MACRO / NORMAL selector
back to portrait mode or landscape mode.
Note:
•When shooting a close-up in macro mode, use the monitor to
compose your shot, avoiding the off-center parallax phenomenon.
•After a macro shot is taken DO NOT FORGET to reset t he lens to the
n ormal po sition .

Digital Still Camera “DSC-2000” Size : 105mm x145mm
GB-15
7. OPERATIONS - Record
Usin g th e F lash Li gh t
P r ess th e /repeatedly to set the desired flash light mode.
Th e f ollo win g ico ns ap pe ar o n t he scree n.
Flash Off mode (Use decides not to use flash)
This mode forcibly prevents automatic firing of the flash, thus
a llowin g ava ilab le ligh t ph ot og rap hy in muse um s, ch urch es , e tc.
wh er e fla sh ph ot og rap hy is p r oh ibite d.
Flash AUTO mode
The flash fires automatically according to the ambient conditions.
S ele ct th is mo de for g en eral p ho to grap hy.
Flas h ON mo de
The flash always fires regardless of the surrounding brightness.
Select this mode for taking photos in artificial light.
Dayligh t fla sh p ho tog rap hy is ef fec tive fo r b ac k-lit su bje cts, st ro ng
shadows, or on cloudy days. It lets you take more natural looking
pictures by softening harsh shadows.
Red Eye Reduction
The flash emits a pre-flash before the main flash flashes, which
ca us es the p u pil in th e hu m an e ye to clo se an d elimina tes r ed -eye
phenomenon. To prevent red eye, set this mode when taking photos
of portrait in low-light conditions.

Digital Still Camera “DSC-2000” Size : 105mm x145mm
GB-16
7. OPERATIONS - Record
Using the Self-Timer
The Self-Timer duration is 10 seconds. After the activation of the self-timer
by pressing the shutter button, the self-timer lamp starts blinking slowly for
7seconds and then blinking faster for the rest of 3 seconds. This allows
yo u t o ge t int o th e sce n e whe n ta king grou p imag e s.
1. Secure the camera to a tripod or place it on a stable surface.
2. Set the unit in RECORD mod e.
3. Press the SET( / / )button repeatedly until the icon appears
on the monitor.
4. Compose the picture.
5. Press the SHUTTER button.
The self-timer function is activated.
6. After ten seconds, the camera takes an image and reset to camera
mode automatically.
UsingDigitalZoom
Your digital camera provides 4 x Digital Zoom feature. You can zoom in or
o ut wh en tak in g a ph oto or re viewin g th e imag es in p layb ack mod e.
To use Digital Zoom, the monitor is required.
1. Press the DISPLAY button to turn on the monitor.
2. Press the ZOOM IN /(up to 4 times) or ZOOM OUT /
.

Digital Still Camera “DSC-2000” Size : 105mm x145mm
GB-17
7. OPERATIONS - Record
Please note tha t Movie mode will not record audio.
Ta king Movies
1 . Turn on the unit by pressing and holding the ON/OFF button.
2. Set the RECORD mode by sliding the RECORD /PLAY
selector to the left.
3 . Push the SET button until appears on the bottom of the
screen. The remaning memory size appears as XXXXs
(seconds). While taking movie, XXXXs counts down to 0000s.
Note : If there is no memory space in the internal memory or SD
memory card, “MEMORY FULL” appears on the Monitor.
Erase picture or movie files to make memory space or replace
the memory card with a new one.
4 . Press the SHUTTER button to start.
Press the SHUTTER button again to stop.
5 . Turn off the unit by pressing the ON/OFF button if you won’t
use for awhile.

Digital Still Camera “DSC-2000” Size : 105mm x145mm
GB-18
7. OPERATIONS - Playback
Viewin g Images o n Bu ilt-in Monitor
1. Select the PLAY mode by sliding the RECORD /P L AY
selector to the right.
2. Press the cursor control or to change pictures.
Viewing Images on TV Screen
Use the special video cable (included) to connect the camera to a television,
a nd y ou ca n view the ima ge s st ored in ca mera memory on t he TV scree n .
•The camera can be connected only to a TV that is equipped with a
“VI DE O IN terminal”.
•Make sure that the power of both the camera and the TV are turned off
when making connections.
•After connecting the camera and TV, set the channel of the TV to the
ch a nn el u sed f or vid eo inp ut . Th en , u se th e same pr o ced ures as th ose
described under “Viewing Images on Built-in Monitor”.
Note:
To set NTSC orPAL,
1. Press the MENU button, press the cursor control an d pre ss t he
cursor control . The mo nito r s ho ws S ET M en u.
2. Press the cursor control twice to move the cursor to TV.
3. Press the cursor control to se le ct e it he r NTSC or PA L.
4. P re ss the SET b utt on to exit o r pre ss t he cu rsor con trol to co ntin ue
Menu settings.

Digital Still Camera “DSC-2000” Size : 105mm x145mm
GB-19
7. OPERATIONS - Playback
Please note tha t Movie mode will not record audio.
Viewing video clips
To view the recorded video clips, follow the steps below.
1. Select the PLAY mode by sliding the RECORD /P L AY
selector to the right.
2. Press the cursor control or to se le ct th e d esir ed mo vie clip file.
3. Press the SHUTTER button to start.
Note:
The zoom function cannot be activated while playing the video
clip back.
Zoomingimages
While reviewing your images, you may enlarge a selected portion of an
im ag e. This m ag nificat io n allows you to view fine de tails.
1. P re ss t he cu rs or / . Picture image will be magnified.
2. Press the cursor control , , or to scroll picture image
on the monitor.
3. To exit, p ress th e DISP LAY b ut ton .
Disp laying thu mbnail i mages
This function allows you to view 9 thumbnail images on the monitor at the
same time, which can quickly search for the image that you want.
1. S et th e u nit in Pla y mod e.
2. P re ss the DI SPL AY / button.
9thumbnail imagesshow on the monitor if the image numberreaches
u p t o 9 frames.
3. To view a fu ll-size ima ge , pre ss t he DIS PL AY / button after
selecting it by the / .

Digital Still Camera “DSC-2000” Size : 105mm x145mm
GB-20
7. OPERATIONS - Playback
Erasing One File
Erasing Selected Image
1 . S ele ct th e pict ure file or mov ie file you wish t o era se by u sing t he
cursor control or .
2. Press the MENU button.
The cursor points “ERASE ONE”.
3. Press the cursor control .Pre ss the SE T
button to erase.
4. After completion of erase, a next picture will be displayed. If you wish
to change picture file or movie file, press the cursor control or to
se lect th e d esired file to e r ase .
5. To exit, press the MENU button.
Er asing All Files
1 . Pr ess th e ME NU bu tto n an d pres s t he cu rs o r
control to se t the cursor at “ERASE ALL”.
2. Press the cursor control ,then press the
cursor control to set Y ES .
3. Press the SET button to erase.
To cancel, press the cursor control to set NO
and press the SET button or press the Menu
button to exit.
Note:
The p r ot ecte d imag es will no t be erase d.
Table of contents
Other Goodmans Digital Camera manuals