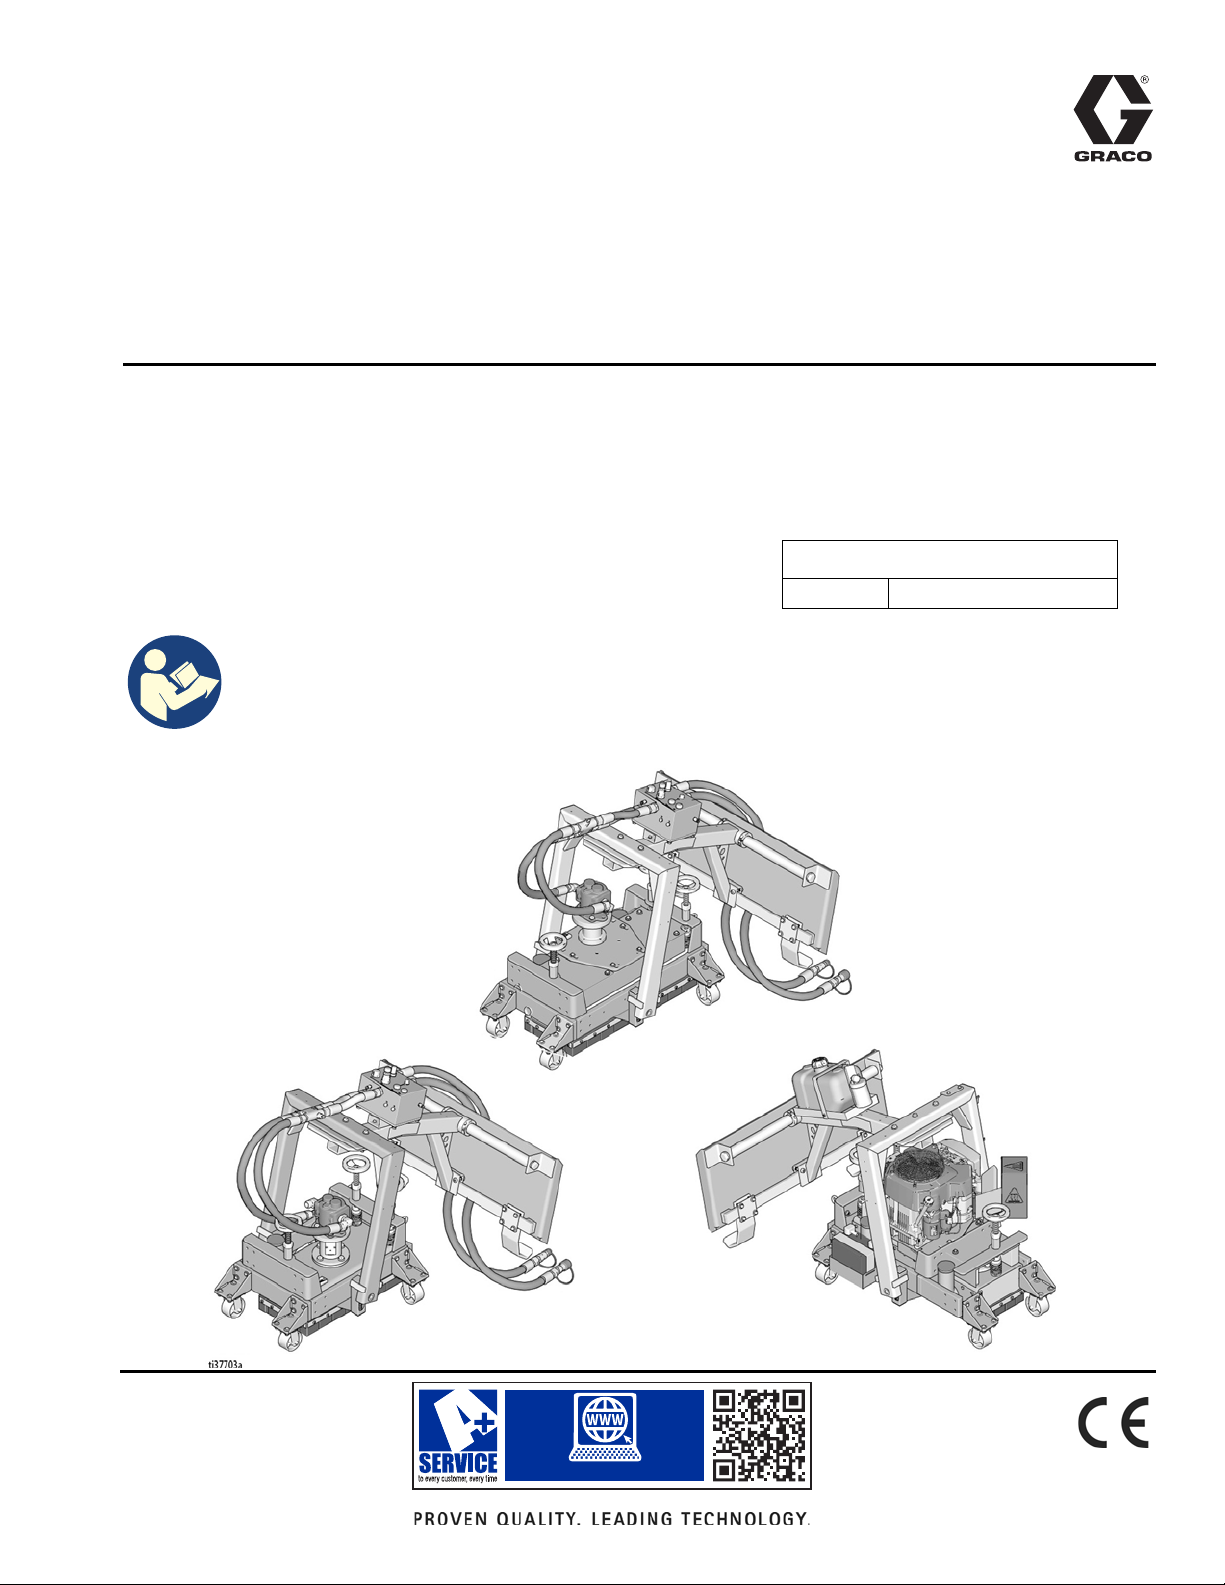
Graco GrindLazer HP RC820 H Use and care manual

www.graco.com/techsupport
?? ??
3A7398A
EN
Operation, Repair, Parts
GrindLazer™
For removal of materials from flat horizontal concrete and asphalt surfaces. For use with
compatible universal quick attach systems from major skid steer manufacturers. For
professional use only.
Model 25P471 - GrindLazer HP RC820 H (Hydraulic-Low Flow)
1000 psi (69 bar, 6.9 MPa) Inlet Fluid Maximum Working Pressure
Model 25P472 - GrindLazer HP RC1640 H (Hydraulic-High Flow)
2000 psi (138 bar, 3.8 MPa) Inlet Fluid Maximum Working Pressure
Model 25P473 - GrindLazer HP RC1625 G (Gas - 25HP Kohler)
Important Safety Instructions
Read all warnings and instructions in this manual before using the
equipment. Be familiar with the controls and the proper usage of the
equipment. Save these instructions.
25P471
25P472
25P473
Related Manuals:
24 590 54 Kohler Owner’s Manual

Contents
23A7398A
Contents
Warnings . . . . . . . . . . . . . . . . . . . . . . . . . . . . . . . . . . . . . . . . . . . . . . . . . . . . . . . . . . . . . . . . . . . . . . . . . . . . . . .4
Component Identification . . . . . . . . . . . . . . . . . . . . . . . . . . . . . . . . . . . . . . . . . . . . . . . . . . . . . . . . . . . . . . . . . .6
25P471 (Hydraulic - Low Flow) . . . . . . . . . . . . . . . . . . . . . . . . . . . . . . . . . . . . . . . . . . . . . . . . . . . . . . . . . . . .6
Component Identification . . . . . . . . . . . . . . . . . . . . . . . . . . . . . . . . . . . . . . . . . . . . . . . . . . . . . . . . . . . . . . . . . .7
25P472 (Hydraulic - High Flow) . . . . . . . . . . . . . . . . . . . . . . . . . . . . . . . . . . . . . . . . . . . . . . . . . . . . . . . . . . .7
Component Identification . . . . . . . . . . . . . . . . . . . . . . . . . . . . . . . . . . . . . . . . . . . . . . . . . . . . . . . . . . . . . . . . . .8
25P473 (Gas) . . . . . . . . . . . . . . . . . . . . . . . . . . . . . . . . . . . . . . . . . . . . . . . . . . . . . . . . . . . . . . . . . . . . . . . . .8
Setup . . . . . . . . . . . . . . . . . . . . . . . . . . . . . . . . . . . . . . . . . . . . . . . . . . . . . . . . . . . . . . . . . . . . . . . . . . . . . . . . . . .9
Connect GrindLazer to Skid Steer . . . . . . . . . . . . . . . . . . . . . . . . . . . . . . . . . . . . . . . . . . . . . . . . . . . . . . . . .9
Cutter Head Installation . . . . . . . . . . . . . . . . . . . . . . . . . . . . . . . . . . . . . . . . . . . . . . . . . . . . . . . . . . . . . . . .10
Caster Wheel Positions . . . . . . . . . . . . . . . . . . . . . . . . . . . . . . . . . . . . . . . . . . . . . . . . . . . . . . . . . . . . . . . . .10
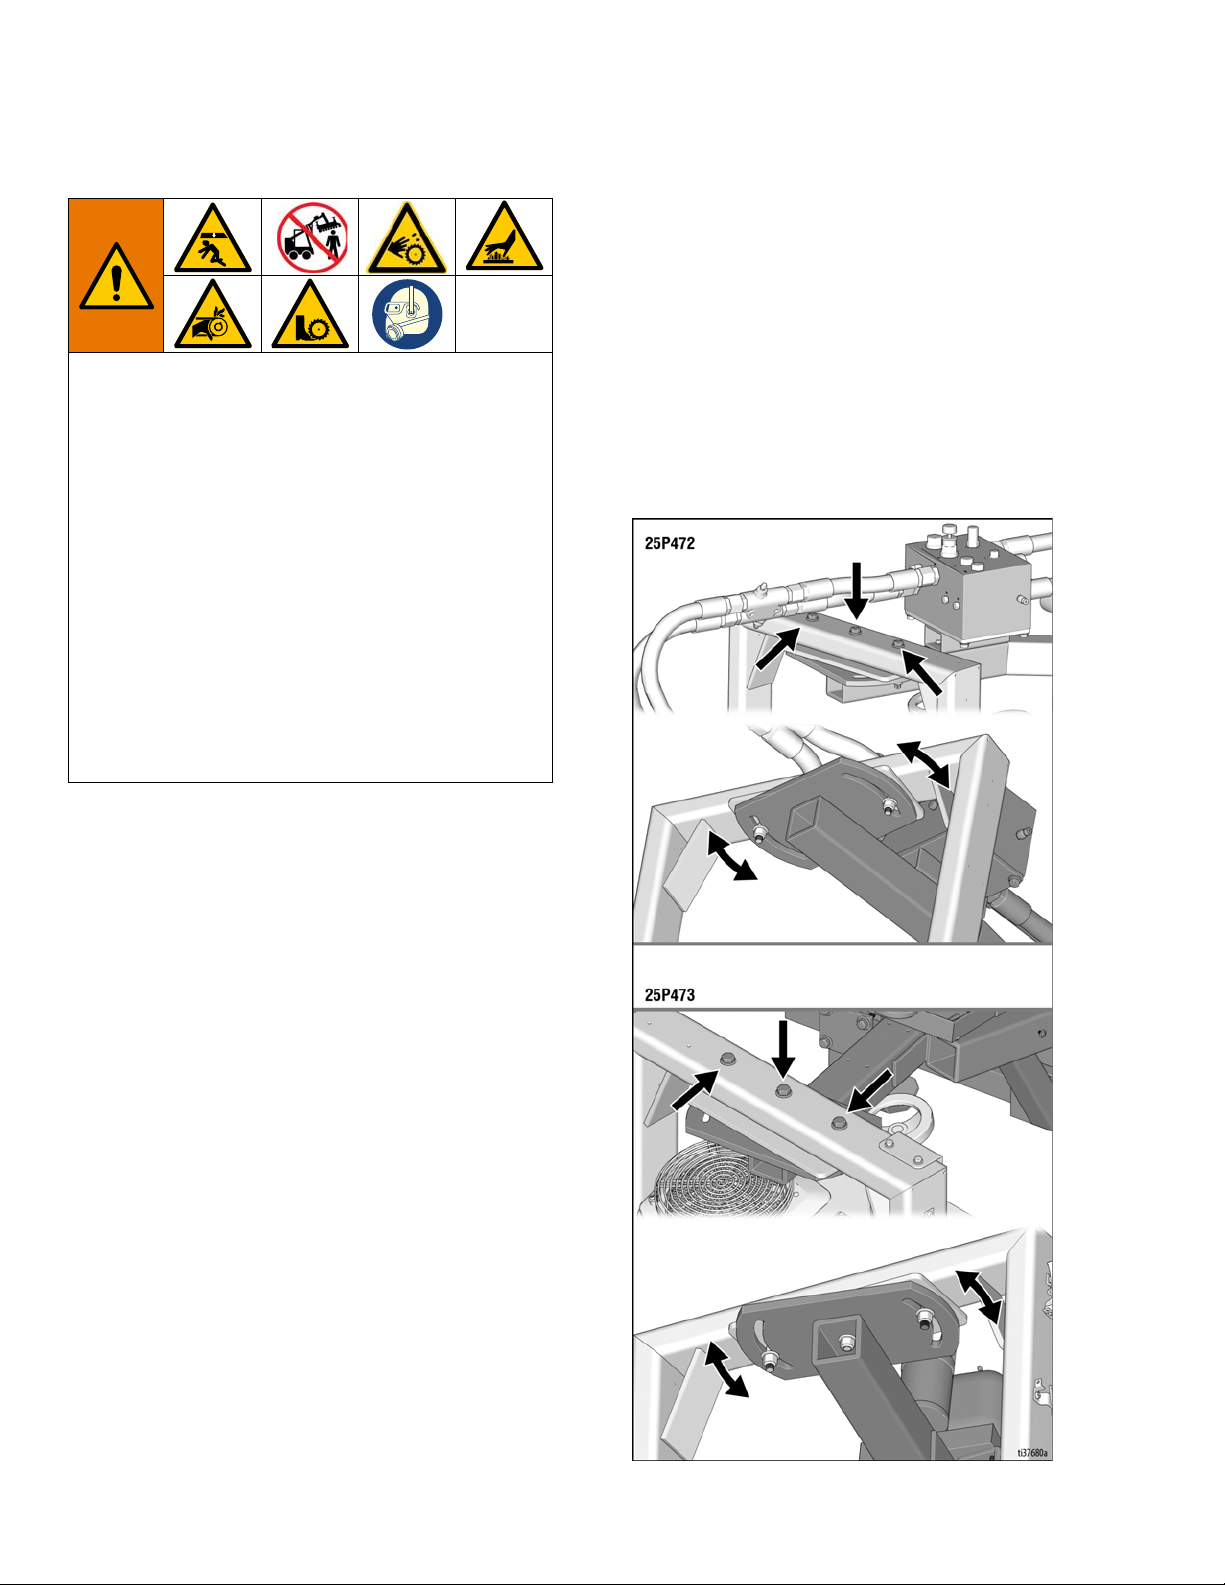
Set Width of Cut (Models 25P472 & 25P473) . . . . . . . . . . . . . . . . . . . . . . . . . . . . . . . . . . . . . . . . . . . . . . . .10
Dust Control . . . . . . . . . . . . . . . . . . . . . . . . . . . . . . . . . . . . . . . . . . . . . . . . . . . . . . . . . . . . . . . . . . . . . . . . .11
Operation . . . . . . . . . . . . . . . . . . . . . . . . . . . . . . . . . . . . . . . . . . . . . . . . . . . . . . . . . . . . . . . . . . . . . . . . . . . . . .12
GrindLazer Start Up . . . . . . . . . . . . . . . . . . . . . . . . . . . . . . . . . . . . . . . . . . . . . . . . . . . . . . . . . . . . . . . . . . .12
When Operating... . . . . . . . . . . . . . . . . . . . . . . . . . . . . . . . . . . . . . . . . . . . . . . . . . . . . . . . . . . . . . . . . . . . . .12
Set Cutter Speed . . . . . . . . . . . . . . . . . . . . . . . . . . . . . . . . . . . . . . . . . . . . . . . . . . . . . . . . . . . . . . . . . . . . .13
Set Cut Depth . . . . . . . . . . . . . . . . . . . . . . . . . . . . . . . . . . . . . . . . . . . . . . . . . . . . . . . . . . . . . . . . . . . . . . . .13
Disconnect GrindLazer from Skid Steer . . . . . . . . . . . . . . . . . . . . . . . . . . . . . . . . . . . . . . . . . . . . . . . . . . . .14
Repair . . . . . . . . . . . . . . . . . . . . . . . . . . . . . . . . . . . . . . . . . . . . . . . . . . . . . . . . . . . . . . . . . . . . . . . . . . . . . . . . .15
Cutter Head Removal . . . . . . . . . . . . . . . . . . . . . . . . . . . . . . . . . . . . . . . . . . . . . . . . . . . . . . . . . . . . . . . . . .15
Cutter Head Replacement . . . . . . . . . . . . . . . . . . . . . . . . . . . . . . . . . . . . . . . . . . . . . . . . . . . . . . . . . . . . . .15
Drive Belt Replacement (Models 25P472 & 25P473) . . . . . . . . . . . . . . . . . . . . . . . . . . . . . . . . . . . . . . . . . .16
Bearing Replacement (Models 25P472 & 25P473) . . . . . . . . . . . . . . . . . . . . . . . . . . . . . . . . . . . . . . . . . . .17
Bearing Replacement (Model 25P471) . . . . . . . . . . . . . . . . . . . . . . . . . . . . . . . . . . . . . . . . . . . . . . . . . . . . .19
Maintenance . . . . . . . . . . . . . . . . . . . . . . . . . . . . . . . . . . . . . . . . . . . . . . . . . . . . . . . . . . . . . . . . . . . . . . . . . . . .21
Recycling and Disposal . . . . . . . . . . . . . . . . . . . . . . . . . . . . . . . . . . . . . . . . . . . . . . . . . . . . . . . . . . . . . . . . . .22
Rechargeable Battery Disposal . . . . . . . . . . . . . . . . . . . . . . . . . . . . . . . . . . . . . . . . . . . . . . . . . . . . . . . . . .22
End of Product Life . . . . . . . . . . . . . . . . . . . . . . . . . . . . . . . . . . . . . . . . . . . . . . . . . . . . . . . . . . . . . . . . . . . .22
Troubleshooting . . . . . . . . . . . . . . . . . . . . . . . . . . . . . . . . . . . . . . . . . . . . . . . . . . . . . . . . . . . . . . . . . . . . . . . .23
Parts - 25P471 (Outer Frame) . . . . . . . . . . . . . . . . . . . . . . . . . . . . . . . . . . . . . . . . . . . . . . . . . . . . . . . . . . . . . .24
Parts List - 25P471 (Outer Frame) . . . . . . . . . . . . . . . . . . . . . . . . . . . . . . . . . . . . . . . . . . . . . . . . . . . . . . . .25
Parts - 25P472 (Outer Frame) . . . . . . . . . . . . . . . . . . . . . . . . . . . . . . . . . . . . . . . . . . . . . . . . . . . . . . . . . . . . . .26
Parts List - 25P472 (Outer Frame) . . . . . . . . . . . . . . . . . . . . . . . . . . . . . . . . . . . . . . . . . . . . . . . . . . . . . . . .27
Parts - 25P472 (Inner Frame) . . . . . . . . . . . . . . . . . . . . . . . . . . . . . . . . . . . . . . . . . . . . . . . . . . . . . . . . . . . . . .28
Parts List - 25P472 (Inner Frame) . . . . . . . . . . . . . . . . . . . . . . . . . . . . . . . . . . . . . . . . . . . . . . . . . . . . . . . .29
Parts - 25P473 (Outer Frame) . . . . . . . . . . . . . . . . . . . . . . . . . . . . . . . . . . . . . . . . . . . . . . . . . . . . . . . . . . . . . .30
Parts List - 25P473 (Outer Frame) . . . . . . . . . . . . . . . . . . . . . . . . . . . . . . . . . . . . . . . . . . . . . . . . . . . . . . . .31
Parts - 25P473 (Inner Frame) . . . . . . . . . . . . . . . . . . . . . . . . . . . . . . . . . . . . . . . . . . . . . . . . . . . . . . . . . . . . . .32
Parts List - 25P473 (Inner Frame) . . . . . . . . . . . . . . . . . . . . . . . . . . . . . . . . . . . . . . . . . . . . . . . . . . . . . . . .33
Parts - 25P471 Motor & Drive . . . . . . . . . . . . . . . . . . . . . . . . . . . . . . . . . . . . . . . . . . . . . . . . . . . . . . . . . . . . . .34
Parts List - 25P471 Motor & Drive . . . . . . . . . . . . . . . . . . . . . . . . . . . . . . . . . . . . . . . . . . . . . . . . . . . . . . . .35
Parts - 25P472 Motor & Drive . . . . . . . . . . . . . . . . . . . . . . . . . . . . . . . . . . . . . . . . . . . . . . . . . . . . . . . . . . . . . .36
Parts List - 25P472 Motor & Drive . . . . . . . . . . . . . . . . . . . . . . . . . . . . . . . . . . . . . . . . . . . . . . . . . . . . . . . .37
Parts - 25P473 Engine & Drive . . . . . . . . . . . . . . . . . . . . . . . . . . . . . . . . . . . . . . . . . . . . . . . . . . . . . . . . . . . . .38
Parts List - 25P473 Engine & Drive . . . . . . . . . . . . . . . . . . . . . . . . . . . . . . . . . . . . . . . . . . . . . . . . . . . . . . .38

Contents
3A7398A 3
Parts - 25P471 / 25P472 Universal Quick Attach Mount U-Bar . . . . . . . . . . . . . . . . . . . . . . . . . . . . . . . . . . 39
Parts List - 25P471 / 25P472 Universal Quick Attach Mount U-Bar . . . . . . . . . . . . . . . . . . . . . . . . . . . . . . 39
Parts - 25P473 Universal Quick Attach Mount U-Bar . . . . . . . . . . . . . . . . . . . . . . . . . . . . . . . . . . . . . . . . . . 40
Parts List - 25P473 Universal Quick Attach Mount U-Bar . . . . . . . . . . . . . . . . . . . . . . . . . . . . . . . . . . . . . . 41
Parts - 25P471 / 25P472 / 25P473 Universal Quick Attach Mount Plate . . . . . . . . . . . . . . . . . . . . . . . . . . . 42
Parts List - 25P471 / 25P472 / 25P473 Universal Quick Attach Mount Plate . . . . . . . . . . . . . . . . . . . . . . . 42
Parts - 25P471 / 25P472 Manifold . . . . . . . . . . . . . . . . . . . . . . . . . . . . . . . . . . . . . . . . . . . . . . . . . . . . . . . . . . 43
Parts List - 25P471 / 25P472 Manifold . . . . . . . . . . . . . . . . . . . . . . . . . . . . . . . . . . . . . . . . . . . . . . . . . . . . 43
Parts - 25P471 / 25P472 Hydraulic Hoses . . . . . . . . . . . . . . . . . . . . . . . . . . . . . . . . . . . . . . . . . . . . . . . . . . . 44
Parts List - 25P471 / 25P472 Hydraulic Hoses . . . . . . . . . . . . . . . . . . . . . . . . . . . . . . . . . . . . . . . . . . . . . . 44
Parts - 25P473 Fuel Tank Assembly . . . . . . . . . . . . . . . . . . . . . . . . . . . . . . . . . . . . . . . . . . . . . . . . . . . . . . . 45
Parts List - 25P473 Fuel Tank Assembly . . . . . . . . . . . . . . . . . . . . . . . . . . . . . . . . . . . . . . . . . . . . . . . . . . 45
Technical Data . . . . . . . . . . . . . . . . . . . . . . . . . . . . . . . . . . . . . . . . . . . . . . . . . . . . . . . . . . . . . . . . . . . . . . . . . 46
CALIFORNIA PROPOSITION 65 . . . . . . . . . . . . . . . . . . . . . . . . . . . . . . . . . . . . . . . . . . . . . . . . . . . . . . . . 46
Graco Standard Warranty . . . . . . . . . . . . . . . . . . . . . . . . . . . . . . . . . . . . . . . . . . . . . . . . . . . . . . . . . . . . . . . . 47
Graco Information . . . . . . . . . . . . . . . . . . . . . . . . . . . . . . . . . . . . . . . . . . . . . . . . . . . . . . . . . . . . . . . . . . . . . . 48

Warnings
43A7398A
Warnings
The following warnings are for the setup, use, grounding, maintenance, and repair of this equipment. The exclamation
point symbol alerts you to a general warning and the hazard symbols refer to procedure-specific risks. When these
symbols appear in the body of this manual or on warning labels, refer back to these Warnings. Product-specific hazard
symbols and warnings not covered in this section may appear throughout the body of this manual where applicable.
WARNING
DUST AND DEBRIS HAZARD
Grinding concrete and other surfaces with this equipment can create dust that contains hazardous
substances. Grinding can also create flying debris.
To reduce the risk of serious injury:
• Control the dust to meet all applicable workplace regulations.
• Wear protective eye wear and a properly fit-tested and government approved respirator suitable for
the dust conditions.
• Use equipment only in a well-ventilated area.
• Grinding equipment must be used only by trained personnel who understand the applicable work-
place regulations.
ENTANGLEMENT AND MOVING PARTS HAZARD
Moving parts can pinch, cut or amputate fingers and other body parts.
• Keep clear of moving parts.
• Stop cutter rotation before raising equipment more than 1/2 inch (1.3 cm) above work surface. Do
not operate cutters when equipment is raised more than 1/2 inch (1.3 cm).
• Do not operate equipment with protective guards or covers removed.
• Do not wear loose clothing, jewelry or long hair while operating equipment.
• Before checking or servicing equipment, disconnect hydraulic supply/return lines (hydraulic models)
or black battery cable and both spark plug wires (gas model).
BURN HAZARD
Cutters and engine can become very hot during operation. To avoid severe burns, do not touch hot
equipment. Wait until equipment has cooled completely.
EQUIPMENT MISUSE HAZARD
Misuse can cause death or serious injury.
• Do not operate the unit when fatigued or under the influence of drugs or alcohol.
• Do not leave the work area while equipment is energized. Turn off all equipment when equipment
is not in use.
• Check equipment daily. Repair or replace worn or damaged parts immediately with genuine manu-
facturer’s replacement parts only.
• Do not alter or modify equipment.
• Use equipment only for its intended purpose. Call your distributor for information.
• Keep children and animals away from work area.
• Comply with all applicable safety regulations.
• Maintain a safe operating distance from other people in the work area.
• Avoid any pipes, columns, openings, or any other objects protruding from work surface.

Warnings
3A7398A 5
SKIN INJECTION HAZARD
High-pressure fluid from hose leaks, or ruptured components will pierce skin. This may look like just a
cut, but it is a serious injury that can result in amputation. Get immediate surgical treatment.
• Inspect hose before each use for cuts, bulges, kinks or any other damage.
• Replace damaged hose immediately.
• Replace hoses proactively at regular intervals based on your operating conditions.
• Tighten all fluid connections before operating the equipment.
• Keep clear of leaks.
• Do not stop or deflect leaks with your hand, body, glove, or rag.
• Never exceed hose Maximum Pressure or Temperature ratings.
• Only use chemicals that are compatible with hose materials. See Technical Specifications in this
manual. Read Safety Data Sheets (SDSs) and fluid and solvent manufacturer’s recommendations.
FIRE AND EXPLOSION HAZARD
Flammable fumes, such as solvent and paint fumes, in work area can ignite or explode. To help pre-
vent fire and explosion:
• Use equipment only in well ventilated area.
• Do not fill fuel tank while engine is running or hot; shut off engine and let it cool. Fuel is flammable
and can ignite or explode if spilled on hot surface.
• Do not top off or overfill tank.
• Do not run engine near spilled gasoline or while fuel cap is removed.
• Keep work area free of debris, including solvent, rags and gasoline.
• Keep a fire extinguisher in work area.
CARBON MONOXIDE HAZARD
Exhaust contains poisonous carbon monoxide, which is colorless and odorless. Breathing carbon
monoxide can cause death.
• Do not operate in an enclosed area.
BATTERY HAZARD
Lead-acid batteries produce explosive gases and contain sulfuric acid that can cause severe burns. To
avoid sparks and injury when handling or working with a lead-acid battery:
• Read and follow the battery manufacturer’s warnings.
• Exercise caution when working with metallic tools or conductors to prevent short circuits and sparks.
• Keep all sparks, flames, and cigarettes away from batteries.
• Always wear protective eyewear and protective equipment for face, hands, and body.
• If you have direct contact with battery fluid, flush with water and consult a physician immediately.
• Installation and maintenance must be performed by knowledgeable personnel only.
PERSONAL PROTECTIVE EQUIPMENT
You must wear appropriate protective equipment when operating, servicing, or when in the operating
area of the equipment to help protect you from serious injury, including eye injury, inhalation of dust or
chemicals, burns, and hearing loss. This equipment includes but is not limited to:
• Protective eye wear.
• Protective shoes.
• Gloves.
• Hearing protection.
• Properly fit-tested and government approved respirator suitable for the dust conditions.
WARNING

Component Identification
63A7398A
Component Identification
25P471 (Hydraulic - Low Flow)
* Connection type: Flat Face - ISO 16028
A
B
G
J
H
RK
PQ
L
N
L
M
F
C
E
D
Component
A* Hydraulic Supply Line (male quick-connect)
B* Hydraulic Return Line (female quick-connect)
C Hydraulic Pump
D Cushion Valve
E Vacuum Port
F Universal Quick Attach Mount Plate
G Cutter Speed Control
H U-bar
J Cutter Height Control Knobs (3x)
K Universal Quick Attach Mount Support Legs
L Wheel Mount Location (side)
M U-bar Spring
N Tachometer
PCasterWheels
Q Dust/Debris Skirt
R Serial ID Label
Component

Component Identification
3A7398A 7
Component Identification
25P472 (Hydraulic - High Flow)
* Connection type: Flat Face - ISO 16028
ti37705a
A
B
G
K
H
S
L
R
Q
M
N
M
P
F
CJ
D
E
Component
A Hydraulic Return Line (male-quick connect)
B Hydraulic Supply Line (female-quick connect)
C Hydraulic Pump
D Cushion Valve
E Vacuum Ports (2x)
F Universal Quick Attach Mount Plate
G Cutter Speed Control
HU-bar
J Tachometer
K Cutter Height Control Knobs (3x)
L Universal Quick Attach Mount Support Legs
M Wheel Mount Location (side)
N Dust/Debris Skirt
P U-bar Spring
QBeltTension
RCasterWheels
S Serial ID Label
Component

Component Identification
83A7398A
Component Identification
25P473 (Gas)
F
H
H
A
R
T
P
Q
N
L
M
A
B
J
K
S
G
ti37706a
C
D
E
Component
A Universal Quick Attach Mount Plate
BGasTank
C Emission Canister
DEngine
E Vacuum Ports (2x)
F Tachometer
GU-bar
H Cutter Height Control Knobs (3x)
J Universal Quick Attach Mount Support Legs
KBatteryBox
L Wheel Mount Location (side)
M Throttle (Speed) Control
N Choke Control
PU-barSpring
Q Debris Skirt
R Belt Tension
S Caster Wheels
T Serial ID Label
Component

Setup
3A7398A 9
Setup
Connect GrindLazer to Skid
Steer
The following instructions are generic. Due to the
differences in attachment mounting and attachment
methods among various brands of skid steers, refer to
your skid steer owners manual for attachment
connection instructions specific to your skid steer.
Verify that the hydraulic hoses are clear from the front of
the Universal Quick Attach Mount Plate and that the
mounting plate is free from dirt and debris. When clear,
move the skid steer close to the Universal Quick Attach
Mount Plate. Tilt skid steer plate adapter forward to align
coupling point with the upper part on the Universal Quick
Attach Mount Plate and raise skid steer plate adapter
slightly.
When the top edge of the skid steer plate adapter is
seated in the top part of the Universal Quick Attach
Mount Plate, curl the skid steer tilt function back until the
Universal Quick Attach Mount Plate is flat against the
skid steer plate adapter. Lock down the skid steer plate
adapter levers. Before operating the GrindLazer, verify
that the skid steer lock pins are fully engaged through the
latch slots on the Universal Quick Attach Mount Plate.
Wipe off any dirt or dust from the male and female
Hydraulic Return/Supply Lines with a clean rag before
attaching hoses, to keep contaminants from entering the
hydraulic system. Connect the GrindLazer Hydraulic
Return/Supply Lines to the auxiliary circuit connectors on
the skid steer.
CRUSH HAZARD
To avoid serious injury or death, never work under the
equipment unless it is securely supported by safety
stands or blocks.
Connect Skid Steer to Universal
Quick Attach Mount Plate
Check Skid Steer Lock Pin
Engagement

Setup
10 3A7398A
Cutter Head Installation
Model 25P471 uses one rotary head. Models 25P472 &
25P473 use multiple rotary heads to increase forward
speed or width in the removal of traffic lines or surface
preparation. Regardless of the type of head chosen,
correct head installation and adjustment will ease
removal and ensure a long cutter life.
If cutter heads are not assembled, see Cutter Head
Removal, page 15.
1. Raise the GrindLazer to a height where the cutters
are easily accessible. Support the GrindLazer with
blocks or safety stands.
2. Install the number of heads desired (from one to
three) on the spindles using either a 24mm socket
or a wrench. It is recommended to use an impact
wrench if available.
Caster Wheel Positions
The four wheel assemblies can be mounted in the front,
rear, or on either side of the GrindLazer, depending upon
surface conditions, and to prevent debris buildup.
Set Width of Cut (Models 25P472
& 25P473)
Models 25P472 & 25P473 allow the GrindLazer to be
swiveled up to 30° either left or right to increase the
cutting path width.
Loosen the center swivel bolt at the end of the
attachment arm and then loosen the outer two bolts
using two 3/4” sockets or wrenches. Swivel the
GrindLazer either right or left to the desired angle and
re-tighten the bolts.
NOTE: You may wish to elevate the leading edge side
of the cutters just slightly to increase erasing capacity.
CRUSH HAZARD
Turn off skid steer, remove key, engage parking
brake, and block wheels before you service your
machine. To avoid serious injury or death, never work
under the equipment unless it is securely supported
by safety stands or blocks.
HYDRAULIC MODELS
To avoid injury from unexpected start up, disconnect
the Hydraulic Supply/Return Lines before you service
your machine.
GAS MODEL
To avoid injury from unexpected start up, disable
engine as follows: 1) Disconnect both spark plug
wires. 2) Disconnect negative (-) battery cable from
battery.

Setup
3A7398A 11
Dust Control
Vacuum Attachment
1. If using a vacuum, attach vacuum hose to the
vacuum ports on the GrindLazer.
2. Attach vacuum hose to the inlet port on the Cyclone
Separator (optional) or vacuum.

Operation
12 3A7398A
Operation
GrindLazer Start Up
Check the surrounding area for bystanders and clear
them before starting the skid steer or GrindLazer. Before
turning on Hydraulic Supply/Return Lines (25P471 &
25P472) or starting engine (25P473), perform the
following:
• Read and understand gas engine manual.
• Make sure all guards are in place and secure.
• Make sure all mechanical fasteners are secure.
• Inspect for damage to engine and other exterior
surfaces.
• Inspect work area to locate any pipes, columns,
deck inserts, or other objects protruding from work
surface. Avoid these objects during operation.
Engine Start (Gas)
1. Raise the GrindLazer off of the work surface slightly
(~0.5 inch, 1.3 cm) to ensure the cutters do not put
grooves in the work surface when starting the
engine. This can be achieved by using the lift
feature on the skid steer.
• If you cannot elevate the GrindLazer initially to start
the engine, you can turn the Cutter Height Control
Knobs counterclockwise to provide the cutter
clearance.
• If the hydraulics of the skid steer do not maintain the
cutter clearance, put a couple of pieces of 1/4”
plywood or some other suitable shim under the
wheels to raise the cutters off of the work surface.
This allows the GrindLazer to be started above the
work surface, then rolled off of the wood (or shim) to
begin line removal.
2. Open the fuel shutoff on the gas tank and then place
the Throttle Control lever at the “fast” position.
3. Move the Choke Control lever to closed.
4. Turn Key Switch to start the engine.
5. After the engine starts, move Choke Control lever to
open.
6. Set Throttle Control to desired setting. Refer to Set
Cutter Speed, page 13.
If the Engine Does Not Start (Gas)
• Check engine for proper gas and oil levels.
• Check the spark plugs. Make sure socket areas are
clean and clear of debris, and the proper gap is set.
Replace if needed.
• Battery might be dead.
• If engine still does not start, refer to the engine
manual.
Motor Start (Hydraulic)
1. Raise the GrindLazer off of the work surface slightly
(~0.5 inch, 1.3 cm) to ensure the cutters do not put
grooves in the work surface when starting the
engine. See Step 1 under Engine Start (Gas),
page 12, for more details.
2. Start the skid steer and engage the auxiliary circuit.
3. Adjust speed as required using the Cutter Speed
Control. Refer to Set Cutter Speed, page 13.
When Operating...
The U-bar should always be positioned perpendicular to
the work surface and never at an angle towards or away
from the driver. The U-bar has two terrain floating or
planing springs to allow the operator to float over high
spots or apply some down pressure to plane through
high spots. After sufficient warm up time, turn on
vacuum, begin forward motion and lower the GrindLazer
simultaneously.
NOTE: If you stop the forward motion, the GrindLazer
should be raised to prevent surface damage.
NOTICE
Do not start GrindLazer while cutter head is in contact
with the work surface. Doing so can cause damage to
the cutters.

Operation
3A7398A 13
Set Cutter Speed
1. Set the skid steer parking brake.
2. Raise the GrindLazer off of the work surface slightly
(~0.5 inch, 1.3 cm) to ensure the cutters do not put
grooves in the work surface when starting the
engine. See Step 1 under Engine Start (Gas),
page 12, for more details.
3. Allow the hydraulic motor/gas engine to warm up for
a minute or two and then set the correct RPM for the
cutters you have installed. Refer to Recommended
Speeds, page 13, and Set Cut Depth, page 13.
4. Hydraulic Models (25P471 & 25P472): Observe
the tachometer to ensure speed of the cutters
matches the Recommended Speeds for best cutter
life. Adjust as required using the Speed Control
Knob.
Gas Model (25P473): After engine warms up, adjust
Throttle Control lever and observe tachometer to
ensure engine speed of the cutters matches the
Recommended Speeds for best cutter life.
Recommended Speeds
For best performance and cutter life, try to maintain the
following speeds read at the Tachometer:
Set Cut Depth
Set cutter depth just deep enough to do the job. Too
much pressure will wear the cutters out faster and leave
a much more severe cut on the surface.
25P471: Cutters should be parallel to the work surface
when engaged. The cutting circle left by the GrindLazer
should be an even circle.
25P472 & 25P473: Add slightly more pressure to the
rear cutters than the front cutters by turning the rear
Cutter Height Control Knobs clockwise two turns. This
will allow the front cutters to remove the material and the
rear to finish the job.
NOTE: Excess down pressure creates excess wear on
all moving parts. The GrindLazer’s weight should be
sufficient enough to hold the cutter heads against the
work surface. Should the desired results not meet your
expectations, consider resetting the GrindLazer (RPM’s)
to the correct speed or reducing forward motion speed.
1. Hydraulic Models (25P471 & 25P472):Turn off
auxiliary circuit and wait until the GrindLazer cools
off if it has been running.
Gas Model (25P473): Turn off engine and wait until
the GrindLazer cools off if it has been running.
2. Loosen the jam nuts using a 1-5/8” wrench on the
Cutter Height Control Knobs located on both ends of
the GrindLazer.
Rotating cutters can severely injure feet. Keep feet
clear of cutters.
NOTICE
Incorrect setting of RPM will damage cutters or the
drive belt.
Tachometer Speed
Cutter Type
Model Carbide Cutters Wire Brush
25P471 2000-2200 800-1000
25P472 2000-2400 1400-1600
25P473 3200-3400 1400-1600
Rotating cutters can severely injure feet. Keep feet
clear of cutters.

Operation
14 3A7398A
3. Turn the Cutter Height Control Knobs
counterclockwise about two turns to ensure the
cutter head or heads do not contact the work
surface.
4. For the initial adjustment, fold the debris skirt
upwards and tape it to the frame. This allows
viewing the cutters when setting the height.
5. Begin adjusting the head or heads downward. Using
a piece of thick paper, adjust until the head or heads
are touching the paper evenly on all sides.
6. Turn the Cutter Height Control Knobs clockwise
about two turns so the cutters touch the work
surface with a slight force.
Disconnect GrindLazer from
Skid Steer
The following instructions are generic. Due to the
differences in attachment mounting and removal
methods among various brands of skid steers, refer to
your skid steer owners manual for proper attachment
removal methods.
1. Set skid steer parking brake.
2. Hydraulic Models (25P471 & 25P472):Turn off
auxiliary circuit and place GrindLazer on the work
surface.
Gas Model (25P473): Turn off engine and place the
GrindLazer on the work surface.
3. Hydraulic Models (25P471 & 25P472):Release
hydraulic pressure in hoses, and disconnect
auxiliary hoses.
4. Release the skid steer lock pins.
5. Start skid steer engine and detach Universal Quick
Attach Mount Plate.

Repair
3A7398A 15
Repair
Cutter Head Removal
1. Raise the GrindLazer to a height where the cutters
are easily accessible. Support GrindLazer with
blocks or safety stands.
2. Remove the cutters from the spindles using either a
24mm socket or a wrench. It is recommended to
use an impact wrench if available.
Cutter Head Replacement
1. Slide backing plate onto spindle shaft. Slide felt
washer onto shaft into the ring in the backing plate.
2. Slide cutter assembly onto shaft up to the backing
plate.
3. Slide felt washer onto the shaft into the space
between the cutter edge and the bearing edge.
4. Slide outer bearing cover onto shaft against the felt
washer.
5. Slide Belleville washer onto shaft against the outer
bearing cover.
NOTE: The washer should bend outward.
6. Place hex nut onto shaft. Tighten so the nut is tight
but the cutters can freely rotate on their bearings (if
no rotation, the nut is too tight).
7. To install cutter heads, refer to Cutter Head
Installation, page 10.
Avoid touching the cutter head(s) after use until they
have completely cooled.
CRUSH HAZARD
To avoid serious injury or death, never work under the
equipment unless it is securely supported by safety
stands or blocks.
HYDRAULIC MODELS
To avoid injury from unexpected start up, always dis-
connect the Hydraulic Supply/Return Lines before
you service your machine.
GAS MODEL
To avoid injury from unexpected start up, disable
engine as follows: 1) Disconnect both spark plug
wires. 2) Disconnect negative (-) battery cable from
battery.

Repair
16 3A7398A
Drive Belt Replacement (Models
25P472 & 25P473)
Models 25P472 & 25P473 are equipped with a Poly
Chain®GT2 (Gates Co.) drive belt or a multi groove
(banded) “V” belt in a serpentine arrangement. This
allows all three heads to turn in the same direction to
minimize parts inventory of heads and drive
components.
Tools required:
• 1 5/8” wrench
• 7/16” socket or wrench
• 1/2” socket or wrench (gas model)
• 9/16” socket or wrench
• 3/16” hex key
1. Hydraulic Models (25P471 & 25P472):Turn off
auxiliary circuit and wait until the GrindLazer cools
off if it has been running.
Gas Model (25P473): Turn off engine. Disable
engine as follows: 1) Disconnect both spark plug
wires. 2) Disconnect negative (-) battery cable from
battery.
2. Raise the cutter heads off the work surface by
turning the 3 Cutter Height Control Knobs all the
way up. Loosen the jam nuts using the 1-5/8”
wrench and raise the three elevating screws all the
way up. This allows access to the button head
screws holding the upper and lower covers on.
3. Remove the auxiliary belt cover over the engine
pulley using a 7/16” socket or wrench.
4. Hydraulic Model (25P472): Remove the main belt
guards using a 9/16” socket or wrench.
Gas Model (25P473): Remove the exhaust using a
1/2” socket or wrench to remove the U-bolts.
Remove the belt guards using a 9/16” socket or
wrench.
5. Once the belt guards are out of the way, remove the
four motor plate screws using a 9/16” socket or
wrench.
If the engine has been running, wait until the exhaust
cools off as it may cause severe burns.

Repair
3A7398A 17
6. To loosen the tension on the belt, locate and loosen
the two jam nuts on the adjusting screws for under
the motor mount plate using a 9/16” socket or
wrench and then using a 3/16” hex key back out the
tensioning screws until the drive belt is completely
loose.
7. Hydraulic Model (25P472): Lift the entire motor
mount plate assembly off and set it aside to allow
access to the drive belt.
Gas Model (25P473): Lift the engine plate up about
4”. You may want to put blocks under the four
corners of the cover to fix it in the raised position and
hold up the engine. Or you can simultaneously lift
and cock engine slightly so that the belt can be slid
free from the pulley.
8. To install the new belt, remove the old belt and slide
the new one around the three pulleys and four
idlers. Tie a piece of string around the belt to pull it
out towards the motor pulley at reassembly time.
9. Lower the engine and belt cover and as you lower it
use the string to pull the belt over the motor pulley.
10. Using the tension screws begin to tighten the belt by
moving the engine away from the center of the
GrindLazer. Torque tensioning screws to 25-30 in-lbs
(2.8-3.4 N·m).
11. Hydraulic Model (25P472): After the belt has been
properly tightened, reconnect the GrindLazer to the
skid steer and allow it to run for 15-20 seconds to
allow the belt to set into the grooves of the pulleys
correctly.
Gas Model (25P473): After the belt has been
properly tightened, reconnect the black battery cable
and both spark plug wires, and turn the starter button
to rotate the engine 15-20 revolutions to allow the
belt to set into the grooves of the pulleys correctly.
12. Reattach all the covers and the GrindLazer will be
ready for operation. Periodic tensioning of the belt
will ensure long belt life. Recheck belt tension again
after 30 minutes of use.
Bearing Replacement (Models
25P472 & 25P473)
Note the assemblies are matched in sets which assures
all three heads hit the working surface at the same time.
Tools required:
• Two 3/4” socket or wrench
• Flat head screw driver
• 3/16” hex key
1. To access the bearing assemblies, follow Drive
Belt Replacement (Models 25P472 & 25P473),
page 16. Remove the drive bearing assemblies.
2. If it has not been done, remove the cutter heads.
Perform Cutter Head Removal, page 15, before
proceeding.
NOTICE
It is better to tension the belt tightly rather than
loosely. Loose belts will cause the belt to ride out of
the pulley grooves and break.

Repair
18 3A7398A
3. Hydraulic Model (25P472): With the hydraulic
hoses attached, remove the hydraulic motor and set
it aside.
Gas Model (25P473): The Quick Attach Mount
boom will have to be removed to allow the U-bar to
be rotated to remove the engine. To do this, use the
3/4” socket or wrench to remove the 3 bolts attaching
the U-bar to the Quick Attach Mount boom. Drain gas
from the tank and carefully disconnect the gas lines
to the engine before pulling the boom away.
4. Gas Model only (25P473): Remove the throttle and
choke levers from the U-bar using a flat head screw
driver. Also disconnect the battery cables, at which
point the U-bar can be rotated so the engine can
completely be removed from the GrindLazer. It is
recommended to use an engine lift or a hoist to lift
the engine off the GrindLazer.
NOTE: At this point there is full access to the
GrindLazer drive components to service them as
needed.
5. To service the main bearing housings, the drive
pulleys must be removed. To do this use a 3/16” hex
key to remove the collar.
6. After the collar is removed, use the 3/16” hex key to
remove the two set screws that are locking down
the pulley.

Repair
3A7398A 19
7. Use one of the set screws and thread it into the
middle hole to back out the bushing as shown
below.
8. Lift off the pulley. Remove the four mounting bolts to
the bearing assembly and lift out the assembly.
Bearing Replacement (Model
25P471)
Tools required:
• Two 3/4” socket or wrench
• 9/16” socket or wrench
1. Turn off auxiliary circuit and wait until the
GrindLazer cools off if it has been running.
2. To remove the drive bearing assembly, first follow
Cutter Head Removal, page 15, to remove the
cutter heads.
NOTE: It may be needed to completely remove the
motor and Universal Quick Attach Mount Plate to
have enough working room. This gives you access
to the bearing assembly.
3. If it has not been done, remove the cutter heads.
Perform Cutter Head Removal, page 15, before
proceeding.
4. Start by removing the hydraulic motor from the
motor adapter using the 9/16” socket or wrench.

Repair
20 3A7398A
5. Remove the Quick Attach Mount boom from the
U-bar using the 3/4” socket or wrench.
6. Remove the Quick Attach Mount and hydraulic
assemblies from the GrindLazer and set aside.
7. Rotate the U-bar out of the way to allow removal of
the entire drive bearing assembly.
8. Remove the bearing assembly using the 3/4” socket
or wrench.
9. Install new bearing assembly using the reverse
steps above to install.
This manual suits for next models
5
Table of contents
Other Graco Lawn And Garden Equipment manuals