GrainPro COCOON LITE User manual

GRAINPRO® COCOON™ LITE
INSTRUCTION MANUAL
MA4061RAD1117-1

2/23
GrainPro® Cocoon™ Lite Instruction Manual
MA4061RAD1117-1
GrainPro® Inc.
5520 Connecticut Avenue. NW Washington, DC 20015
Tel : +1 202-921-6700
GrainPro® Philippines, Inc.
Lot 46 Efficiency Avenue, Subic Bay Gateway Park I, Subic Bay Freeport Zone 2222 Philippines
Phone: +63 47 252 7884 Fax: +63 47 252 7885 Website: www.grainpro.com
Email: salesasia@grainpro.com
GrainPro® (Inc) Kenya Ltd.
Space Apartments, GF Shop A1 & A2 Maimahui Rd. Nairobi West, Kenya
Tel: +254 796 904 144
Tel.: +254 791 222 169
Email: africa@grainpro.com
GrainPro® Nigeria Ltd
6, Adu Street, Aguda-Ogba, Ikeja, Lagos
Tel: +234 806 564 3156
GrainPro® Mexico, S de RL de CV
Cto. Garona No. 903, Sección Tres, Col. Amberes, 37237,
León, Gto. Mexico
Mobile: +52 (477) 392 0851
Email: guillermo@grainpro.com
GrainPro® Costa Rica S.R.L.
Residencial Valle del Sol, Calle Lajas, Casa #27 Alto de las Palomas,
Santa Ana, San José, Costa Rica
Tel : +506 2282 9129
Email: infogpcr@grainpro.com
GrainPro® India Post-Harvest Technology Pvt. Ltd.
Office Number 18A109, WeWork Berger Tower 18th Floor,
C-001/A2, Sector 16-B, Noida, INDIA –201301
Landline: +91 120 515 0017
Customer Service: +91 960 292 0202
GrainPro®Inc., 1401 K Street NW, Suite 502, Washington D.C. 20005 USA
Copyright 2019 GrainPro®, Inc.

3/23
GrainPro® Cocoon™ Lite Instruction Manual
MA4061RAD1117-1
TABLE OF CONTENTS
1.
INTRODUCTION ..................................................................................................................................4
2.
CHECKLIST ..........................................................................................................................................5
3.
COMPONENTS ....................................................................................................................................6
4.
SPECIFICATIONS................................................................................................................................7
5.
WARNINGS...........................................................................................................................................7
6.
Recommended maximum moisture content for safe storage (wet Basis)....................................7
7.
INSTALLATION.....................................................................................................................................8
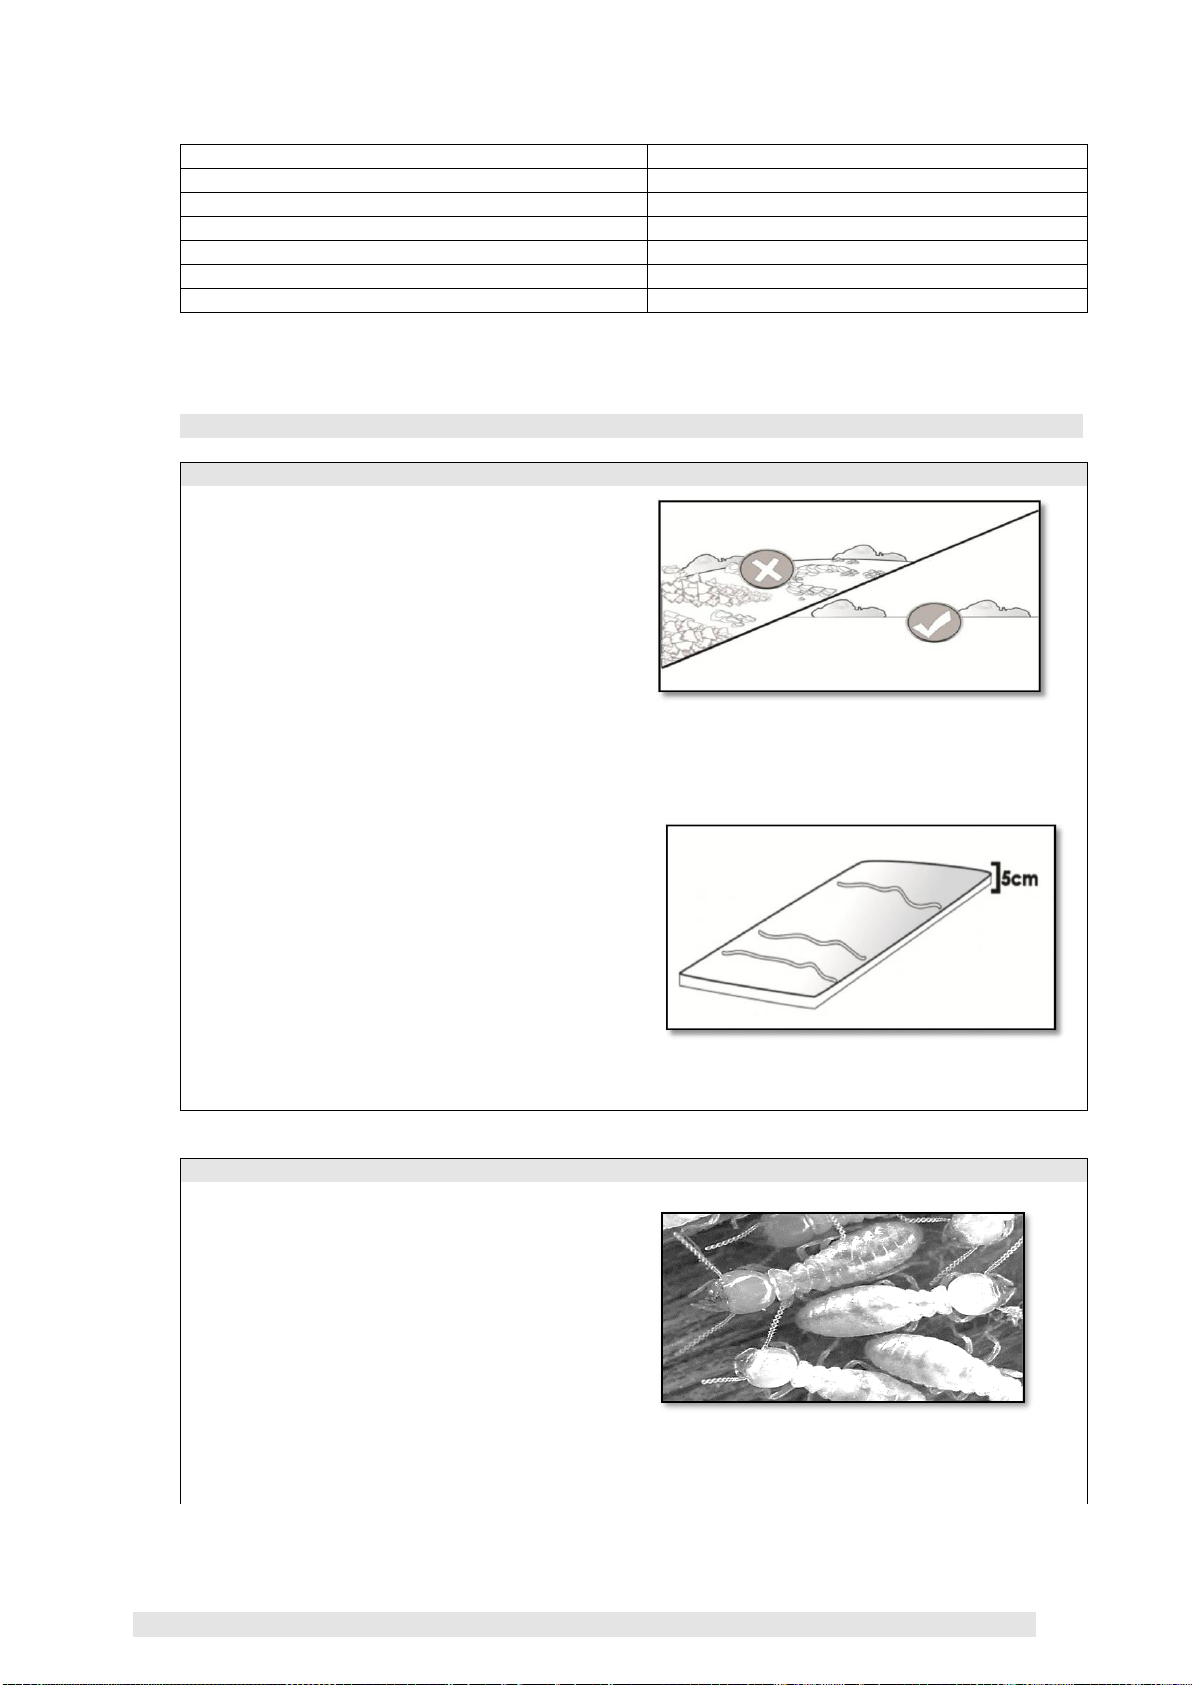
Site selection ....................................................................................................................................8
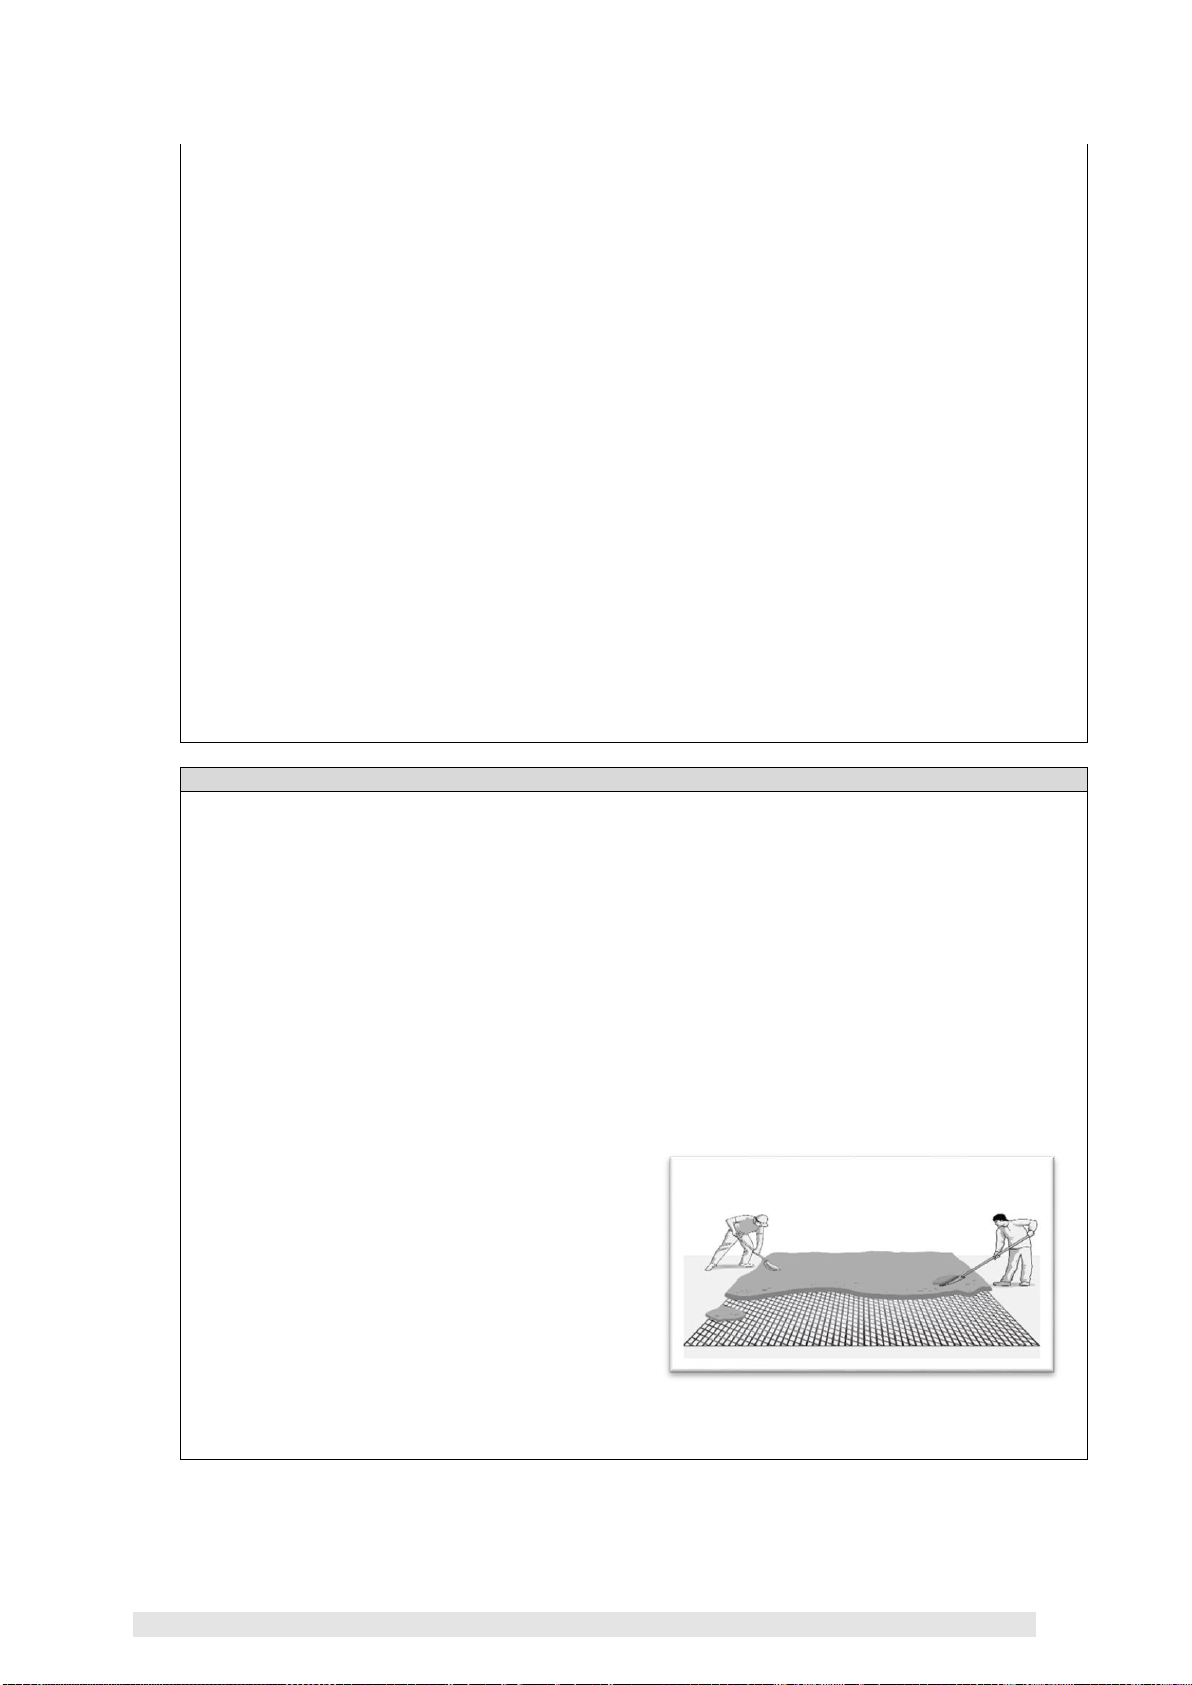
Termite Control.................................................................................................................................8
Rodent Control.................................................................................................................................9
Loading............................................................................................................................................10
Positioning the top section............................................................................................................11
Use of Desiccant (Calcium Chloride, CaCl2) - (Recommended)............................................11
Zipping.............................................................................................................................................12
Pressure Decay testing (PDT).....................................................................................................14
Tensioning of straps ......................................................................................................................14
Monitoring the oxygen level and Relative Humidity (RH%).....................................................15
Dismantling.....................................................................................................................................16
8.
PREVENTING CONDENSATION....................................................................................................17
Why does condensation occur?...................................................................................................17
Moisture content (MC) requirement for safe storage................................................................17
Setting-up the GrainShade™.......................................................................................................17
9.
MAINTENANCE AND CARE............................................................................................................18
Regular examination......................................................................................................................18
Physical inspection........................................................................................................................18
Repairing punctures and other damages...................................................................................19
Cleaning top and bottom sections...............................................................................................19
Folding.............................................................................................................................................19
Safekeeping....................................................................................................................................20
Platform installation of rodent guard (RG)..................................................................................20
Recycling.........................................................................................................................................21
10.
FREQUENTLY ASKED QUESTIONS AND ANSWERS ..............................................................21
11.
WARRANTY CLAUSE.......................................................................................................................23

4/23
GrainPro® Cocoon™ Lite Instruction Manual
MA4061RAD1117-1
The GrainPro®Cocoon™ Lite comes to improve the performance, handling, and cost of the
previous generation of PVC Cocoons. It is made of a lightweight yet uniquely developed sturdy
laminated PE material for ease in handling. It has an extremely low Oxygen Transmission Rate
(OTR) and low Water Vapor Transmission Rate (WVTR) to improve storage performance and it
is optimal UV Protection to make the Cocoon™ Lite applicable for outdoor installation.
Standard sizes of the Cocoon™ Lite are from 5 Metric Tons to 20 Metric Tons capacities. It may
also be used for Carbon Dioxide Fumigation by introducing CO2 gas into the side Inlet Port and
discharging the Oxygen on top by an Outlet Port. For a more confident storing, Relative Humidity
can be visually checked thru its transparent plug RH indicator, also a gas-sampling port for
monitoring the Oxygen Level inside the Cocoon™ Lite using the GrainPro® Oxygen Analyzer.
1.1.
FEATURES:
1.1.1.
Preserves grain quality for long period of storage.
1.1.2.
Safe storage of commodities without using toxic and harmful fumigants.
1.1.3.
The product can be stored at ambient temperature instead of alternative, energy consuming
cold storage method where low temperatures are required to prevent insect infestation and
biochemical deterioration.
1.1.4.
Weather-resistant and UV-protected (can be used indoor or outdoor).
1.1.5.
Mobile and easy to install, no need for any infrastructure.
1.1.6.
No maintenance and operation cost.
1.1.7.
“Green” product fits the demands of organic growers.
1.1.8.
Inhibits mold growth and aflatoxin production.
1.1.9.
Control’s insect infestation by depleting oxygen and increasing carbon dioxide in a gas
tightcontainer.
1.1.10.
Allows user to check oxygen and humidity levels.
1.1.11.
A “green” technology for organic product storage.
1.2.
PRODUCT GUARANTEE:
1.2.1.
In accordance with the terms and conditions herewith, GrainPro®Inc. fully guarantees the
quality of this product if it is used according to the instructions stated in this manual.
1.2.2.
Please read and understand the manual thoroughly before using the Cocoon™ Lite.
1.3.
COMMENTS, COMPLAINTS, AND/OR CLARIFICATIONS:
1.3.1.
Please contact customercare@grainpro.com.
1.3.2.
All queries will be answered by our team of post-harvest solutions experts.
1. INTRODUCTION

5/23
GrainPro® Cocoon™ Lite Instruction Manual
MA4061RAD1117-1
Please inspect your GrainPro®Cocoon™ Lite to ensure that the package includes the following items:
PART NAME DESCRIPTION IMAGE
2.1.
CARRY BAG 2.1.1. Contents:
a.
Cocoon™ Lite
(Top and Bottom)
b.
GrainShade™
c.
Small parts
d.
Instruction
manual
e.
Repair Tape
2.2.
ZIPPER PULL 2.2.1. For zipper sealing.
2.2.2. Two (2) pieces
2.3.
REPAIR TAPE 2.3.1. Repairing and
patching of damages
(holes, tears)
2.3.2.
One (1) piece
2.4.
TAPE MEASURE 2.4.1. For checking height
of stack.
2.4.2.
One (1) piece
2.5. GRAINSHADE™ 2.5.1. For outdoor
installation.
2.5.2. One (1) piece
2. CHECKLIST

6/23
GrainPro® Cocoon™ Lite Instruction Manual
MA4061RAD1117-1
2.6.
EXTRA ROPE 2.6.1. For tying the
GrainShade™.
2.6.2.
Ten (10) meters long
(minimum length)
2.7.
RODENT GUARD 2.7.1. For platform posts to
prevent rodent access
when storing the empty
Cocoon™ Lite.
2.7.2.
Four (4) pieces per
pack
2.8
INSTRUCTION 2.8.1. Installation
MANUAL instructions
2.8.2.
Maintenance
instructions
2.8.3.
Frequently asked
questions and answers
2.8.4.
Warranty Clause
3. COMPONENTS

7/23
GrainPro® Cocoon™ Lite Instruction Manual
MA4061RAD1117-1
4.1. MATERIALS
PARAMETERS
STANDARD
Material
Laminated PE
Color
White
Thickness, microns(inch)
300 (0.012)
Weight, g/m2
205
Oxygen Transmission Rate (OTR), cc/m2/day @
23± 0.5℃, RH= 0%
<1
Water Vapor Transmission Rate (WVTR),
g/m2/day
2
Sealing mechanism
PE Hermetic Zipper
4.2. PRODUCTS
Cocoon Lite
CAPACITY
(MT)*
LENGTH (A)
cm (inch)
WIDTH (B)
cm (inch)
HEIGHT (C)
cm (inch)
VOLUME
m3(ft3)
GP-CL -005
5
300 (118.11)
160 (62.99)
150 (59.06)
7.2 (254.27)
GP-CL -010
10
338 (133.07)
294 (115.75)
150 (59.06)
14.91 (526.54)
GP-CL - 020
20
450 (177.17)
330 (129.92)
200 (78.74)
29.70 (1048.85)
GP-CL - 050
50
890 (350)
440 (173)
200 (79)
78(2,754)
GP-CL - 100
100
860 (339)
580 (228)
300 (118)
150 (5,297)
GP-CL - 150
150
890 (350)
850 (335)
300 (118)
227 (8,016)
GP-CL - 300
300
1,182 (465)
1,182 (465)
300 (118)
419 (14,796)
*Based on the density of wheat.
6. Recommended maximum moisture content for safe storage (wet basis)
COMMODITY
RECOMMENDED MC
Barley
12%
Black Pepper
10%
Cashew nuts
8%
Chia seeds
7%
Chickpeas
12%
Cocoa beans
7%
Coffee beans
12%
Cotton seed
10%
Cowpea
12%
Maize
13.5%
Millet
12%
Mung bean
12%
Oats
12%
Paddy
13.5%
Paddy, rice bran
11%
Peanuts, shelled
7%
Red Chili Pepper
8-10%
5. WARNING!
5.1
Do not put fresh commodities with high moisture content inside Cocoon lite.
5.2
Do not wear shoes with spikes as this might cause damage to the Cocoon Lite.
5.3
Do not directly install the Cocoon Lite without clearing away debris and other foreign materials.
5.4
Do not smoke while installing, cigarette butts might burn and damage the Cocoon Lite.
5.5
Do not put the Cocoon Lite on top of wooden pallet or equivalent to prevent puncture by sharp
edges and nails.
5.6
Do not keep the Cocoon Lite unclean. (Refer to 9.4)
5.7
Do not allow loading vehicles (i.e., forklift/trucks) to run over the Cocoon Lite as this will cause
damage to the P.E. material.
4. SPECIFICATIONS

8/23
GrainPro® Cocoon™ Lite Instruction Manual
MA4061RAD1117-1
Rice, milled
12%
Rye
12%
Sesame
5.5%
Sorghum
12%
Soybean
12%
Sunflower
7%
Wheat
13%
You may also contact us through customercare@grainpro.com for more information or for
commodities that are not on the list.
7.1. SITE SELECTION
7.1.1.
In selecting a site, look for:
a.
Cocoon™ Lite is designed for both
indoor and outdoor installations.
b.
A smooth area away from standing or
running water.
c.
Ensure that the site is protected from
stray animals and from theft.
d.
Shade (otherwise under a
GrainShade™) to minimize temperature
differences.
7.1.2.
Prepare the selected site by clearing away all sharp objects (stones, broken glass, nails,
etc.) that may puncture the Cocoon Lite™. Sufficient space to accommodate the Cocoon™
Lite and an inspection path around (at least 50 cm each side).
7.1.3.
If ground will be used as flooring, put a
layer (5cm) of fine sand (or any
equivalent) on top of the soil as ground
foundation.
7.1.4.
During loading, make sure that workers do not
wear shoes with spikes that may damage the
Cocoon™ Lite. Preferably, choose a site that
offers ease in loading/unloading, away from
crowded areas and rubbish. For indoor
installation, clean the area to remove sharp
objects.
7.2 TERMITE CONTROL
7.2.1.
Overview of Termite
7.2.1.1.The two most common types of termites
are "dry wood" and "ground," or
subterranean termites.
7.2.1.2.Termites need moisture to survive and will
die if exposed to sunlight or open air for
more than a few minutes. Their tunnels
protect them from these elements.
7.2.1.3.High moisture areas like basements and
crawl spaces are very attractive to termites
and can serve as starting points for an
infestation.
7.2.2.
Description (Subterranean Termite)
7.2.2.1.Food and moisture:
7. INSTALLATION

9/23
GrainPro® Cocoon™ Lite Instruction Manual
MA4061RAD1117-1
▪Need a great deal of moisture from soil or damp wood. Cellulose (from wood) is
part of their diet.
7.2.2.2.Habitat:
▪Usually, they live in the soil but can be above ground if enough moisture is present.
They have large colonies.
7.2.2.3.Evidence of activity:
▪Protective mud tubes ascending from the ground to the structure or protruding from
walls, etc.
7.2.2.4.Prevention:
▪Treat the soil before construction using termiticide.
▪For more information search for Chemical Soil Treatment.
▪A termite bait station monitoring system to monitor termite activity and bait
placements after detection.
▪Regular inspections.
7.2.2.5.Control Measures:
▪With current activity use a baiting program or a termite barrier treatment.
7.2.3.
Termite Treatments
7.2.3.1.The traditional method of controlling subterranean termites was to apply a liquid pesticide,
known as a termiticide, to the soil. This chemical treatment relied on the application of a
chemical barrier around and beneath the structure designed to block all possible routes of
termite entry. Any termites attempting to penetrate through the treated soil were either killed
or repelled.
7.2.3.2.There are several different insecticides currently used by pest control operators for termite
soil treatments. All of them are safe and effective when used per label directions. The
insecticides remain effective in the soil for approximately 5 to 10 years.
7.2.3.3.Effective termite treatments require a great volume of termiticide.
7.3. RODENT CONTROL
7.3.1.Prevention:
7.3.1.1. Eliminate unnecessary folds on the sidewalls of the Cocoon Lite when installed.
7.3.1.2. Remove all potential sources of food from the premises, such as scattered grains,
etc.
7.3.1.3. Remove all trash and debris around the Cocoon Lite as it may use as a shelter of
rodents.
7.3.1.4. Keep trash cans closed with tightly fitted lids and should be away from the Cocoon
Lite.
7.3.1.5. Trim trees, bushes, and vines at least 1.5 meters away as it may be use by the
rodents to crawl on top of the Cocoon Lite.
7.3.2.Procedure in installing wire mesh: (Optional)
For ground installations and for areas with high risk of rodents’ attack, it is highly recommended to
use wire mesh not larger than ¼ inch to exclude mice.
7.3.2.1. To install the wire mesh, prepare the
selected site by clearing away all sharp objects
(stones, broken glass, nails, etc.) that may puncture
the Cocoon Lite.
7.3.2.2. Cut the wire mesh of at least 50
centimeters wider than the bottom of the
Cocoon Lite.
7.3.2.3. Spread the wire mesh before the fine sand
and equivalent as a recommended
protection of the Cocoon Lite.
7.3.2.4. Then, follow the standard procedure on how to install Cocoon Lite.

10/23
GrainPro® Cocoon™ Lite Instruction Manual
MA4061RAD1117-1
7.3.3.Procedure for installing GI sheet: (Optional)
7.3.3.1. Install the GI sheet 1meter away from the
sidewall of the Cocoon Lite.
7.3.3.2. Make sure that the GI sheet have wooden
posts or any equivalent that can withstand the
wind.
7.3.4.Requirement for GI sheet:
7.3.4.1. Length varies on the capacity/measurement of the Cocoon Lite.
7.3.4.2. Height is at least 80 centimeters.
7.3.4.3. Gauge or thickness is at least 16.
7.4. LOADING
7.4.1.
Check the moisture content of the
commodity to ensure the MC is at a safe
level.
7.4.2.
Loading the bottom section:
a.
Unfold the bottom section of the
Cocoon™ Lite and lay it out on the
prepared site.
b.
Start piling the sacks on the bottom
section.
c.
Put down the first four bags on every
corner of the Cocoon™ Lite (one for
each corner).
d.
Make sure that the bottom section is
stretched by pulling the corners with
the bags. Stretching will reduce the
risk of rodent damage.
7.4.3.
Required stack height:
a.
Load the first layer of sacks in one
direction.
b.
Continue adding layers in an
interlocking manner (crisscross), i.e.,
onelayer on the top of the previous
layer.
c.
Stack sacks to the corresponding
heights.
7.4.4.
Mechanical loading of bagged commodity, optional for big sizes of Cocoon™ Lite:
a.
Stacking of grains involves diverse operations such as conveyor, forklift, or crane.
b.
Operations provide continuous stacking without delays especially for outdoor installation.
Conveyor Forklift Crane

11/23
GrainPro® Cocoon™ Lite Instruction Manual
MA4061RAD1117-1
7.4.5
The top layer:
a.
Continue piling the sacks until the desired
Cocoon™ Lite height is reached.
b.
Once you have reached the required
stacking height, provide one line of sacks in
the middle along the longitude of the stack.
c.
This creates a crest that will keep rainwater
from accumulating on the top of the
Cocoon™ Lite.
7.5. POSITIONING THE TOP SECTION
7.5.1.
There are several ways to place the top section:
a.
By the rolling.
b.
Using a mechanical aid (forklift and conveyor).
Rolling method Use of forklift Use of conveyor
7.5.2.
Unfold the top section over the stack and be sure that the top and bottom section arrows
meet and make sure the tension straps are on the outside.
7.5.3.
Pull the sides all the way down over the stack.
7.5.4.
Do not pull or carry the top section by the tension straps.
COCOON
LITE
CAPACITY
Desiccant Required (CaCl2)
for one (1) month of storage
Desiccant Required (CaCl2)
forSix (6) months. of
Storage
(MT)
grams
gram
s
GP-CL -005
5
50
300
GP-CL -010
10
100
600
GP-CL -020
20
200
1200
Note: Desiccant (Calcium Chloride, CaCl2) is not included in the
package.
7.6.1.Required dosage of Calcium Chloride, CalCl2.
Place the packed desiccant (Calcium Chloride, CaCl2), at the middle-top portion of
thebags inside the Cocoon™ Lite before Zipping.
If six (6) months of storage, spread-out the packed desiccant (Calcium Chloride, CaCl2) atthe
top portion of the bags inside the Cocoon™ Lite before Zipping.
7.6. USE OF DESICCANT (CALCIUM CHLORIDE, CaCl2) - (RECOMMENDED))

12/23
GrainPro® Cocoon™ Lite Instruction Manual
MA4061RAD1117-1
7.7. ZIPPING
7.7.1. Preparing to zip:
a.
Insert one hand inside the inverted pocket.
b.
Press the zipper to manually close the track to
a length of at least 30cm before using the
zipper pull.
7.7.2.Engaging the zipper pull:
a.
Insert the lower section of the zipper pull
(attached to bottom section of CocoonTM Lite)
to the zipper track.
b.
Insert the top section of the zipper track
(attached to the top section) to the zipper pull.
Make sure that the two zippers are aligned and
overlap each other.
c.
Move the zipper pull towards the zipper track
until the zipper pull is completely aligned/locked
with the engaged zipper section.
7.7.3.
Using the zipper pull:
a.
After engaging the zipper pull, then pull to start
the zipping/closing process.
b.
To make the zipping easier, a second person
should pull the top and the bottom section of
the sidewall until the arrows are properly
aligned.
.

13/23
GrainPro® Cocoon™ Lite Instruction Manual
MA4061RAD1117-1
7.7.4.
Completing the zipping process:
a.
As you go around the CocoonTM Lite,
take note of the marks (“arrows”) printed
on both top and bottom sections in
pairs. The arrows are located just few
centimers above the zipper.
7.7.5.
Removing the zipper pull:
a.
When you have zipped the CocoonTM
Lite and reached the inverted pocket,
take the zipper pull out the
track.Disengage the zipper pull by
turning counterclockwise from the zipper
track.
b.
Close the last few centimeters of the
zipper track by manually pressing the
zipper into the inverted pocket unti both
zippers are airtightly closed.
7.7.6.
Ensuring a complete hermetic closure:
a.
Check to ensure the entire length of the
zipper track is fully closed.
b.
If not, press the zipper halves together by
hand.
7.7.7.
To open the CocoonTM Lite zipper, use only the
tip of the zipper slider to prevent it from possible
damage.
Note:
▪
Dirt or other objects on the zipper trac can prevent it from closing completely. So, it is
important to clean the zipper track before closing/ zipping.
▪
If the temperature rises from 40 degrees Celsius and above, refrain from zipping the
CocoonTM Lite as it may possibly deform or damage the zipper. Resume zipping during
early in the morning or when the temperature drops to 35 degrees Celsius.'

14/23
GrainPro® Cocoon™ Lite Instruction Manual
MA4061RAD1117-1
7.8. PRESSURE DECAY TEST (PDT)
7.8.1.
After completely zipping and closing all the ports
of the CocoonTM Lite, perform a Pressure
{Vacuum} Decay Test (PDT) to ensure gas-
tightness:
a.
Use a digital manometer.
7.8.2.
Either a commercially available or improvised U-
tube manometer can be used to monitor the
pressure.
7.8.3.
Connect the manometer hose into the flexible
inlet (gas sampling port) of the Cocoon lite.
7.8.4.
Use a vacuum pump [at least 2.3 cubic meters
per minute with 600 watts (0.80 horsepower)
centrifugal pump]:
a.
Connect the vacuum pump hose to the inlet
port of the CocoonTM lite.
b.
Create at least -250 pascals (Pa) or -25
millimeters’ water (mm H2O) vacuum.
Doing this can also help engage the zipper tracks properly as there may be imperfections during
zipping.
▪
For it to be considered sufficiently airtight, the final pressure should not be greater than
one-half (1/2) of the initial pressure (created by the vacuum pump) within five (5)
minutes.
▪
If the PDT test failed, check for holes/tears and poorly sealed zipper then repeat the
PDT procedures.
7.9. TENSIONING OF STRAPS
7.9.1.
Pull the protective flap down over the zipper track.
Tighten the straps to pull any slack on the sidewall
up away from the ground. Check that the protective
flap over the zipper track is not displaced.

15/23
GrainPro® Cocoon™ Lite Instruction Manual
MA4061RAD1117-1
7.9.2.
The tension straps are long enough to raise and
apply tension to the sides of the CocoonTM Lite,
even if it is only three-quarters full. The required
tension can be achieved by attaching the cords to
the buckles of the CocoonTM Lite.
7.10. MONITORING THE OXYGEN LEVEL AND RELATIVE HUMIDITY (RH%)
7.10.1.
Use of an oxygen analyzer:
a.
During the first 15 days of installation,
oxygen level should be checked daily using
oxygen analyzer.
b.
Succeeding monitoring should be done
twice a week. Normally, oxygen levels
should drop 1-2% per day to a level less
than 3% (though lower levels have been
observed as well). Oxygen levels go up by
few percent but must not exceed 7%. Except
for coffee beans and seeds, in this situation,
sealing is probably compromised, and the
commodity may not be adequately protected.
c.
When the oxygen does not drop for 3 to 7
days or increase in carbon dioxide is not
observed, check for pinholes or damage in
the Cocoon sections.
Note:
▪
Carbon dioxide flushing must be also recommended for commodities that are fumigated or
processed (i.e., milled rice, yellow split peas).
▪
When planning to store for 2 months or less, carbon dioxide flushing is recommended to
ensure control of insect infestation.
7.10.2. Use of humidity indicator:
a.
The humidity indicator is a special circular paper with moisture-sensitive chemical.
Its color changes from blue to pink when relative humidity exceeds 65%, and vice
versa.
b.
The humidity indicator provides an affordable and quick reference to relative
humidity inside the CocoonTM Lite.
c.
It is easy to use and does not require meticulous preparation for installation.
d.
The material is non-toxic, and disposal does not need any special treatment.
e.
Procedures on how to use the humidity indicator:

16/23
GrainPro® Cocoon™ Lite Instruction Manual
MA4061RAD1117-1
7.10.3. Instruction when Indicator turned Pink:
a.
Replace the pink indicator with an unused (blue) indicator. Make sure the plug is dry
and the replacement is done quickly (Cover threaded flange to not let in too much air
inside).
b.
Monitor the indicator for 4-8 hours.
c.
If the indicator turned pink within 4-8 hours, use other devices to check for the
humidity inside or consult GrainPro®.
d.
If the indicator did not turn pink, continue to monitor. Repeat procedure if the
indicator changes.
Note:
▪
Place unused Humidity indicators on a sealed container with the included desiccant.
▪
Humidity indicator cards with pink or lavender spots can be turned to a blue color by
placing indicators in a sealed container with 33 grams (I unit) of desiccant for 4-8 hours or
oven dry for 10-20 minutes, set the oven to 50 ºC (122 ºF).
7.11. DISMANTLING
7.11.1. Although CO2 is not toxic, it is an asphyxiant and is advisable to unzip the CocoonTM Lite
and wait until most of the CO2has dispersed.
7.11.2. Although the CocoonTM Lite may be progressively filled over several days as the
commodity is harvested and provided, they have the same moisture content, it is not
recommended to top-up a CocoonTM Lite that is still partially filled from a previous harvest,
with commodity brought in from the new harvest. This is because when the new commodity
is tapped from top, the old commodity from the previous harvest is left at the bottom.
7.11.3. This commodity will only be unloaded at the end of storage:
a.
Unfastening the tensions straps.
b.
Using a coin, insert and twist the zipper (sharp objects should not be used for
opening the zipper).
c.
Gently pull the two sections apart, taking the top sections completely off.
d.
Remove the sacks of stored commodities (again, a stairway of sacks might make
the job easier.)
Get a humidity indicator from the pack.
Put the humidity indicator inside the
transparent plug using the clip
Attached the transparent plug to the
threaded flange tightly.
Hide the humidity indicator with the
zipper cover.

17/23
GrainPro® Cocoon™ Lite Instruction Manual
MA4061RAD1117-1
8.
PREVENTING CONDENSATION
8.1. WHY DOES CONDENSATION OCCUR?
8.1.1. Condensation is caused by temperature difference i.e., hot weather by day and cool at night
or sudden rains in a hot sunny day. When air collides with a cool surface at dew point
temperature the water in the air condenses on the surface. Air movement inside the
CocoonTM Lite follow the natural forces i.e., in convention currents hot air rise and cool air
sinks (except for the phenomenon called inversion). Hence, when warm air inside the
CocoonTM Lite rise and hit the cool CocoonTM Lite top cover at dew point temperature,
condensation reaction occurs, and water condenses.
8.1.2. Therefore, avoiding trapped warm air inside the CocoonTM Lite can prevent condensation at
the top layer. This is the role of the GrainShadeTM i.e., prevents heating up the air inside the
CocoonTM Lite by repelling solar radiation. Condensation can be checked manually through
the inspection port. Close the inspection properly after checking.
8.2. MOISTURE CONTENT (MC) REQUIREMENT FOR SAFE STORAGE
8.2.1. Commodities should be dried before storage to at least 12% MC for sorghum, 9-10% millet,
12-14% for paddy, and maize, and 13% wheat.
8.2.2. When the commodity is properly dried, there is virtually no “free water” that the
microorganisms can use to process the nutrients in the stored product for their growth and
development.
8.2.3.This condition can be maintained by avoiding ambient air (with variable moisture content) to
be in contact with the dried product using the hermetic storage technology.
8.3. SETTING-UP THE GRAINSHADE (OUTDOOR INSTALLATION)
8.3.1. Ensure that the poles are rigid and stable:
a.
Use poles (pipe, lumber, or bamboo) at
least 1.5 meters away from each corner
and 1.0 meter higher than the CocoonTM
Lite.
b.
Connect the corners of the GrainSahed to
apex of the poles, maintaining at least 1
meter clearance between the top surface
of the CocoonTM Lite and the
GrainShadeTM.
c.
Additional wires to reinforce the pole by tying at the top with the other end pegged to
the ground away from the pole.
8.3.2. If poles are not feasible, tie the GrainShadeTM to nearby posts, walls, tree branches, or pegs
for support.
8.3.3. To prevent from sagging and flapping during rain and strong wind, install a wire or rope
beneath and above the GrainShadeTM.

18/23
GrainPro® Cocoon™ Lite Instruction Manual
MA4061RAD1117-1
9. MAINTENANCE AND CARE
9.1. REGULAR EXAMINATION
9.1.1. Measure oxygen concentration using oxygen
analyzer (GrainPro®Handheld or ICA model).
a.
First-two weeks –Daily
b.
Succeeding days –Twice a week.
9.1.2.Check (at least weekly) possible condensation
by opening (and reclosing) the checking port).
9.2. PHYSICAL INSPECTION
9.2.1. Check the zipper track for any small
opening/s and push the opened track section
by hand.
9.2.2. No slack material should be developed near
the ground.
9.2.3. If slack is observed, re-adjust the tension
straps to pull up any slack side wall away from
the ground.

19/23
GrainPro® Cocoon™ Lite Instruction Manual
MA4061RAD1117-1
9.2.4.During rainy season, the upper surface of the
CocoonTM Lite should be regularly inspected for
water accumulation and damages that would
permit water to sip into the CocoonTM Lite. The
stored commodity is not adequately protected if
the CocoonTM Lite is not completely sealed.
9.2.5. Re-tensioning of wires to prevent from sagging
and flapping during rain and strong wind.
9.3. REPAIRING PUNCTURES AND OTHER DAMAGES
9.3.1. Repair procedures:
a.
Use the repair tape found in the repair kit to
patch the damaged sections.
b.
Clean the surface of the damaged area with
damp cloth and allow to dry before applying
the repair tape.
c.
Cut-out a piece large enough to cover the
damaged section to be applied at the outside
surface of the CocoonTM Lite.
d.
Manually press the patching tape against the
damaged area.
9.3.2. Protective maintenance:
a.
Check the patched repair tape occasionally and replace if necessary.
9.4. CLEANING TOP AND BOTTOM SECTIONS
9.4.1.If necessary, Clean with soap and water.
9.4.2.Dry under the sun.
9.5. FOLDING
9.5.1. Measure 180 cm from the end and fold inside.
9.5.2. Fold any extra material and finally fold in half.
9.5.3. Fold the material lengthwise until it fits in the carrying bag.

20/23
GrainPro® Cocoon™ Lite Instruction Manual
MA4061RAD1117-1
9.5.4. Folding procedures and repacking of the CocoonTM Lite.
9.6. SAFEKEEPING
9.6.1.The empty CocoonTM Lite should be stored away
from heat or direct sunlight and away from rodent.
9.6.2.Do not place heavy object on top of the stored
liner as it may damage or deform it.
9.7. PLATFORM INSTALLATION OF REDENT GUARD (RG))
9.7.1. For protection against rodent attacks (one set
contains 4 pieces of rodent guard):
a.
One set can be installed on any platform
legs with leg perimeter (round or square)
of 22 cm (9”) to 44 cm (17”).
b.
If the leg area is smaller, the rodent
guard can be optionally cut in half to fit.
Cut along the lines at the back of the
rodent guard.
A
B
C
D
E
F
Other manuals for COCOON LITE
1
Table of contents
Popular Outdoor Storage manuals by other brands

Palram
Palram CANOPIA RUBICON 6x5/2x1.5 How to assemble

habitat et jardin
habitat et jardin Vegas 938 52409 Assembly instruction

Keter
Keter SCALA 6x5 user manual

STOREHAUS
STOREHAUS EL-3048x1829-WD0-D1-PT Instructions for assembly, maintenance and safe use

Rowlinson
Rowlinson SS197C Assembly instructions

STILLA
STILLA Palmwood Assembly instructions