6. Sicherheitshinweise
1. Entfernen Sie die Motorabdeckung, schließen Sie das Ablassrohr an und befestigen Sie den Luftfilter, bevor der Kompressor das erste
mal gestartet wird (Abb. 4).
2. Lösen Sie nie Teile des Kompressors während im Behälter noch Druckluft vorhanden ist.
3. Arbeiten Sie nie am Stromkreis des Kompressors ohne den Netzstecker
abgezogen zu haben.
4. Verstellen Sie das Sicherheitsventil nicht grundlos.
5. Betrieben Sie den Kompressor ausschließlich mit der vorgeschriebenen
Netzspannung.
6. Ziehen Sie zum ausschalten nie den Netzstecker, sondern stellen Sie den
Schalter aus „aus“.
7. Wenn das Ablassventil nach ausschalten des Motors nicht funktioniert, sollten
Sie das Problem sofort beheben. Andernfalls könnte der Motor beschädigt
werden.
8. Neues Schmieröl muss sauber sein. Der Ölstand muss roten Anzeigekreis gehalten werden.
9. Um den Kompressor komplett von der Netzspannung zu trennen, ziehen Sie den Netzstecker.
7. Wartungsanweisungen
1. Nach den ersten 10 Betriebsstunden sollte das Kurbelgehäuse gesäubert und das Öl erneuert werden.
2. Der Ölstand sollte alle 20 Betriebsstunden überprüft und falls nötig nachgefüllt werden.
3. Der Ablasshahn unterhalb des Behälters sollte alle 60 Betriebsstunden geöffnet werden um Kondenswasser zu entfernen.
4. Alle 120 Betriebsstunden sollten Kurbelgehäuse und Luftfilter gesäubert, Sicherheitsventil und Druckanzeiger überprüft und Öl
erneuert werden.
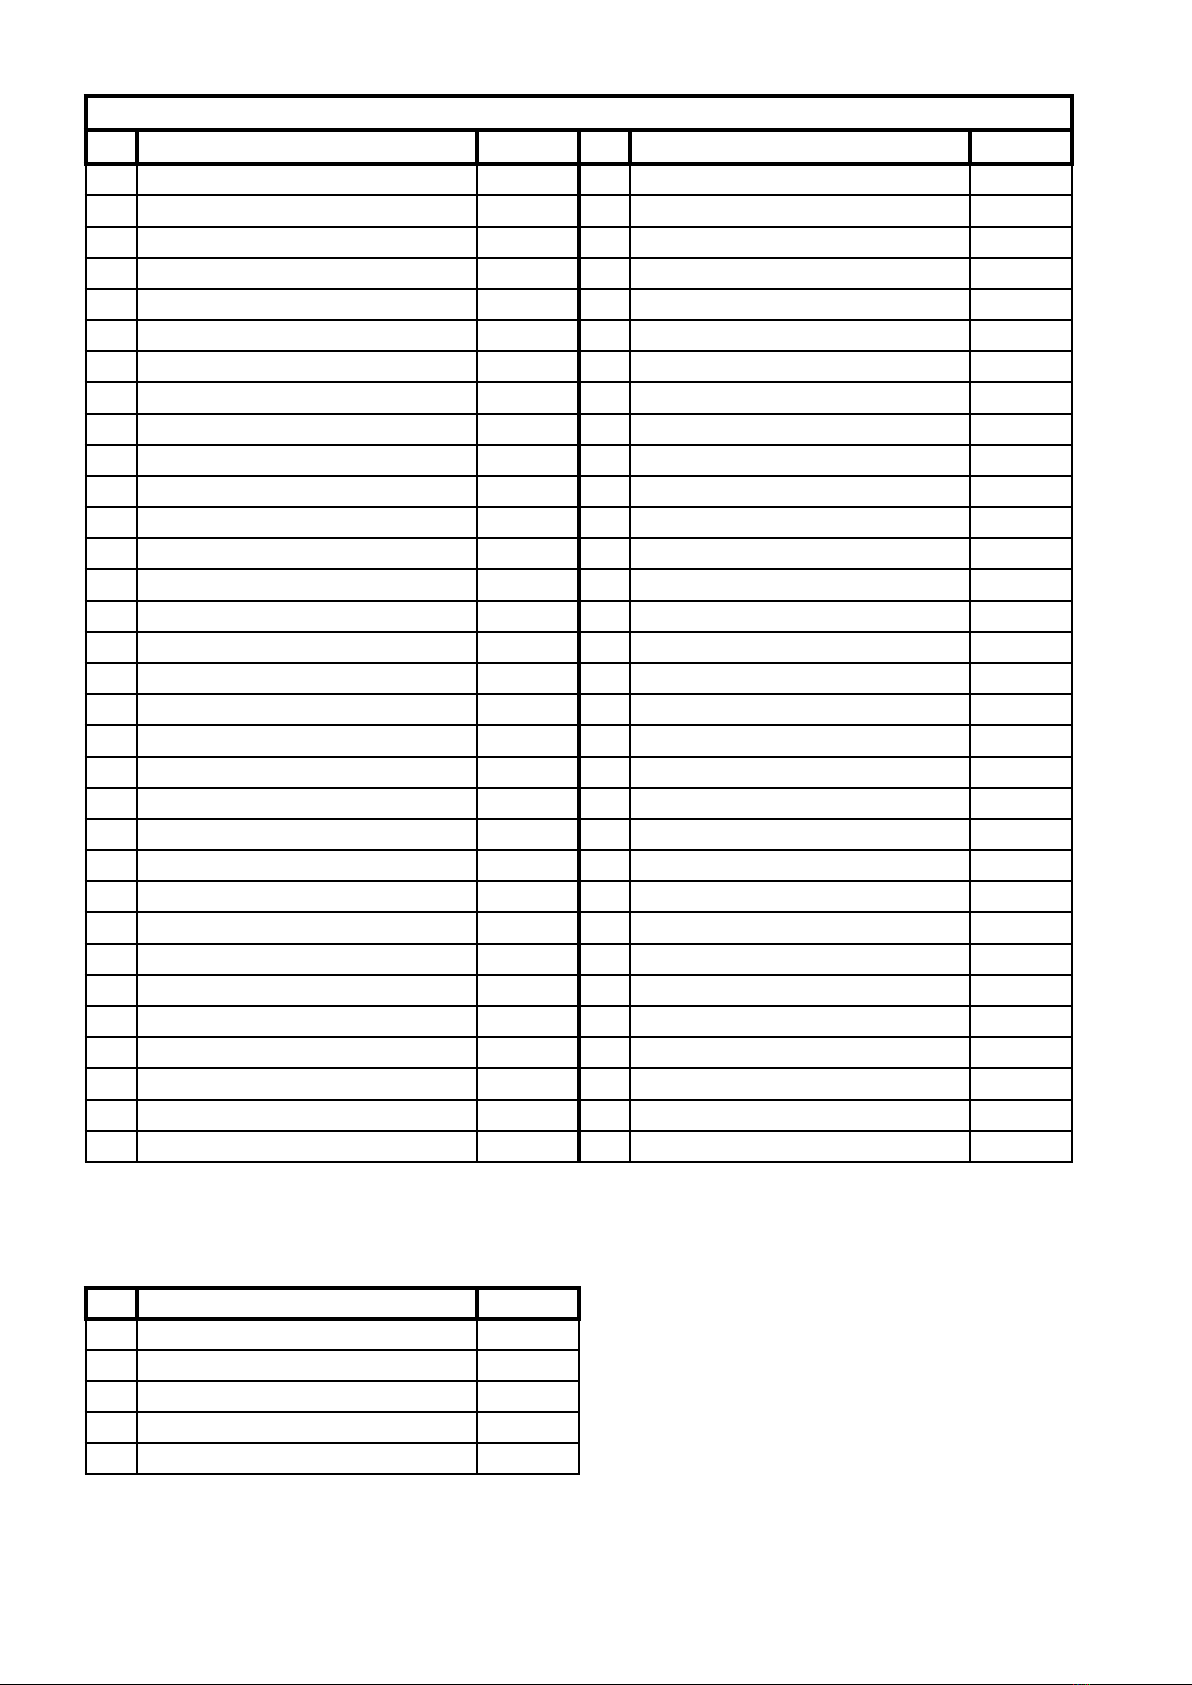
8. Trouble shooting
Störung Mögliche Ursache Behebung
Motor kann nicht gestartet
werden, läuft zu langsam oder
wird zu heiß
1. Ungenügend Spannung oder Fehler im Stromkreis
2. Stromkabel zu lang oder zu dünn
3. Fehlfunktion des Druckschalters
4. Motorfehler
5. Hauptkompressor hängt fest
1. Stromkreis überprüfen
2. Kabel ersetzen
3. Schalter reparieren oder ersetzen
4. Reparieren oder ersetzen
5. Überprüfen und reparieren
Kompressor blockiert
1. Überhitzte bewegende Teile wegen mangelhafter
Schmierung
2. Bewegende Teile durch Fremdkörper beschädigt oder
blockiert
Kurbelgehäuse, Lager, Kolbenstange,
Kolbenring und Kolben überprüfen und ggf.
ersetzen
Kompressor vibriert stark
und/oder macht untypische
Geräusche
1. Verbindungsstück hat sich gelöst
2. Fremdkörper im Kompressor
3. Kolben schlägt gegen Ventilsitz
4. Bewegliche Teile abgenutzt
1. Überprüfen und wieder befestigen
2. Überprüfen und Fremdkörper entfernen
3. Ersetzen durch dickere Dichtung
4. Reparieren oder ersetzen
Mangelhafter Druckaufbau oder
verringerte Entlüftung
1. Motor läuft zu langsam
2. Luftfilter verstopft
3. Sicherheitsventil leckt
4. Entlüftungsrohr leckt
5. Dichtung beschädigt
6. Ventilteller beschädigt oder Rußanhäufung
7. Kolbenring und Zylinder abgenutzt oder beschädigt
1. Überprüfen und beheben
2. Filter säubern oder ersetzen
3. Überprüfen und ersetzen des Ventils
4. Überprüfen und reparieren
5. Überprüfen und ersetzen
6. Ersetzen und säubern
7. Reparieren oder ersetzen
Zu hoher Ölverbrauch
1. Zu hoher Ölstand
2. Entlüftungsrohr verstopft
3. Kolbenring und Zylinder abgenutzt oder beschädigt
1. Ölstand auf richtigem Niveau halten
2. Überprüfen und reinigen
3. Reparieren oder ersetzen
Abb. 4