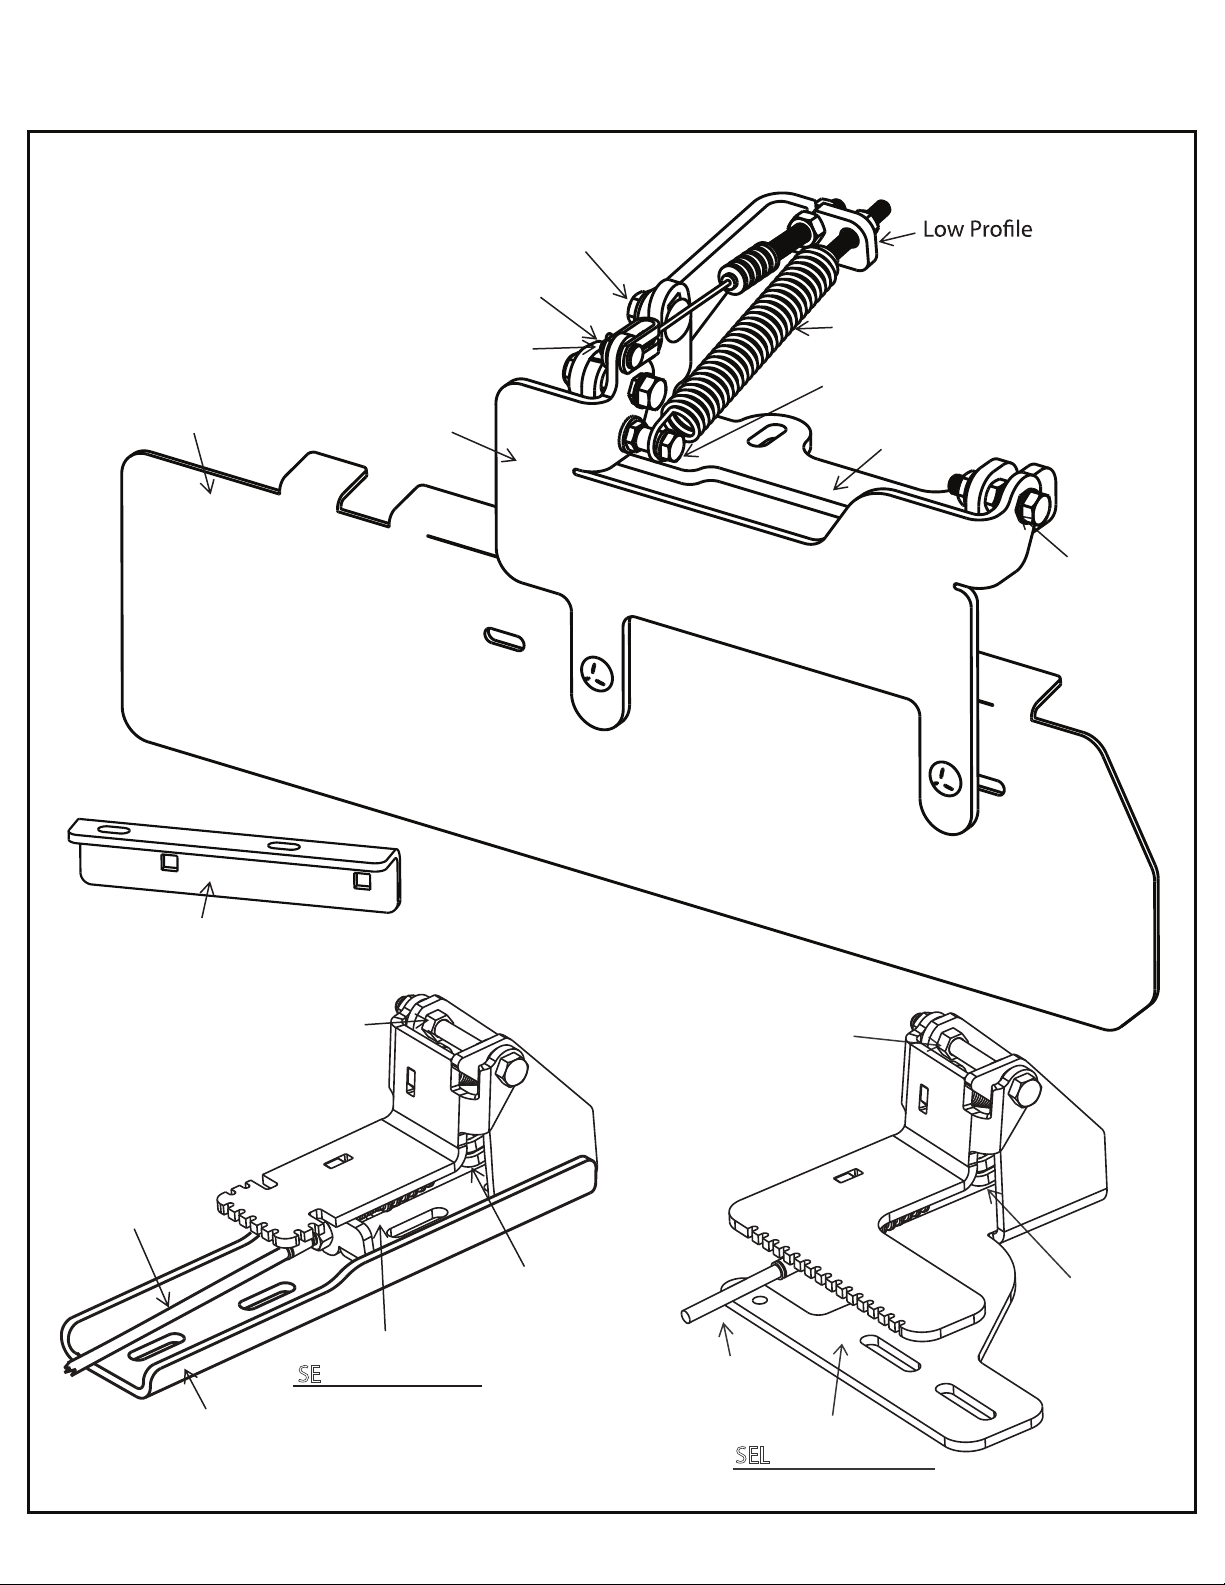
GrassFlap 51FM User manual

51FM GrassFlap Installation Instructions
Rev 8.2022
GrassFlap.com Phone: (502) 594-3546
Parts List
10-99-51
Bushing Kit for
Pedal Hex
10-99-07
Cable 70 Inch
10-99-35
SE Pedal Assembly
10-99-21
Clevis Kit
10-99-52
Bushing Kit for
Flap Hex
10-99-11
Flap Spring
10-99-49
Spring Mount R
10-99-22
Clevis Pin
10-99-47
Flap Mount R
5/16 x 3/4 Hex Bolt
10-99-32 Bushing Spring Bolt
10-99-26 Bushing
11-82-11
Pedal Mount Inline 10-99-41
SEL Pedal Assembly
10-99-08
Cable 50 Inch
10-99-21
Clevis Kit
10-99-51
Bushing Kit for
Pedal Hex
10-99-77
Blocker Plate 1179 10-99-70
Hinge
Plate 1161
11-82-50
No-Drill Mount 1102

STEP 1
GrassFlap.com Phone: (502)594-3546 2
Flap
PLEASE READ!
If you are having ANY ISSUES
with assembly or operation.
Try these video links (scan QR code with phone camera)
Or contact us at:
(502) 594-3546
or
david@grassap.com
(for quicker response include pictures showing area in question)
Help on
Youtube:
How to operate
the GrassFlap:
grassflap.com
Grass

51FM GrassFlap Installation Instructions
STEP 3
GrassFlap.com Phone: (502)594-3546 3
STEP 2
Tools List
Wrench & Socket - 7/16”, 1/2”, 9/16”
Pliers Side Cutter
Mount Pedal to Foot Platform
- SE (5) pedal with Pedal Mount Inline:
Install pedal at center of foot deck with pedal hanging
about 2 inches o the back edge. Use 5/16 ange bolts
and washers provided. Place washer on underside of
foot deck.
- SEL (5L) pedal:
Refer to page 10 for installation.
~2”
SE (5) Pedal with
Pedal Mount Inline
Route cable: Use camera on smart phone to scan
QR code below for specic directions on cable routing.
WARNING: CABLE ROUTING MUST
BE SAME AS SHOWN IN VIDEO OR CABLE WILL BE
DAMAGED BY HEAT FROM MUFFLER OR BELTS.
SEL (5L) Pedal

11-82-50
No-Drill Mount 1102
Secure Flap to No-Drill Mount
Secure ap assembly to angle mount using two
5/16-18 x 1” carriage bolts provided. Hold blocker
plate at against discharge opening as you tighten
bolts.
NOTE: On 32” decks only, the knob for the right side belt
guard cannot be rotated once GrassFlap is installed.
Therefore, reverse mounting bolt and knob on right
side belt guard. Knob should be located in rear
position for ap installation.
Install No-Drill Mount
Mount angle to existing rib using 5/16-18 x 1
carriage bolts as shown.
STEP 5
STEP 6
51FM GrassFlap Installation Instructions
GrassFlap.com Phone: (502)594-3546 4
STEP 4
Connect Spring Mount
A) Remove existing 5/16-18 x 3/4”carriage bolt.
B) Rotate spring mount up as shown.
C) Install 5/16-18 x 3/4” carriage bolt through slot and
snug.
DO NOT
REMOVE

Attach Cable to Foot Pedal
A) Attach Cable to Pedal
- SE (5) & SEL (5L) pedal refer to page 9.
B) Return to step 10 once cable installation is complete.
STEP 7
STEP 8
STEP 9
51FM GrassFlap Installation Instructions
GrassFlap.com Phone: (502)594-3546 5
Install Fixed Clevis End to Spring Mount
A) Pull rubber boot o end of cable tting.
B) Remove nut 1 and slip cable wire into slot.
C) Slide cable tting into hole.
D) Reinstall nut 1 leaving minimum thread showing
on tting as shown below.
E) Snug jam nuts and push rubber boot onto tting.
DO NOT connect clevis to ap at the time.
Connect pedal end rst.
BootNut 1 Fixed Clevis
Nut 2
Attach Flap Spring
A) Ensure pedal is mounted and cable connected to
pedal end.
B) Strech spring to hook on spring bolt by using pliers
to grip open end of spring loop.
SEL (5L) Pedal
SE (5) Pedal

OPTION
STEP 10
51FM GrassFlap Installation Instructions
GrassFlap.com Phone: (502)594-3546 6
Option for Drop-On Bagger
Bend tabs up using crescent wrench to make room
bagger mount.
NOTE: Tabs are designed with slots so they can be bent
as needed. Some paint touch ups may be required
after bending.
Connect Fixed Clevis to Flap
A) Place 1/4”bushing in ap.
B) Slip xed clevis onto ap bushing.
C) Insert 3/16” pin with head on spring side.
D) Insert cotter pin. Open cotter pin and wrap around
3/16” pin.
A
B
C
D

PEDAL END
(Cable Installaon, step 1 and 4, AREAS TO
PAY PARTICULAR ATTENTION TO, Recommended cable roung, WARNINGS)
(Recommended cable roung, SECURE
WITH CABLE CLAMP/ZIP TIE)
Cable Installaon, step 2,
PROPER PEDAL HEIGHT)
(Cable Installaon, step 3, MAINTAINING THE CABLE)
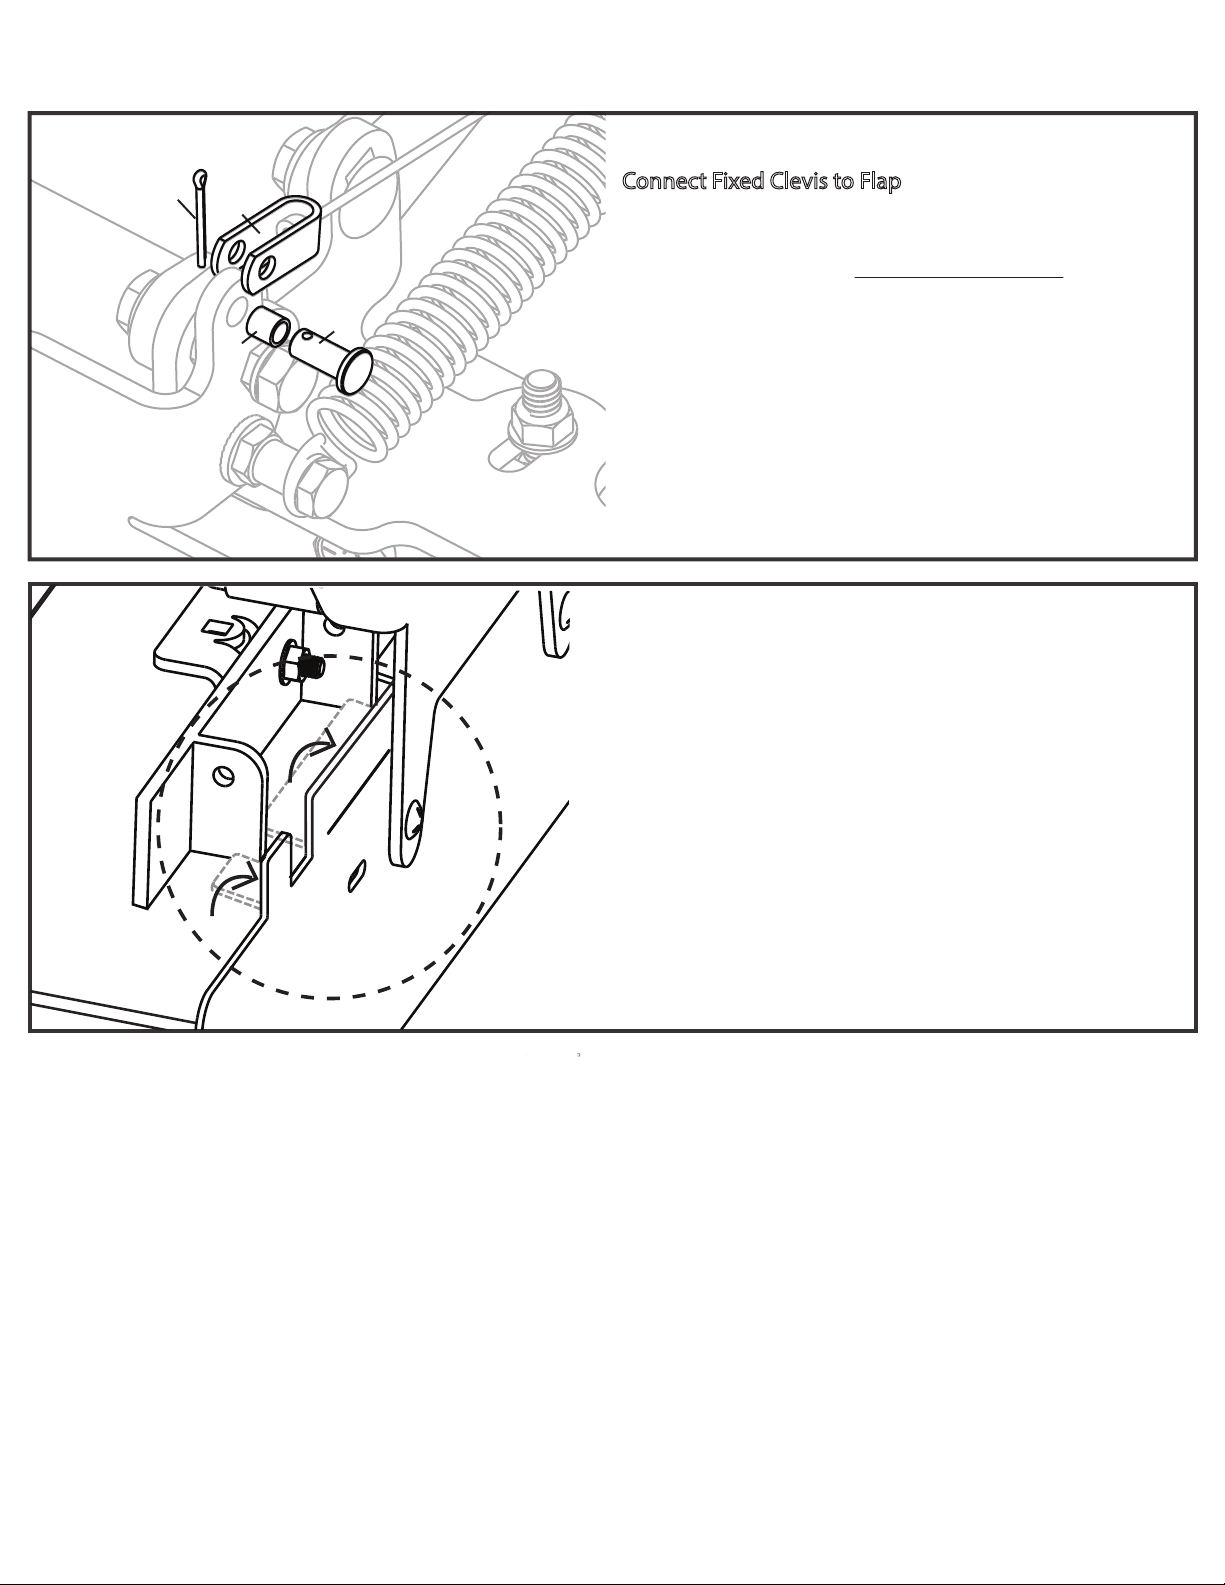
FLAP END
(Cable Installaon, step 1 and 4, AREAS TO
PAY PARTICULAR ATTENTION TO, page 6 installaon guide, WARNING)
ROUTING
(Cable Installaon, step 4, AREAS TO PAY PARTICULAR
ATTENTION TO)
(Cable Installaon, step 5, REFERENCE 6” RADIUS)
(See recommended cable roung)
GrassFlap.com Phone: (502)594-3546 7

GrassFlap Cable Installation
WARNING: PROPER CABLE INSTALLATION AND MAINTENANCE
IS CRITICAL TO LIFE OF CABLE
4) AREAS TO PAY PARTICULAR ATTENTION TO ARE:
1. Do not bend cable wire.
2. Make certain the cable is not in a bind when the deck is raised either manually
or when mowing.
3. Leave enough slack where the cable is tied to mower to keep out of the belts
for the deck to raise and lower without straining the cable.
4. Avoid direct heat on cable, do not route near muer
5. Maintain recommended bend radius of 6 inches for all bends.
3) MAINTAINING THE CABLE:
1. Be sure the rubber boot is in place to keep dirt and water out of cable.
2) PROPER PEDAL HEIGHT:
1. Adjust pedal height so pedal bottoms out with full pressure to
prevent cable from carrying full weight of operator. Start with
cable tting as shown - adjust pedal end to raise pedal, adjust
ap end to lower pedal. Verify pedal height with ap in
balance (half open) position.
DO NOT BEND
1) Improper cable routing WILL cause failure, usually within
the rst month of use. The rst 1/2 inch of cable conduit
(black exible part) must be straight in line with the end tting.
Cable wire near ball must not be bent during installation.
R
e
f
e
r
e
n
c
e
6
”
r
a
d
i
u
s
f
o
r
c
a
b
l
e
r
o
u
t
i
n
g
.
5) MINIMUM BEND RADIUS
GrassFlap.com Phone: (502)594-3546 8
How to set
pedal height:
Pedal End
(1 thread showing)
Flap End
(1 thread showing)
this side
this side

GrassFlap.com Phone: (502)594-3546 9
Step 4
Step 5
Step 2
Position removable clevis onto cable ball.
Step 1
Pull rubber boot o of cable tting and spin nut 1
o of cable tting. Spin nut 2 onto tting so one
thread is showing.
SE & SEL Pedal Cable Installation
1 thread
Nut 1
Nut 2
For video
showing how to
install cable on
pedal scan using
phone camera. SEL (5L) PedalSED (5D) Pedal SE (5) Pedal
Secure with
cable tie
A) Once pedal is installed on mower attach cable clamp
or zip tie to secure cable.
B) Verify everything is in place and secure.
A) Position removable clevis on pedal with clevis slot
on cut out side of pedal.
B) Insert 1/4 pin with head on same side as clevis slot.
C) Insert cotter pin and wrap around pin to secure.
C
A
B
A) Slip cable wire into slot.
B) Spin nut 1 onto tting to secure cable to pedal.
DO NOT OVERTIGHTEN NUTS.
C) Push rubber boot back onto tting.
Step 3

GrassFlap.com Phone: (502)594-3546 10
WARNING:
First ½” after
tting must
be straight
WARNING:
First ½” after
tting must
be straight
Zip Tie Cable
to Pedal
2x
Install Pedal
A) Mark and drill two 11/32” holes, if needed, for pedal
mounting bolts.
B) Tighten two 5/16” x 1” hex bolts to secure pedal
assembly to mower deck.
SEL Pedal Location & Cable Routing
Preferred location for SEL pedal assembly.
WARNING:
First
½” after
tting must
be straight

GrassFlap.com Phone: (502)594-3546 11
GrassFlap's Frequently AskedQues�ons
WHAT TO DO IF YOUR CABLE BREAKS
DO NOT REMOVE cable conduit from the mower, this makes it impossible to determine cause of failure.
FIRST ATTEMPT TO DETERMINE THE CAUSE OF THE FAILURE.
1.REVIEW THE CABLE INSTALATION USING THE CABLE INSTALLATION CHECKLIST,look at each item on the list
from the original installa�on andconfirm the cable is s�ll installed properly. If you find the set-up has changed
then most likely this is the cause of the failure.
IF YOU ARE NOT ABLE TO DETERMINE THE CAUSE OF THE FAILURE AND WOULD LIKE HELP DETERMINING IT,
proceed as follows
2.TAKE PICTURES of cable conduit as it is routed on the mower with broken cable wire alongside the conduit,
just as if wire were run in the conduit. Picture must show both the cableandthe conduit in same picture.
Pictures required for warranty claim.
3.CIRCLE BROKEN END OF WIRE in picture from step2,most phones will letyou edit the picture.
4.EMAIL TO,david@grassflap.com
5.INCLUDE ALL ITEMS LISTED BELOW
a. Pictures of broken cable, (from step 2 above),
b. Picture of Completed“Cable Installa�on Checklist”, (from step 1above).
c.Approximate purchase date of current cable.
d. Where was cable purchased and name purchased under
e. Subject line “BROKEN CABLE”
If you need a cable rightaway it is suggested that you purchase one online so it is headed your way while we review
the informa�on.
MY FLAP ONLY OPENS HALFWAY
The flap is designed to open halfway with the pedal full down. Pushing harder will notcause flap to move. The proper
opera�on is to push the pedal down un�l the flap approaches the half open posi�on then at thatpoint pressure on
the pedal should be release to allow the pedal to rise as the flap passes the halfway point.
CAN THE FLAP BE POSITIONED PARTIALLY OPEN?
Yes, the flap can be held in a par�al open posi�on usingthe foot pedal. Simply hold the pedal in the desired posi�on.
One of the nice features of the GrassFlap is the way the pedal operates to open and close the flap without havingto
push on a separate pedal. You are able to push andrelease the pedal in one smooth mo�on to flip it open and the
same mo�on, push andreleasewill the flip it back to the closed posi�on. In order to lock it somewhere between full
open and full closedwould require a second mo�on to lock and release it.
WILL THE FLAP PUSH OPEN?
Given enough pressure it will push open.It is held close with a spring; the same spring also holds the flap in the open
posi�on. By the �me the flap gets pushedopen there is typically enough grass behindit that you are no longer
making a goodcut.
HOW DO I RETURN GRASSFLAP IF I CHANGED MY MIND?
GrassFlap will only accept returns with prior approval. If you wish to return a product please send an email to
david@grassflap.com explaining the reason for the return request. You will receive a confirma�on email with return
policy and return shipping label. A $35.00 restocking fee will apply, see return policy for addi�onal fees that may apply.
CAN THE DEFLECTOR ANGLE BE MOUNTED TO THE DECK INSTEAD OF THE FLAP?
The deflector angle should travelwith the flap to prevent clippings from blowing straight up as the flap begins to
open.As it first starts to open there is not enough angle to deflect the clippings down so theyend up going both ways
up and down. Without the angle theywill go straight up on onto the operator.Moun�ng the angle to the deck would
only providea good seal when the flap is fully closed.

Safety and Warnings
Thrown objects
Mowing with power equipment involves certain risk including but not limited to thrown objects. Be sure to clean up
the area to be mowed and remove objects that could be thrown by the blades BEFORE you start mowing
Once the grass flap is installed your mower will be equipped with an operator controlled discharge chute (OCDC).
Do not operate the mower if the OCDC is not properly attached. This discharge chute has a variable adjustment
from fully open to fully closed. In the closed position it will serve to keep some of the clipping material under the
mower deck for a longer period of time, in order to enhance the mulching capabilities, as well as function as a
safety shield. The discharge chute should ALWAYS BE IN THE CLOSED POSITION WHEN MOWING WHILE
PEOPLE ARE PRESENT IN THE IMMEDIATE VINCINITY.
Do not allow anyone in the area while mowing. If someone does enter the area, stop mowing immediately until they
leave.
Moving parts
The mower deck has spinning mower blades that can amputate hands and feet. Do not allow anyone near the
mower while it is running! Keep safety devices (guards, shields, and switches) in place and working.
Children
Tragic accidents can occur with children. Do not allow then anywhere near the area of operation. Children are
often attracted to the unit and mowing activity. Never assume that children will remain where you last sat them. If
there is a risk that children may enter the area where you are mowing, have another responsible adult watch them.
General Safety Precautions
1.
Do not mow when children, pets, or others are present. The operator is responsible for the safety of others
within the vicinity of the operation of your mower.
2.
Keep hands, feet, and clothing away from rotating blades or other rotating parts while the engine is
running.
3.
Do not attempt to open or close the flap at the discharge chute while the engine is running, doing so
could result in personal injury including loss of hands, feet or death.
4.
Clear work area of objects (wire, rocks, and debris of any kind) that can be picked up and thrown by the
mower, and possibly damage the equipment or cause personal injury to the operator.
5.
Do not attempt to adjust or repair the mower deck, grass flap, or related components while the engine is
running. You must disengage power to attachments, disengage PTO, set parking brake, set steering
controls to neutral, shut off the engine, and remove the key before making any repairs or adjustments or
attempting any of the following tasks:
a.
Flap connecting linkage adjustment
b.
Flap removal or cleaning
c.
Unclogging the chute
Failure to comply can result in personal injury, loss of limb, or death.
6.
Keep all nuts, bolts, screws, and other fasteners in place and properly secured to be sure
equipment is in safe working condition.
7.
Keep equipment and attachments in good operating condition and keep safety devices, such as guards,
shields and covers in place and working.
8.
Do not operate the mower or attachments if any guards are missing or not functioning.
9.
Stop the mower and attachments, secure the mower, and inspect for damage after striking a foreign
object. Repair any damage before restarting and operating the equipment.
10.
Use personal protective equipment when operating mower of performing maintenance, such as (but not
limited to) protection for eyes, feet, and head. Do not operate or service the mower when barefoot or
wearing open-toed sandals.
11.
Obey all safety decals.
GrassFlap.com Phone: (502)594-3546 12

SAFE OPERATION OF MOWING EQUIPMENT IS THE RESPONSIBILITY OF THE MOWER
OPERATOR! THE GRASS FLAP WHEN CLOSED WILL REDUCE BUT NOT ELIMINATE THE RISK OF
OBJECTS BEING THROWN FROM THE DISCHARGE CHUTE! BE AWARE OF SURRONDINGS AT
ALL TIMES!
WARRANTY
There are no understandings, agreements, representations, or warranties expressed or implied (including
but not limited to any regarding the merchantability or fitness for a particular purpose) not specified herein,
regarding equipment which is the subject of this warranty.
Owner operator Knowledge Responsibility
As a condition of the Grass Flap warranty, the owner operator(s) are fully responsible for having read, and
reasonably understanding the proper operation and care of the Grass Flap unit before attempting to
operate the unit.
Product warranty if for a period of 90 days from date of purchase. Warranty covers defects in workmanship
and materials ONLY.
Limitations of warranty
Proof of purchase including purchase date is required for claim validation. It is the discretion of the
manufacture as to replace or repair a warranted product.
All warranty work must be performed by an authorized Grass Flap servicing dealer ONLY.
This Warranty only covers Grass Flap complete units that have been maintained and operated under
conditions considered normal for turf equipment.
Expressly not covered
a) Damage, defects or deterioration due to normal use, wear, or exposure to the elements.
b) Damage or defects resulting from misuse, neglect, alteration, accident or negligence.
c) Damage or defects resulting from repairs by person(s) other than the manufacturer or a
manufacturer’s representative.
d) Repair or replacements resulting from operation of Grass Flap equipment that has been modified,
or effected with respect to the intended use of the product
e) Repair or replacement as a result of Grass Flap equipment operated in a manner which is not in
accord with the instructions as specified in the operator section or other instructions provided by
Grass Flap.
Grass Flap is not responsible for (nor limited to the following)
f) Travel time, overtime, after hours time or other extraordinary repair charges or charges relating to
repairs or replacements outside of normal business hours at the place of business of the
authorized Grass Flap service dealer.
g) Rental of like or similar equipment during the time of any warranty, or replacement work.
h) Loss, cost or expense relating to transportation of Grass Flap equipment from location of owner
or location where used by owner to or from any authorized Grass Flap dealer
i) Any claims for lost revenue, lost profit or additional cost or expenses incurred as a result of a claim of
breach of warranty.
j) Loss or damage to person or property other than that covered by the terms of this warranty.
k) Losses or damage related to equipment the Grass Flap is mounted on.
l) Any telephone, telegram, travel charges, or attorney’s fees.
Disclaimer
Any and all statements or representations made by seller of this equipment, including those set forth in
any sales literature or made orally by and sales representative are superseded by the terms of this
warranty. There are no representations or warranties, which have been authorized and provided to the
buyer of Grass Flap equipment, other than as set forth in this warranty. Any affirmation of fact or promise
made by Grass Flap or any of its representatives to the buyer which relates to the goods that are the
subject of this warranty shall not be regarded as part of the basis of the bargain and shall not be deemed
to create and express warranty that such goods shall conform to the affirmation or promise
GrassFlap.com Phone: (502)594-3546 13
Table of contents
Other GrassFlap Lawn Mower Accessories manuals