GREAT GREEN SYSTEMS GREEN CONE User manual

1
FOOD WASTE DIGESTER
Installation Manual

2
The following instructions will guide you in assembling your Green
Cone and installing it in a sunny spot in your garden.
Please remember to keep this guide handy throughout the year so that you can
check on any queries that may arise during the changing seasons.
Image of The Green Cone Bundle available at www.greatgreensystems.com
CONGRATULATIONS
ON BUYING YOUR
GREEN CONE

Now It’s Time To Assemble:
STAGE ONE.
The assembly of your Green Cone
It takes just four simple steps to assemble the Green Cone and all you’ll need
to hand is a Crosshead & Flathead screwdriver. Everything is included within
the pack and it should take no more than 15 minutes to assemble.
3
HARDWARE KIT: Lid, green outer cone, black inner cone, basket
TOOLS REQUIRED:
Step 1. You will need to locate the 2 studs, hinge plate
and cone lid.
Then put the ribbed side of the plate on the inside of the
lid and fasten into place via the pre-drilled holes.
Step 2. After gathering the 2(8x5/8) screws and twistlock,
attach it to the main body of the Cone through
themarked holes.
Step 3. Now take the lid, backplate and 3(10x5/8) self-tapping
screws and use them to attach the top of the unit to the
main Cone body. No pre-drilled holes are required for this
step, just remember to screw from the outside, in.
Step 4. You are now ready to connect the 3main components
ofthe Green Cone: green outer cone, black inner cone
and basket. Initially place the green outer cone over
the black inner cone, lining up the screw holes with the
notches on the inner cone. Now sit both these sections
on the basket and use the remaining 6(10x5/8) self-
tapping screws to fastensecurely into place.

4
STAGE TWO.
The installation of your Green Cone
The Green Cone needs a sunny spot that drains well. The water produced by
the Cone must be able to drain freely away, otherwise the Cone will become
anaerobic (without oxygen) and will cease to work. The base of the basket must
not be below the water table or in an area where water gathers.
If you have a naturally damp garden, you can create additional drainage by
placing gravel stones and broken pots underneath the unit.
Step 1. First take a good look around your garden. As well as
choosing a good spot for sun and drainage, you will also
want your Cone to be easy to get to in colder, darker
months.
Step 2. With your perfect spot chosen, it’s time to dig a
foundation hole 70cm wide by 54cm deep, for the unit.
Step 3. Before placing the Green Cone in the hole, mix some of
the dug out soil with a little compost and gravel. This will
be used to pack in the unit and to aid with ltration of
the nutrient-rich water into the surrounding ground.
Step 4. First of all put some of the mix back into the hole then
lower in the Cone. You want the basket to sit 3cm (1”)
below ground level. With the unit in place—ensuring
the bottom lip of the outer cone is below ground level—
backll the remaining gaps with the rest of your soil,
compost and gravel mix.
Please note: After heavy rain, the soil level may drop around
the unit. Check every few weeks and top up with soil should you
need to, always ensuring the green lip is under the ground. It is
worth noting that the base of the basket should never fall below
the water table.

With your Green Cone built and installed, you are now ready to get started
turning your food waste into nutrient-rich water that your garden plants and
vegetables will benet from daily.
5
What Can You Put In Your Kitchen Caddy And Green Cone?
Yes: No:
Bags or liners of any kind, bulk amounts
of oil and fat, shells of nuts and seafood,
metal, wood, plastic, glass, paper,
straw, grass cuttings, hedge clippings,
disinfectant and bleaches, sanitary towels,
medical waste and all chemicals.
Fish, red meat and poultry, all bones,
bread, fruit and peelings, vegetables and
peelings, dairy produce, cooked scraps,
crushed eggshells, teabags and animal
excrement.
Let the Kitchen Caddy be your daily guide to food waste digestion
Keeping the Green Cone running smoothly
Using the accelerator powder with your Green Cone
The Green Cone is supplied with a kitchen caddy for you to ll with food waste
before taking it to empty into the Cone. Please note that bags or liners, even those
which are compostable or biodegradable, should never be placed in the Cone as
this will hinder the digestion process.
The caddy also acts as a useful measure of when to add waste to the digester.
DURING MARCH TO SEPTEMBER: You can empty one full caddy into the Green Cone every 1-2 days.
DURING OCTOBER TO FEBRUARY: You can empty one full caddy into the Green Cone every 2-3 days.
The Green Cone is a very low-maintenance food waste digester and just
requires an occasional check. This mainly involves keeping the ground level
around the Cone above the green lip of the unit and checking that the waste
inside the basket is composting well during colder and darker months. If you
nd that the digestion process has started to slow down during autumn and
winter, additional use of accelerator powder is recommended.
Accelerator powder is a mixture of natural bacteria on a cereal base that
ensures a healthy population of safe bacteria to boost the digestion process.
In order to keep the Green Cone working eciently, it’s a good idea to add a
sprinkle of accelerator powder to your kitchen caddy every few days before
emptying it into the Cone. Aim to use about one sachet of accelerator powder
per month. During colder months you may need to use a little more accelerator
powder.
Your Green Cone is now ready to use

6
How The Green Cone Works
Sunlight
Removeable Lid
Digestion Chamber
Double-Walled Solar Cone
Nutrient-Rich Water
Natural Micro-Organisms
and Worms
Soil
Provides energy source for
the digestion process.
For easy access to the
digestion chamber.
Aerobic conditions
to reduce methane
production.
Creates a heat trap of
circulating air to encourage
bacteria growth.
Enters surrounding ground.
Migrate freely in and out
of the basket and break
down the waste.
Filters out smells
and prevents
access by ies.
Over 90% of the waste material in your Green Cone will be absorbed as water
by the soil. Never over ll the Green Cone, there should only ever be food waste
inthedigestion chamber, no food waste should be in thesolar cone.

7
Q. Is There A Limit To The Amount Of
Food Waste I Can Put In The Green
Cone?
A. You can dispose of up to one kilogram
of waste per day in a well-positioned
and fully working Green Cone. As long
as the unit has a healthy population
of bacteria and a consistent ambient
temperature, it can dispose of the
food waste created by the average
family of four per day.
Q. As Well As Food Waste, Can I Put
Garden Waste In The Unit Too?
A. No, grass cuttings and garden waste
will stop the Cone from working
properly. For garden waste, you
should consider the Green Johanna
composter..
Q. Can I Put My Pet’s Excrement In The
Green Cone?
A. Yes, in moderation, if you are not using
the residue on a vegetable patch and
the Cone is not sited close to water
sources. Pet excrement must be
thrown into the Green Cone directly,
never in a bag. Bags of any sort, even
compostable or biodegradable, will
prevent the Green Cone from working
properly. Avoid adding cat litter as this
may contain antibacterial agents and
its quantity could quickly overwhelm
the Cone.
Q. Do I need to mix or stir the
Contents?
A. No, The Green Cone is designed to
break down waste naturally without
assistance.
Q. Will My Green Cone Work Every Day
Of The Year?
A. Yes, although it may slow down a little
on darker, colder days. But a little
accelerator powder will keep it working
as usual no matter what the weather.
Q. Does The Cone Need Any Chemical
Activators?
A. No, any articial additives will aect
the way the Cone’s natural bacteria
works to break down the food waste.
Q. Will My Green Cone Ever Need To
Be Emptied?
A. With a well working and well-
maintained Cone you may need to
empty and clean it once every few
years. Very little waste residue will be
produced. Should the residue build
up to ground level and not decrease,
the Cone can be removed to access
the basket and the residue dug into
any suitable area of ground.
Q. How Do I Clean The Kitchen Caddy?
A. Simply hand wash it in warm soapy
water. Do not put in the dishwasher.
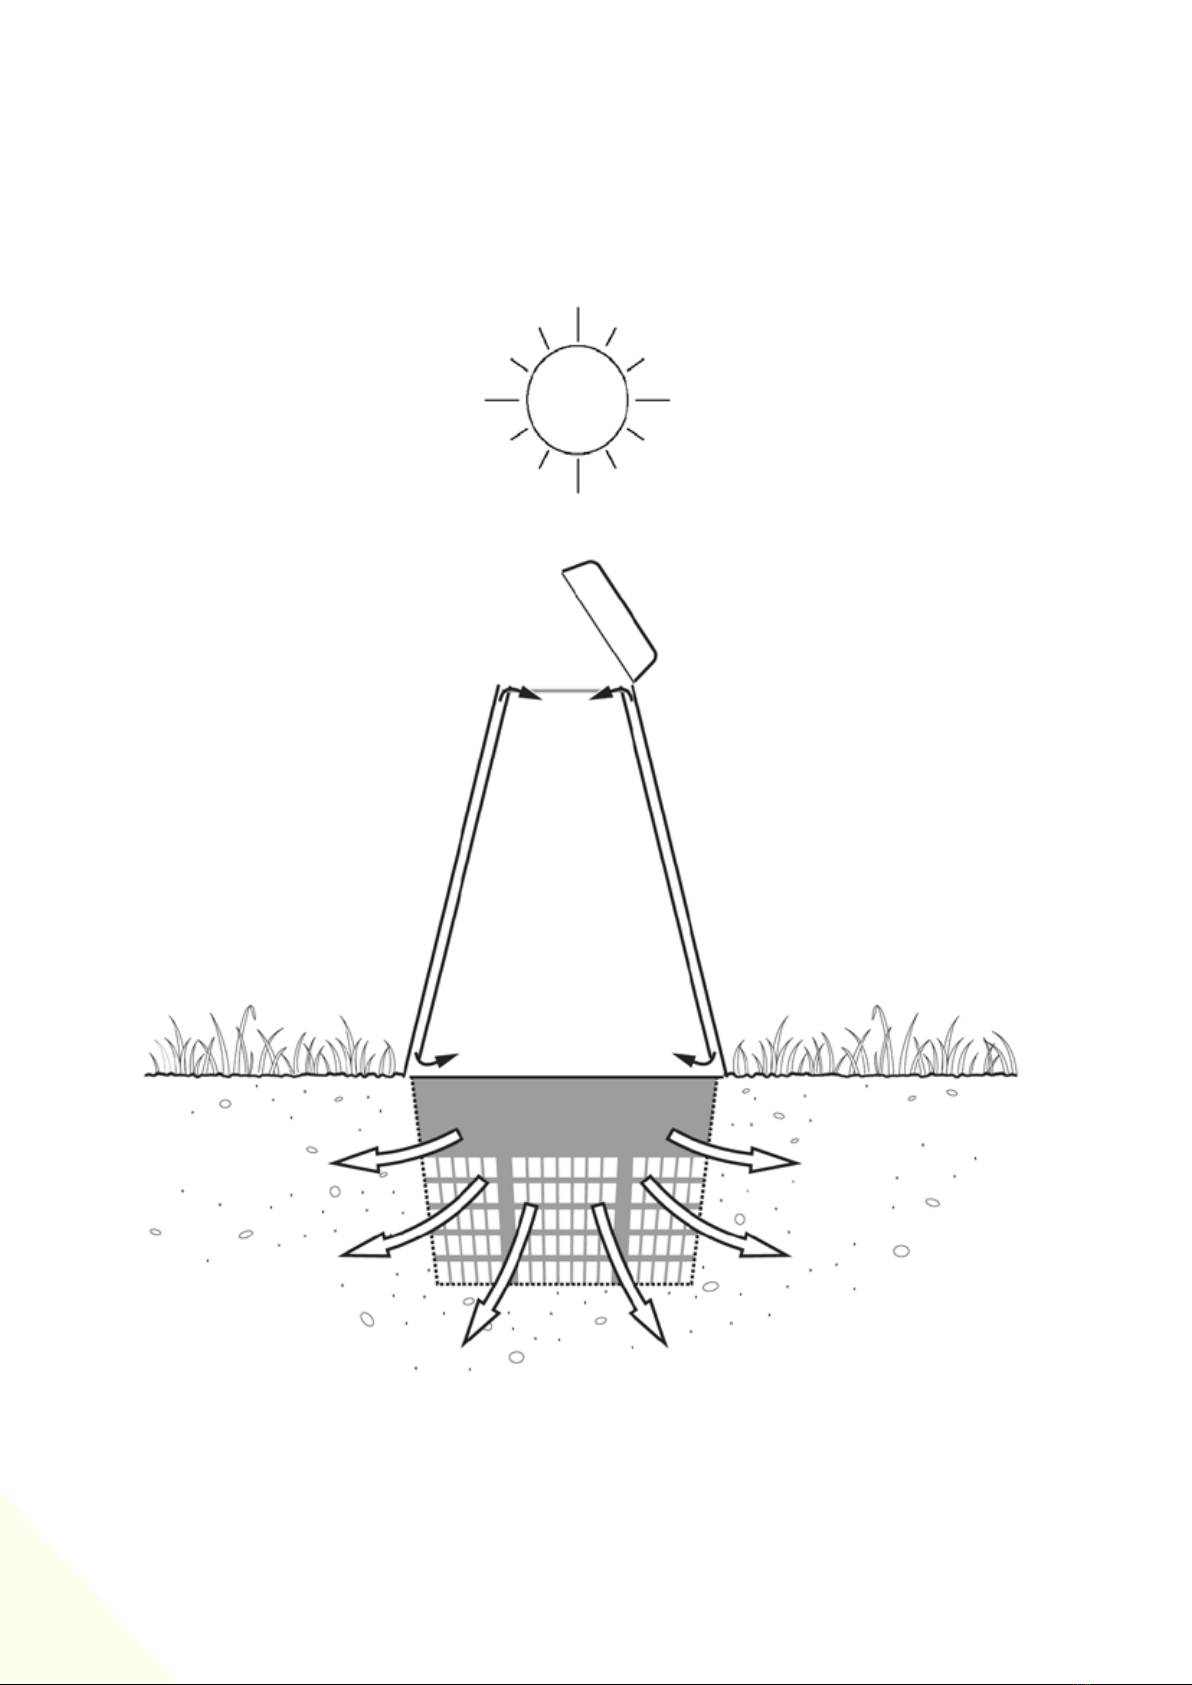
Q. Will The Green Cone Attract Flies
And Vermin?
A. The Green Cone is a sealed unit and
when properly installed, with the top
of the black basket and bottom lip of
the green outer cone below ground
level and the lid shut securely, emits
no smell; any smells are ltered out
by the surrounding soil. This means
there is no obvious attraction for
ies and vermin. However, the eggs
of fruit ies are already in the skins
of many fruits and might hatch out
in the Cone. Should this happen, a
small squirt of organic y spray will
resolve the issue. It is important that
the caddy is always kept well covered
in the kitchen to prevent house ies
laying eggs in the food waste, which
would then be transferred to the
Cone, putting ies into the system.
Again, a squirt of organic y spray will
clear up the issue without hindering
the eco-system in the unit.
Obviously, it is important not to spill
food near the Green Cone.
The most common questions asked by
Green Cone users

8
0800 731 2572
sales@greatgreensystems.com
www.greatgreensystems.com
Useful Additions For Your
Green Cone
If you have a larger family, you
may wish to consider our external
food waste caddy. It is designed
to store more food waste away
from the kitchen.
The 23 Litre External Food Waste Caddy Additional Accelerator Powder
(Available in packs of 3, 6 & 12)
These are designed to ensure
a healthy and active bacterial
population in your Green Cone
food waste digester.
Table of contents
Other GREAT GREEN SYSTEMS Garbage Disposal manuals
Popular Garbage Disposal manuals by other brands

Mistral
Mistral Ultra 10498 Specification sheet

JohnDow Industries
JohnDow Industries AFC-100-94 owner's manual

lamart
lamart SENSOR Series PRODUCT INFORMATION AND INSTRUCTIONS

GE
GE Disposall GFC300F Series Owner's Manual & Installation Instructions

Stark
Stark 61011 owner's manual

Bort
Bort MASTER ECO installation instructions