Green Brook DW070A User manual

Instructions
STEP 1.
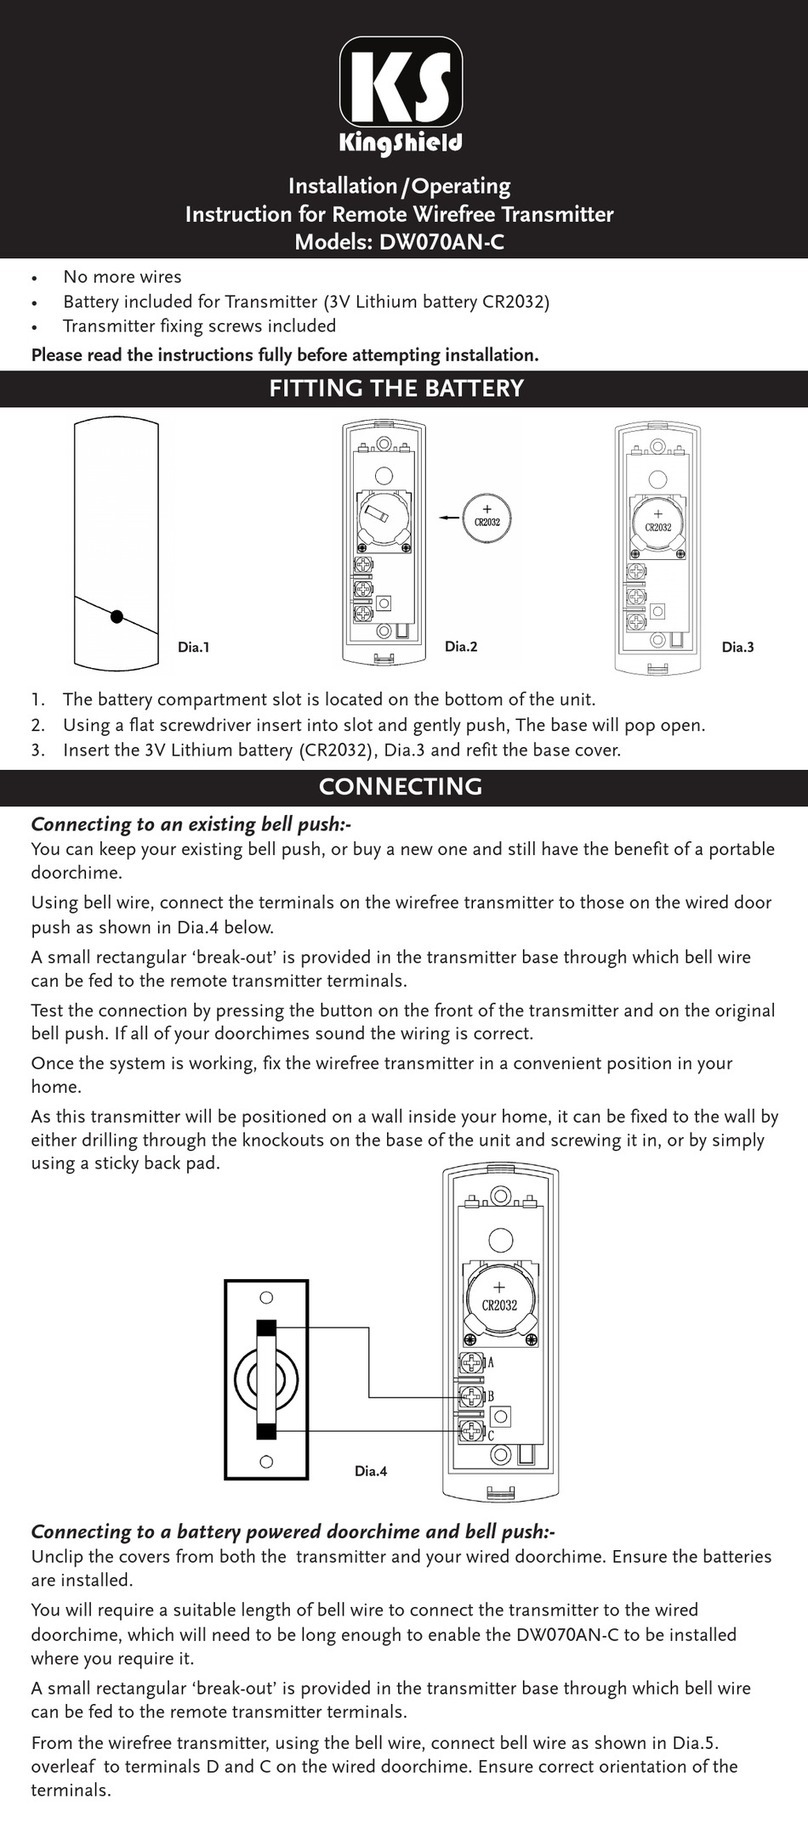
FITTING THE BATTERIES
STEP 2. CONNECTING
REMOTE WIREFREE
TRANSMITTER
Diagram 1.
MODEL NUMBER: DW070A
• No more wires
• Battery included for Transmitter
(2 x AAA)
• Transmitter fixing screws included
Please read the instructions fully
before attem ting installation.
--
1) Transmitter
The battery compartment slot is
located on the bottom of the unit.
Using a flat screwdriver insert into
slot and gently push. The base cover
will pop open.
Insert the two AAA batteries
supplied and refit the base cover.
2.1 Connecting to an existing
bell push.
2.2 Connecting to a battery
powered doorchime and bell
push.
2.3 Connecting to an existing
doorchime and bell push
powered by mains
transformer.
2.1 Connecting to an existing bell
ush.
You can keep your existing bell push,
or buy a new one and still have the
benefit of a portable doorchime.
Using bell wire, connect the
terminals on the wirefree
transmitter to those on the wired
door push as shown in diagram 2.
below.
A small rectangular ‘break-out’ is
provided in the transmitter base
through which bell wire can be fed
to the remote transmitter terminals.
Test the connection by pressing the
button on the front of the
transmitter and on the original bell
push. If all of your doorchimes sound
the wiring is correct.
Once the system is working, fix the
wirefree transmitter in a convenient
position in your home.
As this transmitter will be positioned
on a wall inside your home, it can be
fixed to the wall by either drilling
through the knockouts on the base
of the unit and screwing it in, or by
simply using a sticky back pad.
2.2 Connecting to a battery owered
doorchime and bell ush.
Unclip the covers from both the
transmitter and your wired
doorchime. Ensure the batteries are
installed.
You will require a suitable length of
bell wire to connect the transmitter
to the wired doorchime (bear in
mind where you are to fit the
transmitter for use).
A small rectangular ‘break-out’ is
provided in the transmitter base
through which bell wire can be fed
to the remote transmitter terminals.
From the wirefree transmitter, using
the bell wire, connect bell wire as
shown in diagram 3. below to
terminals D and C on the wired
doorchime. Ensure correct
orientation of the terminals.
Fix the wirefree transmitter in a
convenient position in your home.
As this transmitter will be positioned
on a wall inside your home, it can be
fixed to the wall by either drilling
through the knockouts on the base
of the unit and screwing it in, or by
simply using a sticky back pad.
2.3 Connecting to an existing
doorchime and bell ush,
owered by mains transformer.
Follow diagram . below to connect
the transmitter to an existing
doorchime and bell push, ensuring
the correct orientation of terminals.
A small rectangular ‘break-out’ is
provided in the transmitter base
through which bell wire can be fed
to the remote transmitter terminals.
Diagram 2.
Diagram 3.
Diagram 4.
WARNING: Electricity is
dangerous, if in any doubt
consult a qualified electrician.

STEP 6. TROUBLE
SHOOTING
GUARANTEE
REMARKS
Issue number: 7013 1
West Road, Harlow,
Essex CM20 2BG
Tel: 01279 772750
Fax: 01279 635 285
Email: [email protected]
Web: www.greenbrook.co.uk
STEP 3. TUNE SELECTION
STEP 5. TESTING
STEP 4. CHANGING THE
HOUSE CODE
this way you are unlikely to miss
any visitors.
Fault : Chime does not sound
Cause :
• Check batteries are not exhausted
and they have been inserted the
correct way round. Do not mix
different types of batteries.
• Re-check the dials and switches in
the transmitter and receiver are at
the same setting, especially if the
house codes have been changed.
• Move the receiver nearer the
transmitter.
If after going through the trouble
shooting section, you still experience
difficulty please ring us on
GreenBrook‘s Hel Line
1279 772 75
during office hours quoting
the model number ‘DW070A’
For indoor use only.
No naked flame sources, such as
lighted candles should be placed
near the unit.
The unit should not be exposed to
dripping or splashing and no objects
filled with liquids, such as being
placed near vases.
Please dispose of old, defective
batteries in an environmentally
friendly manner in accordance with
the relevant legislation.
This symbol indicates separate
collection of electronic/electrical
equipment.
Your doorchime is guaranteed for 12
months from date of purchase.
Please retain till receipt as proof of
purchase. This is in addition to your
statutory rights.
As with all low powered transmitters
the number of walls and ceilings the
signal has to travel though between
the transmitter and receiver affects
the range.
Fix the wirefree transmitter in a
convenient position in your home.
As this transmitter will be positioned
on a wall inside your home, it can be
fixed to the wall by either drilling
through the knockouts on the base
of the unit and screwing it in, or by
simply using a sticky back pad.
If mounting on to masonry, wall
fixings will be required.
The unit comes with a factory
pre-set tune that can be changed.
The tune is determined by the slider
switch as in Diagram 5. below.
Remove the transmitter base as in
step 1) Transmitter, leaving the
battery in and select a tune as
shown in Diagram 5. below.
Press the push button to hear the
sound each different setting
produces.
Once a desired tune is selected,
carefully replace transmitter cover.
Up to 3 different sound options are
available.
The unit comes with factory pre-set
code. Only change it if you
experience interference from a
neighbour’s unit (e.g. your door
chime sounds without being
pressed). Remove the transmitter
cover from the base as in step 1)
Transmitter, leaving the batteries in
position.
Set the dial as shown below in
diagram 5. to the required number
i.e “6”, set this number on the
corresponding dial on the
doorchime receiver.
PLEASE NOTE: If the sequence is not
identical in both the transmitter and
doorchime receiver, the unit will not
sound.
Press the button on the transmitter
to check that the doorchime works
and carefully replace the cover.
Test your doorchime by moving the
receiver in different rooms at
varying distances from the
transmitter to ascertain the
coverage available in your home,
Diagram 5.
PLEASE KEEP THESE
INSTRUCTIONS SAFE FOR
FUTURE REFERENCE
Other Green Brook Transmitter manuals

