Greengage ALIS IPH500230 User manual

Version
5.4
CE and UL

Page 1of 33 Version 5.4 • CE and UL • ALIS Barn Lamp and ALIS Nest Lamp 28 August 2019
ALIS Barn Lamp best practice clip on procedure
The new ALIS Barn Lamp has been designed with improved durability and ingress protection against dust and high-
pressure water jets. To ensure the longevity of the lamp it is important to follow the correct fixing procedure.
1. At the desired lamp position un-twist,
the ALIS Bus by approximately 20cm
(8”).
Undo the end clips by holding the lamp
and applying gentle pressure to the
hook part of the clip and pushing away
from the body of the lamp.
Excessive pressure may cause the clip
to come out of the hinge.
This is designed to happen as this
is a replaceable field part. If this
happens then simply push the clip back
into the hinge.
2. Undo the side clips by holding the
lamp firmly and applying equal pressure
with thumb to the clip, one corner at a
time.
3. Lift the upper coupler back on its
hinge and check the position of the
seal.
Due to the compression the seal may
have stuck to the upper coupler.
If this has occurred, then peel the seal
off and position it in the lower coupler
ensuring it has seated correctly.
4. Ensure the ALIS Bus is clean, free
from grit and undamaged.
Position the ALIS Bus on the seal in the
lower coupler, ensure it is correctly
seated then push it firmly into the guide
clips.
5. Ensure that all the clips on the
coupler are fully disengaged before
closing the upper coupler.
Position the coupler lid squarely and
press down in place to ensure correct
fit.
6. Once correctly seated maintain firm
pressure clamping the couplers closed
before first closing the end clips.
7. To close the side clips, press firmly
with equal pressure both ends of
opposed clips to ensure the clips lock
into position securely.
8. To close the side clips, press firmly
with equal pressure both ends of
opposed clips to ensure the clips lock
into position securely.
9. Check that the four side clips are
completely closed.

28 August 2019 Version 5.4 • CE and UL • ALIS Barn Lamp and ALIS Nest Lamp Page 2of 33
Disclaimer
These instructions are provided for information purposes only.
Installation must be carried out by competent experienced/qualified personnel.
All electrical installation work must conform to all local and international electrical wiring and safety regulations such
as those published by local governing body and sites specific.
Installers should contact Greengage Lighting Ltd technical support with any queries they may have at
support@greengage.global relating to installation.
Please follow these instructions carefully as deviation from them may invalidate the product warranty.
Safety
Be safety conscious. Working with electrical circuits can be dangerous if you don’t take adequate safety precautions.
Always isolate the power to a circuit or device that you are working on.
Avoid wet areas when working with or on anything electrical.
Adhere to Best Practices for Safe Working at Height.
Ensure correct PPE used is both site specific and in accordance with local regulations.
When working on an ALIS system ensure warning labels are placed at electrical isolation points.

Page 3of 33 Version 5.4 • CE and UL • ALIS Barn Lamp and ALIS Nest Lamp 28 August 2019
Contents
ALIS Barn Lamp best practice clip on procedure ................................................................................................... 1
Disclaimer.......................................................................................................................................................... 2
Safety................................................................................................................................................................ 2
Tools ................................................................................................................................................................. 4
Mounting accessories.......................................................................................................................................... 4
System description ............................................................................................................................................. 5
ALIS system components.................................................................................................................................... 5
For use only with parts as indicated..................................................................................................................... 6
Installation procedures ....................................................................................................................................... 8
1. Mechanical Installation.................................................................................................................................... 8
1.0 General Guidance ................................................................................................................................................................................8
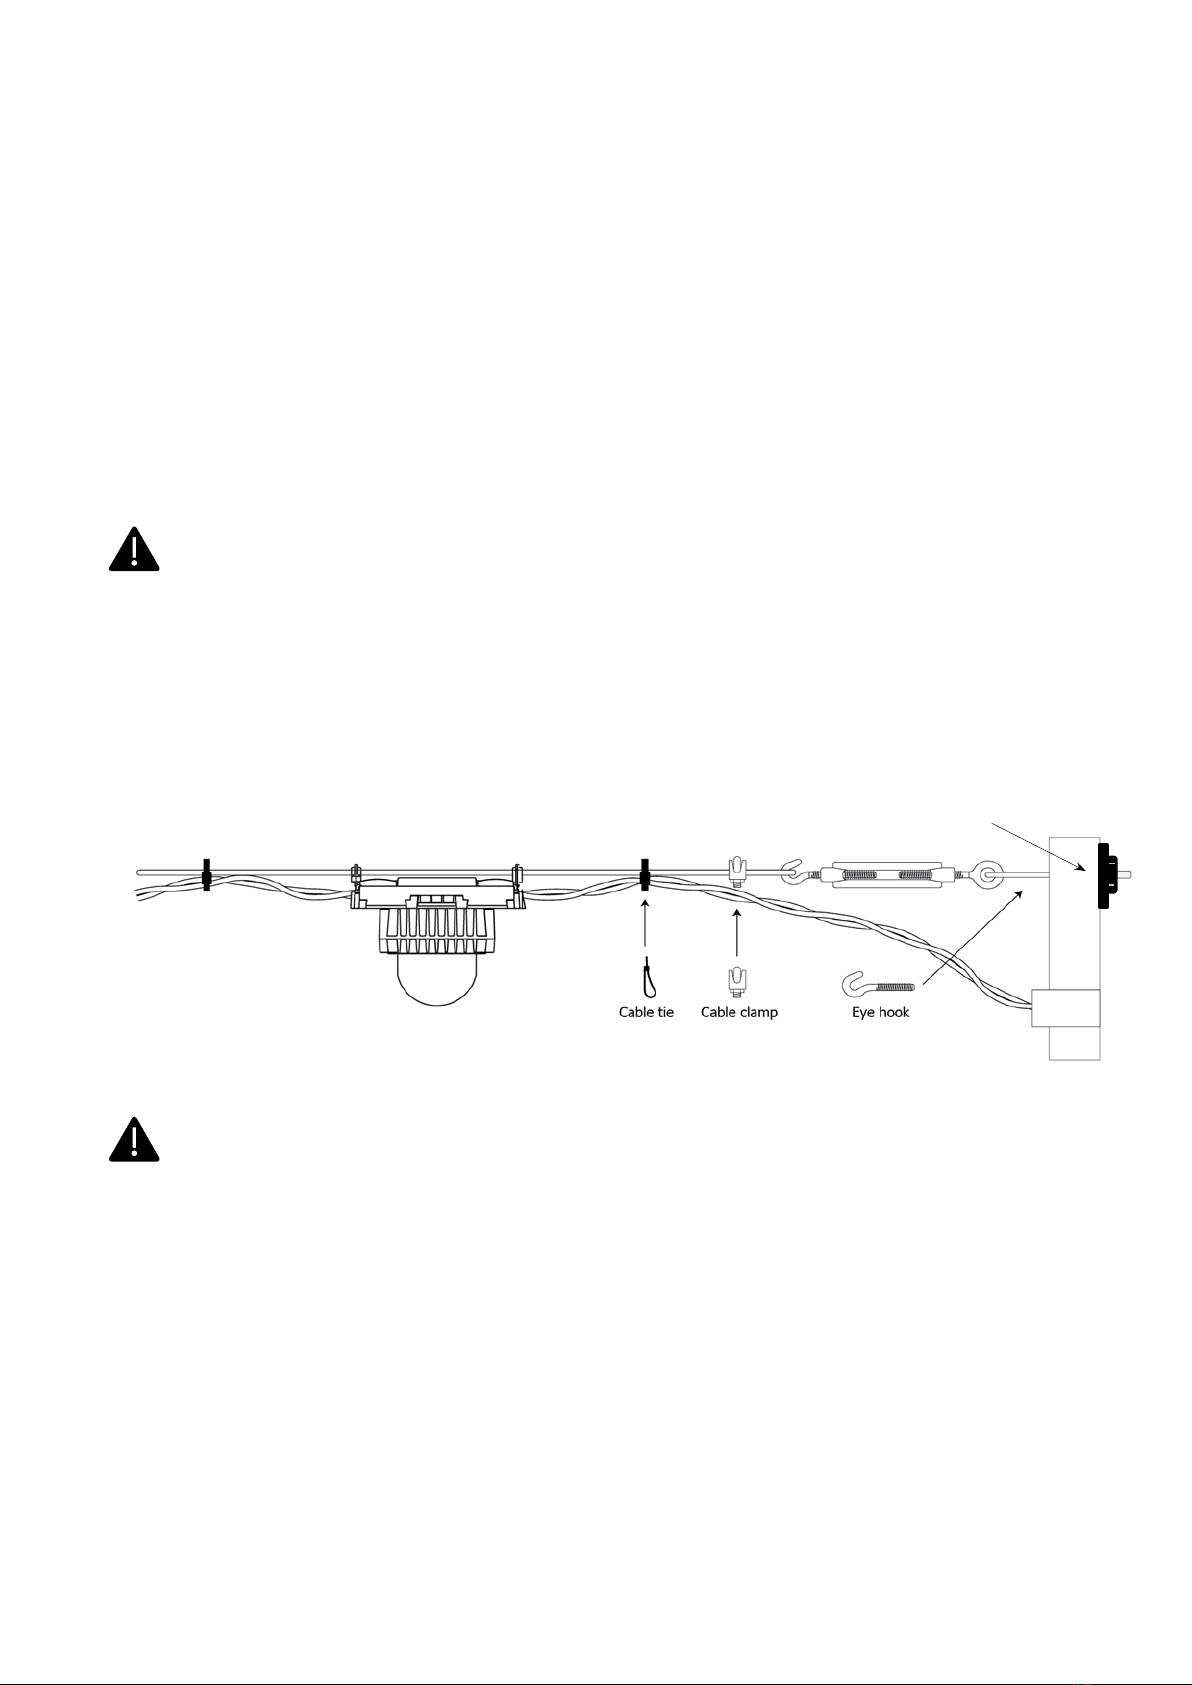
1.1 ALIS Bus Cable Suspension ..................................................................................................................................................................8
1.2 ALIS Power Hub Mounting............................................................................................................................. 9
1.3 ALIS Dimmer Mounting ................................................................................................................................. 9
2. Lamp connection ............................................................................................................................................ 9
2.1 ALIS Barn Lamp ..................................................................................................................................................................................9
2.2 ALIS Nest Lamp................................................................................................................................................................................. 11
3. Electrical installation ......................................................................................................................................12
3.0 General Guidance .............................................................................................................................................................................. 12
3.1 ALIS BUS .......................................................................................................................................................................................... 12
3.2 End termination................................................................................................................................................................................. 13
3.3 Hub supply cable termination (CE)...................................................................................................................................................... 14
3.4 Hub supply cable termination (UL)...................................................................................................................................................... 15
3.5 System Connection ............................................................................................................................................................................ 15
4. Installation checklist and system test..............................................................................................................16
5. Fault finding..................................................................................................................................................17
5.1 Led Status Indicator and Reset Button ................................................................................................................................................ 17
5.2 Fault Finding Guide............................................................................................................................................................................ 18
6. General points and good practices ..................................................................................................................19
7. Care with Lighting .........................................................................................................................................20
7. Specifications ................................................................................................................................................21
7.1 ALIS Power Hub electrical .................................................................................................................................................................. 21
7.2 ALIS Power Hub environmental .......................................................................................................................................................... 22
7.3 ALIS Barn Lamp ................................................................................................................................................................................ 23
7.4 ALIS Nest Lamp................................................................................................................................................................................. 23
8. Compliance ...................................................................................................................................................24
8.1 ALIS Power Hub 230VAC (CE) ............................................................................................................................................................ 24
8.2 ALIS Power Hub 120VAC (cULus) ....................................................................................................................................................... 24
8.3 ALIS Lamps (CE) ............................................................................................................................................................................... 25
8. 4 ALIS Lamps (cULus) ......................................................................................................................................................................... 25
Warranty validation ...........................................................................................................................................27
Site Information ...................................................................................................................................................................................... 27
Installer Information................................................................................................................................................................................ 27
Install Information................................................................................................................................................................................... 28
Appendix 1 .......................................................................................................................................................29
Connection diagram ................................................................................................................................................................................ 29

28 August 2019 Version 5.4 • CE and UL • ALIS Barn Lamp and ALIS Nest Lamp Page 4of 33
Tools
Below is a list of basic tools necessary for carrying out your installation.
Other tools may be required depending on the exact suspension, mounting method used and the composition of the
surface mounting material.
Tape Measure
Screwdrivers inc. terminal driver
Cable cutters, crimpers and wire
strippers
Pliers
Multi Meter
Light Meter
Mounting accessories
Catenary cable
Twist Buckle
Cable ties
Eye hook / Bolt
Suspension chain
Wire rope clamps
Spreader Plate

Page 5of 33 Version 5.4 • CE and UL • ALIS Barn Lamp and ALIS Nest Lamp 28 August 2019
System description
The Greengage induction system (ALIS) is a 'contactless' power technology that allows LED fixtures (ALIS Lamps)
to be clipped onto the cable (ALIS Bus) without an actual physical electrical connection.
This document serves as guidance for an ALIS installation. Installers must also follow all applicable local mechanical
and electrical installation standards when carrying out the installation.
ALIS system components
The main components of the ALIS system are
1ALIS Power Hub
2ALIS Dimmer
3ALIS Bus
4ALIS Lamp
5End Termination Module
6ALIS Pot (Dimmer control input)
7 ALIS Switch
8ALIS Blue Lamp
Note: For further connection detail please see appendix 1 connection diagram.

28 August 2019 Version 5.4 • CE and UL • ALIS Barn Lamp and ALIS Nest Lamp Page 6of 33
For use only with parts as indicated
Component parts
Model
CE
Model
cULus
Additional UL
Requirements/Use
1. ALIS Power Hub
(500W)
IPH500230
IPH500110
Install only in dry
locations.
(or suitable enclosure to
meet local regulations)
2. ALIS Bus
ALS0018
ALS0035
Type USE-2 cable or
Type RHH-2 wire
marked VW-1.14AWG
standard type rated
90 C min and 300V
minimum.
3. ALIS Barn Lamp
Wide Beam
ALS0003
ALS0003
Suitable for wet
location use.
Do not submerse.
(IP66)
4. ALIS Barn Lamp
Narrow Beam
ALIS0001
ALIS0001
Suitable for wet
location use.
Do not submerse.
(IP66)
5. ALIS Barn Lamp
Blue
ALS0017
ALS0017
Suitable for wet
location use.
Do not submerse.
(IP66)
6. ALIS Nest Lamp
ALS0004
ALS0004
Suitable for wet
location use.
Do not submerse.
(IP69K)
7. ALIS
Potentiometer
ALS0007
ALS0007
Install only in dry
locations.
(or suitable enclosure to
meet local regulations)

Page 7of 33 Version 5.4 • CE and UL • ALIS Barn Lamp and ALIS Nest Lamp 28 August 2019
Component parts
Model
CE
Model
cULus
Additional UL
Requirements/Use
8. ALIS Dimmer
component
ALIS Dimmer
Plastic Enclosure
Kit Assembly
ALIS Dimmer in
Plastic Enclosure
IPD1230
ALS0040
ALS0045
IPD1110
ALS0040
ALS0046
Install only in dry
locations.
(or suitable enclosure to
meet local regulations)
9. ALIS Bus End
termination
module
Capacitor / Short
ETM/Short
ETM/Short
Must be housed
within a suitably
sealed enclosure
(IP66) see section
3.2
10. P2M Supply
Connector
P2M
N/A
Not applicable
CE Only
(requires suitable
enclosure to meet local
regulations)
11. ALIS IEC13
Power to Mains
Connector
N/A
IEC13
Install only in dry
locations.
(or suitable enclosure to
meet local regulations)
12. ALIS Power Hub
Panel
ALS0006
(2 x 500W)
ALS0010
(1 x 500W)
Not available
in North
America.
Not applicable
CE Only
13. DTD Controller
ALS0049
ALS0049
Not applicable
CE Only
14. ALIS 3 Position
Switch
ALS0052
ALS0052
Not applicable
CE Only
15. ALIS Bus
Connector
ALS0069
ALS0069
Install only in dry
locations.
(or suitable enclosure to
meet local regulations)

28 August 2019 Version 5.4 • CE and UL • ALIS Barn Lamp and ALIS Nest Lamp Page 8of 33
Installation procedures
Introduction
The installation procedures section is divided into three parts; mechanical, lamp connection and electrical.
Each section must be carried out by suitably trained competent personnel. Care must be taken on the electrical
installation as local electrical regulations may apply.
1. Mechanical Installation
1.0 General Guidance
In this section you will find guidance for the mechanical installation. This is the process of physically fitting the
components within the environment.
The importance of correct mechanical installation should not be underestimated as it can be very difficult
and costly to correct afterwards. It is therefore worthwhile discussing the mechanical fitting at an early
stage with either the house builder or installer to ensure that correct placement of the ALIS lamps within
the house is possible. If not, a redesign of the lighting plan may be required.
1.1 ALIS Bus Cable Suspension
The lamp positioning information is found within the lighting design plan. It is recommended that the ALIS Bus cable
is supported by cable ties to a catenary wire, which is itself supported every three to four metres (10 to 13 feet) and
tensioned by use of a turnbuckle ensuring that the supporting infrastructure is sufficient to support the combined
weight of the ALIS system. Ensure there is adequate load spreading at both ends.
It is important to avoid sharp bends, returns, kinks and knots in the ALIS Bus cable. Excess cable should be
removed and not coiled or wrapped especially around metal elements. The use of non-ferrous metal cable
ties must be used if passing over or near emergency access points.
Load Spreader

Page 9of 33 Version 5.4 • CE and UL • ALIS Barn Lamp and ALIS Nest Lamp 28 August 2019
1.2 ALIS Power Hub Mounting
It is recommended that the ALIS Power Hub is mounted vertically on a non-combustible surface, mounted away
from sources of heat, water and direct sunlight and in accordance with site and local regulations. Clearances of
100mm (4”) top and bottom, and 75mm (3”) from left to right are recommended, this is to allow good air flow.
Where applicable the Hub must be housed within a suitable enclosure. Other mounting options i.e. Rack, or floor
mounting can be used if the above recommendations are adhered to.
1.3 ALIS Dimmer Mounting
The ALIS Dimmer can be mounted, either horizontally or vertically on a non-combustible surface, mounted away
from all combustible materials, sources of heat, water and direct sunlight and in accordance with site and local
regulations. The Dimmer should be mounted in the same enclosure as the Hub, if this is not possible then the ALIS
Dimmer enclosure must be used.
ALIS Power Hub Panel
2 Channel x 500W
ALIS Dimmer
in enclosure
ALIS Power Hub Panels
(shown with DTD Controller providing 0-10V input)
2. Lamp connection
2.1 ALIS Barn Lamp
Reference the lamp positioning information, as per the lighting design or fit as required.
If the reference information places the lamp in the vicinity of an obstruction such as a roof truss, ensure
the lamp is placed 15cm (6 “) from this point to allow movement during washout. Take note of the lamp
position and place the first lamp as follows: At the desired lamp position, un-twist the ALIS Bus by
approximately 20cm (8 “) by inserting your thumbs in the twist and sliding left and right equally.
Fully open the ALIS Barn Lamp and place the ALIS Bus into the coupler housing as shown below, ensuring
the ALIS Bus is clean and free from grit. Press the ALIS Bus firmly within the guide channels.

28 August 2019 Version 5.4 • CE and UL • ALIS Barn Lamp and ALIS Nest Lamp Page 10 of 33
Once the ALIS Bus is positioned within the coupler housing, carefully bring the two coupler sections together and
close.
It is recommended to close the end clips first and then close the side clips by pressing on their outside surfaces
rather than the thumb levers.
Ensure that the ALIS Bus is not trapped when closing the coupler and the ALIS Barn Lamp ferrite surfaces
are clean and free from grit.
Ensure a minimum 3cm (1¼“) of ALIS Bus remains untwisted at the coupler entry holes. Too tight
a twist at this point can cause a lift in the coupler lid resulting in a broken seal.
Attach all the remaining ALIS Barn Lamps to the desired position along the ALIS Bus. Once completed, cable tie the
ALIS Bus to the catenary wire. Use of non-ferrous metal clips are required where the ALIS Bus goes over an
emergency escape route.
TOP TIP – When placing the lamps on the ALIS Bus first unwind the length of ALIS Bus required and start fitting
the lamps working away from the reel.
Place cable ties a minimum of 20 cm (8”) each side of the ALIS Coupler ensuring the catenary wire
supports the ALIS Barn Lamp on its clip. Add the remainder of the cable ties between lamps, 30cm to
40cm (12” to 16”) apart to ensure the ALIS Bus does not sag at any point.
1st Lamp
2nd Lamp

Page 11 of 33 Version 5.4 • CE and UL • ALIS Barn Lamp and ALIS Nest Lamp 28 August 2019
2.2 ALIS Nest Lamp
The lamp positioning information is found within the lighting design plan. If there is not any positioning information
available, then fit to achieve the required lighting level within the nest box. At the desired lamp position un-twist,
the ALIS Bus to allow fitting of the nest lamp. Place one wire from the ALIS Bus into the lamp coupler slot, as shown
below, ensuring the ALIS Bus is clean and free from grit.
Without untwisting the ALIS Bus any further, as the cable twist tension is used to hold the lamp in place, slide the
second wire over the lamp housing as shown below, locating and pressing the ALIS Bus wire firmly within the guide
clip channel.
Ensure the first wire has remained fully inserted within the coupler lamp slot. Attach all the remaining ALIS Nest
Lamps to the desired position along the ALIS Bus.
Top Tip – In areas of vibration use a Tie Wrap to fasten the Nest Lamp to the ALIS Bus.

28 August 2019 Version 5.4 • CE and UL • ALIS Barn Lamp and ALIS Nest Lamp Page 12 of 33
3. Electrical installation
3.0 General Guidance
In this section you will find all the necessary information for the electrical installation. This describes the process of
electrically connecting the components. Each of the components of the system will be handled in a separate
paragraph.
3.1 ALIS BUS
Route the ALIS Bus to the ALIS Power Hub location. If local regulations require encase the ALIS Bus in non-ferrous
suitable protection such as trunking or conduit
ALIS Dimmer Model IPDI110. Strip the ends of the ALIS Bus to 5mm (0.2 “) of exposed conductor,
ensuring there is not any conductor loss.
Attach the ALIS Bus to the Bus Connector into the screw terminals, as shown below. Ensure there are
no frayed copper strands. Note – There is no polarity to the ALIS Bus.
ALIS Dimmer Model IPDI230. Strip the ends of the ALIS Bus to 5mm (0.2 “) of exposed conductor,
ensuring there is not any conductor loss.
Attach the ALIS Bus to the Bus Connector into the outer screw terminals provided, as shown below. Ensure there
are no frayed copper strands. Note – There are no polarity to the ALIS Bus cables.
Note: The ALIS Bus must be connected to the pin 1 and 2.

Page 13 of 33 Version 5.4 • CE and UL • ALIS Barn Lamp and ALIS Nest Lamp 28 August 2019
3.2 End termination
All ALIS Dimmer Models. The correct termination of the ALIS BUS is critical to the overall system performance.
See also section 3.3 of this manual. Connect the ALIS End Termination Module (ETM) or shorting terminal block
to the far open end of the ALIS Bus.
Strip the ends of the ALIS Bus to 5mm (0.2 “) of exposed conductor, ensuring there is not any conductor loss
as shown below. Twist the exposed copper cable strands.
Insert the cable into the terminator fully, ensuring no bare cable can be seen and tighten connections. This must be
a perfect connection with no frayed copper strands. The ETM or short must be housed within an IP66 terminal
enclosure.
A. ETM (68nF) ALIS Bus connection
B. Shorted twisted pair of ALIS Bus connection
Note: All individual cable points must have glands fitted for strain relief and to maintained IP rating.

28 August 2019 Version 5.4 • CE and UL • ALIS Barn Lamp and ALIS Nest Lamp Page 14 of 33
To ensure optimum operation and stability of the system, the following recommendations should be observed.
If the length of the ALIS Bus is less than 100m then it must be terminated by means of a shorting connection to
keep the ALIS Bus in resonance with the Hub.
When the length is greater than 100m, the ALIS Bus must be terminated using the supplied ETM (68nF) to keep the
ALIS Bus in resonance with the Hub. See table below.
Cable Length
Termination
Min Load
≤100m
Short
10W
101m to 150m
ETM (68nF)
50W
>150m
Contact support@greengage.global
3.3 Hub supply cable termination (CE)
Connect the P2M Connector to a 3-core suitably rated mains supply cable by inserting into the screw terminals
as shown below. Ensure there are no frayed copper strands and the supply is suitably protected to meet all local
wiring regulations and sites specific. Not applicable if installing a Greengage Power Hub Panel.
Example.
Note: For assembly instructions of P2M connector see appendix: Assembly instruction – P2M
connector supply.
Model
Version
Cable
Length
(m)
Cable
Length
(feet)
Max
continuous
Load (W)
Max surge
Power (W)
Cable
Loss (W)
Remaining
Power for
Lamps (W)
Max no.
ALIS Barn
(10W)
ALIS
Power
Hub
500W
230VAC
(CE)
≤100
≤328
475
500
12
463
46
101-150
329-492
475
500
18
457
45
>150
>492
Contact support@greengage.global
120VAC
(cULus)
101-150
≤328
450
475
12
438
43
150
329-492
450
475
18
432
43
>150
>492
Contact support@greengage.global
Blue
Yellow/Green
Brown

Page 15 of 33 Version 5.4 • CE and UL • ALIS Barn Lamp and ALIS Nest Lamp 28 August 2019
3.4 Hub supply cable termination (UL)
Connect the IEC C13 Connector to a 3-core suitably rated mains supply cable by inserting into the screw terminals as
shown below. Ensure there are no frayed copper strands and the supply is suitably protected to meet all local wiring
regulations and sites specific.
Example.
3.5 System Connection
a. Connect the ALIS Bus to the ALIS Dimmer as shown in the ALIS system components diagram (page 5).
b. Connect the ALIS Dimmer to the ALIS Power Hub as shown in the ALIS system components diagram
(page 5).
c. Connect the selected dimming control method to the ALIS Dimmer. Dimming is possible via either an ALIS
Dimmer Pot or a 0-10VDC control signal, ensuring polarity is maintained, as shown in the ALIS system
components diagram (page 5).
Connecting ALIS Dimmer to ALIS Pot/0-10VDC (Not applicable if installing the Greengage Power Hub Panel).
Connectors of the same shape can be connected.
Multiple ALIS Dimmers can be controlled with a Greengage DTD Controller or another
0-10VDC supply with >120 µAmp output.
The Dimmer connection to the Hub can also be used to extinguish the lamps via the use of a timer switch
or on/off switch, which avoids the necessity of disconnecting the mains supply.
Please contact support@greengage.global for additional information as required.
A screened cable must be used for the 0v-10v control, which should be tagged one end only. Also making
sure no long runs are in close proximity to power cables, this is to avoid any possible interference.

28 August 2019 Version 5.4 • CE and UL • ALIS Barn Lamp and ALIS Nest Lamp Page 16 of 33
4. Installation checklist and system test
After the installation of the ALIS system onsite, the following checks must be carried out by a qualified electrician,
adhering to local standards and regulations, prior to applying power to the system.
1. Double check the ALIS Bus cable length connected to the ALIS Power Hub. This should not exceed 150 metres.
If in doubt contact support@greengage.global
2. Count the number of lamps per ALIS Bus per ALIS Power Hub. This should not exceed specified limits. If in
doubt contact support@greengage.global
3. Check the ALIS ETM termination. Ensure the ALIS Bus cable is properly terminated in line with requirements.
4. Ensure the ALIS Dimmer is properly connected to the ALIS Bus and Power Hub.
5. Ensure the ALIS Dimmer Pot or independent 0-10VDc control cable is screened, tagged and the polarity has
been observed throughout the connections.
6. Ensure that there are no open circuits within the ALIS Bus cable installation. This can be achieved by ensuring
all the connections of the Bus cable are correctly terminated.
7. Connect mains power cable to the ALIS Power Hub.
Once these points have been verified, power can then be applied to the ALIS system.
If there is an issue, then 230VAC or 120VAC supply must be
disconnected and the unit isolated before any investigation is
attempted.

Page 17 of 33 Version 5.4 • CE and UL • ALIS Barn Lamp and ALIS Nest Lamp 28 August 2019
5. Fault finding
If the ALIS Lamps flash ON and OFF, this means there is too much load on the system. Start removing the ALIS
Lamps one at a time until the flashing stops. Recheck the recommended maximum number of lamps as shown in
section 3.3 and 4.
5.1 Led Status Indicator and Reset Button
To facilitate fault diagnosis, the ALIS Power Hub has a bi-colour (red & green)
status indicator. To remove a fault, press the reset button. The diagram here
shows the indicator and reset button position (arrowed) on the 500W Hub.
When the ALIS Power Hub is performing normally the status indicator is steady GREEN. If another indication
is observed, please see the chart below for status.
LED Status
Indicator
Operating Mode
Description
Action
Steady Amber
Input voltage too low
Automatic lockout when input
supply drops below 160 VAC
for a 230VAC (CE) ALIS Power
Hub
or
Hub shuts down between 92-
98VAC for a 120VAC (cULus)
ALIS Power Hub.
The ALIS Power Hub resets when
supply returns to normal.
Flashing amber, 1
Flash per second,
50% Duty cycle
Input voltage too high.
Automatic lockout when input
supply exceeds 270 VAC for a
230VAC ALIS Power Hub
or
Automatic lockout when input
supply exceeds 132 VAC for a
120VAC (cULus) ALIS Power
Hub.
The ALIS Power Hub resets when
supply returns to normal.
Flashing alternate red
and green, 2 flashes
per second 50% duty
cycle.
Power required exceeds
power available.
Too much load fitted to the
ALIS Bus
Remove excess load. The system
automatically resumes normal mode
of operation
Solid red (with system
OFF)
Output voltage too high.
ALIS Bus is open circuit.
Repair fault in the ALIS Bus. Reset the
system by pressing the reset button.
Solid red (with system
OFF)
ALIS Power Hub only.
Ground fault protection.
ALIS Power Hub has detected a
power imbalance in the output
current (residual current)
>80mA rms
Disconnect from AC supply until LED is
extinguished. Examine the ALIS Bus for
possible earth leakage. Reset button
will not allow re-start.
Flashes red, 1 flash
per second, 50% duty
cycle
Temperature too high.
ALIS Power Hub case
temperature exceeds 90˚C (+/-
5˚C), shutting itself down.
The ALIS Power Hub resets when
temperature returns to normal. This
may take several minutes.
Flashing Green
The Control Port on the
Power Hub has received
an OFF command.
Power Hub RJ11 Switch control
Check and Clean Contamination inside
RJ11
The reset button on the ALIS Power Hub can only be pressed three times. Thereafter the ALIS Power Hub
must be reset by disconnecting it from the AC mains supply, waiting for a minimum 10 minutes before
power is applied.

28 August 2019 Version 5.4 • CE and UL • ALIS Barn Lamp and ALIS Nest Lamp Page 18 of 33
5.2 Fault Finding Guide
These tests must only be carried out by a technically competent person
Indication Single / Multiple Lamps Dim or Off
Check Points
•Open Coupler
oInspect ALIS Bus for Damage
oCheck for Contamination on ALIS Bus, Inside Coupler
oClean Ferrites with Non-Lint Soft Cloth
Indication All Lamps Flashing
Check Points
•Possible System Overload
oConfirm load quantity
oRemove 1 lamp at a time until lamps stop flashing
•Possible Cross Talk on Control Cable (0v-10v)
oDisconnect 0v-10v Control Wires at Dimmer
Still Flashing - Replace Dimmer
oHas Shielded Cable been used and earthed at one end
oIs the Control Cable close to other 240v wires
All Lamps Off
Check Points
•Possible Power Issue
oCheck Status light on Hub
refer to Hub table
Status Light – Flashing or Solid Red / Amber Indication
•Check ETM connection
•Check ALIS Bus Connections between Hub and ETM
•Check ALIS Bus for Breaks
•Check ALIS Bus for loops / loops around ferrous objects
•Press Reset Button / Power Off for 10 mins
•Replace Hub
Status Light – Flashing Green
•Check RJ11 Connection for contamination
•Replace Hub
Status Light – Solid Green
•Check Dimmer 0v-10v Control
•Replace Dimmer
No Status Light
•Check Isolators, Breakers, Main Power In
•Replace Hub
If any problems or faults occur that are outside any of the above, or you are having difficulties, please contact
support@greengage.global for further guidance.

Page 19 of 33 Version 5.4 • CE and UL • ALIS Barn Lamp and ALIS Nest Lamp 28 August 2019
6. General points and good practices
1. All electrical installation work must be carried out in accordance with all applicable local wiring regulations,
such as those published by CENELEC member organisations, or those covered by IEC60364. Failure to do so
will invalidate any associated Product Warranty.
2. The ALIS Power Hub or Power Hub Panel must be earthed/grounded via a securely wired electrical connection.
It is not sufficient to rely solely on the bonded chassis alone.
3. Ensure that all external cables are of a suitable cross-sectional diameter for the intended use. All external
signals carrying cable for uses such as 0/10v must be of a suitably screened/shielded type, with the
screen/shield connected to earth at the supply end only, never both ends.
4. For the connection of external wires always use insulated ‘bootlace’ terminals, which provide a safe and good
connection, and which are well suited for the purpose.
5. Splices and cable joints must be housed within a junction box, with an IP rating suitable for the environment.
All cables must pass through suitable glands to maintain the IP rating.
6. Never use solid communication style wires such as telephone cable, even if making low voltage/current
connections, it is not suitable for any of the connectors within the ALIS range and will in time fail.
7. Cable trunking and conduit. In certain instances, ALIS Bus cable may have to be routed through lidded
electrical wire carriers. Should this situation arise please ensure that all ends are sealed, and lids correctly
fitted to stop fauna (rodent) ingress.
8. Installations should never use no more than the required length of ALIS Bus for each ALIS Power Hub.
Remove any excess end of line ALIS Bus cable at approximately 30cm (12 “) past the final lamp.
9. ALIS Bus cable should never be knotted or looped. it is also important to avoid sharp bends, returns,
and kinks. The minimum recommended bend diameter is 75mm (3 “).
10. Please note that poorly made electrical connections are often the main cause of equipment failure, which
in turn leads to livestock fatalities.
11. If the ALIS Bus passes through a hole or aperture (metal or otherwise) a suitable insulating grommet or gland
must be fitted.
12. ALIS Bus cable should never be un-twisted, apart from through the lamp coupler.
13. Under no circumstances must the ALIS Bus be switched by any means, be that relay, contactor, isolator
or circuit breaker, unless parts are supplied by Greengage Lighting for that purpose. If this is attempted the
subsequent damage caused to the ALIS Power Hub will not be covered by any Product Warranty.
14. Disconnecting the main electrical supply to the ALIS Power Hub as a means of regularly extinguishing the ALIS
Lamps must always be avoided.
15. If switching the 0/10V control signal, the selection of the switching component is extremely important, please
adhere to the instructions on the relevant circuit diagram, available from support@greengage.global.
Contact degradation can lead to the situation, particularly at low current levels, where the switching device
operates mechanically but effectively remains open circuit causing the ALIS lamps to remain at full brilliance.
This manual suits for next models
18
Table of contents
Other Greengage Lighting Equipment manuals
Popular Lighting Equipment manuals by other brands

Velleman
Velleman HQ Power VDP250MH14 manual

Philips
Philips SC Series Installation and operating instructions

ADJ
ADJ Lightning COB Cannon User instructions

Pool Technologie
Pool Technologie MINIPH Instructions for use

American DJ
American DJ Fusion FX Bar 3 User instructions

Phenix
Phenix 184700-1/2/3 instruction manual

Lithonia Lighting
Lithonia Lighting CPRB 18LM MVOLT installation instructions

Pentair Pool Products
Pentair Pool Products IntelliChlor CIC60P Installation and user guide

STEINEL
STEINEL PC4-DALI-2 instruction manual

Triton
Triton WALLY-OK7Q user manual

Chroma
Chroma Space Force quick start guide

E2S
E2S Spectra H100 TF quick start guide