GREENIS 150W Slow Juicer User manual


Your Upright Cold Pressed Juicer ---------------------------01-02
Safety First ------------------------------------------------------03-04
What’s in the Box --------------------------------------------------05
GREENIS Customer Message ------------------------------------05
Parts and Accessories -----------------------------------------06-09
Assembly Instructions ----------------------------------------10-13
Food Preparation and Juicing Techniques -----------------17-18
Cleaning and Maintaining your Juicer -------------------------19
Self Clean -----------------------------------------------------------19
Troubleshooting ---------------------------------------------------20
Specifications ------------------------------------------------------21
Directions for Use ----------------------------------------------14-16
GREENIS
GREENIS
GREENIS
GREENIS
GREENIS
GREENIS
GREENIS
GREENIS
Cold Pressed Juicer
Years of experience, months of design and testing, has teamed up with
some of the world’s most reputable slow-juicer manufacturers to launch the
revolutionary , the world’s slowest slow juicer:
Fruit Juices
The is able to easily juice
anything from a soft berry to a hard apple,
creating a healthy drink with 35% more
juice than conventional juicers.
Vegetable Juices
The Cold Press Process of the
will slowly juice hard vegetables to leafy
greens in seconds maintaining maximum
living nutriments and enzymes, just chop
them up and off you go.
Wheatgrass
Wheatgrass, aloe leaves, pine needles and
other medicinal herbs can be juiced with
ease using the Cold Press Process of the
, when you follow the simple
preparation steps.
Nut milks
Soak almonds, pistachios, Brazilian nuts and
many more nuts overnight, add water and
place in your for a nutritionally
fresh nut-milk.
Ice cream from frozen fruits
The can turn your favourite
fruits into a fat free, preservative free,
beautiful guilt-free bowl of ice cream.
1. Please follow the instructions carefully for ease of use, better
maintenance and longer lifespan of your GREENIS Extractor
Series Juicer.
2. Please keep the user’s guide where it is easily accessible.
3. Please ensure the current, voltage and frequency are in
accordance with the standard of your country.
4. This Juicer design and workings are subject to change
without warning due to continual product development.
GREENIS
GREENIS Slow Juicer Instruction Manual
01

Soy Milk
The GREENIS can replace a traditional
soy milk machine, as the Cold Press
Process can extract milk from soaked soy
beans in seconds.
Nut butters
Although we recommend the GREENIS
Blender for nut butters, soaked nuts
processed in the GREENIS Juicer have
the enzyme inhibitors removed making
them more digestible. You must remove
the wiper blade attachment before preparing
nut butter. Limit of 500 grams at a time.
Baby Food
The GREENIS can make healthy food
for your baby, juicing fruits and vegetables
into either a juice or a healthy pudding full
of nutriments and minerals.
Self-Cleaning
No need for a dishwasher, the GREENIS can self-clean, removing most of the
pulp before rinsing.
Comprehensive Warranty
All GREENIS products are covered by an international warranty, supported by
service centres in Europe, Asia, the Pacific and soon the United States and other
countries.
0302

05
04
GREENIS Customer Message
GREENIS is dedicated to providing 100% natural nutrition to our customers through
our high quality kitchen appliances. With the GREENIS Juicer you can enjoy a variety
of nutrient rich juice along with these benefits.
•Ability to juice greens, herbs and grasses (with a high yield) when prepared correctly
•Juicing fruits AND vegetables, including soft varieties
•Cold pressed, to produce a superior enzyme and nutrient content juice
•Low speed (rpm), to minimise oxidation and produce a longer lasting juice
•Upright design allows gravity to assist in the juicing process
•Juice tap to reduce froth and foaming
•Less waste than centrifugal juicers
•Child friendly with no sharp blades
•Space saving design
•Auto pulp ejection for continuous automatic juicing
•Built in reverse function eliminates clogging for continuous juicing
•Easy to clean with only 5 parts which need a quick rinse or wash
•Low noise
Dual stage juicing that effectively juices:
•Soft fruit e.g. oranges
•Hard Fruit e.g. apples
•Soft Vegetables e.g. kale
•Hard Vegetables e.g. carrot
•Nuts
•Wheatgrass
•Soybeans
Other functions that include making:
•Ice cream from frozen fruits e.g. banana
•Nut milks with soft or soaked nuts
•Soymilk from soybeans
•Tofu
•Baby food
Fabulous recipes for your GREENIS Slow juicer can be found on online.

0706
Parts and Accessories
Juice Tap
Pusher/Tamper

0908
Extra Information
Juice Tap
The juice tap can be optionally inserted into the juice chute. This can help to
reduce froth and foaming in some juice. Simply close the tap while juicing until the
juice bowl is approximately 1/3 full, then open the juice tap allowing the juice to flow
into the juice pitcher/jug. The juice tap can also be used to assist with self cleaning,
see instructions later in this manual.
Tofu Box
The tofu box includes - one large rectangle mould, one fabric cloth & one smaller lid
mould. This can be used to make fresh tofu at home. The cloth is laid inside the large
rectangle mould, the tofu mixture is poured in after it has been processed in the
juicer, then the smaller lid mould is rested on top. TIP: The cloth from the tofu box
can also be used to strain nut milks.
How to Make Homemade Tofu using the Slow Juicer!
Ingredients
• Uncooked Soybeans, 1 ½ cup (300 g)
• Water, 4 cups (960 ml)
• Ground sea salt, 1 tbs (15 ml)
• White Rice Vinegar, 1 tbs (15 ml)
Method
1. Soak the soybeans in 4 cups of water overnight (approximately 8 - 12 hours) or
until you no longer see wrinkles on the beans. NB: Do not leave uncovered and out
during hot weather for more than a day.
2. Turn on the juicer and using a medium sized spoon or ladle, ladle the soybean and
water mix (1:1 ratio) into the juicer. Use all of the soybeans and water. The water will
prevent clogging and yield better results.
3. Soy pulp will be ejected through the waste chute, soy milk will come out of the
juice chute. Optional: Extracted soy milk can be put back into the GREENIS juicer for
re-filtering for finer and smoother soy milk, which will create softer tofu (if desired).
Without re-filtering, you will end up with coarser and more firm tofu.
GREENIS
5. Mix the vinegar and ground sea salt together in a small bowl.
6. Place soy milk in a saucepan on high heat, stirring constantly to prevent sticking.
7. As soon as the soy milk comes to a boil, lower the heat to medium and add the
salt/vinegar mixture.
8. Stir only 2-3 times very slowly on medium heat and let the soy milk start to
curdle (create lumps).
9. Remove from heat once the mixture has curdled and looks like soft bean curd.
10. Place the bottom of the GREENIS tofu box inside a large bowl, making sure there
is enough room for water to drain out, and line with the tofu boxfabric. Scoop soft
bean curd into the lined pan.
11. Wrapping the fabric evenly over the bean curd, place the lid on top. Place the
squeezing screw (Auger) from the GREENIS juicer on top of the tofu press,
allowing the weight to squeeze out the excess juice/milk. In approximately
30minutes, your homemade tofu is ready to eat.
12. Remove tofu carefully and serve immediately, make into your favourite meal, or
refrigerate.

1110
1. Choices of Screens
Coarse screen
Coarse hole strainer is to juice soft fruit (strawberry, kiwi fruit & tomato) or
sticky material (bananas).The end result when using this screen will contain
more pulp.
(Nylon material)
Fine screen
Fine-hole strainer is to juice hard fruit, beans & vegetables with fibres. The
juice will be more smooth.
(ULTEM/PEI material)
Homogenising screen/Blank Plate
This specially designed blank plate, can be used for grinding dry hard food
material (coffee beans, almonds, etc.) It is also able to make frozen
fruit ice-cream and baby food.
(ULTEM/PEI material)
Assembly Instructions 2. Instructions for Silicone Part Usage
A.Make sure all silicone parts are correctly placed before juicing.If not correctly
placed, this may lead to leakage
B.Silicone parts are safe to disassemble & wash, and can be used again once dried
C.Keep an eye on the silicon parts when cleaning, do not use hot water to wash.
Spinning Brush
Underside of Juicing Bowl
Silicone Brush
Please assemble the silicone brush
according to the picture, place the
tail of brush towards bottom and
insert the parts in sequence in the
picture.
Silicone Ring
Place it correctly to fit the slot.
(When installing the silicone ring,
the side with the larger diameter
is to the top)
Silicone Juice Stopper
After cleaning, assemble it
according to the arrow instruction
in the picture.
When experiencing leakage during use, please first check if all silicone
parts are correctly placed/inserted.
Small silicone parts are easily missed during assembly/use, ensure you
keep them properly placed. If missing or broken, please contact the
Customer Service Centre for replacement parts before using.GREENIS

1312
3.Product Assembly
A.As shown in the pictures below , place the juicing bowl onto the base.
When placed properly, ensure that juicing bowl is fully pressed into the base and
firmly attached.
B.As shown in the sequence in the below picture, place the screen and squeezing
screw into the spinning brush.
When assembled, the components in the spinning brush can rotate smoothly.
C.Place the kit after being assembled (juicing screen,
squeezing screw and spinning brush) into juicing
bowl, by lining up the dot on the top of the juicing
screen with the dot on the side of the juicing bowl.
Ensure that bottom of the squeezing screw is
engaged onto the motor shaft.
When placed properly, rotate the juicing screen
slightly the juicing screen and squeezing screw
cannot be rotated after being placed properly and
the screen sits flat and level.
D.Engage the hopper with the juicing bowl as shown on the picture, lining up the dot
on the side of the hopper with the dot on the side of the juicing bowl and turning
into place.
The device can only work when hopper and juicing bowl is fixed properly. If
experiencing difficulty please ensure screen and squeezing screw are correctly
inserted.
E.If desired install the de-foaming tap onto juice outlet, place juice pitcher and pulp
pitcher under juice outlet and pulp outlet accordingly. When using the tap ensure
you do not fill the bowl with liquid more than 1/3rd the way up the bowl to avoid
leakage onto base.

1514
Directions for Use
This device is fitted with a protection system, it will only work
normally when all components are assembled correctly.
Connect power plug with socket outlet and switch on the power.
Place pitchers under two outlets (juice & pulp outlets)
It is normal that the device makes squeaking noise when starting.
This noise is caused by friction between spinning brush and parts
inside juicing bowl. Sounds will disappear after food is inserted.
Caution
Switch on the device and slowly
feed cut up pieces of food down
the feed tube.
Do not operate with wet hands.
Violating the warning may cause
serious injury or electric shock.
Rinse everything thoroughly before
putting into the machine.
Do not put excessive volumes of food
or press food hard into device, this may
cause clogging, leaks or damage.
Please use only the tamper to assist with
guiding food into bowl, do not use any other
implement like spoons in the feed tube.
This will cause damage to the machine.
What to do if the squeezing screw stops working when in use:
Too hard, too much or incorrectly prepared food being stuffed into
the device may cause the protection system to activate and stop
the appliance running.
Reverse button needs to be held down. If the juicer still does not work after above in
structions are followed, please unplug, disassemble and clean the juicer thoroughly.
This includes unclogging any debris from the stopper on the underside of the juicing
bowl.
Frequently juicing food that is too hard or pushing too much food in at once may
shorten product lifespan.
A.Switch the device to the off position.
B.Push reverse button without releasing
for 3-5 seconds, repeat this step2-3 times.
NB: You may see food moving back up and
out of the feed tube, this is normal.
C.Resume juicing as normal after reverse
rotation ends.

1716
Precautions for use:
A.Remove hard seeds before juicing from fruits like: persimmons, peach, plum, etc.
B.Hard items (kudzu vine, sugarcane etc) are not suitable for juicing.
C.Juicer can be used to mash garlic and peppers with moisture. Not suitable for
grinding dry grains.
D. When juicing hard fruits or vegetables like carrots they may cause loud noises,
this does not indicate damage to the machine.
E.Be aware that juice may spill out when juicing fruits and vegetable like grapes
and tomatoes.
F.Using frozen fruits and vegetables may influence the flavour of juice.
G.Frequently juicing processed and hard food stuffs (ice, fruit seeds, etc) may
damage the strainers. Please use with care.
H.The continuous working time should be no more than 30 minutes.
I.Drink juices as soon as possible after juicing, if you wish to store juice place it
in a sealed glass container in the refrigerator.
J. Juicing too much food or juicing hard food stuffs may make it difficult
to remove the hopper from the juicing bowl.
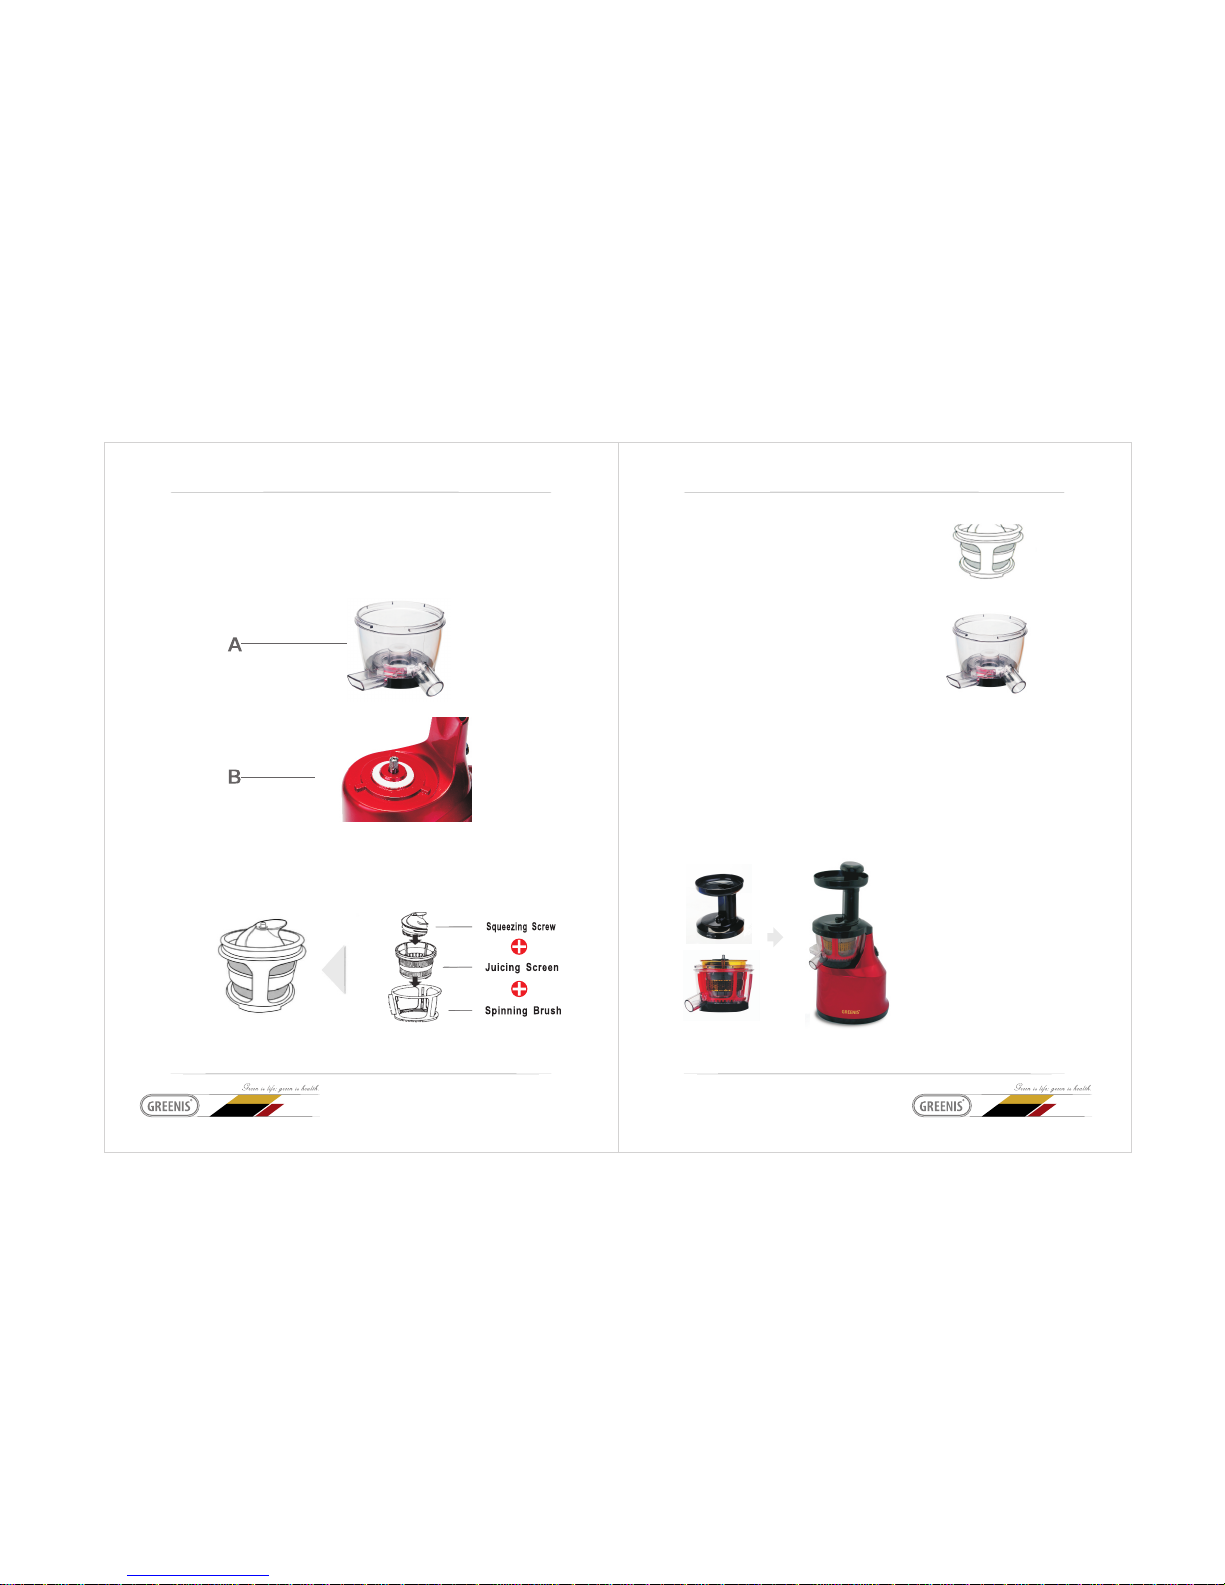
Food Preparation & Juicing Technique
The GREENIS Juicer is versatile and gets great results every time. It makes nut
milks, frozen desserts and baby food along with being able to juice grasses, fruits
and vegetables.
If you don't use the GREENIS Slow Juicer correctly, it can end up creating a large
amount of pulp in the juice or become blocked.Blockage can occur due to the way
you prepare the fruits and vegetables before juicing or how you feed them into the
feed tube. Preparation is key to easy juicing.
All fruits and vegetables must be prepared as follows:
•Refrigerate your product prior to juicing. This will also give you a less pulpy juice.
•Rinse thoroughly.
•Remove any seeds or hard ends.
•Cut the ingredients into thin pieces that fit in the feed tube. Ensure all pieces are
approximately than 3-5cm in length at most. NB: This is especially important for
fibrous vegetables such as celery, kale, spinach and all grasses.
Familiarise yourself with the tips below for optimal results:
Tip #1) Don't press/shove food into the GREENIS Slow Juicer
Most of us used to juice with the old-style centrifugal juicing machines. If you recall,
those machines require you to forcefully press/shove food into them, and allow large
items like whole apples. You actually had to push hard on carrots and apples to shove
them into the spinning blade where they were shredded into tiny flying pieces.
Do not use this same pushing/pressing /shoving force with the GREENIS Slow Juicer!
There is no spinning blade and no dizzying shredding taking place. No pressing is
required. Instead, simply let your food fall into the "chewing auger." Virtually no
force is necessary! In fact, forcing more food into it can cause too much vegetable
mass to end up in the auger at one time, and this will result in pulp overflowing into
your juice, or the juicer to become blocked.
When juicing grasses, feed the GREENIS a small amount of grass at a time,
cutting the grass into short pieces approx 3cm long ensures the waste can easily

1918
come out of the waste chute. You do NOT need to "clump" the grass into a ball like
you used to do with the centrifugal juicers. In fact, you can slowly feed small strands
of grass, coriander, parsley and other leafy greens without any problem at all! You
can also juice kale and spinach in the same way.
A great tip for large leafy, stringy or fibrous vegetables vegetables is to remove the
leaf from the stem, cut both leaves and stems into 3-5cm lengths and feed through
gently, letting the auger pull the ingredients into the juicer, using the tamper only
gently if required.
Tip #2) Juice low-fibre plants first, and high-fibre plants last
Here's a really important tip: If you're going to juice high-fibre plants like celery or
spinach, juice them last! Why? Because the fibres in celery tend to accumulate in the
ejection port in the juicing bowl at the bottom of the juicing auger. If this port
becomes clogged, then "pulp overflow" will occur, sending extra pulp into your juice.
Following Tip #1 will minimise the chances of this occurring to almost zero.
As long as the port stays open, the pulp in your juice will be minimised. So the best
way to do this is to juice your low-fibre fruits and veggies first: Apples, carrots, etc.
Save the more stringy, fibrous plants for last. You'll get a much better result.
Tip #3) Juice your juice!
If you still find too much pulp in your juice, just pour the juice back through the
machine again! You'll find that the second time through, nearly all the pulp is
removed.
You can also strain it through a nut-milk bag, or the fabric cloth that came in your
tofu box.
The bottom line is that if you follow these three tips, you'll find that the GREENIS
Juicer produces very little pulp in the final juice and does not block.
NB: After you have had your juicer for some time, please check that the silicon wiper
blades have not worn, this can also cause extra pulp in the juice.
Cleaning and Maintaining Your Juicer
1.Turn device “OFF”. Please do not touch the plug with wet hands.
2.Twist the hopper to unlock by grabbing the two outlets. Make sure the arrow is
aligned with open side before pulling off the bowl.
3.Disassemble the device in reverse to assembly order.
4.Rinse it using cleaning brush with flowing water after disassembling do not use
metal sponge to clean, otherwise it will scratch and damage the device. Do not
clean it in the dishwasher.
5.Do not immerse or rinse the main body under water, use dry towel or wet sponge
to clean.
6.Let the parts dry in an open, clean and drafty space after washing. Store it out of
reach of children.
In order to extend the product service life, please clean it promptly after usage.
If it appears that the plastic of the containers and parts is very dry, wipe with
cooking oil and then wash with gentle detergent to clean.
Self Clean
When making more than one juice, it is not necessary to disassemble after juicing
each different type of food, a quick self clean will ensure juice flavours do not mix.
1. Ensure the pitchers are underneath both the waste and juice chutes. Turn off
juicing tap.
2. Switch on the juicer and pour a bowl of clean water slowly into the feed tube.
3. Turn on juicing tap drain water after juicing bowl is clean.
NB: Please disassemble fully after juicing is complete and follow the cleaning
instructions found in this manual.

20
Check the below troubleshooting guide before calling for assistance or
maintenance. If you cannot resolve the issue please contact
Customer Service for support and service.
Troubleshooting when the device does not work:
A.Please check if the plug is correctly positioned.
B.Please check if all components are correctly installed. Only when all
components are properly inserted/assembled can the device be operated.
Should the juicer made a strange noise or not start please re-check assembly.
C.Please check hopper is securely locked in place with juicing bowl, juicer will not
start when this is not done correctly.
The device does not work
Make sure the power plug is correctly plugged into the wall socket.
Make sure the device is assembled correctly.
The device stops when juicing
Please check power plug has not become lose.
Please ensure you have not put in excessive or hard foodstuff into the juicer.
Please check that the device has not been working continuously for too long.
Leaking from beneath juicing bowl
Please check if the silicone stopper is plugged in securely.
The device shakes when juicing
The motor rotation may cause it to shake slightly.
Please ensure the device is on a level surface.
Please ensure that the food is prepared correctly.
GREENIS
Separation of juice
Please note that some ingredients have different density and you may note a
slight separation during juicing. Simply stir and enjoy.
Troubleshooting
Abnormal noise
Please ensure to place the device on level of surface.
Check if the device contains excessive or overly hard foodstuffs.
Dyed containers or accessories
Please clean the device promptly after using to prevent pulp leftovers from
sticking to the containers.
The container or accessories may be stained when juicing some foods containing
rich pigments. Clean it with cooking oil and then with detergent.
Hopper/lid is stuck
Do not force it open.
Make sure that no excessive pulp is left inside the device. Please start the juicer
to assist in removing any build up.
Check if any unidentified or hard objects have been left inside. Use the reverse
button to push objects back up the feed tube feed tube.
Product name
Power
RPM
Power cord length
Motor type
Fuse
Product weight
Dimensions
Working sound volume
Slow juicer
150W
65rpm
1.2m
AC motor
5A
6.5KG
18cm(W)*23cm(L)*46cm(H)
30-50 decibels
Table of contents
Other GREENIS Juicer manuals