Greentouch 1457MR-24-800 Quickspecs

Questions, problems, missing parts?
Before returning to your retailer,
call our customer service department at
1-855-571-1044,
9 a.m. - 5 p.m., ES T, Monday - Friday.
www.greentouchhome.com
Français p. 9
Español p. 17
Date Purchased _______________________
24-IN Lighted Mirror
MODEL # 1457MR-24-800
ITEM # 1258834
ASSEMBLY, CARE & USE INSTRUCTIONS
1

PACKAGE CONTENTS
2
PART DESCRIPTION QUANTITY
A Mirror 1
B Main Body 1
A
B
HARDWARE CONTENTS (NOT SHOWN ACTUAL SIZE)
AA BB DD PART DESCRIPTION QUANTITY
AA Wall Mount Screw 4
BB Drywall Anchor 4
DD Screw 1

3
PRODUCT SPECIFICATION
Power Input: 120VAC / 60 Hz
Power Rating: Max. 20W
LED Light Color: Warm White
24in
30in
30in
24in
1-1/2in
16-57/64in
13-7/16in
16-11/16in
12-33/64in
8-11/32in
4-11/64in
23-59/64in
55/64in
55/64in

SAFETY INFORMATION
IMPORTANT SAFETY INSTRUCTIONS
4
When using an electrical furnishing, basic precautions should always be followed, including the following:
Read all instructions before using this mirror.
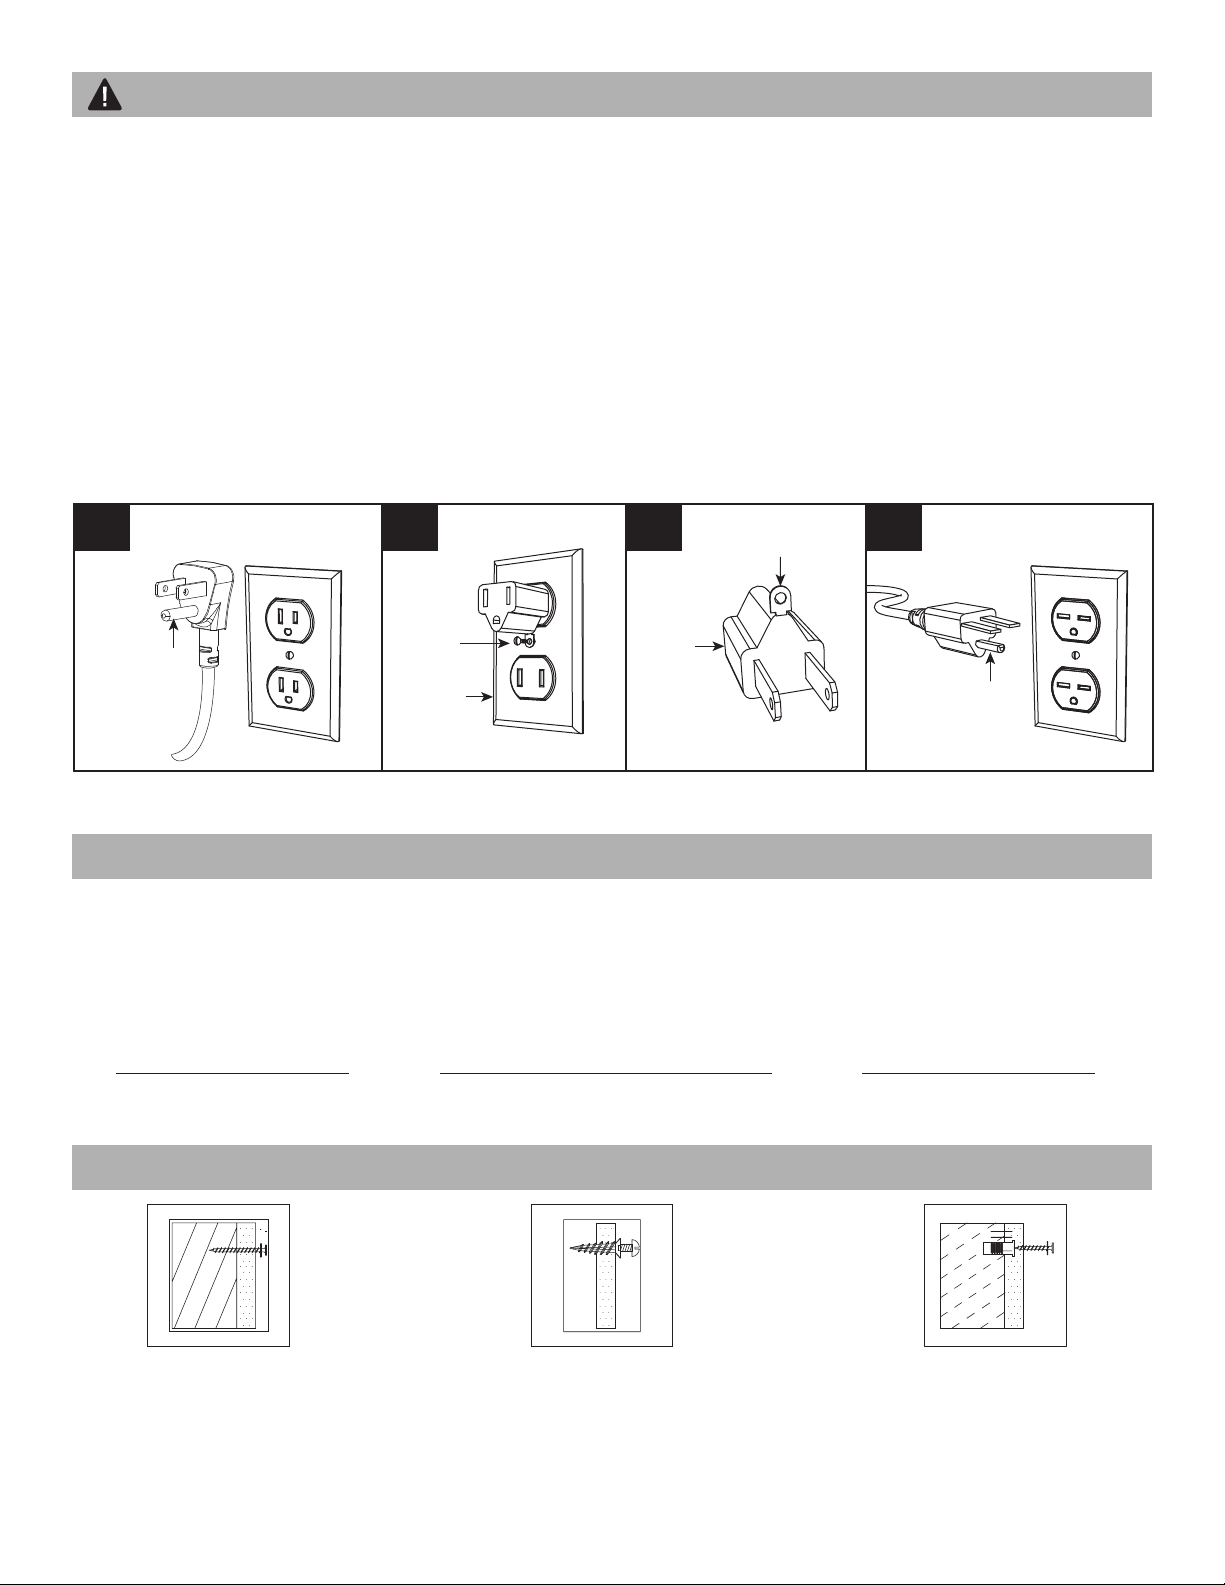
DANGER – To reduce the risk of electric shock:
1. Always unplug the power cord before cleaning around the electrical components.
WARNING – To reduce the risk of burns, fire, electric shock, or injury to persons:
1. Unplug from outlet before putting on or taking off parts.
2. The appliance is not to be used by persons (including children) with reduced physical, sensory or
mental capabilities, or lack of experience and knowledge, unless they have been given supervision or
instruction. Children should be supervised to ensure that they do not play with the appliance.
3. Use this furnishing only for its intended use as described in these instructions. Do not use
attachments/accessories not recommended by the manufacturer.
4. Never operate this furnishing if it has a damaged cord or plug, if it is not working properly, if it has
been dropped or damaged, or dropped into water. Return the furnishing to a service center for
examination and repair.
5. Never drop or insert any object into any opening.
6. For household and dry locations use only.
7. Do not use outdoors.
8. Never operate the furnishing with the air openings blocked. Keep the air openings free of lint, hair, and
the like.
9. Do not operate where aerosol (spray) products are being used or where oxygen is being administered.
Please read and understand this entire manual before attempting to assemble, operate or install the
product.
This equipment has been tested and found to comply with the limits for Class B digital devices,
pursuant to Part 15 of the FCC rules. These limits are designed to provide reasonable protection
against harmful interference in a residential installation. The equipment generates, uses and can radiate
radio frequency energy and, if not installed and used in accordance with the instructions, may cause
harmful interference to radio or television reception, which can be determined by turning the equipment
off and on. The user is encouraged to try and correct the interference by one or more of the following
measures:
This device complies with Part 15 of the FCC rules. Operation is subject to the following two conditions:
1. This device may not cause harmful interference, and
2. This device must accept any interference received, including interference that may cause undesired
operation.
Modifications not approved by the party responsible for compliance could void user’s authority to
operate the equipment.
Reorient or relocate the receiving antenna
Increase the separation between the equipment and the receiver.
Connect the equipment into an outlet on a circuit different from that to which the receiver is connected.
Consult the dealer or an experienced radio/TV technician for help.
•
•
•
•

PREPARATION
MOUNTING OPTIONS
10. To disconnect, turn all controls to the off position, then remove plug from outlet.
11. WARNING: Risk of Electric Shock – Connect this furnishing to a properly grounded outlet only. See
Grounding Instructions.
12. Keep the cord away from heated surfaces.
SAVE THESE INSTRUCTIONS
SAFETY INFORMATION
5
GROUNDING INSTRUCTIONS
This product is for use on 120 volts. The cord has a plug as shown below. See illustration for grounding
instruction. An adapter as shown at (C) is available for connecting three-blade grounding type plugs to
two slot receptacles. The green grounding lug extending from the adapter must be connected to a
permanent ground such as a properly grounded outlet box. The adapter should not be used if a three-slot
grounded receptacle is available.
WARNING: Before beginning assembly of product, make sure all parts are present. Compare parts with
package contents list and hardware contents list. If any part is missing or damaged, do not attempt to
assemble the product.
Secure main body (B) to wall
using screws (AA)(included) at
marked stud locations.
Screw wall anchors (BB)(included) flush
into desired wall location. Secure main
body (B) onto wall using provided screws
(AA)(included) into wall anchors (BB).
Drill holes at marked locations,
then insert wall anchors (not
included) into holes. Secure
the main body (B) to wall using
fasteners (not included).
Estimated
Assembly Time:
20 Minutes
Helpful Tools
(not included):
Tape Measure
Level
Tools Required for
Installation (not included):
Phillips Screwdriver
STUD WALL: DRYWALL: CONCRETE WALL:
(CONT’D)
A B C D
Grounding Pin
Grounding Pin
Grounding Means
Metal
Screw
Cover of
Grounding
Box
Adapter

ASSEMBLY INSTRUCTIONS
Using the dimension drawings on page 3, determine the
desired location for the mirror. Take into account you
should have a 3 inch minimum clearance between the
bottom of the mirror and the top of the faucet/vanity.
Use the main body (B) to mark the screw locations on
the wall.
Note: 1. Make sure it is level.
2. The installation location has to have power
outlet inside of main body (B) as shown
1.
Secure the main body (B) to the wall using screws (AA)
or the hardware best suited for your wall type. Refer to
Mounting Options on page 5. Be careful to not drill into
hidden electrical or plumbing lines inside the wall when
mounting main body (B) to wall.
2.
6
With the help of another adult, hold mirror (A) away
from the main body (B), connect the DC plug(1), then
plug the power cord into the wall outlet (2). Secure
power cord to avoid contact with sharp objects.
3.
1
B
3
A
B
2
2
B
AA
AA
AA AA
AA
BB
Hardware Used
Wall Mount Screw
Drywall Anchor
x 4
x 4
AA
BB
1

ASSEMBLY INSTRUCTIONS
Align the hook on the back of the mirror (A) with the
receiving bracket on the main body (B). Carefully lower
the hook into the receiving bracket.
WARNING: Make sure it feels fully seated and secure
before releasing the mirror (A).
Back Light
The touch switch on the front of the mirror is to turn the
back light ON/OFF.
When the back light is powered ON the button color will
glow Blue; when it is in standby mode it will glow Red.
Adjust Brightness of the Back Light
When the back light is powered ON, press and hold the
power button for approximately 3 seconds. The
brightness will scroll up then back down. Take your
finger off the touch button to leave the brightness at the
setting you choose. This brightness setting will be
retained in memory. To adjust the brightness repeat the
above steps.
•
•
•
4.
7
Install the screws (DD) on bottom sides as shown.5.
5
A
OPERATING INSTRUCTIONS
Touch Switch
(CONT’D)
Hardware Used
Screw x 1
DD
DD
4
A
B

The glass can be cleaned using standard household glass cleaning agents.
Any other servicing should be performed by an authorized service representative.
The manufacturer warrants this item against defects in materials and workmanship for a period of one
(1) year from the date of original retail purchase. This warranty applies only to the original purchaser.
This warranty does not apply to any damage on the product by accident, misuse, or modified,
improper installation or by affixing accessories not produced by the manufacturer. The manufacturer
is not accountable whatsoever for product installation during the warranty period. There is no further
expressed warranty. The manufacturer shall not be legally responsible for incidental, consequential
or special damages arising at or in connection with product use or performance except as may
otherwise be accorded by law. The manufacturer disclaims any and all implied warranties.
•
•
CARE AND MAINTENANCE
WARRANTY
8
For replacement parts, call our customer service department at 1-855-571-1044, 9 a.m. - 5 p.m., EST,
Monday - Friday.
REPLACEMENT PARTS
AA CC DDBB
PART DESCRIPTION PART #
AA Wall Mount Screw MWA-2.5x3.1-SET2
MWA-2.5x3.1-SET2BB Drywall Anchor
PU-4X25-SSDD Screw
CC LED Driver ADE20-12VLS

Des questions, des problèmes, des pièces manquantes?
Avant de retourner l’article au détaillant,
appelez notre service à la clientèle au
1-855-571-1044, entre 9 h et 17 h (HNE), du lundi au vendredi.
www.greentouchhome.com
English p. 1
Español p. 17
Date d’achat _______________________
MODÈLE # 1457MR-24-800
ARTICLE # 1258834
INSTRUCTIONS D’UTILISATION,
D’ASSEMBLAGE ET DE MAINTENANCE
9
Miroir illuminé de 24 po

A
B
CONTENU DE L’EMBALLAGE
10
PIÈCE DESCRIPTION QUANTITÉ
A Miroir 1
B Corps principal 1
CONTENU MATÉRIEL (NON REPRÉSENTÉ EN TAILLE RÉELLE)
PIÈCE DESCRIPTION QUANTITÉ
AA Vis de support mural 4
BB Ancrage à placoplâtre 4
DD Vis 1
AA BB DD

11
SPCCIFICATION DE PRODUIT
Alimentation Clectrique : 120VAC / 60 Hz
Puissance nominale : Max. 20 W
Couleur de lumière LED : Blanc chaud
24in
30in
30in
24in
1-1/2in
16-57/64in
13-7/16in
16-11/16in
12-33/64in
8-11/32in
4-11/64in
23-59/64in
55/64in
55/64in

CONSIGNES DE SÉCURITÉ
CONSIGNES DE SÉCURITÉ IMPORTANTES
12
Lors de l'utilisation de meubles électriques, des précautions de base devraient toujours être suivies,
incluant ce qui suit :
Lisez toutes les instructions avant d'utiliser ce miroir.
DANGER – Pour réduire le risque de choc électrique :
1. Débranchez toujours le cordon d'alimentation avant de nettoyer aux environs des composantes
électriques.
AVERTISSEMENT – Pour réduire le risque de brûlures, d'incendie, de choc électrique ou de
blessures corporelles :
1. Débranchez de la prise avant d'ajouter ou de retirer des pièces.
2. Cet appareil ne doit pas être utilisé par des enfants ou des personnes avec des capacités physiques,
sensorielles ou mentales réduites, ou un manque d'expérience ou de connaissances, sauf s'ils sont
supervisés ou ont des instructions. Les enfants devraient être supervisés pour assurer qu'ils ne jouent
pas avec l'appareil.
3. Utilisez seulement ce meuble pour son utilisation prescrite tel que décrite dans ces instructions.
N'utilisez pas des pièces jointes ou des accessoires non recommandés par le fabricant.
4. N'utilisez jamais ce meuble si son cordon ou sa prise d'alimentation sont endommagés, s'il ne
fonctionne correctement, s'il a tombé, s'il est endommagé, ou s'il est tombé dans l'eau. Retournez le
meuble à un centre de service pour un examen et une réparation.
5. Ne laissez jamais tomber ou n'insérez jamais d'objet dans une des ouvertures.
6. Pour un usage domestique et dans des emplacements secs seulement.
7. Ne pas utiliser à l'extérieur.
8. Ne jamais faire fonctionner l’ameublement si les ouvertures d’air sont bloquées. Garder les ouvertures
d’air libres de peluche, de cheveux et autres.
Assurez-vous de lire et de comprendre l’intégralité du présent manuel avant de tenter d’assembler,
d’installer ou d’utiliser l’article.
Cet article a été testé et déclaré conforme aux limites imposées aux dispositifs numériques de classe B,
conformément à l’alinéa 15 du règlement de la FCC. Ces limites sont destinées à assurer une
protection raisonnable contre les interférences nuisibles dans un environnement résidentiel. Cet article
génère, utilise et peut émettre de l’énergie radiofréquence et, s’il n’est pas installé et utilisé
conformément aux instructions, risque de provoquer des interférences nuisibles lors de la réception
d’émissions de radio ou de télévision (il shffit, pour le vérifier, d’ allumer et d’eteindre successivment
l’article). L’utilisateur devra prendre les mesures nécessaires suivantes pour tenter d’éliminer ces
interférences :
Cet appareil est conforme à l’alinéa 15 du règlement de la FCC. Son utilisation est soumise aux deux
conditions suivantes :
1. cet appareil ne doit provoquer aucune interférence nuisible; et
2. cet appareil doit accepter toute interférence reçue, y compris des interférences susceptibles de
causer un fonctionnement non désiré.
X
Les modifications non autorisées expressément par la partie responsable de la conformité peuvent
annuler le droit de l’utilisateur de se servir de cet appareil.
réorienter ou déplacer l’antenne réceptrice;
accroître la distance entre l’appareil et le récepteur;
brancher l’appareil sur une prise de courant appartenant à un autre circuit que celui du récepteur;
obtenir de l’aide auprès du détaillant ou d’un technicien en radio ou en télévision expérimenté.
•
•
•
•

PRÉPARATION
OPTIONS D’INSTALLATION
9. Ne jamais faire fonctionner où les produits en aérosol sont utilisés ou lors d’administration d’oxygène.
10. Pour débranchez, mettez les contrôles à la position off, et retirer la fiche de la prise.
11. AVERTISSEMENT: Risque de choc électrique, connectez uniquement ce meuble à une prise ayant
une mise à terre. Voir les instructions de mis à terre.
12. Gardez le cordon hors de portée des surfaces chauffantes.
CONSERVEZ CES INSTRUCTIONS
CONSIGNES DE SÉCURITÉFETY
13
INSTRUCTIONS DE MISE À TERRE
L'appareil de chauffage est conçu pour du courant 120 volts. Le cordon a une fiche tel qu'affiché
ci-dessous. Voir l'illustration pour les instructions de mise à terre. Un adaptateur, tel qu'affiché en C, est
disponible pour brancher des fiches à trois mèches dans un réceptacle à deux mèches. La cosse de mise
à terre sortant de l'adaptateur doit être branchée à une mise à terre permanente comme une boîte de
prise mise à terre correctement. L'adaptateur ne devrait pas être utilisé si un réceptacle à trois mèches
est disponible.
AVERTISSEMENT : Avant de commencer l'assemblage du produit, assurez-vous que toutes les pièces
sont présentes. Comparez les pièces avec la liste de contenu du paquet dans la liste de contenu
matériel. Si une pièce est manquante ou endommagée, n'essayez pas d'assembler le produit.
Fixez le corps principal (B) au
mur à l'aide des vis (AA)(inclus)
aux positions marqués.
Vissez les ancrages muraux
(BB)(inclus) à l'emplacement mural
désiré. Fixez le corps principal (B)
au mur à l'aide des vis (AA)(inclus)
dans les ancrages muraux (BB).
Percez des trous aux
emplacements marqués, puis
insérez les ancrages muraux
(non inclus) dans les trous. Fixez
le corps principal (B) au mur à
l'aide d'attaches (non inclus).
Temps d'assemblage
estimé :
20 minutes
Outils utiles
(non inclus) :
Ruban à mesurer
Niveau
Outils requis pour
l'installation (non inclus) :
Tournevis à tête Phillips
MONTANT DE CLOISON : CLOISON SÈCHE : MUR DE BÉTON :
(SUITE)
A B C D
Broche de mise
à la terre la terre
Broche de mise
à la terre
Dispositif de mise
à la terre
Vis
métallique
Couvercle
de la
broche de
mise à la terre
Adaptateur

1
B
INSTRUCTIONS POUR L’ASSEMBLAGE
À l'aide des dessins de dimensions à la page 3,
déterminez l'emplacement désiré du miroir. Prenez en
considération que vous devriez garder un espace
minimum de 3 pouces (7,62 cm) entre le bas du miroir
et le dessus du comptoir/lavabo.
Note: 1. Assurez-vous qu'il est au niveau.
2. L'emplacement d'installation doit positionner la
prise d'alimentation à l'intérieur du corps principal (B) tel
qu'affiché
1.
Fixez le corps principal (B) au mur à l'aide des vis (AA)
ou le matériel approprié pour votre type de mur.
Référez-vous aux options de montage à la page 5.
Faites attention de ne pas percer des lignes de courant
ou de plomberie cachés à l'intérieur du mur lorsque
vous montez le corps principal (B) au mur.
2.
14
Avec l'assistance d'un autre adulte, retirez le miroir
(A)de la structure principale (B), connectez la prise CC
(1), puis branchez le cordon d'alimentation dans la prise
murale (2). Sécurisez le cordon d'alimentation pour
éviter tout contact avec des objets tranchants .
3.
QUINCAILLERIE UTILISÉE
Vis de support mural
Ancrage à placoplâtre
x 4
x 4
AA
BB
3
A
B
2
2
B
AA
AA
AA AA
AA
BB
1

commutateur
tactile
QUINCAILLERIE UTILISÉE
Vis x 1
DD
4
A
B
5
A
DD
INSTRUCTIONS POUR L’ASSEMBLAGE
Alignez le crochet à l'arrière du miroir (A) avec le
support de réception du corps principal (B). Descendez
prudemment le crochet dans le support de réception.
AVERTISSEMENT : Assurez-vous que le miroir (A) soit
bien appuyé et fixé avant de le relâcher.
Rétro éclairage
Le commutateur tactile à l'avant du miroir allume et
éteint le rétro éclairage.
Lorsque le rétro éclairage est allumé, la couleur du
bouton sera bleue; lorsqu'il est en mode attente elle sera
rouge.
Ajuster la luminosité du rétro-éclairage
Lorsque le rétro éclairage est allumé, appuyez et
maintenant le bouton alimentation pendant environ 3
secondes. La luminosité augmentera et puis diminuera.
Relâchez votre doigt du bouton tactile pour laisser la
luminosité au réglage que vous voulez. Ce réglage de
luminosité sera gardé en mémoire. Pour ajuster la
luminosité, répétez les étapes ci-dessus.
•
•
•
4.
15
Mettez les vis (DD) -sur les côtés inférieurs, comme
indiqué.
5.
MODE D’EMPLOI
(SUITE)

Le verre peut être lavé à l'aide d'agents nettoyants domestiques pour le verre standards.
Tout autre entretien devrait être effectué par un représentant de service autorisé.
Le fabricant garantit cet article contre les défauts de matériel et de main-d'œuvre pour une période d'un
(1) an à partir de la date original de l'achat en magasin. Cette garantie s'applique uniquement à
l'acheteur initial. Cette garantie ne s'applique pas aux dommages accidentels au produit, à la mauvaise
utilisation, ou à une installation modifié ou incorrecte ou en apposant des accessoires qui ne sont pas
produits par le manufacturier. Le manufacturier n'est pas responsable de l'installation du produit durant
la période de la garantie. Il n'y a aucune garantie supplémentaire. Le fabricant n'est pas légalement
responsable des dommages accessoires, indirects ou spéciaux causés par ou en lien avec l'utilisation
du produit sauf tel que permis par la loi. La fabricant renonce à toutes les garanties implicites.
•
•
ENTRETIEN
GARANTIE
16
Pour obtenir des pièces de rechange, communiquez avec notre service à la clientèle au
1-855-571-1044, entre 9 h et 17 h (HNE), du lundi au vendredi.
LISTE DES PIÈCES DE RECHANGE
AA CC DDBB
PART DESCRIPTION Nº DE PIÈCE
AA Vis de support mural MWA-2.5x3.1-SET2
MWA-2.5x3.1-SET2BB Ancrage à placoplâtre
PU-4X25-SSDD Vis
CC Driver LED AED20-12VLS

¿Preguntas, problemas, piezas faltantes?
Antes de volver a la tienda,
llame a nuestro Departamento de Servicio al Cliente al
1-855-571-1044 de lunes a viernes de 9:00 a.m. a 5:00 p.m.,
hora estándar del Este.
www.greentouchhome.com
English p. 1
Français p. 9
Fecha de compra _______________________
Espejo iluminado de
24 plug.
MODELO # 1457MR-24-800
ARTÍCULO # 1258834
INSTRUCCIONES DE ENSAMBLAJE,
CUIDADO Y USO
17

A
B
CONTENIDO DEL PAQUETE
18
PIEZA DESCRIPCIÓN CANTIDAD
A Espejo 1
B Estructura principal 1
CONTENIDO DE HARDWARE (NO SE MUESTRAN EN TAMAÑO REAL)
PIEZA DESCRIPCIÓN CANTIDAD
AA Tornillo de montaje en pared 4
BB Taco para tablaroca 4
DD Tornillo 1
AA BB DD

19
ESPECIFICACIONES DEL PRODUCTO
Entrada de alimentación: 120 VCA / 60 Hz
Potencial nominal: Max. 20 W
Color de luz LED: Blanco cálido
24in
30in
30in
24in
1-1/2in
16-57/64in
13-7/16in
16-11/16in
12-33/64in
8-11/32in
4-11/64in
23-59/64in
55/64in
55/64in

INFORMACIÓN DE SEGURIDAD
INSTRUCCIONES DE SEGURIDAD IMPORTANTES
20
Cuando se usa un aparato eléctrico, siempre se deben tomar ciertas precauciones, incluyendo las
siguientes:
Lea todas las instrucciones antes de usar el espejo.
PELIGRO – Para reducir el riesgo de descarga eléctrica:
1. Siempre desconecte el cable de alimentación antes de limpiar alrededor de los componentes
eléctricos.
ADVERTENCIA – Para reducir el riesgo de quemaduras, incendio, descarga eléctrica o lesiones
físicas:
1. Desconecte del tomacorriente antes de colocar o quitar piezas.
2. El aparato no lo deben operar personas (incluyendo niños) con capacidades físicas, sensoriales o
mentales reducidas, o sin experiencia y conocimiento, a menos que hayan recibido supervisión o
instrucción. Los niños deben ser supervisados para asegurarse de que no jueguen con el aparato.
3. Use este aparato solo para su uso previsto, tal como se describe en estas instrucciones. No utilice
aditamentos/accesorios no recomendados por el fabricante.
4. Nunca opere este aparato si tiene un cable o enchufe dañado, si no funciona correctamente, si se ha
caído o dañado, o se ha mojado. Devuelva el aparato a un centro de servicio para su revisión y
reparación.
5. Nunca deje caer ni inserte ningún objeto en las aberturas.
6. Use este aparato solamente en el hogar y lugares secos.
7. No lo use en exteriores.
8. Nunca opere el aparato con las aberturas de aire bloqueadas. Mantenga las aberturas del aire libres
de pelusa, pelo y cosas similares.
9. No lo opere nunca donde se esté usando aerosol (espray) o donde se esté administrando oxígeno.
10. Para desconectar este aparato, gire todos los controles a la posición de apagado, luego retire el
enchufe del tomacorriente.
Lea y comprenda completamente este manual antes de intentar ensamblar, usar o instalar el producto.
Este equipo ha sido probado y se ha verificado que cumple con los límites para dispositivos digitales
clase B, conforme a la parte 15 de las reglas de la FCC. Estos límites se han diseñado para
proporcionar una protección razonable contra la interferencia perjudicial en una instalación residencial.
El equipo genera, utiliza y puede irradiar energía de radiofrecuencia y, si no se instala y usa de
acuerdo con las instrucciones, puede causar interferencia perjudicial a las comunicaciones de radio o
televisión, la que se puede determinar al encender y apagar el equipo. Se insta al usuario a tratar de
corregir la interferencia con una o más de las siguientes medidas:
Este dispositivo cumple con la Parte 15 de las reglas FCC. El funcionamiento está sujeto a las
siguientes dos condiciones:
1. Este dispositivo no debe causar interferencia perjudicial y
2. Este dispositivo deberá aceptar cualquier interferencia recibida, incluyendo la interferencia que
pudiese causar la operación no deseada.
X
Las modificaciones que no estén aprobadas por la parte responsable del cumplimiento podrían anular
la autorización del usuario para utilizar el equipo.
Reorientar o reubicar la antena de recepción
Aumentar la separación entre el equipo y el receptor
Conectar el equipo a un tomacorriente de un circuito distinto al que usa el receptor.
Solicitar ayuda al concesionario o a un técnico con experiencia en radio/TV.
•
•
•
•
This manual suits for next models
1
Table of contents
Languages:
Other Greentouch Personal Care Product manuals
Popular Personal Care Product manuals by other brands

Hauschen Home
Hauschen Home SPECTRO 32 Installation & Aftercare Instructions

ArianaSpas
ArianaSpas S-Shape RF manual

Philips
Philips HB588/01 user manual

Holiste
Holiste Bold'air Tonic operating instructions

Body Clock Health Care
Body Clock Health Care SensaTONE Instructions for use

Otto Bock
Otto Bock Dorso Direxa Posture Instructions for use