GreenWorks Commercial 82TB161 User manual

EN OPERATOR MANUAL
FR MANUEL D’OPÉRATEUR
BIKE HANDLE TRIMMER
COUPE-HERBE
ES MANUAL DEL OPERADORCORTABORDES
STB402
82TB161
www.greenworkscommercial.com
www.shopgreenworksgear.com


1 Description.........................................4
1.1 Purpose.............................................................. 4
1.2 Overview........................................................... 4
2 Important safety instructions...........4
3 Symbols on the product.................... 5
4 Risk levels...........................................6
5 Service................................................ 6
6 Environmentally safe battery
disposal...............................................6
7 Proposition 65....................................7
8 Installation......................................... 7
8.1 Unpack the machine.......................................... 7
8.2 Attach the guard.................................................7
8.3 Attach the auxiliary handle................................7
8.4 Install the battery pack.......................................8
8.5 Remove the battery pack................................... 8
9 Operation........................................... 8
9.1 Controls............................................................. 8
9.2 Start the machine............................................... 8
9.3 Stop the machine............................................... 8
9.4 Operation tips.................................................... 9
9.5 Line cut-off blade.............................................. 9
9.6 Cutting tips........................................................ 9
9.7 Adjust the length of the cutting line................ 10
10 Maintenance.....................................10
10.1 General information.........................................10
10.2 Clean the machine........................................... 10
10.3 Install the cutting line...................................... 10
10.4 Replace the spool.............................................11
10.5 Replace the cutting line....................................11
10.6 Remove the trimmer head................................12
10.7 Assemble the trimmer head............................. 12
10.8 Remove the brush cutter..................................12
10.9 Assemble the brush cutter................................12
11 Transportation and storage............13
11.1 Move the machine........................................... 13
11.2 Store the machine............................................ 13
12 Troubleshooting...............................13
13 Technical data..................................14
14 Limited warranty............................ 14
3
English EN

1 DESCRIPTION
1.1 PURPOSE
This machine is used to cut grass, light weeds, and other
similar vegetation at or around ground level. The cutting
plane must be approximately parallel to the ground surface.
You cannot use the machine to cut or chop hedges, shrubs,
bushes, flowers and compost.
1.2 OVERVIEW
1
24
3
9
10
11
5
6
7
8
-+
+
1Battery release button
2Carrying strip
3Trigger
4Auxiliary handle
5Speed button/lock-out button
6On/off button
7LED indication
8Reverse button
9Shaft
10 Guard
11 Cut-off blade
12 Blade
2 IMPORTANT SAFETY
INSTRUCTIONS
READ ALL INSTRUCTIONS BEFORE USING (THIS
POWER TOOL)
WARNING
Read and understand all instructions before using this
product. Failure to follow all instructions listed below may
result in electric shock, fire, and/or serious personal injury.
• Use only identical manufacturer’s replacement parts and
accessories. Use of any other parts may create a hazard or
cause product damage.
• Always wear safety glasses with side shields marked to
comply with ANSI Z87.1. Everyday glasses have only
impact resistant lenses. They are NOT safety glasses.
Following this rule will reduce the risk of eye injury. Use
face mask if operating in dusty work spaces.
• Avoid Dangerous Environment – Don’t expose power
tools to damp or wet conditions. Water entering a power
tool will increase the risk of electric shock.
• Don’t use in rain.
• Keep all bystanders, children, and pets at least 50 ft.
away.
• Dress Properly – Do not wear loose clothing or jewelry.
They can be caught in moving parts. Use of rubber gloves
and substantial footwear is recommended when working
outdoors. Wear protective hair covering to contain long
hair.
• Use right Appliance. Do not use appliance for any job
except that for which it is intended.
• Avoid Unintentional Starting – Don’t carry appliance
with finger on switch. Be sure switch is off when battery
is plugged in.
• Don’t Force Appliance – It will do the job better and with
less likelihood of a risk of injury at the rate for which it
was designed.
• Don’t overreach – Keep proper footing and balance at all
times.
• Stay alert – Watch what you are doing. Use common
sense. Do not operate this unit when you are tired, ill or
under the influence of alcohol, drugs or medication.
• Always store idle power tools indoors – When not in use,
power tools should be stored indoors in a dry and high or
locked-up place, out of reach of children.
• Maintain Appliance With Care – Replace string head if
cracked, chipped, or damaged in any way. Be sure the
string head is properly installed and securely fastened.
Keep cutting edge sharp and clean for best performance
and to reduce the risk of injury. Follow instructions for
lubricating and changing accessories. Inspect appliance
cord periodically, and if damaged, have it repaired by an
authorized service facility. Inspect extension cords
periodically and replace if damaged. Keep handles dry,
clean, and free from oil and grease. Failure to do so can
cause serious injury.
4
English
EN

• Check damaged parts before using the appliance, a guard
or other part that is damaged should be carefully checked
to determine that it will operate properly and perform its
intended function. Check for alignment of moving parts,
binding of moving parts, breakage of parts, damaged
mountings, and any other condition that may affect its
operation. A guard or other part that is damaged should
be properly repaired or replaced by an authorized service
center unless indicated elsewhere in this manual.
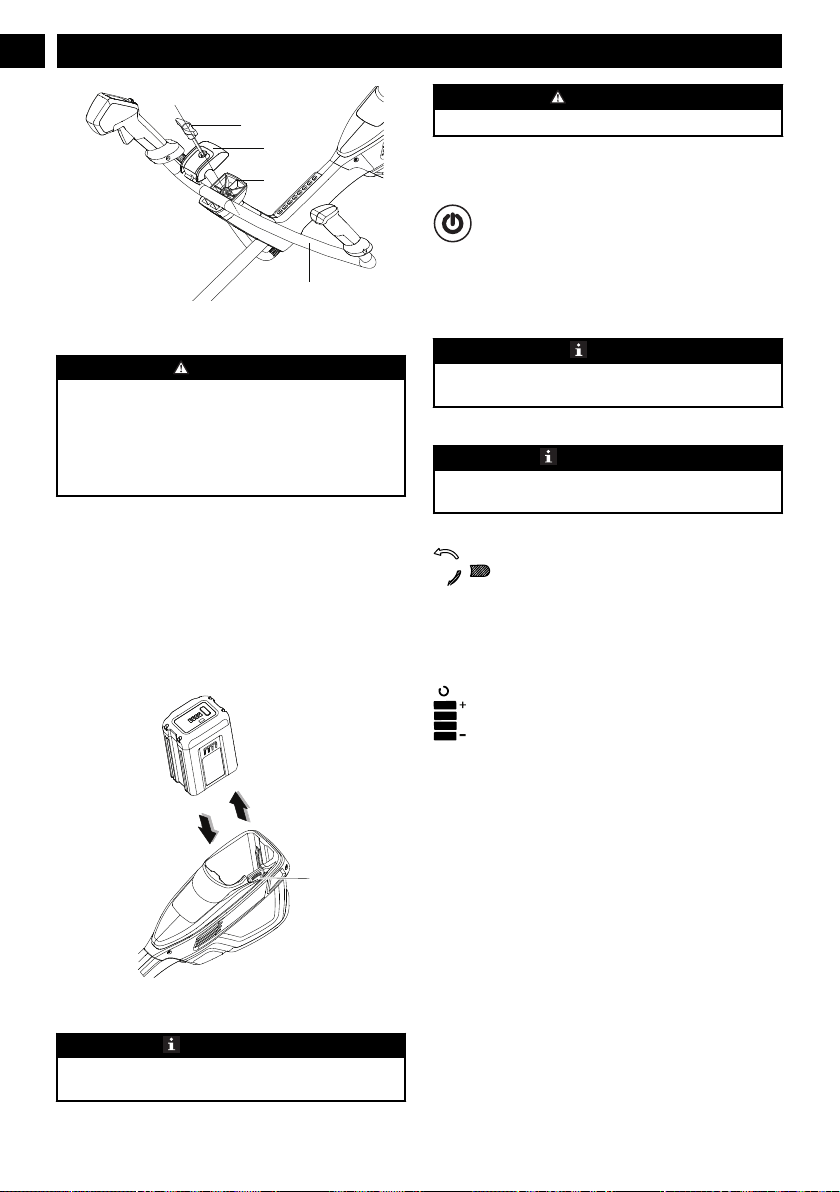
• Remove or disconnect battery before servicing, cleaning
or removing material from the gardening appliance.
• Do not modify or attempt to repair the appliance or the
battery pack (as applicable) except as indicated in the
instructions for use and care. Use appliances only with
specifically designated battery packs. Use of any other
battery packs may create a risk of injury and fire. Use
only Greenworks GLW 200/GLW 300 battery or other
BAB series.
• Recharge only with the charger specified by the
manufacturer. A charger that is suitable for one type of
battery pack may create a risk of fire when used with
another battery pack. Use only Greenworks GC 400
charger or other CAB series.
• When battery pack is not in use, keep it away from other
metal objects, like paper clips, coins, keys, nails, screws
or other small metal objects, that can make a connection
from one terminal to another. Shorting the battery
terminals together may cause a fire.
• Under abusive conditions, liquid may be ejected from the
battery; avoid contact. If contact accidentally occurs,
flush with water. If liquid contacts eyes, additionally seek
medical help. Liquid ejected from the battery may cause
irritation or burns.
• Do not use a battery pack or appliance that is damaged or
modified. Damaged or modified batteries may exhibit
unpredictable behavior resulting in fire, explosion or risk
of injury.
• Do not expose a battery pack or appliance to fire or
excessive temperature. Exposure to fire or temperature
above 265 °F (130 °C) may cause an explosion.
• Do not dispose of the batteries in a fire. The cells may
explode. Check with local codes for possible special
disposal instructions.
• Do not open or mutilate the batteries. Released electrolyte
is corrosive and may cause damage to the eyes or skin. It
may be toxic if swallowed.
• Exercise care in handling batteries in order not to short
the battery with conducting materials such as rings,
bracelets, and keys. The battery or conductor may
overheat and cause burns.
• Follow all charging instructions and do not charge the
battery pack or appliance outside of the temperature range
specified in the instructions. Charging improperly or at
temperatures outside of the specified range may damage
the battery and increase the risk of fire.
• Have servicing performed by a qualified repair person
using only identical replacement parts. This will ensure
that the safety of the product is maintained.
• Keep guards in place and in working order.
• Keep hands and feet away from cutting area.
• Disconnect the battery pack from the appliance before
making any adjustments, changing accessories, or storing
appliance. Such preventive safety measures reduce the
risk of starting the appliance accidentally.
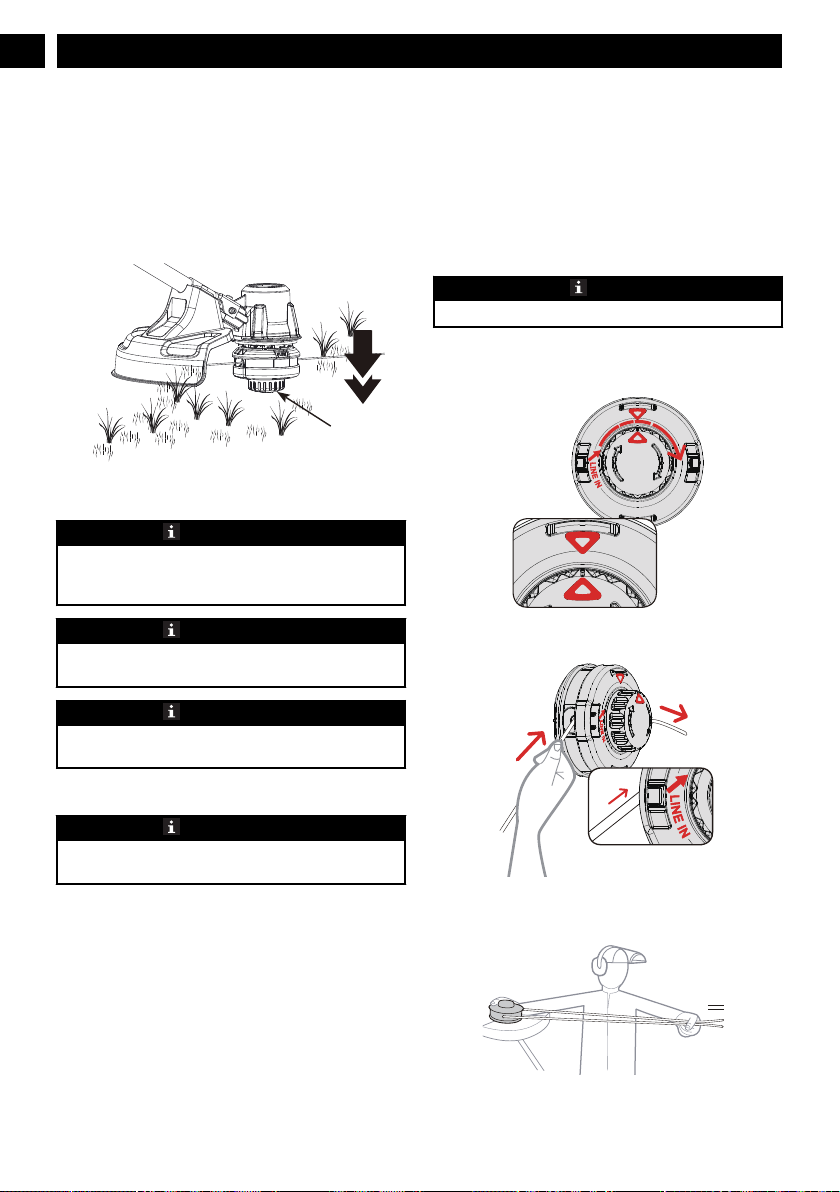
• Use only with the nylon cutting line of 0.094" (2.4 mm)
diameter. Do not use heavier lines than recommended by
the manufacturer and line materials of other types – for
example, metal wire, rope, and the like.
• Be aware of blade thrust :
• Blade thrust may occur when the spinning blade
contacts an object that it does not immediately cut.
• Blade thrust can be violent enough to cause the unit
and/or operator to be propelled in any direction, and
possibly lose control of the unit.
• Blade thrust can occur without warning if the blade
snags, stalls or binds.
• Blade thrust is more likely to occur in areas where it
is difficult to see the material being cut.
• Condition of Unit before Use – The handles shall be
mounted in accordance with the manufacturer’s
instructions. Do not attach any blade to a unit without
proper installation of all required parts. Failure to use the
proper parts can cause the blade to fly off and seriously
injure the operator and/or bystanders. Discard blades that
are bent, warped, cracked, broken, or damaged in any
way. Use a sharp blade. A dull blade is more likely to
snag and thrust.
SAVE THESE INSTRUCTIONS
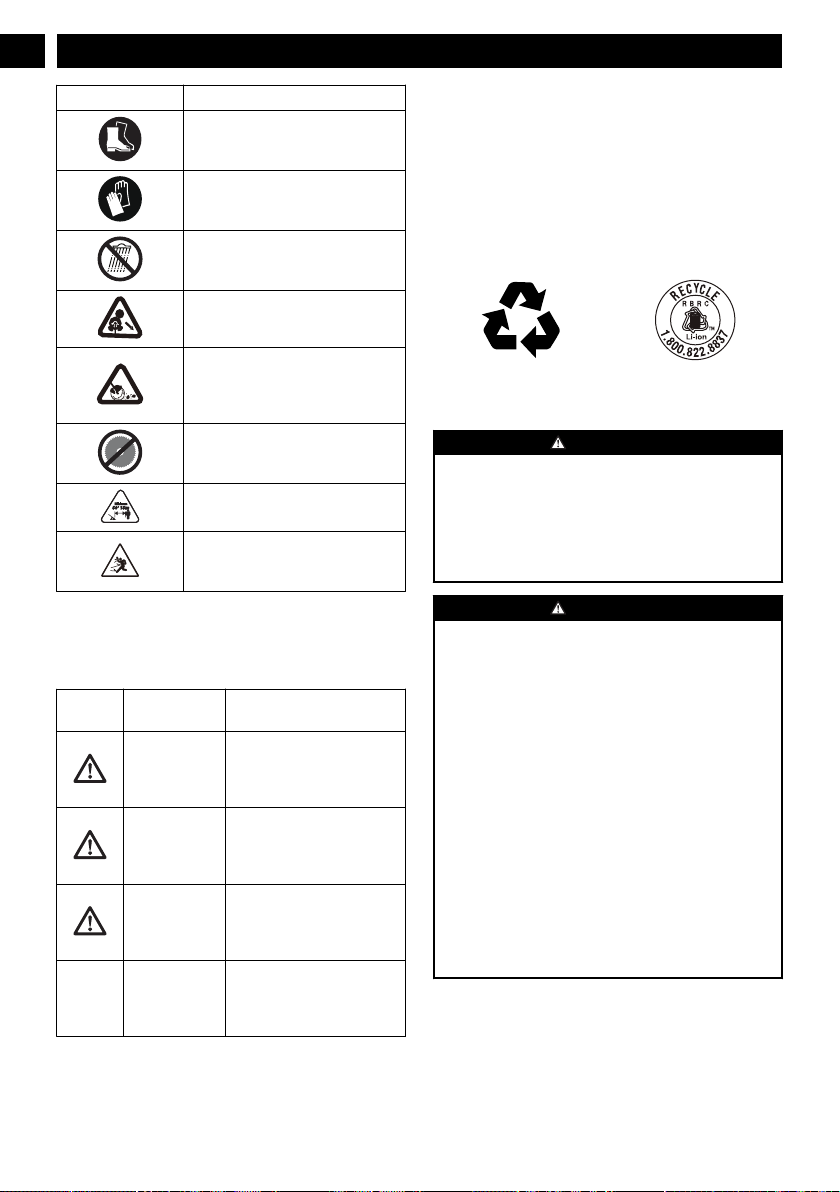
3 SYMBOLS ON THE PRODUCT
Some of the following symbols may be used on this tool.
Please study them and learn their meaning. Proper
interpretation of these symbols will allow you to operate the
tool better and safer.
Symbol Explanation
V Voltage
A Current
Hz Frequency (cycles per second)
W Power
min Time
/min Revolutions, strokes, surface speed,
orbits etc., per minute
Direct current
Precautions that involve your safety.
Wear eyes protection.
5
English EN

Symbol Explanation
Wear safety footwear.
Wear protective gloves.
Do not expose to rain or in damp
condition.
Beware of blade thrust.
Thrown objects can ricochet and re-
sult in personal injury or property
damage. Wear protective clothing and
boots.
Do not use saw blades.
Keep all bystanders at least 15m
away.
Thrown objects can ricochet and re-
sult in personal injury or property
damage.
4 RISK LEVELS
The following signal words and meanings are intended to
explain the levels of risk associated with this product.
SYM-
BOL
SIGNAL MEANING
DANGER Indicates an imminently haz-
ardous situation,which, if not
avoided, will result in death
or serious injury.
WARNING Indicates a potentially hazard-
ous situation,which, if not
avoided, could result in death
or serious injury.
CAUTION Indicates a potentially hazard-
ous situation, which, if not
avoided, may result in minor
or moderate injury.
CAUTION (Without Safety Alert Sym-
bol) Indicates a situation that
may result in property dam-
age.
5 SERVICE
Servicing requires extreme care and knowledge and must be
performed only by a qualified service technician. For service
we suggest you return the machine to your nearest
AUTHORIZED SERVICE CENTER for repair. Use only
identical manufacturer’s replacement parts and accessories.
6 ENVIRONMENTALLY SAFE
BATTERY DISPOSAL
The toxic and corrosive materials below are in the batteries
used in this machine: Lithium-Ion, a toxic material.
WARNING
Discard all toxic materials in a specified manner to prevent
contamination of the environment. Before discarding
damaged or worn out Li-ion battery, contact your local
waste disposal agency, or the local Environmental
Protection Agency for information and specific instructions.
Take the batteries to a local recycling and/or disposal center,
certified for lithium-ion disposal.
WARNING
If the battery pack cracks or breaks, with or without leaks,
do not recharge it and do not use. Discard it and replace
with a new battery pack. DO NOT TRY TO REPAIR IT! To
prevent injury and risk of fire, explosion, or electric shock,
and to avoid damage to the environment:
• Cover the terminals of the battery with heavy-duty
adhesive tape.
• DO NOT try to remove or destroy any of the battery
pack components.
• DO NOT try to open the battery pack.
• If a leak develops, the released electrolytes are
corrosive and toxic. DO NOT get the solution in the
eyes or on skin, and do not swallow it.
• DO NOT put these batteries in your regular household
trash.
• DO NOT incinerate.
• DO NOT put them where they will become part of any
waste landfill or municipal solid waste stream.
• Take them to a certified recycling or disposal center.
6
English
EN

7 PROPOSITION 65
WARNING
This product contains a chemical known to the state of
California to cause cancer, birth defects or other
reproductive harm. Some dust created by power sanding,
sawing, grinding, drilling, and other construction activities
contains chemicals known to cause cancer, birth defects or
other reproductive harm. Some examples of these chemicals
are:
• Lead from lead-based paints;
• Crystalline silica from bricks and cement and other
masonry products;
• Arsenic and chromium from chemically treated lumber.
Your risk of exposure to these chemicals varies depending
on how often you do this type of work. To reduce your
exposure to these chemicals, work in a well-ventilated area,
and work with approved safety equipment, such as dust
masks that are specially designed to filter out microscopic
particles.
8 INSTALLATION
WARNING
Remove the battery pack from the machine before
installation.
WARNING
Do not use accessories that are not recommended for this
machine.
8.1 UNPACK THE MACHINE
WARNING
Make sure that you correctly assemble the machine before
use.
WARNING
• If the parts are damaged, do not use the machine.
• If you do not have all the parts, do not operate the
machine.
• If the parts are damaged or missing, speak to the service
center.
1. Open the package.
2. Read the documentation in the box.
3. Remove all the unassembled parts from the box.
4. Remove the machine from the box.
5. Discard the box and package in compliance with local
regulations.
8.2 ATTACH THE GUARD
WARNING
Do not touch the cut-off blade.
1. Put the shaft into the groove of the guard.
2. Put the bracket (13) into the slot (14).
3. Align the screw hole on the bracket with the screw hole
on the guard.
4. Tighten the screws.
13
14
8.3 ATTACH THE AUXILIARY
HANDLE
1. Loosen the central knob (15).
2. Remove the cap (16) and the lower support (17) .
NOTE
Do not miss the spring in the support.
3. Put the auxiliary handle (4) in the lower support.
4. Put the cap to the lower support.
5. Put the entire block in its housing on the shaft.
6. Set the auxiliary handle in the comfortable position.
7. Lock the auxiliary handle with the central knob.
7
English EN

16
4
17
15
8.4 INSTALL THE BATTERY PACK
WARNING
• If the battery pack or charger is damaged, replace the
battery pack or the charger.
• Stop the machine and wait until the motor stops before
you install or remove the battery pack.
• Read, know, and do the instructions in the battery and
charger manual.
1. Align the lift ribs on the battery pack with the grooves in
the battery compartment.
2. Push the battery pack into the battery compartment until
the battery pack locks into place.
3. When you hear a click, the battery pack is installed.
8.5 REMOVE THE BATTERY PACK
1. Push and hold the battery release button (1).
2. Remove the battery pack from the machine.
1
9 OPERATION
IMPORTANT
Before you operate the machine, read and understand the
safety regulations and the operation instructions.
WARNING
Be careful when you operate the machine.
9.1 CONTROLS
9.1.1 ON/OFF BUTTON
Push this button to connect and disconnect the electrical
circuit of the machine.
Green light on (G): the electrical circuit of the machine is on
(ON). The machine prepares to operate.
NOTE
If you do not use the machine for more than 30 s, the
machine stops.
Lights off: the electrical circuit is off (OFF).
IMPORTANT
Do not keep your finger on the button when you move the
machine to prevent accidental start.
9.1.2 REVERSE BUTTON
1. If grass winds around the trimmer head or blade, prush
the reverse button.
2. Start the machine again.
9.1.3 LED INDICATION
1. 4 green lights are on when you start the machine.
2. Push the speed button forward to adjust the speed.
9.2 START THE MACHINE
1. Push the on/off button (6).
2. Push the lock-out button (5) rearward.
3. Pull the trigger (3).
9.3 STOP THE MACHINE
1. Release the trigger.
2. Push the on/off button again to turn the machine off.
8
English
EN

8
7
6
5
G
3
9.4 OPERATION TIPS
WARNING
Keep clearance between the body and the machine.
WARNING
Do not operate the machine without guard in place.
Do these tips when you use the machine
• Keep the machine connected to the correctly worn
harness.
• Keep a firm hold with the two hands on the machine
while you operate the machine.
• Cut tall grass from the top down.
If grass winds around the trimmer head:
• Remove the battery pack.
• Remove the grass.
9.5 LINE CUT-OFF BLADE
This trimmer is equipped with a line cut-off blade (11) on the
guard. The line cut off blade continuously trims the line to
ensure a consistent and efficient cut diameter. Advance line
whenever you hear the engine running faster than normal, or
when trimming efficiency diminishes. This will maintain best
performance and keep line long enough to advance properly.
9.6 CUTTING TIPS
• Tilt the machine toward the area to be cut. Use the tip of
the cutting line to cut grass.
• Move the machine from right to left to prevent thrown
debris toward the operator.
• Do not cut in the dangerous area.
• Do not force the trimmer head into uncut grass.
• Wire and picket fences cause cutting line wear and
breakage. Stone and brick walls, curbs, and wood can
wear the cutting line quickly.
11
DANGER
AREA
BEST CUTTING AREA
DIRECTION OF
ROTATION
9
English EN

9.7 ADJUST THE LENGTH OF THE
CUTTING LINE
While you operate the machine, the cutting line gets worn and
shorter. You can adjust the length of the cutting line.
1. Hit the trimmer head against the ground while you
operate the machine.
2. Line is automatically released and the cut-off blade cuts
the excess length.
18
10 MAINTENANCE
IMPORTANT
Read and understand the safety regulations and the
maintenance instructions before you clean, repair or do the
maintenance work on the machine.
IMPORTANT
Make sure that all nuts, bolts and screws are tight. Examine
regularly that you install the handles tightly.
IMPORTANT
Use only the replacement parts and accessories of the initial
manufacturer.
10.1 GENERAL INFORMATION
IMPORTANT
Only your dealer or approved service center can do the
maintenance that is not given in this manual.
Before the maintenance operations:
• Stop the machine.
• Remove the battery pack.
• Cool the motor.
• Store the machine in cool and dry place.
• Use correct clothing, protective gloves and safety glasses.
10.2 CLEAN THE MACHINE
• Clean the machine after use with a moist cloth dipped in
neutral detergent.
• Do not use aggressive detergents or solvents to clean the
plastic parts or handles.
• Keep the trimmer head free of grass, leaves, or excessive
grease.
• Keep the air vents clean and free of debris to avoid
overheating and damage to the motor or the battery.
• Do not spray water onto the motor and electrical
components.
10.3 INSTALL THE CUTTING LINE
NOTE
Do not put more than 15 feet of cutting line in at a time.
1. Remove the remaining cutting line on the spool.
2. Line up the slots on the spool cap with the slots on the
trimmer head.
3. Put the cutting line through the hole. Push the cutting line
until it exits the opposite hole.
4. Pull the cutting line through until there is an equal
quantity of cutting line on each side.
10
English
EN

5. Turn the spool cap clock-wise to wind the cutting line
into the trimmer head. Keep approximately 5 in of cutting
line above out of each side of the trimmer head.
(130
mm
)
=
(130
mm
)
5.1" 5.1"
=
10.4 REPLACE THE SPOOL
1. Push the tabs (19) on the sides of the trimmer head at the
same time.
19
2. Pull and remove the spool cover (20).
21
20
3. Remove the remaining spool (21).
4. Put the spool in the spool housing.
NOTE
Make sure that you put the cutting line in the slot on the
new spool and extend the line approximately 15 cm before
you install the new spool.
5. Put the ends of the cutting lines through the holes.
6. Extend the cutting line to release it from the guide slot in
the spool.
7. Push the tabs and install the spool cover onto the spool
housing.
8. Push the spool cover until it clicks into position.
10.5 REPLACE THE CUTTING LINE
NOTE
Remove the remaining cutting line on the spool.
NOTE
Use only with the nylon cutting line of 0.094" (2.4 mm)
diameter.
1. Cut a piece of cutting line approximately 3m long.
2. Bend the line at the midpoint and hook the loop into the
slot in the center rim of the spool. Make sure that the line
snaps into position in the slot.
3. With your finger between the lines, wind the lines equally
and tightly around the spool in the indicated direction.
4. Put the lines in the guide slots.
5. Do not wind the lines beyond the edge of the spool.
20
21
11
English EN

10.6 REMOVE THE TRIMMER HEAD
1. Put the metal rod (E) in the specified angle transmission
hole (D) to fix the trimmer head.
2. Remove the spool cover and the spool.
21
20
3. Loosen the nut (J) on the trimmer head clockwise with a
wrench.
4. Remove the trimmer head.
22
J
D
E
10.7 ASSEMBLE THE TRIMMER HEAD
1. Put the trimmer head onto the housing.
2. Install the nut.
3. Put the metal rod in the specified angle transmission hole
to fix the trimmer head.
4. Tighten the nut on the trimmer head counterclockwise
with a wrench.
IMPORTANT
You must install the cut-off blade when you use the trimmer
head.
10.8 REMOVE THE BRUSH CUTTER
WARNING
Apply the guard to the blade.
1. Put the meatal rod (F) in the specified angle transmission
hole (D) to fix the trimmer head.
2. Loosen the nut (J) clockwise and remove the outer cup
(I).
3. Remove the plate (H) and brush-cutter blade.
4. Remove the inner cup (F).
12
D
J
10.9 ASSEMBLE THE BRUSH CUTTER
WARNING
Wear gloves and be careful with sharp edges.
WARNING
Apply the guard to the blade.
WARNING
Use the specified Nylon locknut which is packed with the
blade, to assemble the blade.
WARNING
You must change the locknut after you use it for 20 times.
1. Put the metal rod (E) in the specified angle transmission
hole (D) to fix the trimmer head.
2. Put the inner cup (F) onto the center shaft.
3. Put the brush-cutter blade (12) on top of the inner cup.
Make sure the blade is in the center.
4. Put the plate (H) above the blade.
5. Put the outer cup above the plate (I).
6. Put the locknut above the outer cup.
7. Tighten the lock-nut (J) counter-clockwise to 44-58” N.M
of torque with a 19mm wrench.
12
English
EN

11 TRANSPORTATION AND
STORAGE
11.1 MOVE THE MACHINE
When you move the machine, you must:
• Wear gloves.
• Stop the machine.
• Remove the battery pack and charge it.
• Assemble the blade guard.
11.2 STORE THE MACHINE
• Remove the battery pack from the machine.
• Make sure that children cannot come near the machine.
• Keep the machine away from corrosive agents such as
garden chemicals and de-icing salts.
• Secure the machine during transportion to prevent
damage or injury. Clean and examine the machine for any
damage.
12 TROUBLESHOOTING
Problem Possible Cause Solution
The ma-
chine does
not start
when you
push the
trigger.
No electrical con-
tact between the
machine and the
battery pack.
1. Remove battery pack.
2. Check contact and in-
stall the battery pack
again.
The battery pack is
depleted.
Charge the battery pack.
The lock-out but-
ton and trigger are
not pushed at the
same time.
1. Pull the lock-out but-
ton and hold it.
2. Pull the trigger to start
the machine.
Problem Possible Cause Solution
The ma-
chine stops
when you
cut.
The guard is not
attached to the ma-
chine.
Remove the battery pack
and attach the guard to
the machine.
Heavy cutting line
is used.
Use only with the nylon
cutting line of 0.094" (2.4
mm) diameter.
The grass winds
around the motor
shaft or the trim-
mer head.
1. Stop the machine.
2. Remove the battery
pack.
3. Remove the grass from
the motor shaft and trim-
mer head.
The motor is over-
loaded.
1. Remove the trimmer
head from the grass.
2. The motor will recover
to work as soon as the
load is removed.
3. When you cut, move
the trimmer head in and
out of the grass to be cut
and remove no more than
8" in pass.
The battery pack
or machine is too
hot.
1. Cool the battery pack
until its function returns
to normal.
2. Cool the machine for
approximately 10 mi-
nutes.
The battery pack is
disconnected from
the tool.
Install the battery pack
again.
The battery pack is
depleted.
Charge the battery pack.
The line
does not ad-
vance.
Lines are welded
to themselves.
Lubricate with silicone
spray.
Not enough line
on spool.
Install more line.
Lines are worn too
short.
Advance the cutting line.
Lines are tangled
on spool.
1. Remove the lines from
the spool.
2. Wind the lines.
13
English EN

Problem Possible Cause Solution
The line
keeps
breaking.
The machine is
used incorrectly.
1. Cut with the tip of the
line, avoid stones, walls
and other hard objects.
2. Advance the cutting
line regularly to keep full
cutting width.
The grass
winds
around the
trimmer
head and
motor hous-
ing.
Cut tall grass at
ground level.
1. Cut tall grass from the
top down.
2. Remove no more than
8" in each pass to prevent
wrapping.
The line
does not cut
well.
The cut-off blade
becomes dull.
Sharpen the cut-off blade
with a file or replace it.
Vibration
increases
obviously.
The line is worn
down at one side
and not advanced
in time.
Make sure that the line on
both sides is normal. Ad-
vance the line.
13 TECHNICAL DATA
Type Cordless, battery powered
Motor 82V DC Brushless
No load speed 4500-5500-6000-6500 RPM
±10% RPM
Cutting line diameter 0.094" (2.4 mm)
Cutting path diameter String Trimmer: 16"
(406mm) ; Brush cutter: 10"
(255mm)
Feed Type Bump Feed
Weight (without battery
pack)
5.5 kg
Battery model GLW 200/GLW 300
and other BAB series
Charger model GC 400 and other CAB ser-
ies
The recommended ambient temperature range:
Item Temperature
String trimmer storage tem-
perature range
32°F (0°C) - 113°F (45°C)
String trimmer operation
temperature range
32°F (0°C) - 113°F (45°C)
Item Temperature
Battery charging temperature
range
39°F (4°C) - 104°F (40°C)
Charger operation tempera-
ture range
39°F (4°C) - 104°F (40°C)
Battery storage temperature
range
32°F (0°C) - 113°F (45°C)
Battery discharging tempera-
ture range
32°F (0°C) - 113°F (45°C)
14 LIMITED WARRANTY
Greenworks hereby warranties this product, to the original
purchaser with proof of purchase, 2 year commercial power
train warranty, 2 year commercial battery warranty against
defects in materials, parts or workmanship. Greenworks, at its
own discretion will repair or replace any and all parts found
to be defective, through normal use, free of charge to the
customer. This warranty is valid only for units which have
been used for personal or commercial use and that have been
maintained in accordance with the instructions in the owners’
manual supplied with the product from new.
2 YEAR LIMITED POWER TRAIN WARRANTY
COVERAGE:
– Motor
– PCB Boards
– Gear Box
– 2 years from the date of purchase (non transferable)
2 YEAR LIMITED BATTERY WARRANTY
COVERAGE:
– Greenworks Commercial Battery Packs (GL 250, GL 400,
GL 500, GL 900, GLW 300, GLW 600, GL400BT and other
series)
– 2 year from the date of purchase (non transferable)
60 DAY LIMITED WEARABLE PARTS WARRANTY
COVERAGE:
– Bars
– Blades
– Guards
– Chains
14
English
EN

– Bump Feed Heads
– Tines
– 60 Days from date of purchase (non transferable)
WARRANTY EXCLUSIONS, LIMITATIONS AND
RIGHTS:
1. All warranties may not be transferred by the consumer to
any subsequent purchaser.
2. Parts or components not supplied by the warrantor, or
parts or components that have been modified.
3. Any failure resulting from the use of improper tools or
improper repair procedures.
4. Any failure resulting from the use of improper tools or
improper repair procedures.
5. Any failure or part that has become inoperative due to
accident, impact, abuse, misuse, neglect, mishandling,
dulling of cutting edges, or failure to operate the product
in accordance with the information provided in the
instruction manual supplied with the product.
6. Routine maintenance items such as lubricants, blade
sharpening.
7. The unit, if it has not been operated and/or maintained in
accordance with the owner's manual.
8. The unit, if it has not been operated and/or maintained in
accordance with the owner's manual.
GREENWORKS HELPLINE:
Warranty service is available by calling our toll-free helpline,
at 1-855-470-4267.
TRANSPORTATION CHARGES:
Transportation charges for the movement of any power
equipment unit or attachment are the responsibility of the
purchaser. It is the purchaser’s responsibility to pay
transportation charges for any part submitted for replacement
under this warranty unless such return is requested in writing
by Greenworks.
Greenworks Tools
P.O. Box 1238
Mooresville, NC 28115
15
English EN

1 Description.......................................17
1.1 But................................................................... 17
1.2 Aperçu............................................................. 17
2 Instructions importantes sur la
sécurité............................................. 17
3 Symboles figurant sur la
machine............................................ 19
4 Niveaux de risques...........................19
5 Service.............................................. 19
6 Élimination des batteries sans
danger pour l'environnement.........19
7 Proposition 65..................................20
8 Installation....................................... 20
8.1 Déballez la machine.........................................20
8.2 Attachez la garde protectrice........................... 21
8.3 Attachez la poignée auxiliaire......................... 21
8.4 Installez le bloc-batterie...................................21
8.5 Retirez le bloc-batterie.....................................21
9 Utilisation.........................................22
9.1 Commandes..................................................... 22
9.2 Démarrez la machine.......................................22
9.3 Arrêtez la machine...........................................22
9.4 Conseils sur l'utilisation...................................22
9.5 Lame de coupe de la ligne............................... 23
9.6 Conseils de coupe............................................ 23
9.7 Réglez la longueur de la ligne de coupe..........23
10 Entretien...........................................23
10.1 Informations générales.................................... 24
10.2 Nettoyez la machine........................................ 24
10.3 Installez la ligne de coupe............................... 24
10.4 Remplacez la bobine........................................24
10.5 Remplacez la ligne de coupe........................... 25
10.6 Retirez la tête de coupe....................................25
10.7 Assemblez la tête de coupe..............................26
10.8 Retirez le taille-broussailles.............................26
10.9 Monter le taille-broussailles............................ 26
11 Transport et entreposage................ 27
11.1 Déplacez la machine........................................27
11.2 Entreposez la machine.....................................27
12 Dépannage........................................27
13 Données techniques......................... 28
14 Garantie limitée...............................28
16
Français
FR

1 DESCRIPTION
1.1 BUT
Cette machine est utilisée pour couper l'herbe, les mauvaises
herbes légères et d'autres végétaux similaires au niveau du sol
ou à proximité. La surface de coupe doit être
approximativement parallèle à la surface du sol. Vous ne
pouvez pas utiliser la machine pour couper ou hacher des
haies, des arbustes, des buissons, des fleurs et du compost.
1.2 APERÇU
1
24
3
9
10
11
5
6
7
8
-+
+
1Bouton d’éjection de la batterie
2Sangle de transport
3Gâchette
4Poignée auxiliaire
5Bouton de verrouillage/déverrouillage de la vitesse
6Bouton marche/arrêt
7Témoin LED
8Bouton marche-arrière
9Manche
10 Garde protectrice
11 Lame de coupe
12 Lame
2 INSTRUCTIONS
IMPORTANTES SUR LA
SÉCURITÉ
LISEZ TOUTES LES INSTRUCTIONS AVANT
L'UTILISATION (CET OUTIL ÉLECTRIQUE)
AVERTISSEMENT
Lisez et comprenez toutes les instructions avant
d'utiliser ce produit. Le non-respect de ces avertissements
et de ces instructions peut entraîner un choc électrique, un
incendie et/ou des blessures graves.
• Utilisez uniquement des pièces de rechange et des
accessoires identiques du fabricant. L'utilisation d'autres
pièces peut créer un danger ou endommager le produit.
• Portez toujours des lunettes de sécurité dont les écrans
latéraux sont conformes à la norme ANSI Z87.1. Les
lunettes ordinaires sont dotées de verres résistants aux
impacts seulement. Ce ne sont PAS des lunettes de
sécurité. Le respect de cette règle réduira le risque de
blessures aux yeux. Utilisez un masque facial si vous
travaillez dans des endroits poussiéreux.
• Évitez les endroits dangereux – N'exposez pas les outils
électriques à des conditions humides ou mouillées. L'eau
qui pénètre dans un outil électrique augmente le risque de
choc électrique.
• N'utilisez pas sous la pluie.
• Tenez tous les curieux, les enfants et les animaux
domestiques à une distance d'au moins 15 m.
• Habillez-vous correctement – Ne portez pas de vêtements
amples ou de bijoux. Ils pourraient se coincer dans les
pièces en mouvement. Le port de gants en caoutchouc et
de chaussures adaptées est recommandé pour travailler à
l'extérieur. Portez un couvre-chef protecteur pour contenir
les cheveux longs.
• Utilisez le bon appareil. N'utilisez l’appareil que pour les
travaux auxquels il est destiné.
• Évitez tout démarrage accidentel – Ne transportez pas
l’appareil avec un doigt sur l’interrupteur. Assurez-vous
que l'interrupteur est éteint lorsque vous branchez la
batterie.
• Ne forcez pas l’appareil – Il fera mieux le travail et avec
moins de risque de blessure à la vitesse pour laquelle il a
été conçu.
• Ne vous penchez pas trop en avant – Gardez un bon
équilibre en tout temps.
• Soyez vigilant – Faites attention à ce que vous faites.
Faites appel à votre bon sens. N'utilisez pas cet appareil si
vous êtes fatigué, malade ou sous l'influence de l'alcool,
de drogues ou de médicaments.
• Rangez toujours les outils électriques inutilisés à
l'intérieur – Lorsqu'ils ne sont pas utilisés, entreposez-les
à l'intérieur dans un endroit sec, hors de portée des
enfants.
• Entretenez soigneusement l’appareil – Remplacez la tête
de coupe si elle est fissurée, ébréchée ou endommagée de
17
Français
FR

quelque façon que ce soit. Assurez-vous que la tête de
coupe est correctement installée et solidement fixée.
Gardez le bord des dents bien aiguisé et propre pour une
meilleure performance et pour réduire les risques de
blessures. Suivez les instructions pour lubrifier et changer
les accessoires. Inspectez périodiquement le cordon de
l'appareil. S'il est endommagé, faites-le réparer par un
réparateur agréé. Inspectez périodiquement les rallonges
électriques et remplacez-les si elles sont endommagées.
Veillez à ce que les poignées restent propres, sèches et
exemptes d’huile et de graisse. Le non-respect de cette
consigne peut entraîner des blessures corporelles graves.
• Vérifier les pièces endommagées avant d’utiliser
l’appareil. Il convient de vérifier soigneusement la garde
protectrice ou toute autre pièce endommagée pour
s'assurer qu'il fonctionnera correctement comme prévu.
Vérifiez l'alignement des pièces mobiles, la fixation des
pièces mobiles, la cassure des pièces, les fixations
endommagées et toute autre condition qui pourrait
affecter leur fonctionnement. Une garde protectrice ou
toute autre pièce endommagée doit être correctement
réparée ou remplacée par un centre de service agréé, sauf
en cas d'indication contraire dans ce manuel.
• Retirez ou débranchez la batterie avant d'entretenir, de
nettoyer ou d'enlever des matériaux de l’appareil de
jardinage.
• Ne modifiez pas ou n'essayez pas de réparer l'appareil ou
le bloc-batterie (selon le cas) sauf en conformité avec les
instructions d'utilisation et d'entretien indiquées dans ce
manuel. Utilisez les appareils uniquement avec des
batteries spécialement conçues à cet effet. L'utilisation de
toutes autres batteries peut créer un risque de blessure et
d'incendie. Utilisez uniquement la batterie GLW 200/
GLW 300 Greenworks ou d’autres séries BAB.
• Rechargez uniquement avec le chargeur spécifié par le
fabricant. Un chargeur adapté à un type de bloc-batterie
peut créer un risque d'incendie lorsqu'il est utilisé avec un
autre bloc-batterie. Utilisez uniquement le chargeur GC
400 Greenworks ou d’autres séries CAB.
• Lorsque le bloc-batterie n'est pas utilisé, éloignez-le des
autres objets métalliques tels qu’attaches trombones,
pièces de monnaie, clés, clous, vis ou autres petits objets
métalliques qui peuvent établir une connexion d'une
borne à une autre. Le court-circuitage des bornes de la
batterie peut provoquer un incendie.
• Dans des conditions abusives, du liquide peut être éjecté
de la batterie ; évitez tout contact. En cas de contact
accidentel, rincez avec de l’eau. En cas de contact avec
les yeux, consultez également un médecin. Le liquide
s'échappant des batteries peut causer des irritations ou des
brûlures.
• N'utilisez pas un bloc-batterie ou un appareil endommagé
ou modifié. Les batteries endommagées ou modifiées
peuvent présenter un fonctionnement imprévisible et
provoquer un incendie, une explosion ou un risque de
blessure.
• N'exposez pas un bloc-batterie ou un appareil à un feu ou
à une température excessive. L'exposition au feu ou une
température supérieure à 130 °C (265 °F) peut provoquer
une explosion.
• Ne jetez pas les batteries au feu. Les cellules peuvent
exploser. Consultez les règlements locaux pour connaître
les instructions d'élimination spéciales.
• Ne tentez pas d'ouvrir ni d'abîmer la batterie. Les
électrolytes rejetés sont corrosifs et peuvent causer des
dommages aux yeux ou à la peau. L'électrolyte peut être
toxique lorsqu'elle est avalée.
• Manipulez les batteries avec précaution afin de ne pas
court-circuiter la batterie avec des matériaux conducteurs
tels que les bagues, les bracelets et les clés. La batterie ou
le conducteur peut surchauffer et provoquer des brûlures.
• Suivez toutes les instructions de recharge et ne rechargez
pas le bloc-batterie ou l'appareil en dehors de la plage de
température spécifiée dans ces instructions. Un
rechargement incorrect ou à des températures en dehors
de la plage spécifiée peut endommager la batterie et
augmenter le risque d'incendie.
• Faites effectuer l'entretien par un réparateur qualifié en
n'utilisant que des pièces de rechange identiques. Cela
garantira le maintien de la sécurité du produit.
• Gardez les gardes protectrices en place et en bon état de
fonctionnement.
• Gardez les mains et les pieds éloignés de la zone de
coupe.
• Retirez la batterie de l'outil électrique avant d'effectuer
des réglages, de changer des accessoires ou de ranger la
machine. De telles mesures de sécurité préventives
réduisent le risque d'un démarrage accidentel de la
machine.
• Utilisez uniquement avec la ligne de coupe en nylon de
0.094" (2.4 mm) diamètre. N'utilisez pas de lignes plus
lourdes que celles recommandées par le fabricant et
d'autres types de lignes. – par exemple, du fil métallique,
de la corde, etc.
• Attention au ricochet de la lame :
• Un ricochet de lame peut se produire lorsque la lame
en rotation entre en contact avec un objet qu’elle ne
coupe pas immédiatement.
• Le ricochet de la lame peut être suffisamment violent
pour provoquer la propulsion de l’appareil et/ou de
l’opérateur dans n’importe quelle direction, et
éventuellement la perte de contrôle de l’appareil.
• Un ricochet de lame peut se produire sans
avertissement si la lame s’accroche, cale ou se
bloque.
• Un ricochet de lame est plus susceptible de se
produire dans les endroits où il est difficile de voir le
matériau coupé.
• État de l’appareil avant son utilisation – Les poignées
doivent être installées conformément aux instructions du
fabricant. Ne fixez aucune lame à un appareil sans avoir
installé correctement toutes les pièces nécessaires. Si
vous n’utilisez pas les pièces appropriées, la lame peut
s’envoler et blesser gravement l’opérateur et/ou les autres
personnes présentes. Jetez les lames qui sont pliées,
18
Français
FR

déformées, fissurées, cassées ou endommagées de
quelque manière que ce soit. Utilisez une lame
tranchante. Une lame émoussée est plus susceptible de
s’accrocher et de ricocher.
CONSERVEZ CES INSTRUCTIONS
3 SYMBOLES FIGURANT SUR
LA MACHINE
Certains des symboles suivants peuvent être utilisés sur cet
outil. Veuillez les étudier et apprendre leur signification. Une
bonne interprétation de ces symboles vous permettra de
mieux utiliser l'outil et de manière plus sécuritaire.
Symbole Explication
V Voltage
A Courant
Hz Fréquence (cycles par seconde)
W Puissance
min Heure
/min Tours, coups, vitesse périphérique,
orbites, etc., par minute
Courant direct
Précautions destinées à assurer la sé-
curité.
Portez des lunettes de protection.
Portez des chaussures de sécurité.
Portez des gants de protection.
N’exposez pas à la pluie ou à dans
des endroits humides.
Attention au ricochet de la lame.
Les objets projetés peuvent ricocher
et causer des blessures corporelles ou
des dommages matériels. Portez des
vêtements et des bottes de protection.
N’utilisez jamais de lames de scie.
Tenez tous les curieux à une distance
d'au moins 15 m.
Symbole Explication
Les objets projetés peuvent ricocher
et causer des blessures corporelles ou
des dommages matériels.
4 NIVEAUX DE RISQUES
Les termes de mise en garde suivants et leur signification ont
pour but d'expliquer les niveaux de risques associés à
l'utilisation de ce produit.
SYM-
BOLE
SIGNAL SIGNIFICATION
DANGER Indique une situation danger-
euse imminente qui, si elle
n'est pas évitée, peut entraîner
la mort ou des blessures
graves.
AVERTISSE-
MENT
Indique une situation poten-
tiellement dangereuse qui, si
elle n'est pas évitée, peut en-
traîner la mort ou des bles-
sures graves.
MISE EN
GARDE
Indique une situation poten-
tiellement dangereuse qui, si
elle n'est pas évitée, pourrait
causer des blessures mineures
ou modérées.
MISE EN
GARDE
(Sans symbole d’alerte de sé-
curité) indique une situation
pouvant entraîner des dom-
mages matériels.
5 SERVICE
L'entretien nécessite un soin extrême et une connaissance
approfondie du système, et ne doit être effectué que par un
technicien qualifié. Pour l'entretien, nous vous suggérons de
retourner la machine à votre CENTRE DE SERVICE
AUTORISÉ le plus proche pour réparation. Utilisez
uniquement des pièces de rechange et des accessoires
identiques du fabricant.
6 ÉLIMINATION DES
BATTERIES SANS DANGER
POUR L'ENVIRONNEMENT
19
Français
FR

Les matières toxiques et corrosives ci-dessous se trouvent
dans les batteries utilisées dans cette machine : Lithium-ion,
une substance toxique.
AVERTISSEMENT
Éliminez toutes les substances toxiques d'une manière
spécifiée afin de prévenir la contamination de
l'environnement. Avant de jeter une batterie Li-ion
endommagée ou usée, contactez votre agence locale
d'élimination des déchets ou l'agence locale de protection de
l'environnement pour obtenir des informations et des
instructions spécifiques. Apportez les batteries à un centre
local de recyclage ou d'élimination certifié pour
l'élimination de batteries au lithium-ion.
AVERTISSEMENT
Si la batterie se fend ou se brise, avec ou sans fuites, ne la
rechargez pas et ne l'utilisez pas. Jetez-la et remplacez-la
par une nouvelle batterie. N'ESSAYEZ PAS DE LA
RÉPARER ! Pour prévenir les blessures et les risques
d'incendie, d'explosion ou de choc électrique, et pour éviter
tout dommage à l'environnement :
• Couvrez les bornes de la batterie avec du ruban adhésif
résistant.
• NE PAS essayer d'enlever ou de détruire les composants
de la batterie.
• NE PAS essayer d'ouvrir ou de réparer la batterie.
• En cas de fuite, les électrolytes rejetés sont corrosifs et
toxiques. NE PAS laisser entrer la solution dans les
yeux ou en contact avec la peau et ne pas l'avaler.
• NE PAS jeter vos batteries usagées dans votre poubelle
à ordures ménagères.
• NE PAS incinérer.
• NE LES Mettez PAS dans un endroit où ils feront partie
d'un site d'enfouissement de déchets ou d'un flux de
déchets solides municipaux.
• Emmenez-les dans un centre de recyclage ou
d'élimination certifié.
7 PROPOSITION 65
AVERTISSEMENT
Ce produit contient un produit chimique connu dans l'état
de Californie comme étant une cause de cancer, de
malformations congénitales ou d'autres problèmes de
reproduction. Certaines poussières produites par le ponçage
mécanique, le sciage, le meulage, le perçage et d'autres
activités de construction contiennent des produits chimiques
connus pour causer le cancer, des malformations
congénitales ou d'autres problèmes de reproduction. Voici
quelques exemples de ces produits chimiques :
• Plomb provenant de peintures à base de plomb;
• Silice cristalline provenant de briques, de ciment et
d'autres produits de maçonnerie;
• Arsenic et chrome provenant de bois traité
chimiquement.
Votre risque d'exposition à ces produits chimiques varie
selon la fréquence à laquelle vous faites ce type de travail.
Pour réduire votre exposition à ces produits chimiques,
travaillez dans un endroit bien ventilé et utilisez un
équipement de sécurité approuvé, comme des masques anti-
poussière spécialement conçus pour filtrer les particules
microscopiques.
8 INSTALLATION
AVERTISSEMENT
Retirez le bloc-batterie de la machine avant l’installation.
AVERTISSEMENT
N’utilisez pas d’accessoire non recommandé pour cette
machine.
8.1 DÉBALLEZ LA MACHINE
AVERTISSEMENT
Assurez-vous d'assembler correctement la machine avant de
l'utiliser.
AVERTISSEMENT
• Si les pièces sont endommagées, n'utilisez pas la
machine.
• Si vous n'avez pas toutes les pièces, n'utilisez pas la
machine.
• Si les pièces sont endommagées ou manquantes,
communiquez avec le centre de service.
1. Ouvrez l’emballage.
2. Lisez la documentation contenue dans la boîte.
3. Retirez toutes les pièces non assemblées de la boîte.
4. Retirez la machine de sa boîte.
20
Français
FR
Table of contents
Languages:
Other GreenWorks Commercial Trimmer manuals

GreenWorks Commercial
GreenWorks Commercial 82T16 User manual

GreenWorks Commercial
GreenWorks Commercial 82TB16 User manual

GreenWorks Commercial
GreenWorks Commercial GHX200 User manual

GreenWorks Commercial
GreenWorks Commercial 82PH20T User manual

GreenWorks Commercial
GreenWorks Commercial GHD260 User manual

GreenWorks Commercial
GreenWorks Commercial 82TB181 User manual