GreenWorks Pro BSC301 User manual

BSC301
FR MANUEL DE L’UTILISATEUR
PULVÉRISATEUR EN SAC À DOS
EN OPERATOR MANUAL
BACKPACK SPRAYER
ES MANUAL DEL OPERADOR
ROCIADOR TIPO MOCHILA
BPS60B00


1 Description...................................4
1.1 Purpose...................................................... 4
1.2 Product overview........................................4
1.3 Packing list................................................. 4
2 General backpack sprayer
safety warnings........................... 4
3 Symbols on the product............. 5
4 Risk levels....................................5
5 Recycle.........................................6
6 Proposition 65............................. 6
7 Installation................................... 6
7.1 Unpack the machine...................................6
7.2 Install the spray gun................................... 6
7.3 Install the tank lid........................................7
7.4 Install the battery pack............................... 7
7.5 Remove the battery pack........................... 7
7.6 Adjust the harness......................................7
8 Operation..................................... 8
8.1 Use the spray gun...................................... 8
8.2 Lock the spray gun trigger..........................9
8.3 Unlock the spray gun trigger...................... 9
8.4 Change the spray tip.................................. 9
8.5 Spray tip type........................................... 10
8.6 Add solution..............................................10
8.7 Start and stop the machine...................... 10
8.8 Pump-free spraying.................................. 10
9 Maintenance ..............................10
10 Troubleshooting........................ 11
11 Technical data............................11
12 Limited warranty........................11
13 Exploded view........................... 12
3
English EN

1 DESCRIPTION
1.1 PURPOSE
The machine is used to spray your yard for invasive
plants and pests. By taking on this task yourself, you
have control over the herbicides and pesticides that you
use in your yard and around your house
For residential use only, not for professional use, and for
operation at temperature above 32°F (0°C).
1.2 PRODUCT OVERVIEW
8a 8b 8c 8d 8e
1
9
7
2
3
4
12
10
11
14
13
5
6
1Tank Lid
2Tank
3Battery Door
4On/Off Power
Switch
5Wand Storage
6Backpack
7Strainer
8a Double Head
Spray Tip
8b Fan Spray Tip
8c Single Head Spray
Tip
8d Four Hole Spray
Tip
8e Adjustable Spray
Tip
9Gun Wand
10 Lock-out Lever
11 Trigger
12 Trigger Handle
13 Water Inlet
14 Hose
1.3 PACKING LIST
• Sprayer
• Spray tips
• Spray gun wand
• Backpack harness
2 GENERAL BACKPACK
SPRAYER SAFETY WARNINGS
• Read all the instructions before using the product.
• To reduce the risk of injury, close supervision is
necessary when a product is used near children.
• Know how to stop the product and bleed pressure
quickly. Be thoroughly familiar with the controls.
• Stay alert – watch what you are doing.
• Do not operate the product when fatigued or under
the influence of alcohol or drugs.
• Keep operating area clear of all persons.
• Do not overreach or stand on unstable support.
Keep good footing and balance at all times.
• Follow the maintenance instructions specified in the
manual.
• Risk of Injection or Injury– DO NOT DIRECT
DISCHARGE STREAM AT PERSONS.
• Do not come in contact or interfere with moving
parts, or liquids being sprayed from wand.
• Only use attachments recommended or sold by the
manufacturer.
• To reduce the risk of electrical shock, do not put in
water or other liquid.
• Do not place or store backpack sprayer where it can
fall or be pulled into a tub or sink. Do not submerge
in water or other liquids.
• Replace damaged or worn parts with replacement
parts listed on "Replacements list".
•
• Read all safety warnings and instructions. Failure to
follow the warnings and instructions may result in
electric shock, fire and/or serious injury.
• Prevent unintentional starting. Ensure the switch
is in the off-position before connecting to battery
pack, picking up or carrying the appliance. Carrying
the appliance with your finger on the switch or
energizing appliance that have the switch on invites
4
English
EN

accidents. Remove your finger from the on/off switch
before carrying or moving the backpack sprayer.
• Disconnect the battery pack from the appliance
before making any adjustments, changing
accessories, or storing appliance. Such preventive
safety measures reduce the risk of starting the
appliance accidentally.
• For use only with LB602 battery and other BAC
series.
• For use only with CAC801 charger and other CAC
series.
• When battery pack is not in use, keep it away from
other metal objects, like paper clips, coins, keys,
nails, screws or other small metal objects, that can
make a connection from one terminal to another.
Shorting the battery terminals together may cause
burns or a fire.
• Do not use a battery pack or appliance that
is damaged or modified. Damaged or modified
batteries may exhibit unpredictable behavior
resulting in fire, explosion or risk of injury.
• Do not expose a battery pack or appliance to
fire or excessive temperature. Exposure to fire or
temperature above 265°F may cause explosion.
• Follow all charging instructions and do not charge
the battery pack or appliance outside of the
temperature range specified in the instructions.
Charging improperly or at temperatures outside of
the specified range may damage the battery and
increase the risk of fire.
• Have servicing performed by a qualified repair
person using only identical replacement parts .This
will ensure that the safety of the product is
maintained.
• Do not modify or attempt to repair the appliance or
the battery pack (as applicable) except as indicated
in the instructions for use and care.
3 SYMBOLS ON THE PRODUCT
Some of the following symbols may be used on this
tool. Please study them and learn their meaning. Proper
interpretation of these symbols will allow you to operate
the tool better and safer.
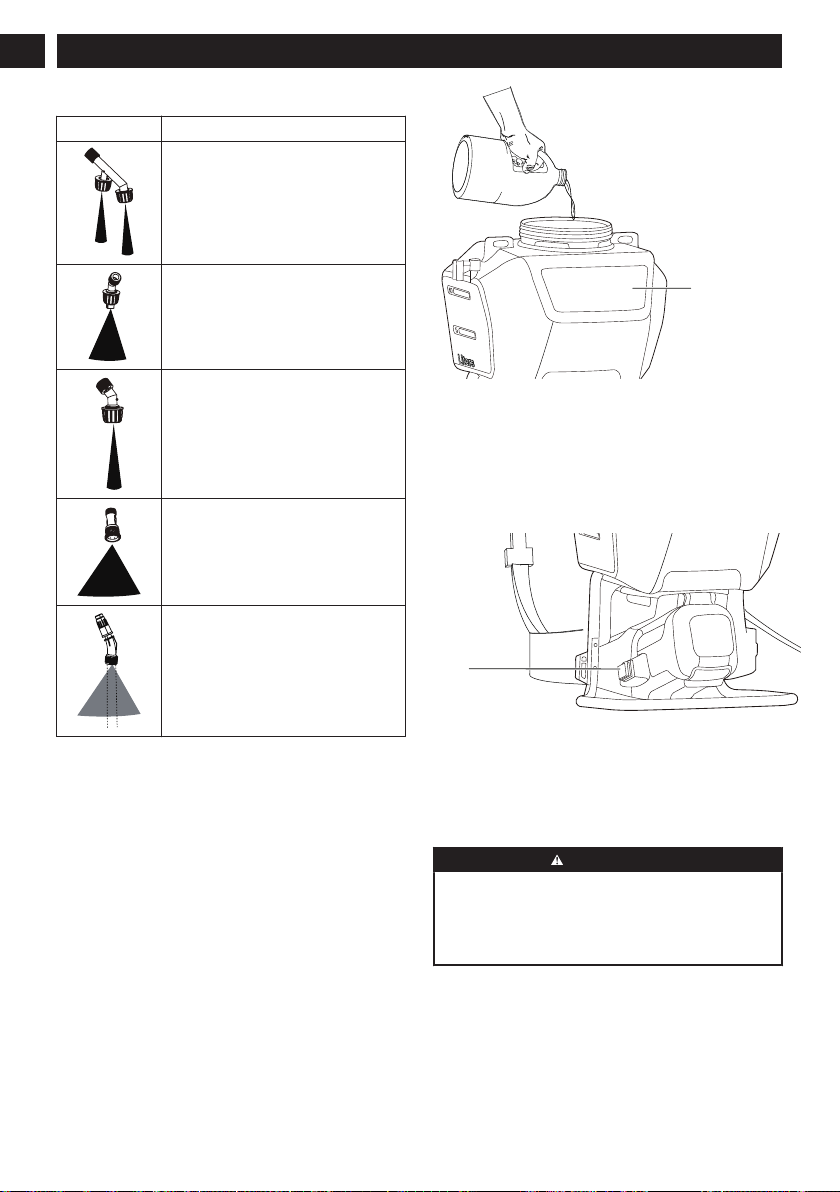
Symbol Explanation
V Voltage
A Current
Hz Frequency (cycles per second)
W Power
/min Revolutions, strokes, surface
speed, orbits, etc., per minute
Type or a characteristic of current
Precautions that involve your
safety.
Symbol Explanation
To reduce the risk of injury, user
must read and understand oper-
ator’s manual before using this
product.
Always wear safety goggles or
safety glasses with side shields
and, as necessary, a full face
shield when operating this prod-
uct.
To reduce the risk of injection or
injury, never direct a water stream
towards people or pets or place
any body part in the stream. Leak
ing hoses and fittings are also ca-
pable of causing injection injury.
Do not hold hoses or fittings.
To reduce the risk of injury from
kickback, hold the spray lance se-
curely with both hands when the
machine is on.
Failure to use in dry conditions
and to observe safe practices can
result in electric shock.
Fuel and its vapours are explosive
and can cause severe burns or
death.
4 RISK LEVELS
The following signal words and meanings are intended
to explain the levels of risk associated with this product.
SYM-
BOL
SIGNAL MEANING
DANGER Indicates an imminently
hazardous situation, which,
if not avoided, will result in
death or serious injury.
WARNING Indicates a potentially haz-
ardous situation, which, if
not avoided, could result in
death or serious injury.
CAUTION Indicates a potentially haz-
ardous situation, which, if
not avoided, may result in
minor or moderate injury.
CAUTION (Without Safety Alert Sym-
bol) Indicates a situation
that may result in property
damage.
5
English EN

5 RECYCLE
Separate collection. You must not dis-
card with usual household waste. If it is
necessary to replace the machine, or if it
is no more use to you, do not discard it
with household waste.
Separate collection of used machine
and packaging let you recycle materi-
als and use them again. Use of the re-
cycled materials helps prevent environ-
mental pollution and decreases the re-
quirements for raw materials.
At the end of their useful life, discard
batteries with a precaution for our envi-
ronment. The battery contains material
that is dangerous to you and the envi-
ronment. You must remove and discard
these materials separately at a location
that accepts lithium-ion batteries.
6 PROPOSITION 65
WARNING
This product contains a chemical known to the
state of California to cause cancer, birth defects
or other reproductive harm. Some dust created by
power sanding, sawing, grinding, drilling, and other
construction activities contains chemicals known to
cause cancer, birth defects or other reproductive
harm. Some examples of these chemicals are:
• Lead from lead-based paints;
• Crystalline silica from bricks and cement and other
masonry products;
• Arsenic and chromium from chemically treated
lumber.
Your risk of exposure to these chemicals varies
depending on how often you do this type of work. To
reduce your exposure to these chemicals, work in a
well-ventilated area, and work with approved safety
equipment, such as dust masks that are specially
designed to filter out microscopic particles.
7 INSTALLATION
7.1 UNPACK THE MACHINE
WARNING
Make sure that you correctly assemble the machine
before use.
WARNING
• If parts of the machine are damaged, do not use
the machine.
• If you do not have all the parts, do not operate the
machine.
• If parts are damaged or missing, contact the
service center.
1. Open the package.
2. Read the documentation provided in the box.
3. Remove all the unassembled parts from the box.
4. Remove the machine from the box.
5. Discard the box and packing material in compliance
with local regulations.
7.2 INSTALL THE SPRAY GUN
8a 8b 8c
9
12
8d 8e
1. Connect the nozzle (8a - 8b) to the wand (3), turn
clockwise until the tabs lock into place to ensure
leak-free connection.
2. Connect the wand (9) to the gun handle (12), turn
clockwise until the tabs lock into place to ensure a
leak-free connection.
6
English
EN

7.3 INSTALL THE TANK LID
1
2
• Connect the tank lid (1) to the tank (2) , turn
clockwise until the tabs lock into place.
WARNING
Do not move the sprayer by carrying the tank
lid handle when the tank is full with solution!
Only lift the lid handle when the tank is empty. It
is recommended to wear harness to transport the
sprayer.
7.4 INSTALL THE BATTERY PACK
Battery pack
Battery
release button
1. Open the battery door (3).
2. Align the lift ribs on the battery pack with the
grooves in the battery compartment.
3. Push the battery pack into the battery compartment
until the battery pack locks into place.
4. When you hear a click, the battery pack is installed.
7.5 REMOVE THE BATTERY PACK
1. Open the battery door.
2. Push and hold the battery release button.
3. Remove the battery pack from the machine.
7.6 ADJUST THE HARNESS
1. Place the sprayer on an elevated surface.
2. Fit the sprayer onto your back loosely.
3. Tighten the upper straps first.
4. Then tighten the lower straps to get the weight
above your waist.
7
English EN

5. Tighten both sides of the waist belt until the weight
of the sprayer is on your hips.
6. Tighten the chest strap the keep the weight close to
your back.
7. Install the back pad against your back tightly and
safely.
8. The sprayer should sit above your waist and the
tank should be close to the user’s back.
8 OPERATION
WARNING
Make sure that all the connections are tight and have
no leakage before operation.
8.1 USE THE SPRAY GUN
11
1. Pull and hold the spray gun trigger (11) to start the
machine.
2. Release the spray gun trigger (11) to stop water flow
through the spray tip.
8
English
EN

8.2 LOCK THE SPRAY GUN TRIGGER
11
10
1. Press the trigger (11) and push forward the trigger
safety lock-out (10) to lock the gun trigger.
2. Release the spray gun trigger (11) to stop water flow
through the spray tip.
8.3 UNLOCK THE SPRAY GUN
TRIGGER
1. Pull backwards on the trigger safety lock-out (10) to
unlock the gun trigger.
8.4 CHANGE THE SPRAY TIP
8a 8b
8
9
8c 8d 8e
1. Insert any of the spray tips (8a - 8e) onto the spray
wand (9).
WARNING
After changing the spray tip, if the angle of the spray
tip is not appropriate, adjust the joint between the gun
wand and the triggle handle and tighten it again.
9
English EN

8.5 SPRAY TIP TYPE
Spray tip APPLICATION
Double head spray tip sprays water
from both tips at the same time.
Fan spray tip, also known as "fan" tip
creates the widest area of spraying.
Single head spray tip provides the
highest versatility.
Four hole spray tip covers a wide
area of spraying and strong pressure.
Adjustable spray tip allows the user to
adjust the tip to the desired spraying
technique.
8.6 ADD SOLUTION
1. Open the tank lid on the tank (2).
2. Pour solution into tank (2).
3. Reattach tank lid to the tank (2).
2
8.7 START AND STOP THE MACHINE
To start:
• Press the switch (4) to turn the machine ON (I).
To stop:
• Press the switch (4) to turn the machine OFF (O).
4
8.8 PUMP-FREE SPRAYING
The battery-powered sprayer keeps fluid continously
cycling through the tank to allow pump-free spraying.
9 MAINTENANCE
WARNING
Always depressurize the sprayer, remove all chemical
solution, and clean the sprayer before making
repairs. Replacement parts may be purchased at the
store where you bought the sprayer. For a list of
replacement parts refer to <Replacement parts>.
Cleaning and maintaining the machine
After each use, clean the tank thoroughly. If spray
solution remains, properly dispose of it and drain
the tank completely. Follow recommendations from
the chemical manufacturer for proper disposal of the
solution. Pumping causes air to be taken in, and the
remaining liquid needs to be discharged. Pump until
10
English
EN

all liquid and air are completely discharged through
the nozzle. Refill the tank with a few quarts of soapy
water (a mild dish detergent is recommended) and
discharge as previously instructed. If necessary, repeat
this procedure several times to ensure that the sprayer
is clean. Sporadic spray distribution is caused by a
clogged nozzle. If necessary, remove and clean nozzle.
Maintenance and storage
After use, the sprayer should be properly cleaned and
stored away from direct sunlight to prevent UV damage.
Before storing for the winter, be sure that all liquid is
completely drained from the tank, lines and air chamber.
(Refer to the CLEANING AND MAINTAINING THE
SPRAYER instructions above). Regularly inspect hose,
pump tank for water, damage or leaks.
10 TROUBLESHOOTING
PROBLEM POSSIBLE
CAUSE
SOLUTION
Liquid leaks. Nut may be
loose or rubber
seal is cracked
or damaged.
Tighten the nut
and/or replace the
seal and lubricate.
Liquid leaks
from the lid.
Lid not
screwed on
tightly or seal is
cracked or
damaged.
Tighten lid. Lubricate
the seal, replace if
necessary.
Tank starts to
collapse; tank
lid cannot be
unscrewed
creating vac-
uum.
Vent holes in
tank lid have
become clog-
ged.
Remove cap and with
a small wire, unclog
the holes. Clean the
cap, check the valve.
Lubricate check valve
and reinstall.
Low or no
pressure.
Battery is out
of charge,
switch is in "off"
position or tip
nozzle is stuck.
Charge the battery
to full charge, turn
switch to ON posi-
tion, unscrew nozzle,
and remove debris.
Tank leaks at
pump connec-
tion.
Seals are dam-
aged.
Replace damaged
seals
Tank leaks at
pump.
The hose
clamp is loose.
Tighten the hose
clamp.
Tank leaks at
hose connec-
tion.
Clamp is loose
or damaged.
Tighten clamp or re-
place if damaged.
Diaphragm is
leaking.
Diaphragm is
damaged.
Replace diaphragm.
PROBLEM POSSIBLE
CAUSE
SOLUTION
The machine
does not start.
The battery is
not charged.
Charge the battery
by following the pro-
cedures in the battery
and charger manual.
Battery is too
cold.
Remove battery from
backpack sprayer.
Place battery on
charger and allow
to charge for 10 mi-
nutes or until the
changing light turns
green. Remove from
charger and install in
backpack sprayer for
use.
11 TECHNICAL DATA
Rated Voltage 60V; Cordless, battery pow-
ered
Max. Pounds Per
Square Inch Pressure
70 PSI (0.5 MPA)
Rated Gallons Per
Minute
0.5 GPM (1.89 L/min)
Maximum Inlet Water
Temperature
104 °F (40 °C)
Cleaning Units 35 C.U.
Capacity 4 Gallons
Weight (without bat-
tery pack)
11.69 lbs. (5,3 kg)
Battery Mode LB602 and other BAC series
Charge Mode CAC801 and other CAC series
12 LIMITED WARRANTY
Greenworks hereby warranties this product, to the
original purchaser with proof of purchase, for a period
of four (4) years against defects in materials, parts
or workmanship. Greenworks, at its own discretion, will
repair or replace any and all parts found to be defective,
through normal use, free of charge to the customer.
This warranty is valid only for units which have been
used for personal use that have not been purchased
11
English EN
M
E
I
L
L
E
U
R
D
A
N
S
S
A
C
A
T
É
G
O
R
I
E
•
M
E
J
O
R
E
N
C
L
A
S
E
B
E
S
T
I
N
C
L
A
S
S
GARANTIE OUTIL &
BATTERIE • GARANTÍA PARA
HERRAMIENTAS Y BATERÍAS

or rented for industrial/commercial use, and that have
been maintained in accordance with the instructions
in the owners’ manual supplied with the product when
new.
ITEMS NOT COVERED BY WARRANTY:
1. Any part that has become inoperative due to
misuse, commercial use, abuse, neglect, accident,
improper maintenance, or alteration; or
2. The unit, if it has not been operated and/or
maintained in accordance with the owner's manual;
or
3. Normal wear;
4. Routine maintenance items such as lubricants,
blade sharpening;
5. Normal deterioration of the exterior finish due to use
or exposure.
HELPLINE:
Warranty service is available by calling our toll-free
helpline at 1-855-345-3934.
TRANSPORTATION CHARGES:
Transportation charges for the movement of any power
equipment unit or attachment are the responsibility of
the purchaser. It is the purchaser’s responsibility to
pay transportation charges for any part submitted for
replacement under this warranty unless such return is
requested in writing by Greenworks.
USA address: Canadian address:
Greenworks Tools Greenworks Tools Canada,
Inc.
P.O. Box 1238 P.O. Box 93095, Newmarket,
Ontario
Mooresville, NC 28115 L3Y 8K3
13 EXPLODED VIEW
12 3 4 5
6 7 8
12
English
EN

No. Part No. Description Qty.
1 C1103722-00 Double Head Spray Tip 1
2 C1103667-00 Fan Spray Tip 1
3 C1103663-00 Single Head Spray Tip 1
4 C1104975-00 Four Hole Spray Tip 1
5 C1104999-00 Adjustable Spray Tip 1
6 C1103718-00 Gun Wand 1
7 C1103719-00 Trigger Handle 1
8 C1103666-00 Strainer 1
13
English EN

1 Description.................................15
1.1 But............................................................ 15
1.2 Aperçu du produit..................................... 15
1.3 Liste du contenu de l’emballage...............15
2 Avertissements généraux sur
la sécurité des
pulvérisateurs à dos................. 15
3 Symboles figurant sur la
machine......................................16
4 Niveaux de risques....................17
5 Recyclage...................................17
6 Proposition 65........................... 17
7 Installation................................. 17
7.1 Déballer la machine..................................17
7.2 Installez le pistolet de pulvérisation..........18
7.3 Installez le couvercle du réservoir............ 18
7.4 Installer le bloc-batterie............................ 18
7.5 Retirez le bloc-batterie............................. 19
7.6 Ajustez le harnais..................................... 19
8 Utilisation................................... 20
8.1 Utilisez le pistolet pulvérisateur................ 20
8.2 Verrouillez la gâchette du pistolet
pulvérisateur.............................................20
8.3 Déverrouillez la gâchette du pistolet
pulvérisateur.............................................20
8.4 Changez la buse de pulvérisation............ 21
8.5 Type de buse de pulvérisation..................21
8.6 Ajoutez la solution.................................... 21
8.7 Démarrez et arrêtez la machine............... 22
8.8 Pulvérisation sans pompe........................ 22
9 Entretien ....................................22
10 Dépannage................................. 22
11 Données techniques................. 23
12 Garantie limitée......................... 23
13 Vue éclatée.................................24
14
Français
FR

1 DESCRIPTION
1.1 BUT
La machine est utilisée pour pulvériser votre jardin afin
d'éliminer les plantes envahissantes et les parasites.
En assumant vous-même cette tâche, vous avez le
contrôle des herbicides et des pesticides que vous
utilisez dans votre jardin et autour de votre maison.
Pour usage résidentiel uniquement et ne convient pas
à un usage professionnel, et pour une utilisation à une
température supérieure à 32 °F (0 °C).
1.2 APERÇU DU PRODUIT
8a 8b 8c 8d 8e
1
9
7
2
3
4
12
10
11
14
13
5
6
1Couvercle du
réservoir 2Réservoir
3Porte de la batterie
4Interrupteur
marche/arrêt
5Rangement de la
baguette
6Sac à dos
7Crépine
8a Embout de
pulvérisation à
double tête
8b Embout de
pulvérisation du
ventilateur
8c Embout de
pulvérisation à tête
unique
8d Embout de
pulvérisation à
quatre trous
8e Embout de
pulvérisation
réglable
9Lance du pistolet
10 Levier de
verrouillage
11 Gâchette
12 Poignée de la
gâchette
13 Entrée d'eau
14 Tuyau
1.3 LISTE DU CONTENU DE
L’EMBALLAGE
• Pulvérisateur
• Conseils de pulvérisation
• Baguette de pistolet à peinture
• Harnais de sac à dos
2 AVERTISSEMENTS
GÉNÉRAUX SUR
LA SÉCURITÉ DES
PULVÉRISATEURS À DOS
• Lisez toutes les instructions avant d’utiliser le
produit.
• Afin de réduire les risques de blessure, une
surveillance étroite est essentielle lorsqu’un produit
est utilisé en présence d’enfants.
• Apprenez à éteindre le produit et à abaisser la
pression rapidement. Familiarisez-vous avec les
commandes.
• Soyez vigilant et faites attention à ce que vous
faites.
• N’utilisez pas le produit si vous êtes fatigué ou sous
l’influence de l’alcool ou de drogues.
• Gardez toute personne à l’écart de la zone de
travail.
• Ne vous penchez pas trop en avant et ne vous
tenez pas sur un support instable. Gardez une
position stable et un bon équilibre en tout temps.
• Suivez les instructions d’entretien spécifiées dans le
manuel.
• Risque d’injection ou de blessure : NE PAS
DIRIGER DE VAPEUR VERS LES PERSONNES.
• N'entrez pas en contact ou n'interférez pas avec
les pièces mobiles ou les liquides pulvérisés par la
baguette.
• N'utilisez que des accessoires recommandés ou
vendus par le fabricant.
15
Français
FR

• Pour réduire le risque de choc électrique, ne pas
mettre l'appareil dans l'eau ou dans un autre liquide.
• Ne placez pas ou ne rangez pas le pulvérisateur à
dos à un endroit où il peut tomber ou être tiré dans
une baignoire ou un évier. N'immergez pas dans
l'eau ou d'autres liquides.
• Remplacez les pièces endommagées ou usées par
des pièces de rechange figurant dans la "Liste des
pièces de rechange".
•
• Lisez tous les avertissements de sécurité et
toutes les instructions. Le non-respect de ces
avertissements et de ces instructions peut entraîner
un choc électrique, un incendie et/ou des blessures
graves.
• Évitez tout démarrage accidentel. Assurez-vous
que l'interrupteur est en position d'arrêt avant de
brancher la batterie, de soulever ou de transporter
l'appareil. Le fait de porter l'appareil avec un
doigt sur l'interrupteur ou d'alimenter l'appareil dont
l'interrupteur est en marche risque de provoquer
des accidents. Retirez votre doigt de l'interrupteur
marche/arrêt avant de porter ou de déplacer le
pulvérisateur à dos.
• Retirez la batterie de l'outil électrique avant
d'effectuer des réglages, de changer des
accessoires ou de ranger la machine. De telles
mesures de sécurité préventives réduisent le risque
d'un démarrage accidentel de la machine.
• A utiliser uniquement avec la batterie LB602 et les
autres séries BAC.
• A utiliser uniquement avec le chargeur CAC801 et
les autres séries CAC.
• Lorsque le bloc-batterie n'est pas utilisé, éloignez-
le des autres objets métalliques tels qu’attaches
trombones, pièces de monnaie, clés, clous, vis ou
autres petits objets métalliques qui peuvent établir
une connexion d'une borne à une autre. Le court-
circuitage des bornes de la batterie peut provoquer
des brûlures ou un incendie.
• N'utilisez pas une batterie ou un appareil
endommagé ou modifié. Les batteries
endommagées ou modifiées peuvent présenter
un fonctionnement imprévisible et provoquer un
incendie, une explosion ou un risque de blessure.
• N'exposez pas une batterie ou un appareil à un
feu ou à une température excessive. L'exposition
au feu ou une température supérieure à 265°F peut
provoquer une explosion.
• Suivez toutes les instructions de recharge et ne
rechargez pas le bloc-batterie ou l'appareil en
dehors de la plage de température spécifiée dans
ces instructions. Un rechargement incorrect ou à
des températures en dehors de la plage spécifiée
peut endommager la batterie et augmenter le risque
d'incendie.
• Faites effectuer l'entretien par un réparateur qualifié
utilisant uniquement des pièces de rechange
identiques. Cela garantira le maintien de la sécurité
du produit.
• Ne modifiez pas ou n'essayez pas de réparer
l'appareil ou le bloc-batterie (selon le cas) sauf
en conformité avec les instructions d'utilisation et
d'entretien indiquées dans ce manuel.
3 SYMBOLES FIGURANT SUR
LA MACHINE
Certains des symboles suivants peuvent être utilisés
sur cet outil. Veuillez les étudier et apprendre leur
signification. Une bonne interprétation de ces symboles
vous permettra de mieux utiliser l'outil et de manière
plus sécuritaire.
Symbole Explication
V Voltage
A Courant
Hz Fréquence (cycles par seconde)
W Puissance
/min Révolutions, courses, vitesse de
surface, orbites, etc., par minute
Type ou caractéristique du cou-
rant
Précautions destinées à assurer
la sécurité.
Pour réduire les risques de bles-
sures, l'utilisateur doit lire et com-
prendre le manuel d'opérateur
avant d'utiliser ce produit.
Portez toujours des lunettes de
protection ou des lunettes de sé-
curité avec écrans latéraux et, au
besoin, un écran facial intégral
lorsque vous utilisez ce produit.
Pour réduire le risque d'injection
ou de blessure, ne dirigez jamais
un jet d'eau vers des personnes
ou des animaux domestiques et
ne placez aucune partie du corps
dans le jet. Les tuyaux et rac-
cords qui fuient peuvent égale-
ment causer des blessures par in-
jection. Ne pas tenir les tuyaux ou
les raccords.
Pour réduire le risque de blessure
par rebond, tenez fermement la
lance avec les deux mains lors-
que la machine est en marche.
16
Français
FR

Symbole Explication
Le non-respect des consignes de
sécurité et de l'utilisation dans des
conditions sèches peut entraîner
un choc électrique.
Le carburant et ses vapeurs sont
explosifs et peuvent causer de
graves brûlures ou la mort.
4 NIVEAUX DE RISQUES
Les termes de mise en garde suivants et leur
signification ont pour but d'expliquer les niveaux de
risques associés à l'utilisation de ce produit.
SYM-
BOLE
SIGNAL SIGNIFICATION
DANGER Indique une situation dan-
gereuse imminente qui, si
elle n’est pas évitée, peut
entraîner la mort ou des
blessures graves.
AVERTISSE-
MENT
Indique une situation po-
tentiellement dangereuse
qui, si elle n’est pas évitée,
peut entraîner la mort ou
des blessures graves.
MISE EN
GARDE
Indique une situation po-
tentiellement dangereuse
qui, si elle n'est pas évitée,
pourrait causer des bles-
sures mineures ou modér-
ées.
MISE EN
GARDE
(Sans symbole d’alerte de
sécurité) indique une situa-
tion pouvant entraîner des
dommages matériels.
5 RECYCLAGE
Collecte séparée. Vous ne devez pas
jeter ces déchets avec les ordures mé-
nagères habituelles. S'il est nécessaire
de remplacer la machine, ou si elle ne
vous est plus utile, ne la jetez pas avec
les déchets ménagers.
La collecte séparée des machines et
des emballages usagés vous permet de
recycler les matériaux et de les réutil-
iser. L'utilisation de matériaux recyclés
contribue à la prévention de la pollution
de l'environnement et à la réduction des
besoins en matières premières.
À la fin de leur durée de vie utile, jet-
ez les batteries en prenant des précau-
tions pour l'environnement. La batterie
contient des matières dangereuses pour
les humains et pour l'environnement.
Vous devez retirer et jeter ces matériaux
séparément à un emplacement qui ac-
cepte les batteries aux ions de lithium.
6 PROPOSITION 65
AVERTISSEMENT
Ce produit contient un produit chimique connu dans
l'état de Californie comme étant une cause de cancer,
de malformations congénitales ou d'autres problèmes
de reproduction. Certaines poussières produites par le
ponçage mécanique, le sciage, le meulage, le perçage
et d'autres activités de construction contiennent des
produits chimiques connus pour causer le cancer, des
malformations congénitales ou d'autres problèmes de
reproduction. Voici quelques exemples de ces produits
chimiques :
• Plomb provenant de peintures à base de plomb;
• Silice cristalline provenant de briques, de ciment et
d'autres produits de maçonnerie;
• Arsenic et chrome provenant de bois traité
chimiquement.
Votre risque d'exposition à ces produits chimiques
varie selon la fréquence à laquelle vous faites ce
type de travail. Pour réduire votre exposition à ces
produits chimiques, travaillez dans un endroit bien
ventilé et utilisez un équipement de sécurité approuvé,
comme des masques anti-poussière spécialement
conçus pour filtrer les particules microscopiques.
7 INSTALLATION
7.1 DÉBALLER LA MACHINE
AVERTISSEMENT
Assurez-vous d'assembler correctement la machine
avant de l'utiliser.
AVERTISSEMENT
• Si les pièces de la machine sont endommagées,
ne l’utilisez pas.
• Si vous n'avez pas toutes les pièces, n'utilisez pas
la machine.
• Si des pièces sont endommagées ou manquantes,
communiquez avec le centre de service.
1. Ouvrez l’emballage.
2. Lisez la documentation contenue dans la boîte.
17
Français
FR

3. Retirez toutes les pièces non assemblées de la
boîte.
4. Retirez la machine de sa boîte.
5. Jetez la boîte et l’emballage conformément aux
règlements locaux.
7.2 INSTALLEZ LE PISTOLET DE
PULVÉRISATION
8a 8b 8c
9
12
8d 8e
1. Connectez la buse (8a - 8b) à la baguette (3),
tournez dans le sens des aiguilles d'une montre
jusqu'à ce que les languettes se verrouillent en
place pour assurer une connexion sans fuite.
2. Connectez la baguette (9) à la poignée du pistolet
(12), tourner dans le sens des aiguilles d'une montre
jusqu'à ce que les languettes se verrouillent en
place pour assurer une connexion sans fuite.
7.3 INSTALLEZ LE COUVERCLE DU
RÉSERVOIR
1
2
• Connectez le couvercle du réservoir (1) au réservoir
(2), tournez dans le sens des aiguilles d'une montre
jusqu'à ce que les languettes se verrouillent en
place.
AVERTISSEMENT
Ne déplacez pas le pulvérisateur en portant la
poignée du couvercle du réservoir lorsque le
réservoir est plein de solution ! Ne soulevez la
poignée du couvercle que lorsque le réservoir est
vide. Il est recommandé de porter un harnais pour
transporter le pulvérisateur.
7.4 INSTALLER LE BLOC-BATTERIE
Batterie
Bouton d’éjection
de la batterie
3
1. Ouvrez le couvercle de la batterie (3).
2. Alignez les languettes du bloc-batterie avec les
rainures du compartiment de batterie.
18
Français
FR

3. Poussez le bloc-batterie dans le compartiment de
batterie jusqu'à ce qu'il soit bien encliqueté.
4. Vous devriez entendre un clic lorsque le bloc-
batterie sera inséré correctement.
7.5 RETIREZ LE BLOC-BATTERIE
1. Ouvrez la trappe de la batterie.
2. Poussez et maintenez enfoncé le bouton de
déblocage de la batterie.
3. Retirez le bloc-batterie de la machine.
7.6 AJUSTEZ LE HARNAIS
1. Placez le pulvérisateur sur une surface surélevée.
2. Installez le pulvérisateur sur votre dos sans serrer.
3. Serrez d'abord les sangles supérieures.
4. Ensuite, serrez les sangles inférieures pour que le
poids soit au-dessus de votre taille.
5. Serrez les deux côtés de la ceinture jusqu'à ce que
le poids du pulvérisateur repose sur vos hanches.
6. Serrez la sangle de poitrine pour garder le poids
près de votre dos.
19
Français
FR

7. Installez solidement le support dorsal contre votre
dos de manière sécuritaire.
8. Le pulvérisateur doit être placé au-dessus de votre
taille et le réservoir doit être près du dos de
l'utilisateur.
8 UTILISATION
AVERTISSEMENT
Assurez-vous que tous les raccords sont bien serrés
et qu'il n'y a pas de fuite avant de les utiliser.
8.1 UTILISEZ LE PISTOLET
PULVÉRISATEUR
11
1. Tirez sur la gâchette du pistolet (11) et maintenez-la
enfoncée pour démarrer la machine.
2. Relâchez la gâchette du pistolet pulvérisateur (11)
pour arrêter l'écoulement de l'eau à travers la buse.
8.2 VERROUILLEZ LA GÂCHETTE DU
PISTOLET PULVÉRISATEUR
11
10
1. Appuyez sur la gâchette (11) et poussez vers l'avant
le verrou de sécurité de la gâchette (10) pour
verrouiller la gâchette du pistolet.
2. Relâchez la gâchette du pistolet pulvérisateur (11)
pour arrêter l'écoulement de l'eau à travers la buse.
8.3 DÉVERROUILLEZ LA GÂCHETTE
DU PISTOLET PULVÉRISATEUR
1. Tirez vers l'arrière sur le verrou de sécurité de
la gâchette (10) pour déverrouiller la gâchette du
pistolet.
20
Français
FR
Table of contents
Languages:
Other GreenWorks Pro Paint Sprayer manuals