GreenWorks PAC460 User manual

PAC460
2941507AU
P0803561-00 Rev B
EN OPERATOR MANUALMID SHAFT HEAD
www.greenworksaustralia.com
Greenworks Australia
A Division Jak Max P/L
380 Foley’s Road Derrimut
Victoria, Australia 3026

1.
PAC460
2
3
3
4
4
5
5
1
2
2.
3.

1 Description.........................................4
1.1 Introduction....................................................... 4
1.2 Overview........................................................... 4
2 Safety.................................................. 4
3 Installation......................................... 4
3.1 Unpack the machine.......................................... 4
3.2 Attach the shaft..................................................4
4 Maintenance.......................................4
4.1 General information...........................................4
4.2 Clean the machine............................................. 4
5 Transportation and storage..............5
5.1 Store the machine.............................................. 5
6 Troubleshooting.................................5
7 Technical data....................................5
8 Warranty............................................5
3
English EN

1 DESCRIPTION
1.1 INTRODUCTION
Your product has been engineered and manufactured to high
standards for dependability, ease of operation, and operator
safety. When properly cared for, it will give you years of
rugged, trouble-free performance.
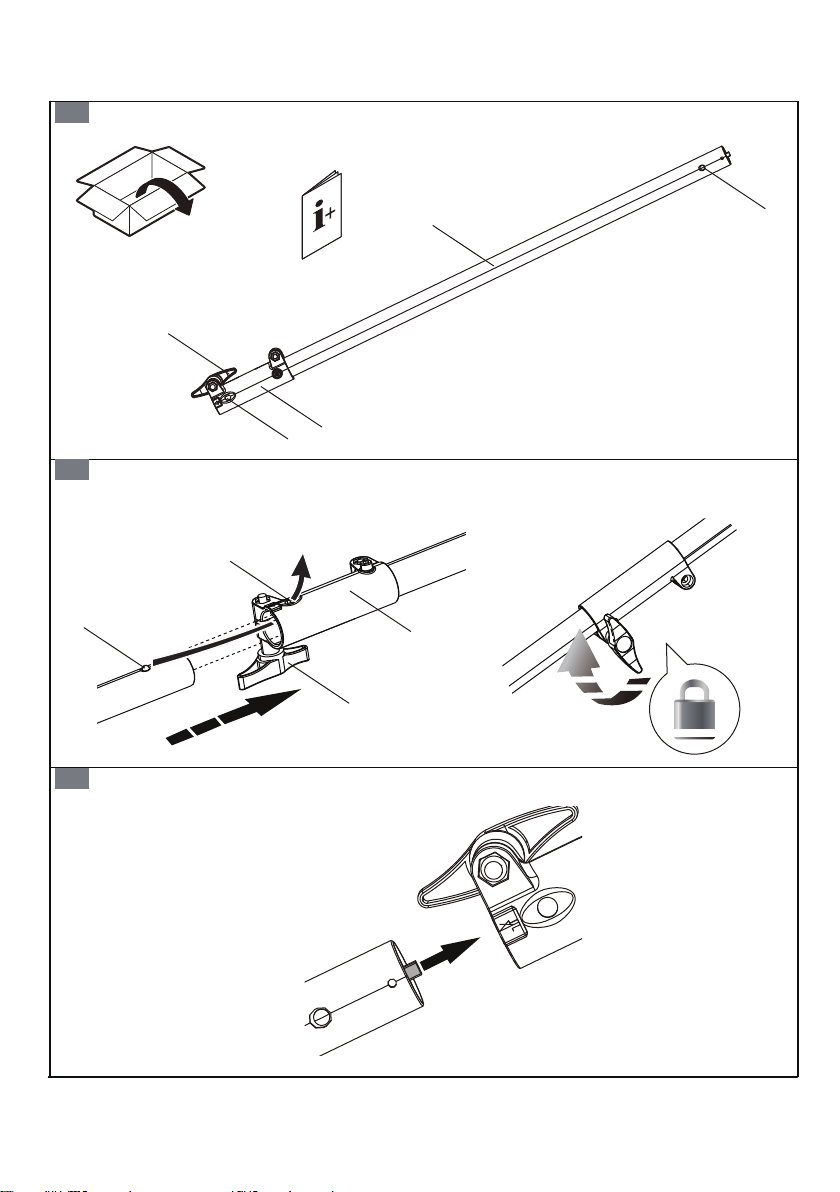
1.2 OVERVIEW
Figure 1 - 3.
1Middle shaft attachment
2Knob
3Location hole
4Coupler
5Release button
2 SAFETY
WARNING
Make sure that you follow all safety instructions.
Refer to Safety Manual.
3 INSTALLATION
3.1 UNPACK THE MACHINE
WARNING
Make sure that you correctly assemble the machine before
use.
WARNING
• If parts of the machine are damaged, do not use the
machine.
• If you do not have all the parts, do not operate the
machine.
• If parts are damaged or missing, contact the service
center.
1. Open the package.
2. Read the documentation provided in the box.
3. Remove all the unassembled parts from the box.
4. Remove the machine from the box.
5. Discard the box and packing material in compliance with
local regulations.
3.2 ATTACH THE SHAFT
Figure 2.
NOTE
If the button does not release fully in the location hole, the
shafts are not locked into position. Turn from side to side
until the button is locked into position.
1. Loosen the lock knob on the coupler.
2. Align the release button with the location hole and move
the two shafts together.
3. Turn the upper shaft until the release button locks into the
location hole.
4. Tighten the lock knob.
4 MAINTENANCE
IMPORTANT
Read and understand the safety regulations and the
maintenance instructions before you clean, repair or do the
maintenance work on the machine.
IMPORTANT
Make sure that all nuts, bolts and screws are tight. Examine
regularly that you install the handles tightly.
IMPORTANT
Use only the replacement parts and accessories of the initial
manufacturer.
4.1 GENERAL INFORMATION
IMPORTANT
Only your dealer or approved service center can do the
maintenance that is not given in this manual.
Before the maintenance operations:
• Stop the machine.
• Remove the battery pack.
• Cool the motor.
• Store the machine in cool and dry place.
• Use correct clothing, protective gloves and safety glasses.
4.2 CLEAN THE MACHINE
• Clean the machine after use with a moist cloth dipped in
neutral detergent.
• Do not use aggressive detergents or solvents to clean the
plastic parts or handles.
• Keep the trimmer head free of grass, leaves, or excessive
grease.
• Keep the air vents clean and free of debris to avoid
overheating and damage to the motor or the battery.
• Do not spray water onto the motor and electrical
components.
4
English
EN

5 TRANSPORTATION AND
STORAGE
WARNING
Remove the battery pack from the machine before
transportation and storage.
5.1 STORE THE MACHINE
• Remove the battery pack from the machine.
• Make sure that children cannot come near the machine.
• Keep the machine away from corrosive agents such as
garden chemicals and de-icing salts.
• Secure the machine during transportion to prevent
damage or injury. Clean and examine the machine for any
damage.
6 TROUBLESHOOTING
Problem Possible Cause Solution
Can’t disas-
semble.
Damaged coupling Contact Service Center
Head does
not turn.
Cutting blade is
damaged.
Reconnect coupling as
shown above (Shaft As-
sembly). Contact Service
Center.
Can’t as-
semble.
Coupling not lined
up
The internal drive shaft is
not located correctly, turn
drive slightly and refit
Contact Service Center.
7 TECHNICAL DATA
Weight 0.6 kg
8 WARRANTY
(The full warranty terms and conditions can be found on
Greenworks website www.greenworksaustralia.com)
The Greenworks warranty is 4 years on the product, and 2
years on batteries (consumer/private usage) from the date of
purchase. This warranty covers manufacturing faults. A faulty
product under warranty might be either repaired or replaced.
A unit that has been misused or used in other ways then
described in the owner’s manual might be rejected for
warranty. Normal wear, and wear parts are not considered as
warranty. The original manufacturer warranty is not affected
by any additional warranty offered by a dealer or retailer.
A faulty product must be returned to the point of purchase in
order to claim for warranty, together with the proof of
purchase (receipt).
5
English EN
Other manuals for PAC460
1
This manual suits for next models
1
Table of contents
Other GreenWorks Power Tools Accessories manuals