GreenWorks 7403607AU User manual


1 Introduction................................. 2
1.1 Product description.....................................2
1.2 Intended use...............................................2
1.3 Overview.................................................... 2
1.4 Hardware list (not actual size).................... 3
1.5 Symbols on the product..............................4
1.6 California Proposition 65............................ 4
2 Safety............................................4
2.1 Safety definitions........................................ 4
2.2 Important safety instructions...................... 4
2.3 FCC Requirement...................................... 6
3 Assembly..................................... 6
3.1 Install the steering wheel............................6
3.2 Install the seat............................................ 7
3.3 Install the belt............................................. 7
3.4 Install the brush guard................................7
3.5 Install the rack............................................ 8
3.6 Install the safety net................................... 8
4 Operation..................................... 8
4.1 Before driving............................................. 9
4.2 Start the product.......................................10
4.3 Light on/off................................................11
4.4 Speaker function.......................................11
4.5 Drive the product...................................... 11
4.6 Drive uphill/downhill..................................11
4.7 Stop the product....................................... 12
5 SMARTg home application.......12
5.1 Setup........................................................ 12
6 Maintenance...............................13
6.1 Maintenance schedule............................. 13
6.2 Clean the product..................................... 13
6.3 Clean the battery and battery charger......13
7 Transportation, storage and
disposal......................................14
7.1 Transportation.......................................... 14
7.2 Storage.....................................................14
7.3 Disposal of the battery, battery
charger, and product................................ 14
8 Error codes................................ 14
9 Technical data............................15
10 Limited warranty........................15
1
English (Original Instructions) EN

1 INTRODUCTION
1.1 PRODUCT DESCRIPTION
This product is a battery-operated go-kart with an electrical motor.
We are committed to continuously improving our products, and reserve the right to modify the design and
appearance without prior notice.
1.2 INTENDED USE
This is a recreational vehicle for off-road driving.
1.3 OVERVIEW
Go kart
12
11
1413
9
10
1
4
2
3
7
6
8
5
1Brush guard
2Steering wheel
3Headlight
4Front wheel
5Rack
6Seat
7Seat belt
8Rear wheel
9Brake pedal (left)
10 Accelerator pedal (right)
11 Gear shift switch
12 Light switch
13 Start button
14 LCD Display
Display
D
N
Rmph
Mi
READY
1
3
2
5
7
6
4
1Bluetooth
2Gear
3Battery level indicator
4Headlight
5Bluetooth speaker
6Speed
7Trip distance/total distance/error code
2
English (Original Instructions)
EN

1.4 HARDWARE LIST (NOT ACTUAL SIZE)
Steering wheel installation (Bag A)
Name Quantity Picture
M6 x 16 mm bolt 3
M6 nut 3
Seat installation (Bag B)
Name Quantity Picture
M8 x 40 mm flange bolt 2
M8 nut 2
Brush guard installation (Bag C)
Name Quantity Picture
Plug 4
Concave spacer 4
M8 x 50 mm flange bolt (long bolt) 4
M8 x 20 mm bolt (short bolt) 20
Rack installation (Bag D)
Name Quantity Picture
Concave spacer 2
M8 x 45 mm flange bolt (long bolt) 2
M8 x 20 mm flange bolt (short bolt) 4
M8 nut 6
3
English (Original Instructions) EN

1.5 SYMBOLS ON THE PRODUCT
Symbol Explanation
IPX4 Waterproof level
Direct current
Important safety precautions.
Carefully read and understand instructions before operating the product and
follow all warnings and safety instructions.
Warning. Electric shock hazard.
14
Never permit children under age 14 to operate this product. Operation by
children under the age of 14 increases the risk of severe injury or death.
Adult supervision required for children under the age of 16.
Always use an approved helmet and protective gear.
Never use on public roads.
Never use with drugs or alcohol.
1.6 CALIFORNIA PROPOSITION 65
WARNING
This product contains or emits a chemical known to the State of California to cause cancer or birth defects or other
reproductive harm.
2 SAFETY
2.1 SAFETY DEFINITIONS
Warning, cautions, and notes are used to point out especially important parts of the manual.
WARNING
Used if there is a risk of injury or death for the operator, or bystanders if the instructions in the manual are not
obeyed.
CAUTION
Used if there is a risk of damage to the product, other materials, or the adjacent area if the instructions in the
manual are not obeyed.
Note: Used to give more information that is necessary in a given situation.
2.2 IMPORTANT SAFETY INSTRUCTIONS
WARNING
Read all safety warnings and all instructions. Failure to follow the warnings and instructions may result in
electric shock, fire and/or serious injury.
4
English (Original Instructions)
EN

• This product is not a means of transportation. Please obey local laws, regulations, and policies when driving.
• This product is not a toy and could be hazardous to operate. greenworks is not responsible for injuries or damage
caused by a driver's inexperience or failure to follow the instructions in this user manual or in the new driver
tutorial.
• Remember as with any mode of transportation, that whenever you drive the product, you risk injury or death from
loss of control, collisions, and falls. You can reduce the risk by following all the instructions and warnings in this
manual, but you cannot eliminate all the risks.
• This product contains small parts which can create a choking hazard. Keep small children away from the product.
Who should not drive
• Anyone under the influence of drugs, medication, alcohol or other substances.
• Children under the age of 14.
• Anyone with a condition that advises against engaging in strenuous physical activity.
• Anyone who is extremely fatigued or has balancing issues.
• Anyone whose weight is outside the stated limits (see Technical data).
• Anyone who is deaf, hard of hearing, and/or cannot hear important auditory cues while driving.
• Children under the age of 16 should only drive under adult supervision.
Areas to avoid driving:
• When entering public spaces, always comply with local laws and regulations. Only drive in areas where you have
obtained permission from the property owner.
• Do not drive on roadways, near motor vehicles, pedestrians, bicyclists, animals, on or near steep inclines or
steps, curbs, near swimming pools, through puddles, or other bodies of water. Use caution when driving in areas
with trees, posts, or fences. You must leave sufficient space between you and those items to be able to safely
pass them.
• Do not drive at night or in poor visibility conditions.
• Do not drive on any ramp or incline that exceeds the maximum slope.
• Do not drive indoors.
• Do not drive in the snow, rain, or on roads that are wet, icy, or that are slippery for any reason. Do not drive over
obstacles (including but not limited to, sand, loose gravel, or sticks). Doing so could result in a loss of balance or
traction and could cause a collision.
• This product is not intended for use at elevations greater than 2000 m above sea level.
Battery product use and care
•Recharge only with the charger specified by the manufacturer. A charger that is suitable for one type of
battery pack may create a risk of fire when used with another battery pack.
•Use the product only with specifically designated battery packs. Use of any other battery packs may create
a risk of injury and fire.
•When battery pack is not in use, keep it away from other metal objects, like paper clips, coins, keys,
nails, screws, or other small metal objects, that can make a connection from one terminal to another.
Shorting the battery terminals together may cause burns or a fire.
•Under abusive conditions, liquid may be ejected from the battery; avoid contact. If contact accidentally
occurs, flush with water. If liquid contacts eyes, additionally seek medical help. Liquid ejected from the
battery may cause irritation or burns.
•Do not use a battery pack or product that is damaged or modified. Damaged or modified batteries may
exhibit unpredictable behavior resulting in fire, explosion, or risk of injury.
•Do not expose a battery pack or product to fire or excessive temperature. Exposure to fire or temperature
above 130 °C (265°F) may cause explosion.
•Follow all charging instructions and do not charge the battery pack or product outside the temperature
range specified in the instructions. Charging improperly or at temperatures outside the specified range may
damage the battery and increase the risk of fire.
Maintenance and service
• Be sure the product is powered off before performing any maintenance or when installing or replacing parts.
• Follow all instructions contained in the manual when performing maintenance on the product.
• Do not use high-pressure hose to clean the product.
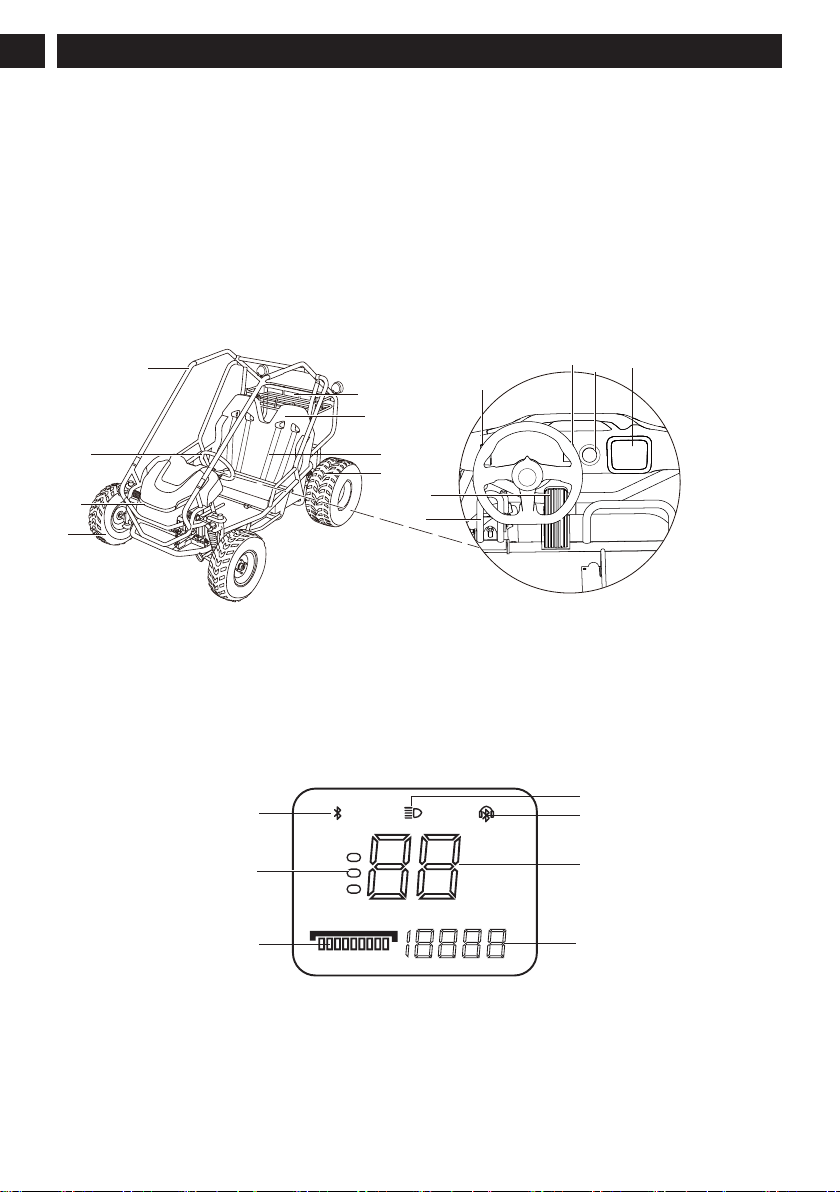
5
English (Original Instructions) EN

• Have your product serviced by a qualified repair person using only identical replacement parts. This will ensure
that the safety of the product is maintained.
• Never service damaged battery packs. Service of battery packs should only be performed by the manufacturer or
authorized service providers.
• Store the product in a location where it is protected from the elements whenever possible. Ultraviolet light from
the sun can fade the paint and can cause rubber or plastic parts to become porous or to crack.
SAVE THESE INSTRUCTIONS
2.3 FCC REQUIREMENT
This device complies with part 15 of the FCC Rules. Operation is subject to the following two conditions:
1. This device may not cause harmful interference, and
2. This device must accept any interference received, including interference that may cause undesired operation.
WARNING
Any changes or modifications not expressly approved by the party responsible for compliance could void the user’s
authority to operate the equipment.
Note: This equipment has been tested and found to comply with the limits for a Class B digital device, pursuant to
Part 15 of the FCC Rules. These limits are designed to provide reasonable protection against harmful interference in
a residential installation. This equipment generates, uses, and can radiate radio frequency energy, and if not installed
and used in accordance with the instructions, may cause harmful interference to radio communications. However,
there is no guarantee that interference will not occur in a particular installation. If this equipment does cause harmful
interference to radio or television reception, which can be determined by turning the equipment off and on, the user is
encouraged to try to correct the interference by one or more of the following measures:
•Reorient or relocate the receiving antenna.
•Increase the separation between the equipment and receiver.
•Connect the equipment into an outlet on a circuit different from that to which the receiver is connected.
•Consult the dealer or an experienced radio/TV technician for help.
3 ASSEMBLY
This section describes how to assemble and adjust the
product.
WARNING
Read and understand the safety chapter and the
assembly instructions before you assemble the
product.
3.1 INSTALL THE STEERING WHEEL
1. Attach the steering wheel to the steering column.
2. Use M6 bolts and M6 lock nuts in Bag A to tighten
the steering wheel.
3. Attach the steering wheel cap by snapping into
place at the center of steering wheel.
6
English (Original Instructions)
EN

3.2 INSTALL THE SEAT
1. Insert the two barbs, located under the seat, into the
two slots, on the frame.
2. Pull up and hold the seat lever to move the seat to
its frontmost position, exposing the mounting holes
at the rear.
3. Insert two M8 x 40 mm bolts and M8 nuts in Bag
B through the mounting holes. Tighten the bolts to
secure the seat to the frame.
3.3 INSTALL THE BELT
1. Attach the end of the belt to the frame and use a
bolt, washer, gasket, and nut to secure it in place
(as shown in the figure). Repeat this step on all
eight anchorage points.
3.4 INSTALL THE BRUSH GUARD
1. Attach the two main guards and screw into place
using eight M8 x 20 mm bolts (short bolts) in Bag C.
7
English (Original Instructions) EN

Note: Do not fully tighten the bolts. Keep bolts loose
until after the support guards are also in place.
2. Align the rear support guards between the frame
and main guard. Screw into place using eight M8 x
20 mm bolts (short bolts) in Bag C.
3. Attach the two side support guards and one center
support guard into place. Screw into place using
four M8 x 50 mm flange bolts (long bolts) in Bag C.
4. Securely tighten all bolts on the main guards and
support guards.
3.5 INSTALL THE RACK
1. Align the rack to the mounting points on the guard.
2. Secure into place using M8 X 20 bolts (short
bolts), M8 X45 bolts (long bolts), M8 lock nuts, and
washers in Bag D.
3.6 INSTALL THE SAFETY NET
1. Secure the safety net looping the eleven ends
around the guard.
2. Pull the ends through both sides of the buckle
securing it into place.
4 OPERATION
This section describes how to operate the product.
WARNING
Read and understand the safety chapter and
operation instructions before you operate the product.
8
English (Original Instructions)
EN

4.1 BEFORE DRIVING
4.1.1 PRE-DRIVE CHECKLIST
Make sure to check the condition of the product before
each drive.
What to check Check for
Brake
• Ensure the brakes work prop-
erly.
• Ensure brake pedal is not
over worn and is correctly posi-
tioned.
Steering wheel
• Ensure the steering wheel is
correctly adjusted and tight-
ened, allowing for proper steer-
ing.
Tires
• Inflate the tires to the correct
PSI before using. Ensure the
appropriate tire pressure range
is 4-10 PSI/24-68 kpa.
• Ensure tires have tread and
have no bulges or excessive
wear.
• Ensure hubs run true and have
no obvious wobbles or kinks.
• Check that axle nuts are tight.
• Look for cracks or leaks.
4.1.2 PERSONAL PROTECTIVE EQUIPMENT
To ensure your safety when operating the product, it
is important to dress appropriately, as shown in the
picture. Additionally, minors should only operate the
product under the supervision of an adult.
You must:
• Wear protective gear
• Tie up any long hair
• Wear a helmet
• Zip up any zippers to avoid any loose articles of
clothing
• Avoid wearing long skirts
• Wear flat shoes
4.1.3 CONNECT THE BATTERY CHARGER
1. Connect the battery charger to the voltage and
frequency that is specified on the rating plate.
2. Refer to the Battery Charger Operator Manual for
information about how to use the battery charger.
4.1.4 CHARGE THE BATTERY
Refer to the Battery Charger Operator Manual for
information about how to use the battery charger.
4.1.5 BATTERY INFORMATION
Refer to the Battery Operator Manual for information
about how to use the battery.
4.1.6 CONNECT THE BATTERIES TO THE
PRODUCT
Note: Make sure that the batteries are fully charged.
Tip: For optimal product performance, install two
batteries at the same time.
1. Pull the latch to unlock the battery compartment lid.
2. Open the battery compartment lid.
3. Push the batteries into the battery compartment.
The batteries lock into position when you hear a
click.
Note: If the battery does not fit easily into the
battery holder, it may not be installed correctly,
which can cause damage to the battery and/or the
product.
9
English (Original Instructions) EN

4. Close and lock the battery compartment lid.
4.1.7 ADJUST THE SEAT
WARNING
Failure to have the seat locked in position could be
hazardous. The seat coming loose could cause the
operator to lose control. Never operate the product
without the seat securely locked in place.
1. Pull up the seat lever to move the seat forward or
backward. Set seat location according to the shape
of the driver.
4.1.8 FASTEN THE SEAT BELTS
WARNING
Driving this product without properly fastened seat
belts for the operator and passengers may increase
the chance of injury or death in the event of an
accident. Never operate or allow a passenger to drive
this product without properly fastening the seat belt.
Note: if there is no passenger in the passenger seat,
make sure the seat belt on the passenger seat is locked
together and secured.
1. Sit on the seat.
2. Adjust the length of the shoulder straps.
3. Place the two straps over your shoulders and
securely insert the latch plate into the buckle over
your hips.
4.2 START THE PRODUCT
1. Press the start button to turn on the product.
2. Set the gear shift switch to the “D” position.
3. Press the brake pedal (left) once to activate the
product.
10
English (Original Instructions)
EN

4.3 LIGHT ON/OFF
1. Press the light switch to turn the light on or off.
4.4 SPEAKER FUNCTION
With this product, you can enjoy music through your
Bluetooth-enabled phone.
1. Turn on the product.
2. Turn on the Bluetooth function on your phone.
3. Choose device GW- ‘Model No.’ -****** to pair.
4. Use your phone to control the volume.
4.5 DRIVE THE PRODUCT
1. Accelerate by lightly press the accelerator pedal
(right).
2. Decelerate by lightly press the brake pedal (left).
Note: Do not pump the brake pedal to decelerate.
3. Steer the product right and left by slightly turning the
steering wheel clockwise or counterclockwise.
4. Reverse by first stopping the product, then setting
the gear shift switch to the "R" position. Then lightly
press the accelerator pedal to reverse.
4.6 DRIVE UPHILL/DOWNHILL
WARNING
The maximum slope should not exceed 17°.
Uphill
1. Before driving uphill, assess the terrain for
steepness, loose or slippery areas, and obstacles.
2. Maintain a consistent speed while driving uphill.
11
English (Original Instructions) EN

3. Reduce speed as you approach the top of the slope.
If the product cannot reach the top of the slope:
• Avoid turning the product around while driving,
as this may cause it to roll over.
• Slowly reverse the product while using the
brakes.
WARNING
To prevent the product from flipping over, avoid driving
it downhill on sharp angles.
Downhill
1. Before driving downhill, assess the terrain for
steepness, loose, or slippery areas, and obstacles.
2. Go straight down the hill. Avoid sharp turns or
sudden movements that could cause loss of control.
3. Use the brakes to control your speed. Press the
brake intermittently to avoid brake overheating.
4.7 STOP THE PRODUCT
WARNING
Do not park the product on a slope.
1. Slightly press the brake pedals until product has
completely come to a stop.
2. Set the gear shift switch to the “N” position.
3. Press the battery release button and pull out the
batteries.
5 SMARTG HOME APPLICATION
SMARTg Home is a free mobile application that
provides additional features for your Greenworks
product. These features include extended information
about products, product parts and servicing.
5.1 SETUP
1. Download the SMARTg Home app on your mobile
device.
2. Register in the SMARTg Home app.
3. Follow the instructions in the SMARTg Home app to
connect and register the product.
Note: Ensure that your phone's Bluetooth function is
always on.
12
English (Original Instructions)
EN

6 MAINTENANCE
IMPORTANT
Carefully read and understand the safety regulations and the maintenance instructions before you clean, repair or
do any maintenance work on the product.
WARNING
• Remove battery or batteries from the product before you do any maintenance.
• Failure to follow proper maintenance procedures, using third-party replacement parts, or modifying/removing
components can result in injury to the user.
6.1 MAINTENANCE SCHEDULE
Item Before each use First 5 hours of use First 20 hours of use or 1
month
Brake & acceleration ped-
als
I I
Tires I
Steering wheel I I
Front suspension I I
Rear suspension I I
Nuts and bolts I T T
Brake fluid Inspect brake fluid level before each use. Check brake lines and components for
leaks. Replace brake fluid every 2 years.
Note: I = inspect and clean, adjust, replace or lubricate as necessary, T = tighten
It is recommended that this be done by an authorized service center.
6.2 CLEAN THE PRODUCT
Clean the product after each use with water, neutral detergent, and a soft cloth.
CAUTION
• Keep water away from battery compartment while washing to avoid damaging the electrical components.
• DO NOT clean with alcohol, gasoline, acetone, or other corrosive/volatile solvents. These substances may
damage the external and internal structure of your vehicle.
• DO NOT rub with sandpaper or metal brush.
6.3 CLEAN THE BATTERY AND BATTERY CHARGER
WARNING
DO NOT clean the battery or the battery charger with water.
• Make sure that the battery and the battery charger are clean and dry before you insert the battery into the battery
charger.
• Clean the battery terminals with compressed air or use a soft and dry cloth.
• Clean the surface of the battery and the battery charger with a soft and dry cloth.
13
English (Original Instructions) EN

7 TRANSPORTATION, STORAGE AND DISPOSAL
7.1 TRANSPORTATION
• Any removable (electronic) parts, such as the charger and battery, should always be disconnected before
transport.
• Avoid transporting the product in bad weather conditions when possible.
• Properly cover any exposed electronic parts during transport when transport in bad weather conditions cannot be
avoided.
• High speeds, along with wind, and rain may force moisture into the electronic components, which can lead to
temporary malfunctions or permanent defects.
• In case of malfunction occurring after transport in such conditions, remove the battery and allow all parts to
air-dry when you reach your destination.
7.2 STORAGE
1. Turn off the product and remove the batteries.
2. Thoroughly clean the product and then wax the painted parts with a non-abrasive automotive wax.
3. Inflate the tires with correct air pressure.
4. Store the product in a covered shed or garage to protect it from dust, dirt and humidity. If the product must be
stored outdoors, cover it completely with a waterproof cover.
5. Store the product in a safe place to prevent theft.
7.3 DISPOSAL OF THE BATTERY, BATTERY CHARGER, AND PRODUCT
Symbols on the product or the package of the product means that the product is not domestic waste. Recycle it at
a recycling station for electrical and electronic equipment. This helps to prevent damage to the environment and to
persons.
Get in touch with your local authorities, domestic waste service, or your dealer for more information about how to
recycle your product.
8 ERROR CODES
Error Code Error Content Possible Solution
E001 Battery 1 Abnormal • Turn off the product and reinstall the battery.
• Please contact after-sales service.
E002 Battery 2 Abnormal • Turn off the product and reinstall the battery.
• Please contact after-sales service.
E003 Motor 1 Abnormal • Turn off the product and restart it.
• Please contact after-sales service.
E004 Motor 2 Abnormal • Turn off the product and restart it.
• Please contact after-sales service.
E005 PMU Communication Abnormal • Turn off the product and restart it.
• Please contact after-sales service.
E006 Speed Controller Abnormal • Turn off the product and restart it.
• Please contact after-sales service.
E007 Motor Controller Abnormal • Turn off the product and restart it.
• Please contact after-sales service.
E008 Display Abnormal • Turn off the product and restart it.
• Please contact after-sales service.
14
English (Original Instructions)
EN

9 TECHNICAL DATA
Voltage 60 V
Maximum payload 275 lbs./125 kg
Driver age 12+ years old
Maximum speed limit 25 mph/40 km/h
Maximum slope 12°
Battery model* LB604/LB605/LB606/60BA08/LB6041/LB6051/LB6081
and other BAC series
Charger model CH60R00 and other CAC series
*batteries above 4Ah are recommended
The recommended ambient temperature range:
Item Temperature
Product storage temperature range 32°F (0°C) - 113°F (45°C)
Product operation temperature range 32°F (0°C) - 113°F (45°C)
Battery charging temperature range 39°F (4°C) - 104°F (40°C)
Charger operation temperature range 39°F (4°C) - 104°F (40°C)
Battery storage temperature range 32°F (0°C) - 113°F (45°C)
Battery discharging temperature range 32°F (0°C) - 113°F (45°C)
10 LIMITED WARRANTY
Greenworks hereby warranties this product, to the original purchaser with proof of purchase, for a period of eighteen
(18) months against defects in materials, parts or workmanship. Greenworks, at its own discretion will repair or
replace any and all parts found to be defective, through normal use, free of charge to the customer. This warranty
is valid only for products which have been used for personal use that have not been hired or rented for industrial/
commercial use, and that have been maintained in accordance with the instructions in the operator’s manual
supplied with the product from new.
ITEMS NOT COVERED BY WARRANTY:
1. Any part that has become inoperative due to misuse, commercial use, abuse, neglect, accident, improper
maintenance, or alteration.
2. Unit that has not been operated and/or maintained in accordance with the operator's manual.
3. Normal wear and tear.
4. Routine maintenance items such as lubricants.
5. Normal deterioration of the exterior finish due to use or exposure.
HELPLINE:
Warranty service is available by calling our toll-free helpline, at 1-855-345-3934.
TRANSPORTATION CHARGES:
Transportation charges for the movement of any power equipment unit or attachments are the responsibility of the
purchaser. It is the purchaser’s responsibility to pay transportation charges for any part submitted for replacement
under this warranty unless such return is requested in writing by Greenworks.
15
English (Original Instructions) EN

USA address:
Greenworks Tools
P.O. Box 1238, Mooresville, NC 28115
Canadian address:
Greenworks Tools Canada, Inc.
P.O. Box 93095, Newmarket, Ontario, L3Y 8K3
Mexico address:
TECNOLOGIA CAMPO Y JARDIN S.A. DE C.V.
ADMINISTRADORES No. 5336 A, COL. ARCOS DE GUADALUPE, ZAPOPAN , JALISCO , C.P. 45037
16
English (Original Instructions)
EN
Table of contents
Other GreenWorks Utility Vehicle manuals
Popular Utility Vehicle manuals by other brands

Hog Technologies
Hog Technologies Stripe Hog SK2000 Operation manual

Cushman
Cushman Trackster 898002 Operator's manual

TransTank
TransTank Versatile Boom Operator's handbook

Club Car
Club Car IntelliTach Carryall 295 owner's manual

Hisun
Hisun HS394-2 Owner's/operator's manual

Storti
Storti husky MT 160 Operation and maintenance

MDC
MDC Robson XTT 2015 owner's manual

Elliott
Elliott Digger Derrick Operation & maintenance manual

Atlas Copco
Atlas Copco CP275 Tier II instruction manual

Toro
Toro 12004TC Twister 1600 Operator's manual

HAUL MASTER
HAUL MASTER 62665 Owner's manual & safety instructions

Polaris
Polaris RANGER Diesel 2013 Owner's manual for maintenance and safety