Grid PORSCHE 911 GT3 CUP User manual

INSTRUCTION MANUAL
PORSCHE 911 GT3 CUP
DASHBOARD DISPLAY UNIT
VERSION 1.2
Last updated: 13-04-2023

2|2 18
BEFORE YOU START:
Thank you for your purchase. In this manual we will provide you with the means to
get started using your new dash!
Porsche 911 GT3 Cup
Dashboard Display Unit
Features:
10.3” 1920x720 LCD
Contrast ratio 1000:1
60 FPS
24-bit Colors
24 full RGB LEDs
Multiple software options
Porsche licensed
Mounting the dash is very easy thanks to the included mounting brackets.
We offer a wide range of support for most popular hardware.
In this manual we only display the two mounting brackets included with the dash.
Please review our website to determine which mounting bracket fits your hardware.
Remote control
Included is a simple remote control. Batteries are not included. This is only used
when the screen has gone in hibernation mode. Press the home button to
wake the display up.

3
| |318 18
A10
Mounting the dash
To be able to mount the dash on the hardware of your choice, we provide several
mounting brackets. Which ones you have received may depend on your purchase
and may be different from the following ones we show. However, mounting is all
more of the same. With the instructions for the two included brackets, you should be
able to mount any specific ones for your hardware.

4|4 18
A7
A8
OSW/SC/VRS
Replace the existing upper bolts which hold the motor in place with the countersunk
ones included (A8). Use these bolts, including existing washers and locknuts to fix the
mounting bracket to the front mount.

5
| |518 18
A9
A6
Fanatec DD1/DD2
Locate the accessory mounting holes on your Fanatec hardware and use the two
bolts (A9) from our supplied hardware kit.

6|6 18
Preparation
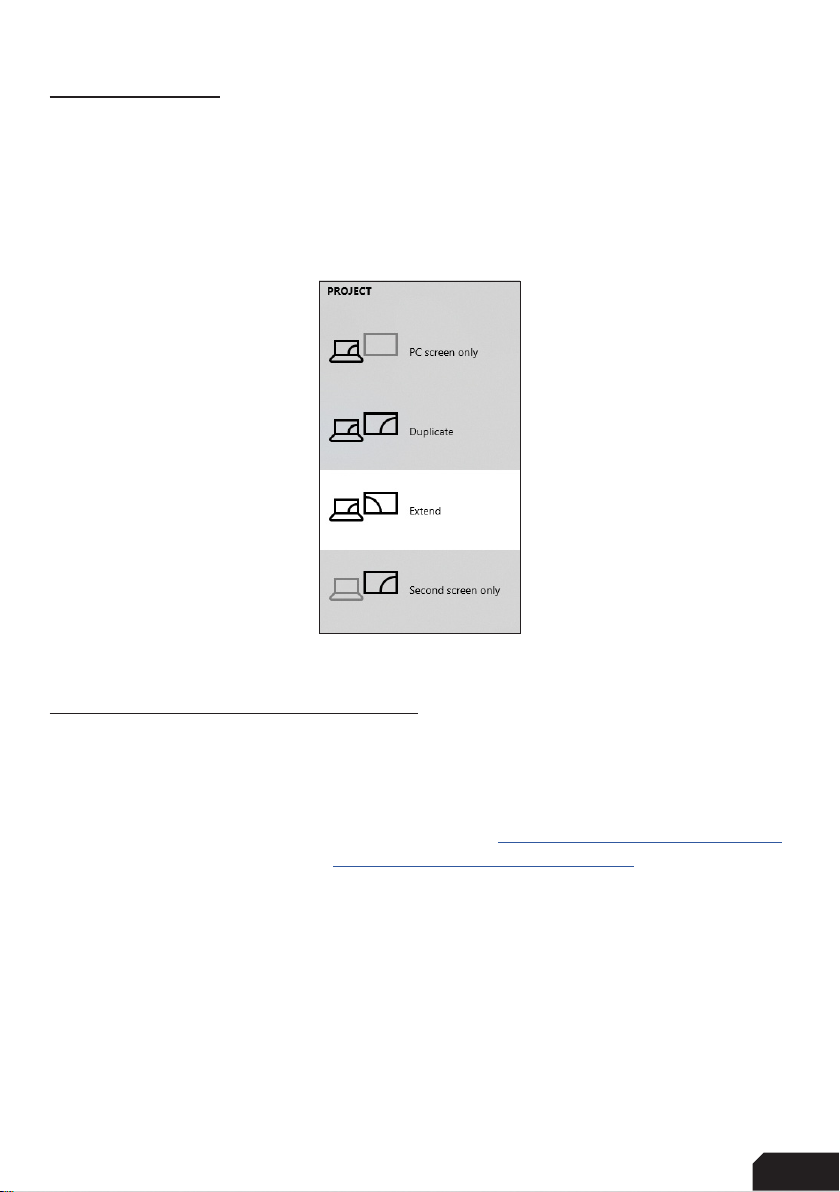
This dash isn’t just any dash, it’s an actual monitor! That means running a dashboard
on it almost couldn’t be easier and is almost literally, plug and play.
Just be sure to ‘extend’ from your desktop. Press ‘windows-key’+p and press
‘Extend’, now you can use the dash as a monitor. On to Race Director.
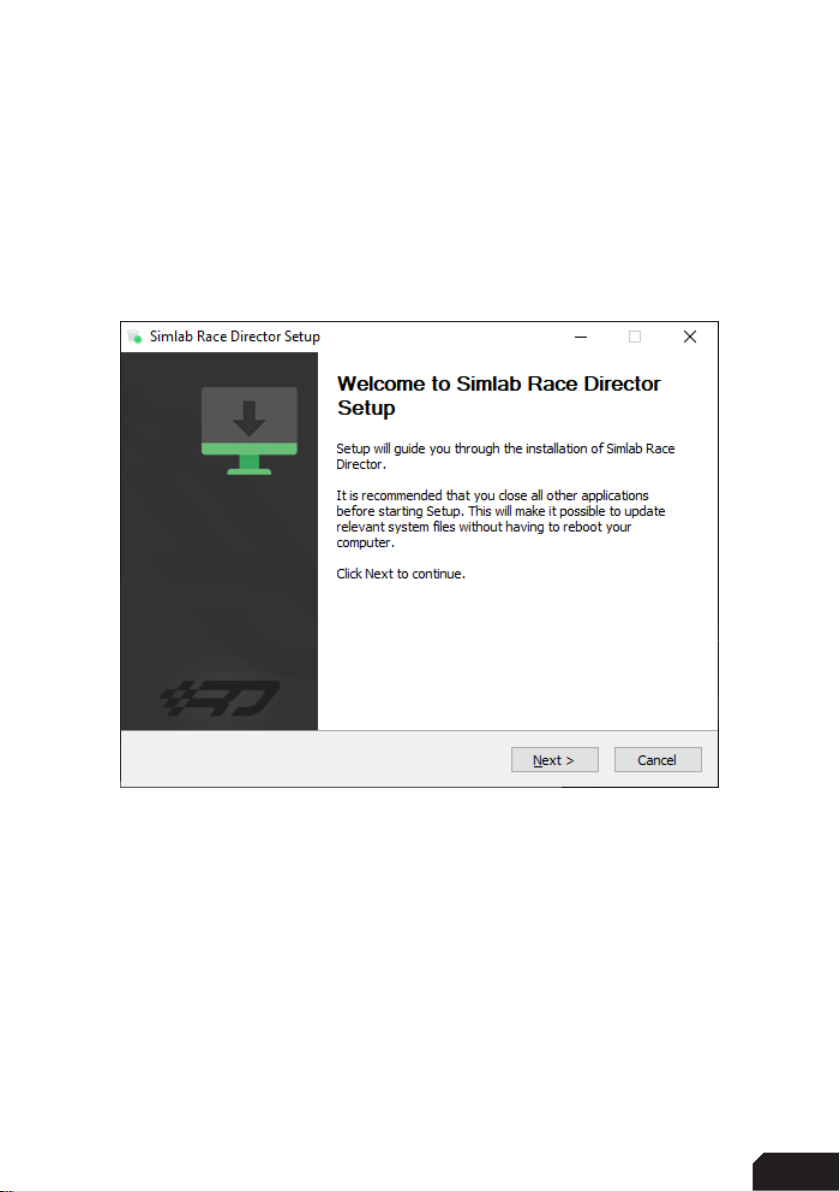
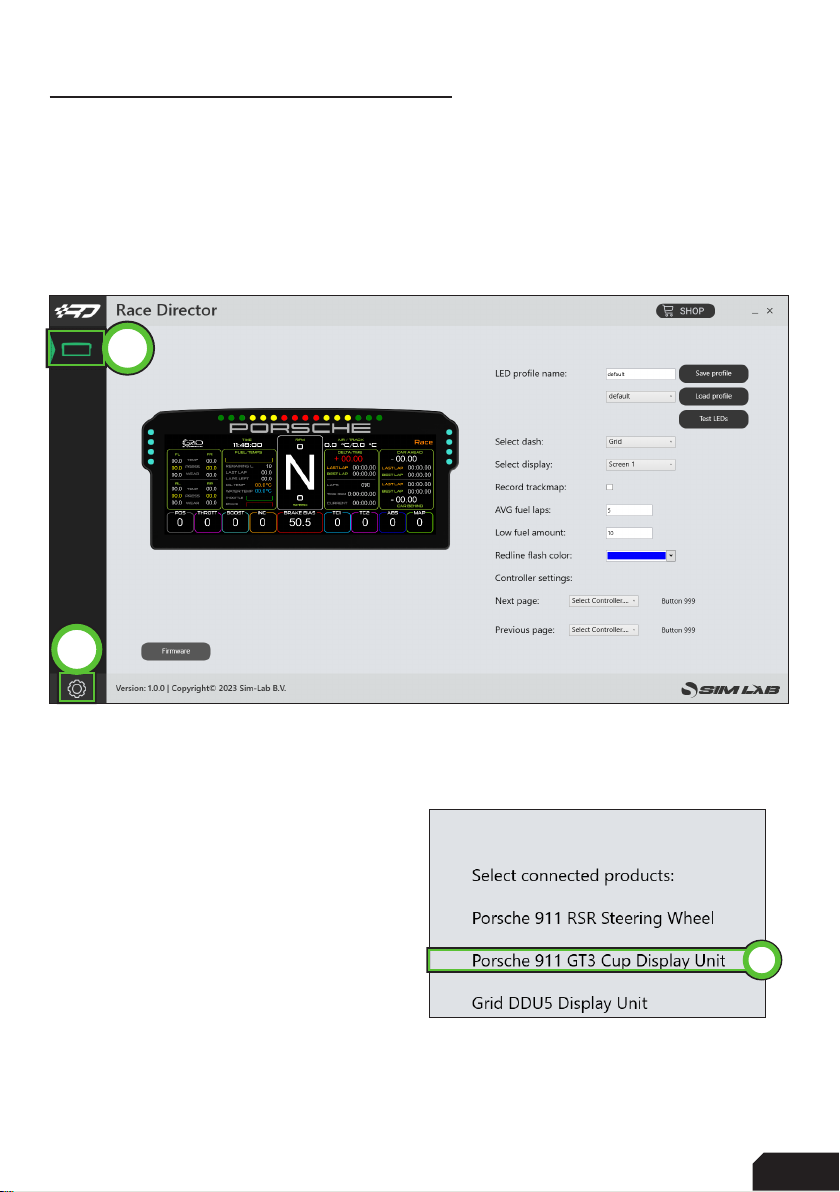
Race Director installation
To control the dash, Race Director can be used. This is a simple but effective piece of
software, purpose built for our own hardware.
Download the lastest version of Race Director from http://www.sim-lab.eu/srd-setup
and review the manual found at http://www.sim-lab.eu/srd-manual.
For more advanced users, SimHub can also be used, but this manual will focus on
our own software.
Download the lastest version of SimHub from https://simhubdash.com

7
| |718 18
Installation
Unzip the downloaded file ‘RaceDirector.zip’ and extract the folder to a location of
your choice, run the installer to start the installation.
If you encounter a Windows Defender/Smart Control screen warning you of only
software of trusted sources, please press ‘Run anyway’. This warning will dissapear
when more and more people startbusing Race Director and the software has been
proven safe for use.
Press ‘Next’.

8|8 18
Specify the location where to install the software:
Press ‘Next’.
Make sure all options are checked:
Press ‘Install’.

9
| |918 18
Race DIrector will be installed:
Press ‘Finish’.

10 |10 18
2
1
3
Race Director configuration
The very first time launching Race Director, you will probably be greeted with an
empty screen and booting might also take a bit longer than you would expect.
Don’t worry, this is normal, some additional files might be downloaded/updated. To
keep things visually clear and clutter free, we only want to show the options you
actually need.
Press the ‘Gear’ (1) symbol to enter the
settings page. To keep the interface
clutter free, the device(s) you own need
to be activated.
In this case we tick the box for the
‘Porsche 911 GT3 Cup Display Unit’ (2).
The ‘device icon’ (3) is activated now and
once we press it, the device page will be
shown.

11
| |1118 18
2
1
Flashing for Race Director
Out of the box our current products are ready for use with SimHub, since Race
Director is in early stages of development.
To switch your device working with Race Director instead of Simhub, we have added
a method of adjusting the firmware of your device to allow for this. This way you can
take advantage of our software and still configure your device to your preferences.
To know if your device has been flashed to be compatible wth Race Director, the
device status indicator will provide information. If the connected device is flashed for
use with SimHub, Race Director will state it has detected an ‘Unflashed device found’
(1) and an orange button will appear.
Press the ‘Flash device’ (2) button to make the device ready to be controlled by
Race Director.
After flashing the device for Race Director, the ‘Flash device’ (2) button will turn grey
and will read ‘Firmware’. This means you can still use the button to flash your device
to work with Simhub if you want to.

12 |12 18
1
2
Flash device
A quick look at the first page of this menu gives the user the choice to flash a device
for use with either Race Director or Simhub.
The top option, ‘Used COM port’ (1) indentifies which device to flash. If only 1 Arduino
based device with a specific ID has been connected, Race Director will automatically
select that port.
In case you have multiple Arduino based pieces of hardware and/or dashboards
connected, we suggest to follow these steps:
- Close Race Director.
- Disconnect all devices you do NOT want to flash for use with different software
other than supported out of the box.
- Start Race Director.
- Check the ‘Used COM port:’ (1) drop down for other entries. Ideally, only 1 would
show up due to the process of elimination.
- Choose either to flash for use with ‘Race Director’ (2) or ‘Simhub’ (3)
3

13
| |1318 18
4
You will be prompted to make sure you don’t accidentally have selected the wrong
option or COM port. Make sure to double check the selected COM port and
firmware. In case this all checks out, press ‘Yes’ (4)
The flashing is taking place when you see this screen. Please follow the instructions
on screen and simply wait for the process to finish.

14 |14 18
1 2
4
10
56
7
9
11
12
8
3
Configuration and settings
Almost all of the options found here speak for themselves, though for the sake of
being complete, we will go over them on by one.
For more detailed information about the functioanlity we offer within Race Director,
please read the Race Director manual. We go into more detail in there, as we prefer
to keep the product manuals as easy to read as we possibly can.
- ‘LED profile name’ (1)
This serves two purposes in one. Firstly the name of the loaded profile is
noted to verify that the profile has been loaded. Secondly the name is used
when saving the profile.
- ‘Save profile’ (2)
When you want to save an excisting profile, press this button. You will be
warned that the profile is an excisting profile, thus overwriting it will change
it from the default settings. Alternatively, once the profile name (see above)
has been changed, that name will be used as the new profile name.
- ‘Load profile’ (3)
This loads the selected profile in the drop down menu.

15
| |1518 18
- ‘Test LEDs’ (4)
This opens up a pop-up window where you use test input to see what the
LEDs do using the currently loaded profile.
- ‘Select dash’ (5)
This allows you to select a standard dash for a given car. We do not support
all cars in every sim. The chosen dash will also be visually shown on
the visual representation of the hardware.
- ‘Select display’ (6)
This will make sure the chosen dash is rendered on the correct screen.
If you don’t get any picture, be sure to follow the instructions on Page 6 of
this manual.
- ‘Record trackmap’ (7)
This will allow you to record a trackmap of the track you are driving. This
will be used by dashes which have a GPS page where you can track
the positions of drivers on track. When no data has been recorded,
the track will be rendered as a simple loop. Stop short of start/
finish on track, tick the tickbox and drive a lap in the middle of the track with
a constant speed. After start/finish the record function is automatically
disabled, the track will display as recorded on the appropriate page(s).
- ‘AVG fuel laps’ (8)
This value determines how many laps are used to calculate average fuel
usage. The average is reset every time you enter the pits to keep the
average a meaningful number.
- ‘Low fuel amount’ (9)
This number (in liters) will be used for the dash to know when to activate the
‘Low Fuel’ function, alarm or warning.
- ‘Redline flash color’ (10)
You can pick the color when you reach the redline or optimal shift point.
Right now this is preset at a standard 95%.

16 |16 18
- ‘Next page’ (11)
Cycle to the next page of the loaded dash. Select a controller of your choice,
press ‘Select button’ and you have about 10 seconds to press the button you
want to use.
- ‘Previous page’ (12)
Cycle to the previous page of the loaded dash, works like described above.
Note: when the page controls are configured, they won’t affect a dashboard unless a
sim is running.
LED settings
The LEDs can be changed by simply pressing the LED to be changed and changing
its function or color. Here is the LED numbering for reference.
There should be enough info in the provided default LED profiles to be able to adjust
LED settings to your liking. To start building your own profile, we suggest to copy an
existing one and change where needed. The advantage is you always have a backup
of the default profile to fall back to.
We do recommend to read the Race Director manual for detailed information on
functions, settings and basic rules for the LED settings.
1
242
3
4
5 6 7 8 9 10 11 12 13 14 15 16 17 18 19 20
24
2423
22
21

17
| |1718 18
HDMI-IN
IR-SENSOR POWER-LED
DC-POWER USB
Inputs and indicators
Since this dash is a bit more involved than our usual products, we will show the
layouts for the input and indicator sections of the dash.
Bottom - Inputs
Side - Indicator LEDs

18 |18 18
Bill of materials
More information
If you still have some questions regarding assembly of this product or about the
manual itself, please refer to our support department. They can be reached at:
Alternatively, we now have Discord servers where you can hang out or ask for help.
www.sim-lab.eu/discord / www.gridbysimlab.com/discord
Product page on the
GRID by Sim-Lab website:
IN THE BOX
#Part QTY Note
A1 Porsche 911 GT3 Cup DDU 1
A2 USB B cable 1
A3 HDMI cable 1
A4 Remote control 1
A5 DC power supply 1
A6 Bracket Fanatec DD1/DD2 1
A7 Bracket OSW/SC/VRS 1
A8 Bolt M8 X 50 DIN 7991 2
A9 Bolt M6 X 12 DIN 7991 2 Used with Fanatec.
A10 Bolt M5 X 10 DIN 7991 2 To fit mounting bracket to dash.
Bill of materials
Other manuals for PORSCHE 911 GT3 CUP
2
Table of contents
Other Grid Automobile Accessories manuals
Popular Automobile Accessories manuals by other brands

Lange Originals
Lange Originals HOIST-A-TOP JL CRANK installation instructions

DICE
DICE DCR-50 installation guide

BGS technic
BGS technic 6035 instruction manual

Whelen Engineering Company
Whelen Engineering Company 295HFSA7 Installation & operating guide

Wagan
Wagan 12 Volt Heated Travel Mug user manual

Metra Electronics
Metra Electronics 108-TO4 installation instructions