manuals.online logo
Brands
  1. Home
  2. •
  3. Brands
  4. •
  5. Grohe
  6. •
  7. Plumbing Product
  8. •
  9. Grohe GLOUCESTER User manual

Grohe GLOUCESTER User manual

English Français Español
Application
Operation is possible in conjunction with:
•Pressurized storage heaters
•Thermally controlled instantaneous
heaters
•Hydraulically controlled instantaneous
heaters
Operation with low-pressure storage
heaters (displacement water heaters) is not
possible.
Specifications
•Max. flow:
6.6 L/min or 1.75 gpm/60 psi
•Flow pressure
- min.: 7.25 psi
- recommended: 14.5 -72.5 psi
- greater than 72.5 psi, fit pressure
reducing valve
•Max. operating pressure: 145 psi
•Test pressure: 232 psi
•Temperature
max. (hot water inlet): 158 °F
Thermal disinfection possible
•Water connection: cold - RH
hot - LH
•Deck thickness max. 2 3/8"
•Non reversible cartridge
Notes:
- Major pressure differences between cold
and hot water supply should be avoided.
- To be installed according to local codes
and regulations.
- This faucet is not intended for the use
with portable appliances.
Replacement parts, see page 6
( * = special accessories).
Care
Instructions for care of this faucet will be
found in the Limited Warranty supplement.
Domaine d'application
Le service est possible en combinaison
avec:
•Des chauffe-eau à accumulateur sous
pression
•Des chauffe-eau instantanés à
commande thermique
•Des chauffe-eau instantanés à
commande hydraulique
Un service avec des systèmes d'eau
chaude à écoulement libre n'est pas
possible.
Caractéristiques techniques
•Débit maxi.:
6,6 l/min ou 1,75 g/min/4,1 bar
•Pression dynamique
- mini.: 0,5 bar
- recommandée: 1 - 5 bar
- supérieure à 5 bar, mise en place d'un
réducteur de pression
•Pression de service maxi.: 10 bar
•Pressiond d'épreuve: 16 bar
•Température
maxi. (admission d'eau chaude): 70 °C
Désinfection thermique possible
•Raccord d'eau: froide - à droite
chaude - à gauche
•Longueur de serrage maxi. 60mm
•Cartouche non réversible
Remarques:
- Il convient d'éviter toute différence de
pression importante entre l'alimentation
en eau chaude froide et chaude.
- A installer conformément aux
prescriptions et réglementations locales.
- Ce robinet n'est pas destiné a être utilisé
dans des apareils portatif.
Pièces de rechange, voir page 6
(* = accessoires spéciaux).
Entretien
Vouz trouverez les instructions d'entretien
de ce mitigeur dans le supplément Garantie
Limitée.
Campo de aplicación
Es posible el funcionamiento en conjunción
con:
•Acumuladores de presión
•Calentadores instantáneos con control
térmico
•Calentadores instantáneos con control
hidráulico
No instalar con acumuladores de baja
presión (calentadores de agua sin presión).
Características técnicas
•Caudal máx.:
6.6 L/min o 1.75 gpm/60 psi
•Presión
- mín.: 7,25 psi
- recomendada: 14,5 - 72,5 psi
- si la presión es superior a 72,5 psi, se
deberá instalar una válvula reductora
de presión
•Presión de utilización máx.: 145 psi
•Presión de verificación: 232 psi
•Temperatura
máx. (entrada del agua caliente): 158 °F
Desinfección térmica posible
•Acometida del agua: fria - a la derecha
caliente - a la izquierda
•Longitud de aprieta para fijación máx.
“8/32
•Cartucho irreversible
Notas:
- Deberán evitarse las diferencias de
presión entre las acometidas del agua
fría y del agua caliente.
- A ser instalado conforme a códigos y
reglamentos locales.
- Este mezclador no esta previsto para
utilizar en enseres móuiles.
Componentes de sustitución, véase la
página 6 (* = accesorios especiales).
Cuidados periódicos
En el suplemento Garantía a Limitada
encontrará las instrucciones relativas al
cuidado de esta batería.
+1 888 6447643
[email protected]
CDN
+1 800 4447643
[email protected]m
USA
www.grohe.com
Parts/Assembly
Unidad/de Partes
M965770_SP_EZ (9/16)
HANDLE KIT
CARTRIDGE CAP
CARTRIDGE NUT
SPRAY HOSE
SPRAY ASSEMBLY
AERATOR KIT
SHANK
SHANK MOUNTING KIT
FAUCET MOUNTING KIT
FLOW RESTRICTOR KIT
SOAP DISPENSER
WEIGHT
KEY
CARTRIDGE KIT
SET SCREW & PLUG
BUTTON
DECKPLATE KIT
OWNERS MANUAL
MANUAL DEL USUARIO
GLOUCESTER Pull Out Kitchen Faucet
30318000
GLOUCESTER Grifo de Cocina Extensible I30318000
GLOUCESTER
Pull Out Kitchen Faucet
Grifo de Cocina Extensible
30318000
434 mm
(17-1/16")
530 mm
(20-7/8")
282 mm
(11-1/8")
269 mm
(10-5/8")
68 mm
(2-11/16")
34 mm
(1-5/16")
60 mm
(2-3/8")
30 mm
(1-3/16")
Max 68 mm
(2-11/16")
45 mm
(1-3/4")
76 mm
(3")
74 mm
(2-15/16")
253 mm
(9-15/16")
66 mm
(2-5/8")
Installation Instructions
Instrucciones de Instalación
Care and Cleaning:
Do
:
Simply rinse the product clean with clear water, dry with
a soft cotton flannel cloth.
Do Not:
Clean the product with soaps, acid, polish, abrasives,
harsh cleaners, or a cloth with a coarse surface.
Recommended Tools
Note: Supplies and P-Trap
not included and must be
purchased separately
Debe: Lavar el producto sólo con agua limpia. Secar con un trapo suave de algodón.
No Debe: Limpiar el producto con jabones, ácido, productos para pulir, abrasivos,
limpiadores duros, ni con un trapo grueso.
Para el Cuidado:
Herramientas Recomendadas
Nota: No están incluidos los suministros flexibles o elevadores
de cabeza redonda y se deben comprar por separado.
Gloucester Pull out Kitchen Faucet
30318000
Gloucester Grifo de Cocina Extensible
30318000
7
Hand Spray
2
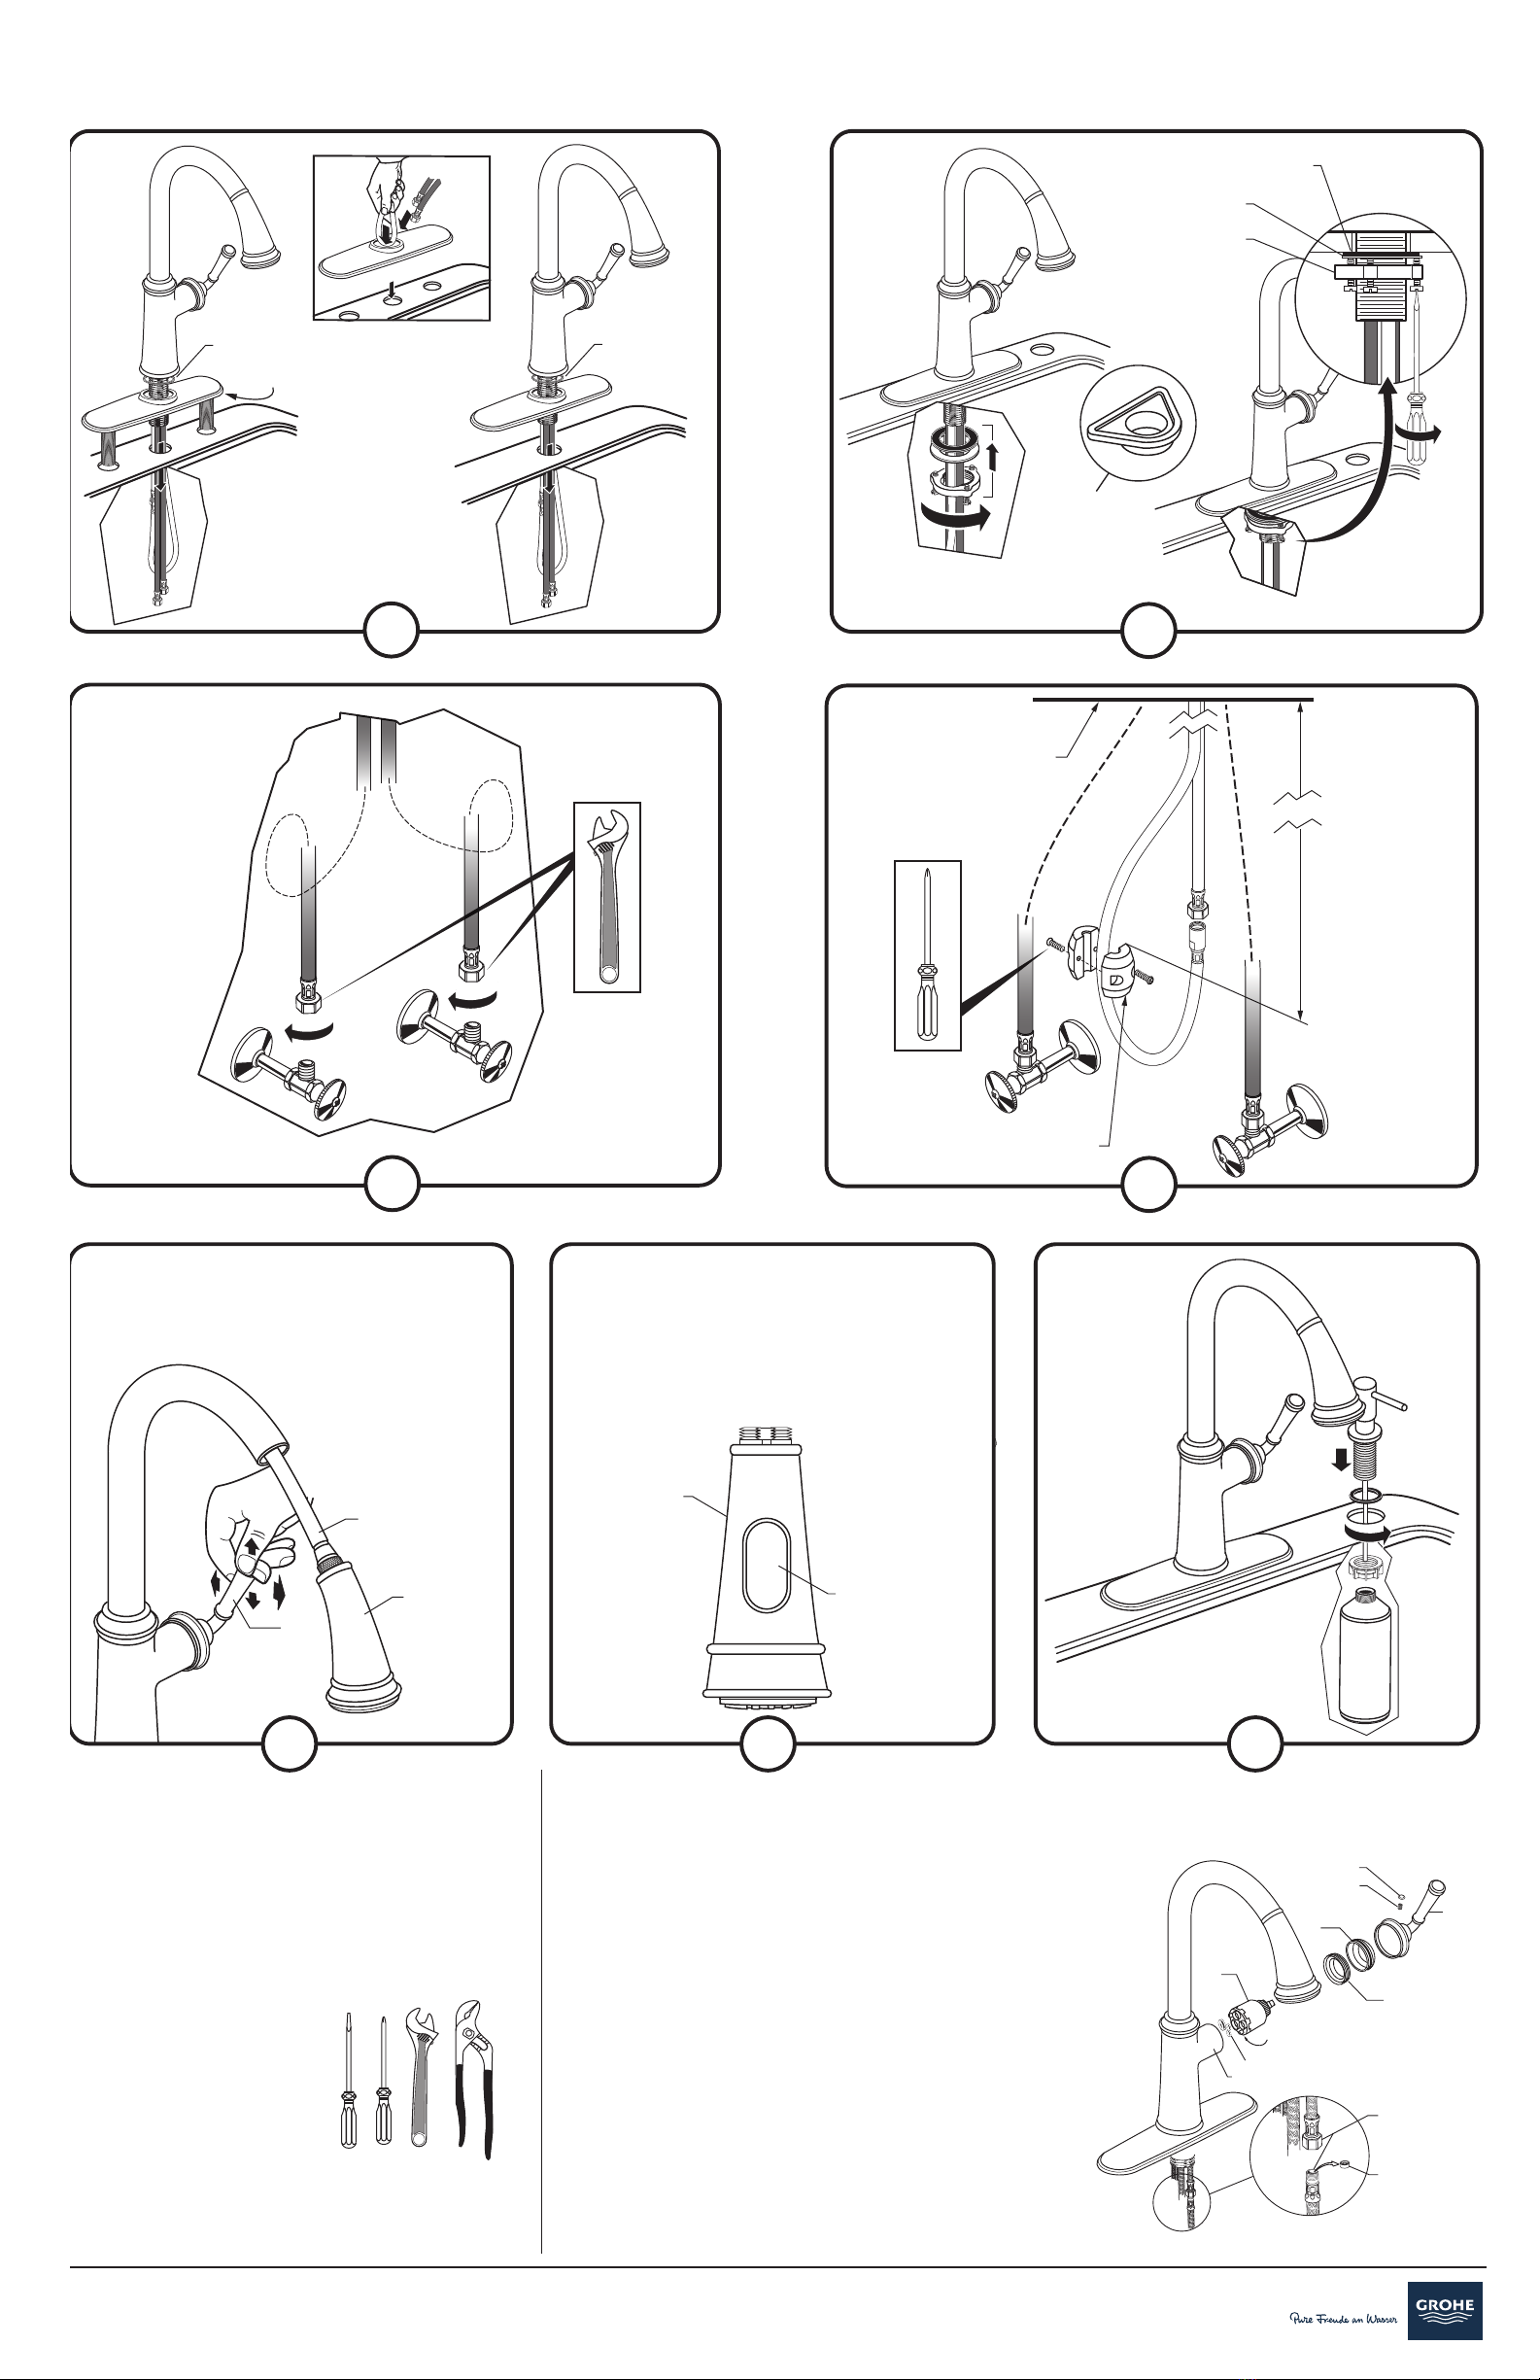
• To test the installed faucet, move the HANDLE (1) left into the OFF
position and pull out the HAND SPRAY (2). Noting that the SPRAY
HOSE (3) should pull out approximately 2 ft., point the spray into
the sink. Move the HANDLE (1), in the cold and hot positions,
flushing the water lines thoroughly.
• Para probar el grifo instalado, coloque la
manija (1) a la izquierda en la posición
OFF y jale el rociador manual (2).
Considerando que la manguera de
rociado (3) debe jalarse aproximadamente
0,60 m, apunte el rociador dentro del
fregadero. Mueva la manija (3) en las
posiciones fría y caliente y deje que
las líneas de agua se descarguen
completamente.
1
PUTTY
MASILLA
SEAL
SELLO
SEAL
SELLO
2
RUBBER WASHER
ARANDELA DE CAUCHO
METAL WASHER
ARANDELA DE METÁL
RETAINER
IGUALA
UNDER SIDE OF
MOUNTING SURFACE
BAJO LADO SUPERFICIE DE MONAJE
4
ASSEMBLE COUNTERWEIGHT
REUNA CONTRAPESO
24"
SPRAY OPERATION
6
• Lift faucet handle to start water flow. Faucet will default to an
aerated stream. To select the other spray functions, press
the TOGGLE BUTTON (2) as you turn to SPRAY MODE.
• El grifo de levantamiento se maneja para comenzar el
flujo de echar agua. Grifo mantendrá un chorro aireado.
Para seleccionar una de las otras funciones de spray, presione
el BOTÓN (3) cuando usted gira el DISCO DE SPRAY (2) a una
de las tres funciones. (Aerosol, Jet o Bruma)
WITHOUT
SHANK
SIN EL SHANK
WITH
ESCUTCHEON
CON CHAPETÓN USE WHEN
COUNTERTOP IS
1-3/4" OR LESS
3
COLD
FRÍA
HOT
CALIENTE
2
3
1
5
Service
If Faucet Drips Proceed As Follows:
• Turn VALVE in OFF position.
• If faucet drips, operate HANDLES several times from OFF to ON position. Do not apply excessive force.
• FLOW CONTROL DEVICE may accumulate dirt. To remove the FLOW CONTROL DEVICE, unthread SPRAY AND
HOSE ASSEMBLY and rinse clean FLOW CONTROL DEVICE.
Clogged CARTRIDGE outlets or inlets may cause reduced flow.
To clean, first turn off water supply then:
• Remove INDEX BUTTON (1), loosen HANDLE SCREW (2) and remove HANDLE (3).
• Pull the CARTRIDGE CAP (4). Unthread three CARTRIDGE NUTS (5).
• Lift CARTRIDGE (6) off MANIFOLD (7) and remove CARTRIDGE SEALS (8).
• Clean MANIFOLD (7), CARTRIDGE (6) ports and SEALS (8).
• Place SEALS (8) into CARTRIDGE PORTS (6a).
• Place CARTRIDGE (6) onto MANIFOLD (7) and tighten MOUNTING SCREWS (5) alternately.
• Replace ESCUTCHEON CAP (4), HANDLE (3), tighten HANDLE SCREW (1) and install INDEX BUTTON (2).
.
Servicio
Si el grifo gotea, realice lo siguiente:
• Gire el cartucho a la posición de cerrado.
• Si la llave gotea, gire el maneral varias veces de posición de cerrado a la de abierto. No aplique fuerza excesiva.
•
El DISPOSITIVO DE CONTROL DE FLUJO
puede acumular suciedad.
Para remover el dispositivo de control de flujo,
desatornille la UNIÓN DE LA MANGUERA DEL SPRAY y enjuage para limpiar el DISPOSITIVO DE CONTROL DE FLUJO.
Las salidas o entradas obstruidas del CARTUCHO pueden hacer que disminuya el flujo del agua.
Para limpiarlo, cierre el suministro de agua, luego:
•
Retire el BOTÓN INDICADOR (1), afloje el TORNILLO DE LA MANIJA (2) y retire la MANIJA (3).
•
Desenrosque el TAPÓN DEL CHAPETÓN (4). Destornille los tres TORNILLOS DE MONTAJE (5).
•
Saque el CARTUCHO (6) del COLECTOR (7) y retire los SELLOS DEL CARTUCHO (8).
•
Coloque los SELLOS (8) en los PUERTOS DEL CARTUCHO (6a).
•
Vuelva a poner la TAPA DEL CHAPETÓN (4), la MANIJA (3), apriete el TORNILLO DE LA MANIJA (1) e instale el
•
BOTÓN INDICADOR (2).
5
6
8
3
4
7
1
2
6a
Flow Control
Devise
Spray and Hose
Assembly
Dispositivo de
Control de Flujo
Unión de la Manguera
del Spray
M965770_SP_EZ (9/16)

This manual suits for next models

1

Other Grohe Plumbing Product manuals

Grohe Europlus E + Powerbox 36 387 User manual

Grohe

Grohe Europlus E + Powerbox 36 387 User manual

Grohe Chiara User manual

Grohe

Grohe Chiara User manual

Grohe Geneva 25 054 User manual

Grohe

Grohe Geneva 25 054 User manual

Grohe StartEdge Series User manual

Grohe

Grohe StartEdge Series User manual

Grohe Eurostyle 33 980 User manual

Grohe

Grohe Eurostyle 33 980 User manual

Grohe LADYLUX3 30 313 User manual

Grohe

Grohe LADYLUX3 30 313 User manual

Grohe Sense Guard 22 500 User manual

Grohe

Grohe Sense Guard 22 500 User manual

Grohe Atrio 25 010 User manual

Grohe

Grohe Atrio 25 010 User manual

Grohe F-DIGITAL DELUXE 26 371 User manual

Grohe

Grohe F-DIGITAL DELUXE 26 371 User manual

Grohe Tectron 38 698 User manual

Grohe

Grohe Tectron 38 698 User manual

Grohe Ondus 36 059 User manual

Grohe

Grohe Ondus 36 059 User manual

Grohe Talia 25 596 User manual

Grohe

Grohe Talia 25 596 User manual

Grohe 36 264 User manual

Grohe

Grohe 36 264 User manual

Grohe Red 30325001 User manual

Grohe

Grohe Red 30325001 User manual

Grohe Eurodisc 33 772 User manual

Grohe

Grohe Eurodisc 33 772 User manual

Grohe EUROCUBE 29218001 User manual

Grohe

Grohe EUROCUBE 29218001 User manual

Grohe 34 240 User manual

Grohe

Grohe 34 240 User manual

Grohe EUROSMART COSMOPOLITAN E 36 332 User manual

Grohe

Grohe EUROSMART COSMOPOLITAN E 36 332 User manual

Grohe 29 082 User manual

Grohe

Grohe 29 082 User manual

Grohe Blue Chilled 31 382 User manual

Grohe

Grohe Blue Chilled 31 382 User manual

Grohe Blue 31 079 User manual

Grohe

Grohe Blue 31 079 User manual

Grohe BauFlow 29045000 User manual

Grohe

Grohe BauFlow 29045000 User manual

Grohe BauClassic 25 118 User manual

Grohe

Grohe BauClassic 25 118 User manual

Grohe Ondus 36 067 User manual

Grohe

Grohe Ondus 36 067 User manual

Popular Plumbing Product manuals by other brands

agape Fez 2 AFEZ001 instructions

agape

agape Fez 2 AFEZ001 instructions

Hans Grohe 13612 Series Assembly instructions

Hans Grohe

Hans Grohe 13612 Series Assembly instructions

Bano 5970S2-EL installation instructions

Bano

Bano 5970S2-EL installation instructions

American Standard PEKOE 4332.400 Specification sheet

American Standard

American Standard PEKOE 4332.400 Specification sheet

Severn Trent ADVANCE 200 Series instruction manual

Severn Trent

Severn Trent ADVANCE 200 Series instruction manual

Kohler K-205 Installation and care guide

Kohler

Kohler K-205 Installation and care guide

Kohler Bancrof K-2347 Installation and care guide

Kohler

Kohler Bancrof K-2347 Installation and care guide

Kohler K-7142 Installation and care guide

Kohler

Kohler K-7142 Installation and care guide

Zip HydroTap All-In-One 89944 Installation and operating instructions

Zip

Zip HydroTap All-In-One 89944 Installation and operating instructions

Halsey Taylor HTVZD 1A Series owner's manual

Halsey Taylor

Halsey Taylor HTVZD 1A Series owner's manual

TLV JH8R-B instruction manual

TLV

TLV JH8R-B instruction manual

American Standard FFAS1401-101501BF0 Installation & operation instructions

American Standard

American Standard FFAS1401-101501BF0 Installation & operation instructions

Svedbergs Smart 96925 manual

Svedbergs

Svedbergs Smart 96925 manual

Hans Grohe Croma Showerpipe 27135000 Instructions for use/assembly instructions

Hans Grohe

Hans Grohe Croma Showerpipe 27135000 Instructions for use/assembly instructions

hayneedle Belle Foret N180 01 Installation

hayneedle

hayneedle Belle Foret N180 01 Installation

Iqua lino Series Installation & user manual

Iqua

Iqua lino Series Installation & user manual

PEERLESS P188103LF-SD instruction manual

PEERLESS

PEERLESS P188103LF-SD instruction manual

Leisure Sinks Velstra Installation details

Leisure Sinks

Leisure Sinks Velstra Installation details

manuals.online logo
manuals.online logoBrands
  • About & Mission
  • Contact us
  • Privacy Policy
  • Terms and Conditions

Copyright 2025 Manuals.Online. All Rights Reserved.