GrowUp Freedom Series User manual

www.GrowUp.Green 1.800.985.9138
THE FREEDOM SERIES
INSTRUCTION MANUAL

Freedom Series Instruction Manual
Unpacking your shipment
1. Unpack your wall mounted unit and inspect for any items that may have become damaged during
the shipping process. If so, immediately notify GrowUp.
2. Make sure all dripper lines are securely attached to the emitters.
3. Peel off protective covering.
4. Stainless steel polisher or baby oil can be used to clean up any nger prints or smudge marks.
Warning Statements
PRIOR TO THE INSTALLATION OF THIS PRODUCT, THE INSTALLATION INSTRUCTIONS MUST
BE READ AND COMPLETELY UNDERSTOOD.
PROPER INSTALLATION PROCEDURE BY A QUALIFIED SERVICE TECHNICIAN MUST BE
FOLLOWED, AS OUTLINED IN THESE INSTALLATION INSTRUCTIONS. FAILURE TO DO SO
COULD RESULT IN PROPERTY DAMAGE, SERIOUS PERSONAL INJURY, OR EVEN DEATH.
SAFETY MEASURES MUST BE PRACTICED AT ALL TIMES DURING THE ASSEMBLY OF
THIS PRODUCT. USE PROPER SAFETY EQUIPMENT AND TOOLS FOR THE ASSEMBLY
PROCEDURE TO PREVENT PERSONAL INJURY.
GROWUP DOES NOT WARRANT AGAINST DAMAGE CAUSED BY THE USE OF ANY GROWUP
PRODUCT FOR PURPOSES OTHER THAN THOSE FOR WHICH IT WAS DESIGNED OR
DAMAGE CAUSED BY UNAUTHORIZED ATTACHMENTS OR MODIFICATIONS, AND IS NOT
RESPONSIBLE FOR ANY DAMAGES, CLAIMS, DEMANDS, SUITS, ACTIONS OR CAUSES OF
ACTION OF WHATEVER KIND RESULTING FROM, ARISING OUT OF OR IN ANY MANNER
RELATING TO ANY SUCH USE, ATTACHMENTS OR MODIFICATIONS.
At least two qualied people should perform the assembly procedure. Personal injury and/or property
damage can result from dropping or mishandling the Freedom Series unit4.
Be aware of the mounting environment. If drilling and/or cutting into the mounting surface, always
make sure that there are no electrical wires in wall. Cutting or drilling into an electrical line may cause
serious personal injury.
Make sure there are no water or natural gas lines inside the wall where the mount is to be located.
Cutting or drilling into a water or gas line may cause severe property damage or personal injury.
Installation Tools
www.GrowUp.Green 1.800.985.9138
1

The following tools may be required depending upon your particular installation. They are not
included.
Mounting the system – Use the French Cleat built into back of the unit
h.
Hammer Electronic Stud Finder 1/2” Socket
1/4” Drill Bit for
Wood Stud
Tape Measure Pencil Protective Eyewear
Socket Wrench Level Hand Drill
www.GrowUp.Green 1.800.985.9138
1. Mounting into drywall with wood studs.
a. You must screw into two studs when mounting
the Freedom Series unit.
b. Once you have picked an ideal location for
hanging your planter, use a stud nder to
locate two studs in your wall.
c. Mark the location of each stud’s center with a
pencil. Use a nail to conrm a stud has been
located.
d. Two people are recommended for the next
steps.
e. Place level under “wall cleat” and with a pencil
mark the exact hole locations in relation to the
center of the studs.
f. Using a ¼” drill bit and power drill. Drill a “pilot
hole” in the center of each mark.
g. Place the wall cleat against the wall and
using socket wrench and lag bolts, screw the
wall cleat into the pilot holes. Careful not to
overtighten.
h. Using two people, lift the wall mounted unit
onto the “wall cleat” and ensure that it is
seated into the cleat properly and is secure
before letting it hang freely.
2

i. Do one more check to ensure your still level by putting a level on top of the unit.
For mounting on Drywall, Metal Studs, Stucco, Brick or Concrete, please consult a contractor.
Plant selection
It is important when selecting plants to ensure that they have
similar water and light requirements. There are several
guides of plants we have successfully used together in the
past on the resource page on our website:
https://www.growup.green/resources or click the image to
download our guide.
Planting of pots
You want your soil medium to be consistent throughout all the plants. A light well-draining soil is
recommended.
It is important that all plants have similar watering requirements.
Click here to watch the planting instructional video (located on the resource page of our website).
www.GrowUp.Green 1.800.985.9138
3

Hanging of Pots
1. Starting at the bottom, hang pots into the pre-slotted grooves on the back of the unit.
2. Make sure the pots are straight and no leaves are blocking the water intake hole at the top of the
pot.
Testing Irrigation System
1. Fill water tank reservoir up to at least 1” below the top.
2. Connect the pump to the adapter and plug the adapter into a standard 110 outlet.
3. Check that drippers are inserted into pots
4. Run the irrigation until water is dripping from the bottom pots.
www.GrowUp.Green 1.800.985.9138
4

Maintenance Instruction Manual
Weekly | Bi-weekly Maintenance Visit Checklist
1. Inspect for bugs or pests
2. Do any areas look dry or like the plants are not doing well, if so, investigate until you nd the
reason and correct.
3. Are any specic plants growing too fast and shading other plants, if so, swap them moving the
larger plant down and smaller plant above.
4. Check the level of the water in the catch tank and add up to the maximum level with fresh water.
5. If the wall is all looking good check the moisture in a selection of plants by inserting your nger
into the soil. If the moisture is NOT as expected based on when the wall was last watered and
when it will be watered next, make appropriate adjustments to the timing system for the next
watering cycles
6. Turn the watering system on and let it run while you do the balance of your maintenance activities.
Check the top of each column to ensure water is dripping and nish with conrming that water
is dripping through every column of plants and into the tanks at the bottom. Correct the columns
where water is not dripping all the way through.
7. Remove any brown leaves and trim/prune plants of any excess growth. Keeping the plants tight
and neat leads to healthier plants.
8. Replace any plants that have not done well and need remedial action. Plants are growing
organisms and a certain amount of attrition is expected.
9. Remove any oating leaves or debris from the catch tank.
Troubleshooting
1. If there are dry plants or sections of the wall that are not doing as well as others:
a. If no drippers are working, there may be a problem with the pump. Check the pump lter and
listen to hear if the pump is running.
b. If there is no vibration of water after the pump has been turned on, checked for blockages, the
pump may be faulty and in need of replacement.
c. Run the irrigation and check that water is dripping out of each dripper
d. With the pump plugged in, place your hand on the irrigation line to conrm the vibration of
water moving up the irrigation line.
2. If some drippers are dripping more than others, open the under-performing drippers by screwing
them apart and clean them. Replace them and check the performance. You can watch a video
here. It is not unusual for small amounts of plant matter or calcium to accumulate in the drippers
over time and cleaning them is part of the normal maintenance cycle.
a. When all the drippers are working correctly and water is owing, water should begin dripping
from the bottom pot in each column within 30 to 45 minutes depending on the soil.
3. Once water is dripping from some of the columns, checkup any column that water is not dripping
from and look for:
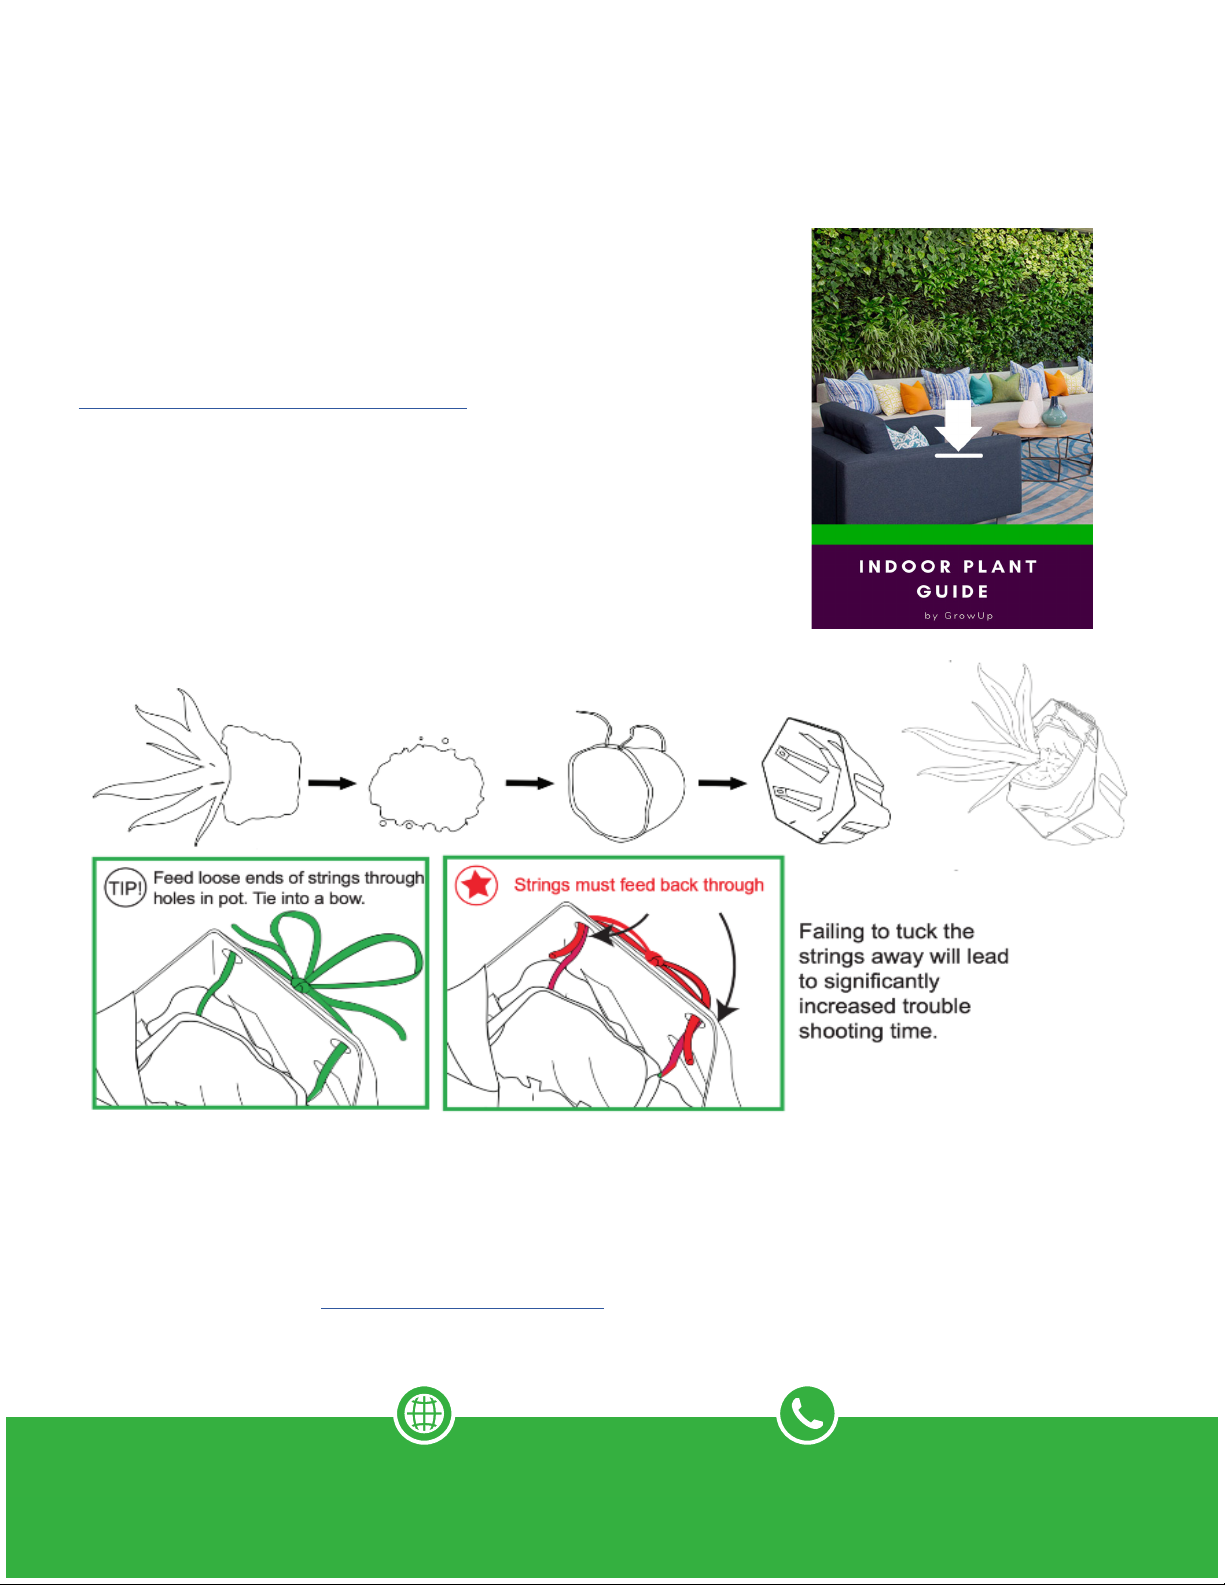
a. Growbag strings that have come loose and are diverting water from any of the pots
b. Leaves or plant growth that has grown between the pots and could be diverting water
c. Any pots that are out of alignment could lead to water missing the pot below it.
www.GrowUp.Green 1.800.985.9138
5

d. Once the above issues are addressed water should be dripping from the bottom of each
column
e. Once each column is dripping properly out of each bottom plant, leave the water running for at
least 20 additional minutes until all the soil in all the bags is saturated
f. Make a note of the timing as this is how long the water should run for
4. Note: A major cause of failed plants is the watering cycle not running long enough to saturate the
bottom plants. Be sure that the duration is 20-30 minutes after water begins dripping out of the
bottom plant.
5. If the watering system is working well and some plants are not, consider if:
a. They are getting watered too often
b. There is enough light to keep them healthy (take note with outdoor walls of changes to the
sun’s position from one season to another)
c. Check if any plants are being denied of light by plants above them in the wall. This is common
and an important design consideration as the plants starved of light may not do well
6. Review the wall for any signs of pests or disease. If you note any issues discuss them promptly
with an area plant specialist. Any pests or disease can spread quickly through living wall
7. If you have your wall outdoor, check the water tanks for any signs of mosquito larvae, if you see
them in the water, consult with your local plant specialist or even Home Depot for mosquito tablets
Monthly / Quarterly Maintenance Activities
1. Remove the lter from the pump and clean the lter to remove any built-up sediment or plant
matter
2. Clean the tank of sediment and debris.
3. Assess the plants and determine any need for fertilizing or supplementing the plants. Remember
that the goal is healthy plants but not plants that grow too quickly as plants growing too fast create
maintenance headaches and may lead to early replacements
4. We recommend an organic soluble fertilizer is added to the master tank if the wall requires
additional nutrients. Dissolve it well and be aware that the emitters may need to be cleaned within
a few weeks of fertilizing.
Disclaimer
GrowUp intends to make this manual accurate and complete. However, GrowUp makes no claim
that the information contained herein covers all details, conditions or variations, nor does it provide
for every possible contingency in connection with the installation or use of this product. The
information contained in this document is subject to change without notice or obligation of any kind.
GrowUp makes no representation of warranty, expressed or implied, regarding the information
contained herein. GrowUp assumes no responsibility for accuracy, completeness or sufciency of the
information contained in this document.
www.GrowUp.Green 1.800.985.9138
6
Table of contents
Popular Indoor Furnishing manuals by other brands

Riverside Furniture
Riverside Furniture Huntleigh 10289 Assembly instructions

LDI
LDI Safco Alday 24/7 3391 Assembly instructions

Dorel
Dorel AMERIWOOD INDUSTRIES 1217317PCOM quick start guide

sweeek.
sweeek. LINEAR ILINTVSTAND manual

Living Spaces
Living Spaces JAXON GREY 7YU661 owner's manual

Multistore
Multistore EXC-SHELF 0027260 Assembly instructions