GSI Electronics Agri-Alert 800EZe User manual

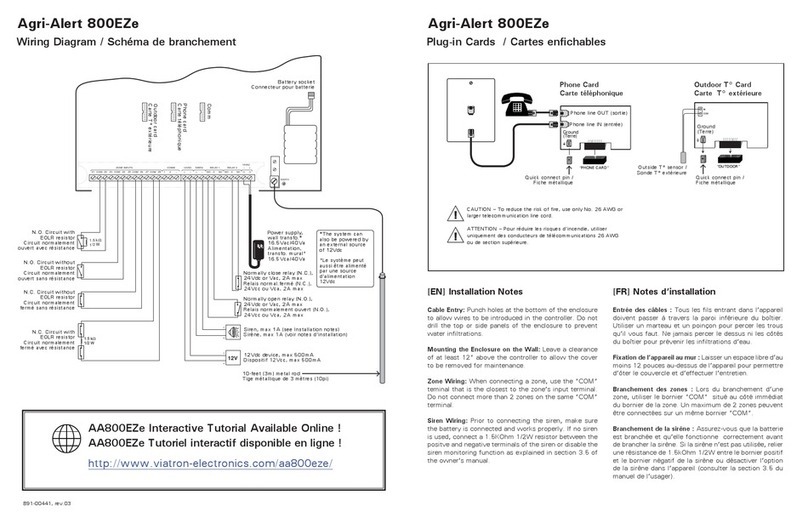
ADO1021750
Agri-Alert 800EZe
Alarm System
User’s Manual
Alarm
System in Standby
Burglary Armed
Online (phone)
ZONES
1
2
3
5
6
7
8
Main
Menu
Alarm
Memory
Arm /
Disarm
Standby
4
GHI
7
PRS
12
ABC
5
JKL
8
TUV
0
QZ
3
DEF
6
MNO
#
9
WXY
Back
Enter
Pause
AM / PM
ZONE LIGHTS LEGEND
4
Green
=
zone activated
Amber
=
zone bypassed
Red
=
zone in alarm
Off
=
zone deactivated
M 890-00502 rev.16
Rev.17

2AA800EZe rev.16
AA800EZe
WARNINGS
The warranty can be void if this product is used in a manner not
specied by the manufacturer.
Every eort has been made to ensure that this manual is complete,
accurate and up-to-date. The information contained in it is however
subject to change without notice due to further developments.
Manufacturer:
GSI Electronics
5200, Armand-Frappier
Saint-Hubert (Qc)
Canada
J3Z 1G5

3
AA800EZe rev.16
AA800EZe
TABLE OF CONTENTS
1. INSTALLATION..............................................................4
1.1. Introduction.......................................................................................4
1.1.1. Terms of Use ............................................................................. 4
1.1.2. Using the Product According
to Your Function...................................................................... 4
1.1.3. General Safety Usage............................................................ 4
1.1.4. General Safety Precautions................................................. 4
1.1.5. Symbols of the Manual......................................................... 4
1.1.6. General Safety and Electrostatic
Discharge Prevention............................................................ 5
1.2. Installation Procedure ....................................................................5
1.3. Mounting the Equipment .............................................................5
1.4. Connecting the Equipment..........................................................5
1.4.1. Sensors ...................................................................................... 5
1.4.2. AC Power Connection .......................................................... 5
1.4.3. Backup Battery Connection................................................ 5
1.4.4. Siren Output ............................................................................ 6
1.4.5. 12VDC Output ......................................................................... 6
1.4.6. Outdoor Temperature Sensor ............................................ 6
1.4.7. Relays.......................................................................................... 6
1.4.8. Phone Hookup......................................................................... 6
1.4.9. Connecting the Earth Ground ........................................... 7
1.5. Power Up the System......................................................................7
2. USER INTERFACE ........................................................7
2.1. Front Panel..........................................................................................7
2.2. Modifying a Parameter...................................................................8
2.3. Navigation ..........................................................................................8
2.4. Acknowledging an Alarm..............................................................8
2.5. Telephone Interface ........................................................................8
2.5.1. Alarm Report Call.................................................................... 8
2.5.2. Status Report over the Phone ........................................... 8
2.5.3. Acknowledge upon call-back.............................................8
3. SYSTEM INITIALIZATION..........................................10
3.1. Installation Wizard ........................................................................ 10
3.2. Password ......................................................................................... 10
3.2.1. Setting the Passwords.........................................................10
3.2.2. Changing the User Level....................................................11
3.3. Time & Date..................................................................................... 11
3.4. Units of Measurement................................................................. 11
3.5. Siren ................................................................................................... 11
3.6. Volume.............................................................................................. 12
3.7. Conguring the Zones ................................................................ 12
3.7.1. Introduction ...........................................................................12
3.7.2. Number of Zones & Outside T° Sensor..........................12
3.7.3. Dry Contact Inputs & Burglar Zone Settings ..............13
3.7.4. Temperature Zone Settings ..............................................14
3.7.5. Assigning a Relay to a Zone..............................................14
3.7.6. Disable the Siren...................................................................15
3.7.7. Zones’Vocal Identication ................................................15
3.7.8. Initial Activation of the Zones..........................................15
3.8. System Setup.................................................................................. 16
3.8.1. Standby Mode .......................................................................16
3.8.2. System’s Vocal Identication ............................................16
3.8.3. High Noise Alarms................................................................16
3.8.4. Relay Status.............................................................................17
3.8.5. System Self Test.....................................................................17
3.8.6. System Alarm Monitoring .................................................17
3.8.7. Software Version...................................................................17
4. COMMUNICATION PARAMETERS ...........................18
4.1. Introduction.................................................................................... 18
4.2. Dialout Sequence.......................................................................... 18
4.3. Dialing Information ...................................................................... 19
4.4. Phone Numbers............................................................................. 20
4.5. Pager Setup..................................................................................... 20
4.6. On-Site Listening........................................................................... 21
4.7. Phone Call-in................................................................................... 21
4.8. Disable the Dialer.......................................................................... 22
4.9. Test Report....................................................................................... 22
4.10. Precision of the Phone Signals (DTMF).................................. 22
5. ALARM PARAMETERS ..............................................23
5.1. Summary of Events....................................................................... 23
5.2. Internal System Alarms ............................................................... 23
5.3. Outdoor Temperature Compensation................................... 23
5.4. Burglar Zones.................................................................................. 24
5.4.1. Entry/Exit Delays...................................................................24
5.4.2. Arming/Disarming the System........................................24
5.5. Zone Status...................................................................................... 25
5.5.1. Bypass / Activate...................................................................25
5.5.2. View/ Modify Zone Settings .............................................25
6. MONITORING FUNCTIONS .......................................26
6.1. Alarm Memory ............................................................................... 26
6.2. Current Conditions ....................................................................... 26
6.3. Event Buer..................................................................................... 26
7. INSTALLATION CHECK LIST....................................26
8. UPDATE / BACKUP.....................................................27
9. TECHNICAL SPECIFICATIONS ................................28
10. TROUBLESHOOTING GUIDE ...................................28
10.1. System Troubles............................................................................. 28
10.2. Memory Card Troubles................................................................ 29
10.3. Phone Communication Troubles............................................. 29
11. MAINTENANCE ...........................................................29
11.1. Inspecting and Cleaning the Controller................................ 29
11.2. Replacing the Battery Pack........................................................ 30
12. APPENDIX....................................................................30
12.1. Wire Length..................................................................................... 30
12.2. Backup Battery Life Span............................................................ 30
12.3. Replacement Parts Specications........................................... 30
13. INDEX ...........................................................................31

4AA800EZe rev.16
AA800EZe
1. INSTALLATION
1.1. Introduction
1.1.1. Terms of Use
Read and follow all installation, operation, and
maintenance information carefully before using
the product. If the product is used in a manner not
specied, the protection provided by the product
warranty is considered void.
1.1.2. Using the Product Accord-
ing to Your Function
A responsible body is an individual or group respon-
sible for the use and maintenance of equipment, for
ensuring that the equipment is operated within its
specications and operating limits, and for ensuring
that operators are adequately trained.
Operators use the product for its intended function.
Maintenance personnel perform routine proce-
dures on the product to keep it operating properly.
Service personnel are trained to work on live
circuits, perform safe installations, and repair
products. Only properly trained service personnel
can perform installation and service procedures.
1.1.3. General Safety Usage
The following guidelines must be followed to en-
sure safe usage of the product:
• Installation must only be performed by qualied
service personnel.
• Installation must comply with local and national
safety codes.
• Repairs must only be performed by qualified
service personnel.
• When replacing the fuses, use the same type
and same rating as specied. Make sure the unit is
disconnected from AC power.
• Do not try to operate the system if it is damaged.
Disconnect the power from the unit and call your
local service representative.
• Do not operate when condensation is present.
• Use of the system in a manner not specied by
these instructions can impair the safety protec-
For Customer Use: Enter below the serial num-
ber located on the side of the alarm system and
keep this information for future reference.
Model: AA800EZe
Serial number:
Date installed:
1.1.5. Symbols of the Manual
Warning. Read the following text carefully;
it contains important information which, if
ignored,maycausethe controllertooperate
improperly.
High Voltage. Hazard of electrical shock.
Read the message and follow the instruc-
tions carefully.
Pay attention. The following text contains
very useful information.
Double insulation.
Both direct and alternating current
(AC/DC).
Direct current (DC).
Alternating current (AC).
Functional Ground Terminal Primarily
used for functional earth terminals which
are generally associated with test and
measurement circuits. These terminals
are not for safety earthing purposes but
provide an earth reference point.
tion provided by the system. Do not operate the
system outside of its rated supply voltages or
environmental ranges.
• Failure to read the installation and user manuals
or to comply with the warnings and references
contained herein can result in serious bodily injury
or controller damage.
• Do not insert metal objects into the connectors.
• Use the system only as specied.
• Carefully read all instructions.
• Do not use the system if it does not operate cor-
rectly.
• The enclosures must be closed and locked before
you operate the product.
• Use only specied replacement parts.
1.1.4. General Safety Precautions
WARNING: Read and save
these instructions!
Safety may be jeopardized if the equipment is used
in a manner not specied by the manufacturer.
Carefully read and keep the following instructions
for future reference.
The room temperature where the alarm system
is located must always remain between 32°F and
104°F (0°C to 40°C). For Indoor use only !
To avoid exposing the alarm system to harmful
gases or excessive humidity, it is preferable to install
it in a corridor.
Do not spray water on the alarm system ! In order
to clean it, wipe it with a damp cloth.
The enclosure should be opened and inspected
once a year for moisture. Proper care will extend
the life of the system.

5
AA800EZe rev.16
AA800EZe
1.1.6. General Safety and Electro-
static Discharge Prevention
Electrostatic discharge (ESD) can damage equip-
ment and impair electrical circuitry. ESD damage oc-
curs when electrostatic components are incorrectly
handled, and can result in complete or intermittent
failures. Always follow ESD-prevention procedures
when you remove and replace components. Wear
an ESD-preventive wrist strap, ensuring that it
makes good skin contact.
Connect the grounding clip to an unpainted surface
of a metal chassis frame to safely ground unwanted
ESD voltages.
To guard against ESD damage and shocks, the wrist
strap and cord must operate correctly. If no wrist
strap is available, ground yourself by touching the
metal part that is grounded. For safety, periodically
check the resistance value of the antistatic strap. It
must be between 1 and 10 Mega ohms (Mohm).
1.2. Installation Procedure
To avoid electrical shocks and equipment dam-
age, unplug the unit before making connections.
1. Determine where you want to install the sys-
tem. You need an unswitched AC power outlet and
a telephone plug nearby to operate the system.
2. Make a list of all the sensor inputs you will be
using with the Agri-Alert system.
3. Mount the Agri-Alert system on the wall (see
section 1.3).
4. Connect a ground wire to the ground terminal
of the system (see section 1.4.9).
5. Install and connect all zone sensors and the
siren. If the alarm system uses the phone, connect
the phone line to the Phone Plug-in Card and then
insert the card in the PHONE CARD port of the Agri-
Alert. If the system uses an outside temperature
sensor, connect the sensor to the Outdoor Plug-in
Card and then insert the card in the OUTDOOR port
of the Agri-Alert. These 2 plug-in cards are optional
(see section 1.4).
6. Install the battery and then power up the Agri-
Alert with the 16VAC wall transformer (note that the
system will not boot when connecting the battery).
1.3. Mounting the Equipment
The Agri-Alert system should be mounted on a wall.
Use 3/16” diameter screws to mount the enclosure
on the wall. Fasten the black caps onto the mount-
ing holes once the screws are tightened. Make
sure the cover can be opened easily (to open the
enclosure, pull the latch and lift the cover).
If outdoor connections are used, mount the
enclosure as close as possible to the entry point
of the outdoor wiring.
1.4. Connecting the Equip-
ment
Electrical knockouts are located on the bottom
of the enclosure for running the cables. Use a
screwdriver and a hammer to punch out the holes.
Additional holes made in the enclosure will void
the warranty.
Strip the wires as little as possible (about 1/4”) to
avoid electrical shorts. Once they are connected,
run them through watertight nylon cable glands
at the bottom of the enclosure.
All wiring must be done by an authorized elec-
trician and must comply with applicable codes,
laws and regulations. Be sure power is off before
doing any wiring to avoid electrical shocks and
equipment damage.
Do not install rigid conduit into electrical knock-
outs. Only nylon cable glands are permitted for
cable or wire fastening.
Before making the connections, pass the wires
through an hermetic cable holders at the bottom
of the enclosure.
1.4.1. Sensors
The terminals used for sensor inputs are numbered
Z1, Z2, Z3, etc. on the removable card. Connect
each sensor to a Z terminal and to the ground
terminal (COM). Note that each “COM” terminal is
used by two zones; for example, Z1 and Z2 share
the same “COM” terminal. Make sure each sensor
is connected to the proper “COM” terminal. False
alarms can result if the ground wires are not prop-
erly connected.
Zone 1
Sensor
Zone 2
Sensor
Zone 3
Sensor
Zone 4
Sensor
1.4.2. AC Power Connection
The terminals marked 16VAC on the main board
are used for connecting the transformer. The trans-
former provided with the system is a 16.5VAC/40VA
transformer. It must be plugged into a 120VAC 60Hz
outlet. Make sure the power source is unswitched
(i.e. there is no switch on the power outlet).
1.4.3. Backup Battery Connection
The Agri-Alert system uses a rechargeable 8.4V bat-
tery Ni-MH 2300mAh (part number 112-00007). No
other type of battery can be used. Plug the battery
pack’s male connector to the female socket located
on the main board inside the enclosure. See Ap-
pendix B for normal battery life spans.
Battery Pack
Battery Connector

6AA800EZe rev.16
AA800EZe
1.4.4. Siren Output
Connect the siren to the SIREN terminals on the
removable circuit card. The voltage supplied is
12VDC with a maximum current of 1A. Note that
the battery must be hooked up if a siren is used.
Make sure the positive wire is connected to the
positive terminal of the siren. The siren circuit is
monitored by the Agri-Alert system for defects
and wire troubles. This may not work properly if the
impedance of the siren is too high. If this is the case,
you can add a 1.5KOhm resistor (1/2W) to the siren
circuit as close to the siren as possible.
If no siren is used, connect a 1.5KOhm 1/2W resistor
between the positive and negative terminals of the
siren or disable the siren monitoring function as
explained in section 3.5.
1.4.5. 12VDC Output
The terminals marked 12VDC pro-
vide 12VDC with a maximum cur-
rent of 500mA. This output can be
used to power other accessories
such as temperature controllers
or the Agri-Alert wireless module
(WM-3000). In case of power fail-
ure, the battery back-up provides
12VDC to this line.
12VDC
+
-
+
-
12 VDC
Device
1.4.6. Outdoor Temperature Sen-
sor
In order to use an outside temperature sensor a
plug-in card must be inserted in the “Outdoor”
port of the Agri-Alert (be sure to line up the ground
connector of the card with the quick connect pin
of the bottom board). The outdoor temperature
plug-in card is optional.
Outdoor Card
Ground
Connector
Quick
connect
Pin
“OUTDOOR” portOutside
temperature
sensor
1.4.7. Relays
The Agri-Alert has 2 built-in relays which can be
used to control various on/o devices. Relay out-
puts provide 24VDC or AC with a maximum current
of 2A. They can either be activated manually or
when an alarm occurs in a zone.
Normally
Open (N.O.)
Connection
N.O.
On/O
Device
Normally
Close(N.C.)
Connection
N.C.
On/O
Device
Tip*
Ring
*The TIP wire is the one with the
most positive voltage reading on a
voltmeter.
Phone Card
Phone line OUT
Phone line IN
Phone card connector
Ground
connector
Quick
connect pin
Phone Hookup
CAUTION – To reduce the risk of re, use only No. 26 AWG or larger
telecommunication line cord.
1.4.8. Phone Hookup
A plug-in card must be inserted in the “Phone Card”
port of the Agri-Alert to use dialing functions (be
sure to line up the ground connector of the card
with the quick connect pin of the bottom board).
The phone plug-in card is optional.
If dialing functions are used, the system has priority
over other users when dialing out. This means the
system disconnects all other phones on the line
when dialing out in case of emergency.

7
AA800EZe rev.16
AA800EZe
10ft (3 m)
Bedrock
<47 in( 1.2 m)
EARTH
10ft (3m)
metal rod
10ft
(3 m)
2 ft
(600mm)
10ft (3 m)
<47 in( 1.2 m)
2 ft
(600mm)
1.4.9. Connecting the Earth
Ground
The earth ground terminal of the Agri-Alert must be
connected to the earth ground as follows.
Use a rod at least 5/8 inches (16 millimeters) india-
meter at least 10 feet (3 meter) long. The rod must
have a clean metal surface free of paint, enamel or
other nonconducting substances. Drive the rod
at least 10feet (3 meters) into the ground. If the
bedrock is more than 47inches (1.2meters) deep,
drive the rod into the ground to bedrock level and
bury any remainder horizontally at least 2 feet
(600millimeters) below ground level. If the bedrock
is less than 47inches (1.2meters) deep, bury the rod
horizontally at least 2 feet (600millimeters) below
ground level (ref. Article 10-702, 3d of the Canadian
Electricity Code C22.10-99).
The rod must be connected to the wire described
above. It is recommended to let the rod going out of
the ground to connect it. The wire length must not
exceed 50feet (15 meters).
IMPORTANT: The earth ground terminal must
be connected to a proper ground to protect the
electronic components from damage due to
lightning surges and electrostatic discharges.
Do not use the electrical ground for this purpose
If outdoor connections are used, mount the
enclosure as close as possible to the entry point
of the outdoor wiring
A faulty earth ground connection immediately
voidsthe system warrantywithout further notice.
1.5. Power Up the System
After executing the paragraph 1.4, the system is
ready to power up for the rst time. Read other
paragraphs before powering the system for its
conguration.
The power up is done by plugging the wall trans-
former into a 120VAC 60Hz outlet.
2. USER INTERFACE
2.1. Front Panel
LCD Screen
Arrow keys Microphone
Speaker Short-cut
keys
Keypad
Status LEDs Zone Status LEDs
Graphic LCD Screen: A graphic LCD screen
is used to provide and collect information. The
contrast of this screen can be adjusted with the
potentiometer located behind the display. Turn
the potentiometer with a screwdriver to adjust the
contrast of the screen.
Potentiometer of the
LCD screen
Arrow Keys: These keys are used to step through
menu items.
Speaker: The speaker delivers the system identi-
cation and alarm messages.
Integrated Microphone: The microphone is
used to record ID messages and gives an on-site
listening input.
Keypad: The keypad is used to enter data and to
enable/disable the various functions of the system.
Hot Keys: The hot keys bring you to specic pre-
dened menus. These menus are not accessible
from the main menu.
Zone Status LEDs:
Zone LED Meaning
Red Zone is in alarm
Green Zone is activated
Amber Zone is bypassed
O Zone is disabled
System LEDs:
System Sta-
tus LED
Meaning
Alarm This LED is On when one or more
alarm conditions are detected (the
individual zone LED on the right
side of the panel tells which zone
is in alarm).
System in
Standby
This LED is ON when the Agri-Alert
system is in standby mode (the
system does not monitor alarm
conditions). It turns OFF when
normal monitoring is resumed.
Burglary Armed This LED is ON when the burglar
zone is armed.
Phone This LED is ON when the system
uses the phone line.

8AA800EZe rev.16
AA800EZe
2.2. Modifying a Parameter
Use the numeric keypad and/or the up and down
arrow keys to modify the value of a parameter and
then press Enter to validate the new value.
A password may be required to change the value of
a parameter. Refer to section 3.2.2 to enter/change
your password or to disable the protected access.
2.3. Navigation
Menus items can be accessed with the arrow keys
or by pressing the proper number on the numeric
keypad. A highlight bar indicates which item is
selected on screen. You can move this bar up and
down using the arrow keys and then press “Enter”
to select the menu item. Press “Back” to exit from
a menu.
To get further information about the navigation
process, select the help menu:
1. Select:
• Main Menu
• Help Menus
• Programming Notes
The system gives the meaning of all possible navi-
gation icons:
Programming Notes
Previous Screen/
Cancel Editing
Enter/Select/Apply
Navigate
Exit Wizard
Next wizard Step
Increase /
Decrease Value
Negative Sign/Switch
time to PM
Insert Pause in Phone
Number
2.4. Acknowledging an
Alarm
The Agri-Alert knows an alarm message has been
received when a user acknowledges the alarm.
There are several ways of doing this. If you are on-
site when an alarm is detected, enter your password
(if the password feature is enabled) or simply press
<1> key on the front panel to acknowledge the
alarm. You can also acknowledge an alarm over
the phone when the Agri-Alert system reports the
alarm or you can call the Agri-Alert system yourself
between phone dialouts if the intercall time is
greater than zero (see section 2.5).
Follow this sequence to acknowledge an alarm
from the keyboard:
1. If this screen is not already displayed, press the
Alarm Memory button.
System is in alarm
Curtain doesn't move
Press 1 to continue
to acknowledge alarm
Continue
2. Press 1 to continue.
3. If you have not been identied by the system
yet, the Agri-Alert may prompt for a password. Type
in your password and then press Enter.
Active Alarm Status
Alarm Memory
System is in Alarm
Press 1 to Acknowledge
Continue View
Memory
4. Press “#” to get details about the active alarm
situation or type 1 to acknowledge it right away.
Note that the dialout sequence automatically starts
when an alarm is set o (if the zone in alarm uses
the dialout function).
The siren stops ringing when the alarm is acknowl-
edged. If the alarm is not acknowledged at the end
of the dialout sequence, the Agri-Alert automati-
cally acknowledges it and stops the siren.
2.5. Telephone Interface
The Agri-Alert system sends alarm reports over
the phone. You can also call the system to get
some status reports. When calling the Agri-Alert,
make sure the “Phone Call-in” parameters are set
properly (see section 4.7).
2.5.1. Alarm Report Call
When an alarm occurs, the Agri-Alert system tries to
reach you by phone and dials all numbers of the di-
alout sequence (see chapter4). It puts an end to the
dialout sequence when the alarm is acknowledged.
The following section outlines the dialog session
when a number is reached. Note that a touch-tone
phone is required to respond to the system prompts
and that the system automatically hangs up when
the session is over.
2.5.2. Status Report over the
Phone
You can dial into the Agri-Alert system and obtain
status reports over the phone. A touch-tone phone
is needed to respond to the system prompts.
The following section outlines the dialogue session
when the Agri-Alert system answers the call. The
system automatically hangs up when the status
report is nished.
2.5.3. Acknowledge upon call-
back
If the parameter “Ack. on callback?” is set to “Yes”
(see section 4.7), you can acknowledge an alarm /
test call without using the touch-tones. The follow-
ing sequence should be respected:
1. The Agri-Alert calls you to report an alarm /
test call.
2. Listen to the complete message and wait until
the Agri-Alert hangs up.
3. Call the Agri-Alert back within 30 seconds from
hanging up.
• As soon as the Agri-Alert answers, the alarm/
test call will automatically be acknowledged.
• You can then hang up or wait on the line to
listen to a complete status report.

9
AA800EZe rev.16
AA800EZe
Telephone Session
Status Report
Hello, this is Agri-Alert
ID message of the Agri-Alert
system (if applicable)
Enter your password and press
star (*)
The user enters a four-digit password
on the phone keypad and presses
start (*). If an incorrect password is
entered, the system replies “Wrong
password”; if it is correct, the system
replies “OK”.
Main Menu:
- For a complete status report, press 1;
- For a status report on a particular
zone, press 2;
- To select relay, press 3;
- For on-site listening, press 4;
- To activate/bypass a zone, press 5;
- For a new selection, press 8;
- To hang-up, press 0.
The user selects the desired menu on
the keyboard.
Telephone Session –
Alarm Call
Hello, this is Agri-Alert
ID message of the Agri-Alert
system (if applicable)
Description of the alarm condi-
tion
(e.g.: “Alarm Zone 1”).
On-site Listening
[Microphone input is sent over
the phone for on-site listening if
enabled].
To acknowledge the alarm mes-
sage, enter your password and
press Star (*)
The user enters a four-digit password
on the phone keypad and presses
start (*). If an incorrect password is
entered, the system replies “Wrong
password”; if it is correct, the system
replies “OK”. The system automati-
cally acknowledges the alarm when
a correct password is entered.
Main Menu:
- For a complete status report, press 1;
- For a status report on a particular
zone, press 2;
- To select relay, press 3;
- For on-site listening, press 4;
- To activate/bypass a zone, press 5;
- For a new selection, press 8;
- To hang-up, press 0.
The user selects the desired menu on
the keyboard.
Complete Status Report
[...]
Status of each zone:
- Activated;
- Bypassed;
- Deactivated;
- Not installed;
- Alarm (if the zone is in alarm);
- Temperature (if this is a T° zone).
Status of the system:
- Low battery / Battery OK;
- System power down / System
power OK;
- System trouble;
- Relay 1-2 activated / deactivated.
[System returns to the main
menu]
Zone Status Report
[...]
Enter zone number and press
star (*).
The user types in the zone number
on the keypad and presses star (*).
Status of the chosen zone:
- Activated;
- Bypassed;
- Deactivated;
- Not installed;
- Alarm (if the zone is in alarm);
- Temperature (if this is a T° zone).
[System returns to the main
menu]

10 AA800EZe rev.16
AA800EZe
3. SYSTEM INITIALIZATION
3.1. Installation Wizard
The Installation Wizard guides you through the
process of initializing your Agri-Alert system. When
it is launched, the Wizard displays all setup menus
in turn. You can choose to perform or to skip each
programming step and can exit from the Wizard
at any time.
To run the Installation Wizard:
1. Select:
• Main Menu
• Install Programming*
• Use Program Wizard
*Accessible with the Installer or Master password
only (see section 3.2).
Welcome to Wizard
Installation
1 Set Time & Date
2 System Options
3 Install Zone
4 Install Phone
Start
2. All programming steps are displayed.
3. Press the pound key “#” to launch the Installa-
tion Wizard or press Back to cancel.
4. Follow the prompts to configure your Agri-
Alert system.
Programming steps — Here is a list of all pro-
gramming steps of the Installation Wizard. Refer to
the proper section of this manual to get information
about each of them.
• Time and date (section 3.3)
• System options
Default Passwords:
Master 0800
Installer 0801
User 1 ----
User 2 ----
User 3 ----
User 4 ----
User 5 ----
User 6 ----
User 7 ----
User 8 ----
IMPORTANT
Choose easy-to-remember
passwords and write them
down in a safe place!
3.2.1. Setting the Passwords
1. Select:
• Main Menu
• System Auxiliaries
• Password Management*
*Accessible with the Installer or Master password
only (see section 3.2).
Password Management
Current User Installer
Enable password Yes
Installer 0801
User 1
User 2
Back
2. Set the following parameters:
Enable password — Select “Yes” to use the
password protection or select “No” to disable it.
Users — Use the numeric keypad to specify the
password of each users.
Units of measurement (section 3.4)
Volume: speaker & phone line (section 3.6)
Phone line volume (section 3.6)
Passwords (section 3.2)
• Setup Zones (section 3.7)
• Zone’s Vocal Identication (section 3.7.7)
• Outdoor Temp. compensation (sec. 5.3)*
* Accessible if a zone uses the outside temperature
sensor (sec. 3.7).
• Phone numbers (sections 4.3 & 4.4)
• Auto-Test Schedule (section 4.9)
• Burglar arming options (section 5.4)
• Siren options (section 3.5)
• Zone’s Activation (section 3.7.8)
3.2. Password
The Agri-Alert can use a password protection to
limit access to certain menus and can identify
4dierent levels of users (the password protec-
tion is optional):
LEVEL 1– System:
This user level is automatically selected after
5minutes of inactivity. It gives a read-only access
to the current condition menu and to the system
version menu.
LEVEL 2 – User:
This user level gives access to all functions of the
controller except for the “Install Programming”
menu. Up to 8 dierent password can be assigned
to the users.
LEVEL 3 – Installer:
This user level gives a read/write access to all func-
tions of the system, except for the event buer .
LEVEL 4 – Master:
This user level gives a read/write access to all func-
tions of the system, including the event buer menu.

11
AA800EZe rev.16
AA800EZe
3.2.2. Changing the User Level
1. Select:
• Main Menu
• System Auxiliaries
System Auxiliaries
1 Update/Backup
2 Password Management
...
Back Change
User
2. Press ”0” to change the user level in use.
System Auxiliaries
Enter your Password
3. Enter the password of the desired user.
3.3. Time & Date
1. Select:
• Main Menu
• System Auxiliaries
• User Preferences
• Time and Date
Time and Date
Wed Oct 14 2008
Back
11:59:00 A M
2. Press Enter to start editing the time and date.
3. Set the following parameters:
Use the arrow key and/or the numeric keypad to
change the value of the parameter displayed on
screen. When it is set, press Enter to validate the new
value and to step to the next parameter.
Month, Day & Year;
Time of day — Use the numeric keypad to enter
the time of day. If required, press the AM/PM button
to change the AM/PM status.
3.4. Units of Measurement
1. Select:
• Main Menu
• System Auxiliaries
• User Preferences
• Units
Use the arrow keys to select the desired parameter
on screen and then, use the arrow keys and/or the
numeric keypad to change its value. When the pa-
rameter is set, press Enter to validate the new value.
Unit Preferences
Te m p. For m at °F
Time Format AM/PM
Date Format D/M/Y
Back
2. Set the following parameters:
Temperature Units — Celsius (°C) or Fahrenheit
(°F).
Time Format — AM/PM or 24-hour.
Date Format — Select the proper date format
(Year/ Month/ Day).
3.5. Siren
The system activates the siren output when an
alarm is set o. The procedure below allows the
Agri-Alert to use the siren output.
It is possible to disable the siren output in specic
zones (see sec. 3.7.6).
1. Select:
• Main Menu
• View/Modify
• Siren Settings
Use the arrow keys to select the desired parameter
on screen and then use the arrow keys and/or the
numeric keypad to change its value. When the pa-
rameter is set, press Enter to validate the new value.
Siren
Monitoring
Yes
Start Delay 0:00(m:s)
Time On 0:00(m:s)
Back
2. Set the following parameters:
Monitoring — Select “No” if no siren is connected
to the siren output. This way, the Agri-Alert will
never send a “defective alarm” error. By default,
the siren’s monitoring feature is enabled.
Start Delay — This parameter is used to postpone
the moment at which the Agri-Alert activates the
siren when an alarm is detected. It ranges from 0
to 15 minutes. The default is 0 minute.
Time ON — When an alarm is declared, the siren
sounds during this length of time. It ranges from
1 to 15 minutes and is set to 5minutes by default.

12 AA800EZe rev.16
AA800EZe
3.6. Volume
When an alarm condition is validated, an alarm
message is immediately delivered through the
unit speaker. You can adjust the volume of the
system’s voice and can turn the speaker on or o.
By default, the mute function is disabled and the
speaker enabled.
1. Select:
• Main Menu
• System Auxiliaries
• User Preferences
• Voice Volume
Voice Volu me
Speaker Volume 50
Mute Voice No
Phone Volume 50
Back
2. Set the following parameters:
Speaker Volume — Set the speaker volume to
the desired intensity.
Mute Voice — Select “Yes” to mute the system’s
voice or select “No” to allow spoken message to be
delivered through the speaker. If an alarm situation
occurs while the voice is mute, the system sends out
an alarm sound instead of a vocal message.
Phone Volume — This parameter represents
the volume at which the messages are delivered
over the phone. Do not increase this value unless
otherwise informed by your dealer. By default the
phone volume is set to 50.
3.7. Conguring the Zones
3.7.1. Introduction
The Agri-Alert system is a device used to detect
alarm conditions. It can monitor several types of
sensors and can launch a dialout sequence each
time an alarm is detected on one of its inputs.
When an alarm is detected, the system reports
the alarm on-site and starts the dialout sequence.
It maintains the alarm active up until a user ac-
knowledges it, either on-site or on the phone. In
addition, the Agri-Alert stores all relevant informa-
tion regarding the incident: the zone number, the
type of alarm, the moment at which it occurred/was
acknowledged and the identity of the user who has
acknowledged it.
Zone Denition:
A zone is an input congured to respond to the
type of sensor connected to it. In all, the Agri-Alert
can monitor 8 dierent zones on which dry contact,
dry contact burglar, or temperature sensors can be
connected.
Note that when you recongure a zone, the
systemautomaticallydeactivates this zoneinput.
Refer to section 3.7.8 to reactivate it.
3.7.2. Number of Zones & Outside
T° Sensor
The Agri-Alert can monitor up to 8 dierent zone
inputs and 1 outside temperature sensor. This sec-
tion explains how to activate these inputs.
1. Select:
• Main Menu
• Install Programming*
• Program Zones
*Accessible with the Installer or Master password
only (see section 3.2).
Zone Installation
How many zones ? 8
Use Outdoor T° No
Back
2. Set the following parameters:
How many zones ? — Select how many zones
are required (from 1 to 8 zones).
Use Outdoor Temperature Sensor ? —Select
“Yes” if an outside temperature sensor is connected
to the Agri-Alert.

13
AA800EZe rev.16
AA800EZe
3.7.3. Dry Contact Inputs & Bur-
glar Zone Settings
Dry contacts can be either normally open (NO) or
normally closed (NC) circuits. In addition, they can
be congured for an end of line resistor (EOLR).
Adding an end of line resistor will help the system
detect wiring problems. This is illustrated in the g-
ure below. In the center diagram, an open wire has
occurred. The system detects this by reading the
resistance on the circuit and sets o an alarm when
this happens. The gures below shows three pos-
sible states for a normally open circuit with EOLR.
opened circuit
Normal Alarm Alarm
Normally Open Circuits
with EOLR
The following gures show dierent zone connec-
tion examples. Note that if you add an EOLR to a
circuit, the resistor must be connected to the sensor
that is furthest from the Agri-Alert system.
Dry Contact Burglar Input
Dry contact inputs can be congured as burglar
zones. These zones are armed or disarmed as a
group using a password and they are connected
just as regular dry contact inputs. Burglar zones can
be congured in 2dierent ways:
Examples of Zone Connections
without EOLR
Normally open circuit Normally closed circuit
Examples of Zone Connec-
tions with EOLR
Normally open circuit Normally closed circuit
1. Instant burglar zone: in this type of zone, alarms
are declared as soon as they are detected.
2. Delayed burglar zone: in this type of zone,
alarms are declared only after an entry delay has
elapsed. This way, the authorized user has time to
disarm burglar zones before an alarm is declared
(the delay is common to all delayed burglar zones).
Similarly, all zones are armed after the exit delay
has elapsed.
When the system is arming, the speaker starts
beeping and the Agri-Alert displays a countdown of
the exit delay. After the exit delay has elapsed, the
“Burglary Armed” pilot light turns red, the system
arms all burglar zones and sets o an alarm as soon
as an alarm situation occurs in any burglar zone.
If an alarm occurs in a burglar zone with an entry
delay, the Agri-Alert displays a countdown of the en-
try delay. The speaker beeps during this delay and
stops beeping when the key sequence is entered.
If no one has disarmed the system after the entry
delay has elapsed, an alarm is declared; if someone
has correctly disarmed the system, all burglar zones
are disarmed at once and the “Burglary Armed”
pilot light turns o.
Assigning Dry Contact & Burglar
Zones
1. Select:
• Main Menu
• Install Programming*
• Program Zones
*Accessible with the Installer or Master password
only (see section 3.2).
2. Press Next to display a table showing all
zones in use.
3. Use the numeric keypad to select the desired
zone number.
Zone 1 Installation
Type Dry Contact
Normal State Closed
EOL Resistor No
R ec.Ti m e (h:m:s) 0:00:30
Back Zone 2
4. Set the following parameters:
Type of Zone — Select “Dry Contact” to assign a
regular dry contact input ; select “Delayed Burglar”
to assign a dry contact burglar zone which uses a
delay or select “Instant Burglar” to assign a dry
contact burglar zone which uses no delay.
Normal State (NO / NC) — Select the normal
state of the zone contact: Normally open or nor-
mally closed contact.
EOL Resistor — Specify if the input has an end
of line resistor or not.
Recognition Time — Determine during how
much time the alarm condition must be maintained
before it constitutes a valid alarm situation. *For
regular dry contact inputs only.
Refer to section 5.4 to set the entry and exit
delays of burglar zones.

14 AA800EZe rev.16
AA800EZe
3.7.4. Temperature Zone Settings
A temperature zone responds to changes in tem-
perature readings from a sensor. The system sets o
an alarm if the temperature of a zone exceeds the
user-dened temperature range (the acceptable
temperature range is bounded between a low and
a high temperature set point).
Assigning Temperature Zones
1. Select:
• Main Menu
• Install Programming*
• Program Zones
*Accessible with the Installer or Master password
only (see section 3.2).
2. Press Next to display a table showing all
zones in use.
Select Zone Number
Zone 1 Zone 2 Zone 3 Zone 4
Zone 5 Zone 6 Zone 7 Zone 8
Back Enter
3. Use the numeric keypad to select the desired
zone number.
Zone 1 Installation
Type Temp
Low T° Set. 50.0°F
High T° Set. 90.0°F
Critical T° Set. 100.0°F
R e c.Ti m e (h:m:s) 0:0 0:30
Back Zone 2
4. Set the following parameters:
Type of Zone — Select “Temp” to assign a tem-
perature zone.
Low / High Set Points — Set the lower and up-
per values of the normal temperature range. The
low set point ranges from -60°F to 150°F (-50°C to
65°C); the high set point ranges from the low set
point to 150°F (65°C).
Critical Temperature — This is the absolute
temperature limit for room temperatures. It is
used in conjunction with the outdoor temperature
compensation feature. When the room temperature
reaches this point and the outdoor temperature
compensation feature is enabled, an alarm is set
o, no matter what the outdoor temperature is. The
critical temperature ranges from the high set point
to 150°F (65°C) with an accuracy of 0.1°F (0.1°C).
Enter the critical temperature and press Enter. To
enter a negative value, use the “+/-” key. * Acces-
sible if the outside temperature sensor is enabled
in section 3.7.2.
Recognition Time — Determine during how
much time the alarm condition must be maintained
before it constitutes a valid alarm situation.
3.7.5. Assigning a Relay to a
Zone
The Agri-Alert has 2 relay outputs to activate dif-
ferent devices when an alarm occurs in a zone.
This section shows how to assign a relay to a zone.
1. Select:
• Main Menu
• Install Programming*
• Program Auxiliaries
• Relay Assigned Zone
*Accessible with the Installer or Master password
only (see section 3.2).
2. Press the zone number on the keypad to change
the relay assignment of that zone.
Relay Assigned Zone
1 2 3 4
Rel.1 --- --- ---
5 6 7 8
--- --- --- ---
Back Modify
3. Select “Rel.1” or “Rel.2” to assign the 1st or 2nd
relay to the selected zone; select “None” if no relay
is assigned to that zone.
Legend
Room temperature
Alarm limits
Temperature alarm
No alarm
Time
Lo
Alarm
limit
Hi
Alarm
limit
alarm sets
o
Room T°
Detecting
Temperature Alarms

15
AA800EZe rev.16
AA800EZe
3.7.6. Disable the Siren
This function allows disabling the siren in specic
zones. By default, the siren is enabled on all zones.
1. Select:
• Main Menu
• Install Programming*
• Program Auxiliaries
• Siren Enabled Zone
*Accessible with the Installer or Master password
only (see section 3.2).
Siren Enabled Zone
1 2 3 4
No Yes Yes Yes
5 6 7 8
Yes Yes Yes Yes
Back Modify
2. To change the siren status on a zone, simply
press the zone number on the keypad. Select “Yes”
to use the siren on the zone or “No” to disable it.
3.7.8. Initial Activation of the
Zones
This section explains how to activate the zones
when running the system for the rst time. If you
wanttheAgri-Alerttostop monitoringalarmsin a
zoneafterwards,use the“BypassZone” function
instead of deactivating the zone (see sec. 5.5.1).
After having been initialized, all zones are disabled.
To start using them, you must activate each zone as
shown below (except for burglar zones: this type of
zone is automatically activated). The pilot light of a
disabled zone is o on faceplate of the controller.
1. Select:
• Main Menu
• Activate / Bypass
• Activate Zones
The zones that have been initialized are displayed
on screen. Refer to section 3.7.1 to create new zones.
Select Zone to Activate
1 2 3 4
No Yes Yes Yes
5 6 7 8
Yes Yes Yes Yes
Back Modify
2. Press the zone number on the keypad to
change the zone status. Select “Yes” to activate it.
3.7.7. Zones’ Vocal Identication
When giving status reports and alarm messages,
the system identies the zones with a voice record-
ing provided by the user. This section shows how
to record these messages.
1. Select:
• Main Menu
• System Auxiliaries
• User Preferences
• Voice ID
• Zone Messages
2. Use the arrow keys to select the desired zone.
Recording a New ID Message — To record a
new message, press star (*) and record the ID mes-
sage (8 seconds maximum). The Agri-Alert then
plays the new message over the speaker.
Original ID Message — Press the pound key “#”
to retrieve the original ID message.

16 AA800EZe rev.16
AA800EZe
3.8.2. System’s Vocal Identication
When giving status reports and alarm messages,
the system identies itself with a voice recording
provided by the user. This section shows how to
record this message.
1. Select:
• Main Menu
• System Auxiliaries
• User Preferences
• Voice ID
• System Message
Recording a New ID Message — To record a
new message, press star (*) and record the ID mes-
sage (8 seconds maximum). The Agri-Alert then
plays the new message over the speaker.
Original ID Message — Press the pound key “#”
to retrieve the original ID message.
3.8.3. High Noise Alarms
The Agri-Alert can trigger an alarm if the level of
noise around surrounding it gets too high. High
noise alarms can be used warn you if a generator’s
motor starts running for instance.
In order to use high noise alarms, you must cali-
brate the regular level of sound surrounding the
Agri-Alert and then specify the recognition time
for this type of alarm.
1. Select:
• Main Menu
• View/Modify
• High Noise Alarm
High Noise Alarm
State Enabled
R ec.Ti m e (h:m:s) 0:00:30
Start Calibration No
Back
2. Set the following parameters:
State — Select “Enabled” to use high noise alarms
or select “Disabled” to disable this function.
Recognition Time — Determine during how
much time the alarm condition must be maintained
before it constitutes a valid alarm situation.
Start Calibration — Select “Yes” for the Agri-
Alert to record a sample of the regular sound level
surrounding it (this process takes about 10 seconds).
Once the calibration is over, the Agri-Alert starts
monitoring the level of sound and triggers an alarm
if it gets higher than the sample sound for a period
of time exceeding the recognition time.
3.8. System Setup
3.8.1. Standby Mode
When it is in standby mode, the Agri-Alert stops
monitoring all alarm inputs and the “System in
Standby” LED turns on the front panel. It also re-
moves access to most of its menus.
1. Select:
• Main Menu
• Press the Standby key
*Accessible with the Installer or Master password
only (see section 3.2).
2. Press Enter to select the desired system status.
Change system operating
mode
System is normal
Back
3. Use the arrow keys to select the normal mode
or standby mode. Press Enter again to validate.

17
AA800EZe rev.16
AA800EZe
3.8.4. Relay Status
The Agri-Alert has 2 built-in relays which can be
used to control various on/o devices. Relay can
either be activated manually (i.e., the user activates
or deactivates it manually) or they can be activated
only when an alarm occurs in a zone. Note that it is
not possible to change the status of a relay that is
associated with a zone.
Refer to section 3.7.5 to assign a relay to a zone.
The following steps allow seeing the current status
of the relays. Their status can be change if they are
not assigned to a zone.
1. Select:
• Main Menu
• View/Modify
• Output Relays
Relays
Relay 1 Activated
Relay 2 Deactivated
Back
The status of both relays is displayed. If a relay is
not assigned to a zone, you can change its status by
pressing Enter and using the up or down-arrow key.
3.8.5. System Self Test
The Agri-Alert system has the capability of testing
some of its functions. To start the test, select the
following menus:
1. Select:
• Main Menu
• System Self Test
2. Press to launch the test.
System Self Test
No Self Test Running
Cancel Start
Outline of the test :
1. Test LEDs — The system makes each zone LED
go from red to green. It then turns on each status
pilot light in red.
2. Test LCD — The system tests the LCD display.
The LCD backlight is turned o and the display
displays a rectangular pattern.
3. Test Siren — Two short beeps are sent to the
siren (if a siren is hooked up).
4. Test Relays — The Agri-Alert opens and closes
relays 1 and 2.
5. Test 12 VDC Output — The Agri-Alert activates
and then deactivates the 12VDC output.
6. Audio (Record / Play) — The Agri-Alert
records surrounding sounds while the message
“Record” is displayed. It then plays the recorded
sound through the speaker.
7. Dialout Sequence — The system launches the
dialout sequence.
3.8.6. System Alarm Monitoring
The Agri-Alert generally launches the alarm and the
call sequence when it detects an internal system
failure. It is possible to disable the alarm monitoring
for some of these failures.
1. Select:
• Main Menu
• Install Programming*
• Program Auxiliaries
• Monitoring
Monitoring
Battery Yes
12Vdc Yes
16Vdc Yes
Line cut Yes
Siren Yes
Back
2. Set the following parameters:
Battery / 12Vdc Output / 16Vac Supply / Line
cut / Siren — Select “No” if you do not want the
alarm to sound when one of these system failure
occurs.
3.8.7. Software Version
The following menu gives the actual version of your
Agri-Alert software.
1. Select:
• Main Menu
• System Auxiliaries
• Software Version
800 EZe V X.X.XXXX
Jan 1 20XX
Base Mx Vx

18 AA800EZe rev.16
AA800EZe
4. COMMUNICATION PA-
RAMETERS
4.1. Introduction
This chapter shows how to congure your Agri-Alert
system so that it can transmit alarm or status reports
over the phone line. For example, the user can call
the Agri-Alert system in order to obtain a status
report in the form of voice messages. The system
can also be programmed to dial a series of phone
numbers and deliver a voice message when an
alarm situation occurs. Make sure to set your com-
munication parameters properly for these features
to work with your phone system.
Phonecommunicationis only possibleifaplug-in
card is inserted in the “PHONE CARD” port of
the Agri-Alert (sec. 1.4.8). This card is optional.
4.2. Dialout Sequence
When an alarm is set o, the Agri-Alert launches
the dialout sequence (sequence of phone numbers
that are called in case of an alarm). After a call is
answered, the Agri-Alert either delivers the alarm
message as a voice message or as a pager code.
The system puts an end to the dialout sequence
when the alarm is acknowledged by a user (see
section 2.4). Otherwise, it keeps dialing and repeats
the dialout sequence following the number of
repetitions dened by the user.
If a phone number is busy, the Agri-Alert puts it at
the bottom of the list and calls all busy numbers at
the end of the sequence (the number of time busy
numbers are called is dened by the user).
Dialout Sequence Example
Settings:
# of phone numbers = 5;
Call repetitions = 2;
Busy tries = 2
Start of Dialout Sequence 1
Phone number 1 connect
Phone number 2 connect
Phone number 3 busy
Phone number 4 busy
Phone number 5 connect
The Agri-Alert calls all phone numbers and
places busy numbers at the bottom of the list.
It calls back all busy numbers at the end of the
sequence (Busy Tries parameter=2).
Phone number 3 connect
Phone number 4 busy
Since phone number #4 is still busy and the
Busy Tries parameter is set to 2, the Agri-Alert
calls phone number #4 once again.
Phone number 4 busy
Phone number #4 is still busy. It is not redialed
since the number of busy line tries has been
reached.
Since the number of call repetitions is set to
2, the Agri-Alert repeats the whole dialout
sequence from the start:
Start of Dialout Sequence 2
Phone number 1 busy
Phone number 2 connect
Phone number 3 busy
Phone number 4 connect
Phone number 5 connect
The Agri-Alert calls all phone numbers and
places busy numbers at the bottom of the list.
It calls back all busy numbers at the end of the
sequence (Busy Tries parameter=2).
Phone number 1 connect
Phone number 3 connect
End of Dialout Sequence
The Agri-Alert puts an end to the dialout
sequence when the number of call repetition
is reached or if someone acknowledges the
alarm (the alarm can either be acknowledged
on the phone or on site). If no acknowledg-
ment is received for the alarm at the end of the
dialout sequence, the Agri-Alert automatically
acknowledges it.

19
AA800EZe rev.16
AA800EZe
4.3. Dialing Information
The following dialing parameters are used to estab-
lish communications over the telephone network
when the dialout sequence is used.
Phonecommunicationis only possibleifaplug-in
card is inserted in the “PHONE CARD” port of
the Agri-Alert (sec. 1.4.8). This card is optional.
1. Select:
• Main Menu
• Install Programming*
• Program Dialer
* Accessible with the Installer or Master password
only (see sec. 3.2).
Dialing Settings
Use Dialout? Yes
How Many Phone No’s 8
Time Between Calls 1min
Start Call Delay 1min
Message Repetitions 3
Alarm Recall 0:30(h:m)
Call Repetitions 7
Busy Tries 1
Pause Delay Key 4Sec
Tone Delay 4Sec
Detect phone key ? Yes
Back
2. Set the following parameters:
Refer to the previous section to get further informa-
tion about the dialing sequence.
Use Dialout ? — Select “Yes” to use the dialout
sequence. The dialout sequence allows the Agri-
Alert to call all stored phone numbers when there
is an alarm.
The dialing parameters below are accessible if the
dialout option is enabled above.
How Many Phone Numbers? — When an alarm
occurs, the Agri-Alert calls up the phone numbers in
memory to report the alarm situation. It can either
communicate the alarm condition with a voice
message or with a pager code. The Agri-Alert can
memorize 8phone numbers and the order in which
they are stored denes the order of the dialout
sequence (i.e. the rst number stored is the rst
number called when an alarm occurs).
Time Between Calls — After having dialed a
phone number, the Agri-Alert waits until the end
of this delay before calling the next number in the
dialout sequence. This delay allows a user to reach
the system by phone when the system is between
2 calls (if the system was continuously dialing out,
it would not be possible to reach it by phone to
acknowledge an alarm). This parameter ranges from
0 to 59 minutes. By default, it is set to 1 minute. If
the parameter “Acknowledge upon callback” is set
to Yes, the lower limit of “Time Between Calls” is
automatically set to 1 minute.
Start Call Delay — This parameter represents the
time left before the Agri-Alert launches the dialout
sequence when an alarm situation occurs. It allows
someone on-site to acknowledge an alarm before
the dialout sequence starts. This parameter ranges
from 0 to 59minutes. By default, it is set to 1 minute.
Message Repetitions — This is the number of
times a voice message is delivered by the system
when an alarm condition is reported. It applies to
the messages given over the phone and on the
unit speaker. The number of repetitions ranges
from 2 to 15 times and is set to 3 by default. If the
parameter “Acknowledge upon callback” is set to
Yes, the higher limit of “Message Repetitions” is
automatically set to 2.
Alarm Recall Time — The alarm recall time is the
time left before the Agri-Alert restarts the dialout
sequence when an alarm condition that has been
acknowledged is still valid. The recall time is set to
30 minutes by default.
Call Repetitions — When an alarm is validated,
the system starts calling the phone numbers stored
in memory to deliver the alarm message. The # of
Call Repetitions determines the number of times
the system repeats the dialout sequence. The value
ranges from 1 to 7 times. The default is 7.
Busy Tries — This parameter represents the
number of times a phone number is called when the
line is busy. It applies to all phone numbers in the
dialout sequence and ranges from 0 to 3 tries. The
default is 1 try. When a phone number is busy, the
system places it at the bottom of the list and tries
reaching it again at the end of the dialout sequence.
Pause Delay Key — This parameter is associated
with the Pause key. The Pause key is used to intro-
duce a pause in a telephone number when dialing.
The Pause Delay is the length of the pause. For
example, if you need to exit a local phone network
before reaching an outside line, you can use the
Pause key after entering the access code (usually
‘9’ —see section 4.4). The range is from 1 to 255
seconds. The default is 4 seconds.
Tone Delay — This is the time the system waits
after hooking up to a line before dialing a number.
This ensures that the line is ready before dialing.
The system can be set to wait from 1 to 15seconds
after hookup. The default is 4 seconds.
Detect phone key ? — Pressing a key on the touch
tone can be taken into account or can be ignored
while the system sends a vocal message over the
phone. Select “Yes” to enable the touch tone during
the message transmission or select “No” to block
it. In either case, the dialer is enabled after the mes-
sage is delivered.
Dial out priority ? — Select “Yes” to prioritize
the dial out sequence by blocking the calls
made to the Agri-Alert while the sequence
is on or select “No” to allow the Agri-Alert
to pick up a call during its dial out sequence.

20 AA800EZe rev.16
AA800EZe
4.4. Phone Numbers
The Agri-Alert uses the phone numbers to report
alarm conditions. It can either send the alarm con-
dition by means of a voice message or on a pager.
The order in which phone numbers are stored
denes the order of the dialout sequence, i.e. the
rst number stored is the rst number called when
an alarm occurs.
1. Select:
• Main Menu
• View / Modify
• Phone Numbers
2. Use the numeric keypad to select the desired
phone number.
Select Phone Number
Phone Phone Phone Phone
1 2 3 4
Phone Phone Phone Phone
5 6 7 8
Back Enter
3. Set the following parameters:
Phone Number 1
Type Home
Tel.#
Back Phone 2
Type — Press Enter to select the type of system
associated with the selected number:
• Home — When this type of number is called,
the system delivers a voice message describing
the alarm condition.
• Cellular — When this type of number is
called, the system delivers a voice message
describing the alarm condition.
• Pager — When this type of number is
reached, the system sends a pager code on the
pager screen. The code is associated with the
type of alarm. *Refer to the following section to
get further information about the pager.
Telephone Number — Type in the phone num-
ber. Special characters such as the Asterisk (*) or
Pound (#) can also be included in a phone number.
It is also possible to add one or many pauses in the
dialing (the pause is identied by letter “P” in the
phone number):
Inserting pauses in a phone number —
Inserting a pause is useful if you need to enter
an access code to reach an external phone line
(e.g., if you have to dial “9” to access the exter-
nal phone line and then have to wait 4seconds
before dialing the number). Refer to section 4.3
to set the delay associated with the Pause key.
4.5. Pager Setup
When a pager is paged, a code number is displayed
on the pager screen. The Agri-Alert uses this num-
ber to transmit information to the user. The code is
displayed in the form of a telephone number and
contains the following information:
“SSS” is the identication number of the site where
the Agri-Alert is installed. The site number is de-
ned by the user and can contain up to 32 digits.
For example, if 2 Agri-Alert controls are installed on
separate sites, the user can identify each site with
a unique code number.
“AAAA” is an alarm code generated
by the Agri-Alert. If more than 1
alarm is active, alarm codes are
displayed one after the other. In
the example below, alarm code
3000 identies a test call.
SSS Three-digit code of
the site where the alarm
occurred.
AAAA: Four-digit code de-
scribing the type of alarm.
Pager Code Components
PAGER CODE MEANING
1001, 1002, ... , 1008 Alarm Zone 1, 2, ... , 8
3001 Test call
Problem
encoun-
tered
8001 Low battery
8002 16VAC failure
8005 Siren defect
8006 12VDC output defect
8010 High Noise alarm
8011 Outdoor probe failure
Other manuals for Agri-Alert 800EZe
1
Table of contents
Other GSI Electronics Security System manuals
Popular Security System manuals by other brands

Alderon Industries
Alderon Industries Versa'larm VA02A Operation, maintenance and installation manual

Baby Alert
Baby Alert ChildMinder quick start guide

Assistive Technology Services
Assistive Technology Services Touch N Talk troubleshooting guide

SiKom
SiKom A-Comfort User and installation manual

Curv360
Curv360 MS-06B manual

Ingrid
Ingrid Security System user manual