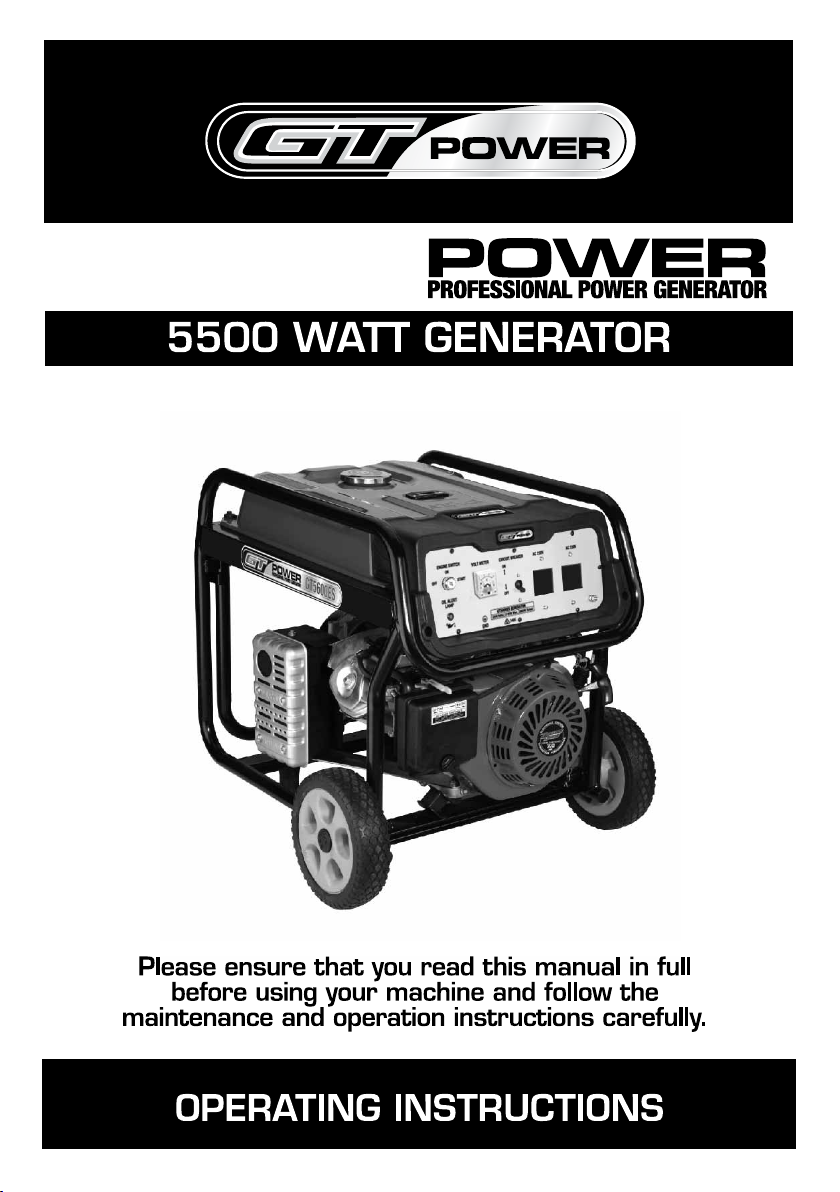
GT POWER GT5600ES User manual

GT5600ES

GT5600ES
2
Contents
Introduction.....................................3
Environmental Protection................3
Scope of Product.............................3
Description of Symbols....................3
Specications................................3
Safety Rules....................................4
Unpacking the Generator.................6
Assembling the Generator...............7
Features and Controls.....................8
Preparation Before Operating.........9
Calculating Your Power Need........10
Operating the Generator................11
Maintenance.................................14
Storage.......................................17
Troubleshooting............................18
Warranty.......................................19

3
GT5600ES
Introduction
Your new GT POWER Generator will more
than satisfy your expectations. It has been
manufactured under stringent quality stand-
ards to meet superior performance criteria.
You will nd your new tool easy and safe to
operate, and, with proper care, it will give
you many years of dependable service.
CAUTION: Carefully read through
this entire Instruction Manual before
using your new GT POWER Genera-
tor. Take special care to heed the
Cautions and Warnings.
Your generator has many features that will
make your job faster and easier. Safety,
performance, and dependability have been
given top priority in the development of this
tool, making it easy to maintain and operate.
Environmental
Protection
Recycle unwanted materials instead of
disposing of them as waste. All tools, hoses
and packaging should be sorted, taken to
the local recycling centre and disposed of in
an environmentally safe way.
Scope Of Product
This product is suited for home and camping,
back-up power, rural and commercial
applications.
Description
Of Symbols
The rating plate on your tool may show sym-
bols. These represent important information
about the product or instructions on its use.
Wear hearing protection.
Wear eye protection.
Wear breathing protection.
Conforms to
relevant standards
for electromagnetic
compatibility.
Specifications
AC Output: 230V AC ~ 50Hz
Rated Power: 5000W
Peak Power: 5500W
Phase: Single
Power Factor: COS O = 1
Displacement: 389cc
Engine: 13HP, 4 stroke
No Load Speed: 3000 RPM
Fuel Tank Capacity: 25L
Fuel Type: Unleaded petrol
Engine Oil Type: SAE30
Operation Noise Level: 72dBA / 7m
Net Weight: 81kg

GT5600ES
4
Safety Rules
Read this manual carefully and become
familiar with your generator. Know its
applications, its limitations and any
hazards involved.
Throughout this brochure, on tags and
decals afxed to the generator, DANGER,
WARNING, CAUTION and NOTICE marks
are used to alert personnel with special
instructions about a particular operation that
may be hazardous if performed incorrectly,
or carelessly. Observe them carefully. Their
denitions are as follows:
DANGER indicates a hazard which,
if not avoided, will result in death or
serious injury.
WARNING indicates a hazard which,
if not avoided, could result in death or
serious injury.
CAUTION indicates a hazard which,
if not avoided, could result in minor or
moderate injury.
NOTICE covers some practices which
may be not related to personal injury.
A running engine gives off carbon monoxide,
an odorless, colorless, poison gas. Breath-
ing carbon monoxide could result in death,
serious injury, headache, fatigue, dizziness,
vomiting, confusion, seizures, nausea or
fainting.
• Operate this product ONLY outdoors.
• Install a battery operated carbon monoxide
alarm near the bedrooms.
• Keep exhaust gas away from entering a
conned area through windows, doors,
ventilation intakes, or other openings.
• NEVER operate this product inside any
building, carport, porch, mobile equipment,
marine applications, or enclosure, even if
windows and doors are open.
WARNING: Starter cord kickback
(rapid retraction) will pull hand and
arm toward engine faster than you
can let go which could cause broken
bones, fractures, bruises, or sprains
resulting in serious injury.
• When starting engine, pull cord slowly
until resistance is felt and then pull rapidly
to avoid kickback.
• NEVER start or stop engine with electrical
devices plugged in and turned on.
WARNING: Fuel and its vapors are
extremely ammable and explosive
which could cause burns, re or
explosion resulting in death, serious
injury and/or property damage.
When Adding or Draining Fuel
• Turn generator engine OFF and let it cool
at least 2 minutes before removing fuel
cap. Loosen cap slowly to relieve pressure
in tank.
• Fill or drain fuel tank outdoors.
• DO NOT overll tank, Allow space for fuel
expansion.
• If fuel spills, wait until it evaporates before
starting engine.
• Keep fuel away from sparks, open ames,
pilot light, heat, and other ignition sources.
• Check fuel lines, tank, cap and ttings
frequently for cracks or leaks. Replace if
necessary.
• DO NOT light a cigarette or smoke.

5
GT5600ES
When Starting Equipment
• Ensure spark plug, mufer, fuel cap and
air cleaner are in place.
• DO NOT crank engine with spark plug
removed.
When Operating Equipment
• DO NOT operate this product inside any
building, carport, porch, mobile equipment,
marine applications or enclosure.
• DO NOT tip engine or equipment at angle
which causes fuel to spill.
• DO NOT stop engine by moving choke
control to “OFF” position.
When Transporting or Repairing
Equipment
• Transport/move/repair with fuel tank
EMPTY or with fuel valve OFF.
• DO NOT tip engine or equipment at angle
which cause fuel to spill.
• Disconnect spark plug wire.
When Storing Fuel or
Equipment with Fuel in Tank
• Store away from furnaces, stoves,
water heaters, clothes dryers, or other
appliances that have light or other ignition
source because they could ignite fuel
vapors.
WARNING: Generator voltage
could cause electrical shock or burn
resulting in death or serious injury.
• Use approved transfer equipment to
prevent back feed by isolating generator
from electric utility workers.
• When using generator for backup power,
notify utility company.
• Use a ground fault circuit interrupter in any
damp or highly conductive area, such as
metal decking or steel work.
• DO NOT touch bare wires or receptacles.
• DO NOT use generator with electrical
cords which are worn, frayed, bare or
otherwise damaged.
• DO NOT operate generator in the rain or
wet weather.
• DO NOT handle generator or electrical
cords while standing in water, while bare-
foot, or while hands or feet are wet.
• DO NOT allow unqualied persons or
children to operate or service generator.
WARNING: Exhaust heat/gases could
ignite combustibles, structures or dam-
age fuel tank causing a re, resulting
in death, serious injury and/or property
damage. Contact with mufer area
could cause burns resulting in serious
injury.
• DO NOT touch hot parts and AVOID hot
exhaust gases.
• Allow equipment to cool before touching.
• Keep at least 5 feet (1.5m) of clearance
on all sides of generator including overhead.
CAUTION: Excessively high operating
speeds could result in minor injury and/
or generator damage. Excessively low
speeds impose a heavy load.
• DO NOT tamper with governor spring,
links or other parts to increase engine
speeds. Generator supplies correct rated
frequency and voltage when running at
governed speed.
WARNING: Unintentional sparking
could cause re or electric shock
resulting in death or serious injury.

GT5600ES
6
When Adjusting or Making
Repairs to the Generator
• Disconnect the spark plug wire from
the spark plug and place the wire where it
cannot contact spark plug.
When Testing for Engine Spark
• Use approved spark plug tester.
• DO NOT check for spark with spark
removed.
WARNING: Starter and other rotating
parts could entangle hands, hair,
clothing, or accessories resulting in
serious injury.
• NEVER operate generator without
protective housing or covers.
• DO NOT wear loose clothing, jewellery or
anything that could be caught in the
starter or other rotating parts.
• Tie up long hair and remove jewellery.
• DO NOT modify generator in any way.
NOTICE: Exceeding generators
wattage/amperage capacity could
damage generator and/or electrical
devices connected to it.
• DO NOT exceed the generator’s wattage/
amperage capacity. See Don’t Overload
Generator in the Operation section.
• Start generator and let engine stabilize
before connecting electrical loads.
• Turn electrical loads OFF and disconnect
from generator before stopping generator.
NOTICE: Improper treatment of
generator could damage it and
shorten its life.
• Use generator only for intended uses.
• If you have questions about intended use,
ask dealer or contact local service center.
• Operate generator only on level surfaces.
• DO NOT expose generator to excessive
moisture, dust, dirt, or corrosive vapor.
• DO NOT insert any object through cooling
slots.
• If connected devices overheat turn
them off and disconnect them from
generator.
- or electrical output is lost.
- or equipment sparks, smokes, or emits
ames.
- or unit vibrates excessively turn them
off and disconnect them from generator.
Unpacking the
Generator
• Set the carton on a rigid at surface.
• Remove everything from carton except
generator.
•Open carton completely by cutting each
corner from top to bottom.
• Leave generator on carton to install wheel
kit.
Packing Contents
1 x Owner’s Manual
2 x Wheels
1 x Handle Assembly
2 x Wheel Axles
1 x Hardware Bag (includes 1 x Spark Plug
Socket; 1 x Extension Tool)

7
GT5600ES
Assembling the
Generator
The generator requires some assembly prior
to using it.
Assembling The Accessory Kit
The wheels are designed to greatly improve
the portability of the generator.
NOTE: The wheels are NOT intended
for on-road use.
1. Refer to diagrams to install wheels as
shown.
• Slide the axle through the frame brackets.
• Slide on the hub,wheel and at washer,
then insert the split pin through the wheel
axle hole.
• Bend the split pin tabs outward to lock the
pin in place.
2. The wheel bumpers as shown.
• Insert an M6 bolt through the rubber
bumper and insert an M8 bolt through the
bottom of the bumper bracket. Secure the
bolt with an M8 ange nut.
• Install an M8 bolt through the generator
frame and through top of the bumper
bracket. Secure the boltwith an M8 ange
nut.
3. Refer to following diagram to install
the handle assembly as shown.
• Insert the handle bracket onto the
generator frame and secure with two M8
bolts and two M8 ange nuts.
• Align the handle assembly holes with the
handle bracket holes and secure with one
M8 bolt and one M8 ange nut.

GT5600ES
8
2
1
4
5
6
7
8
9
10
12
14 13
15
11
17
3
16
Features and Controls
Read this Operating Manual and the Safety Rules section before operating your generator.
Compare the illustrations with your generator, to familiarise yourself with the locations of
various controls and adjustments. Save this manual for future reference.
1. Engine Switch
2. Mufer
3. AC Circuit Breaker
4. Oil Drain Plug
5. Oil Fill Cap/Dipstick
6. Spark Plug
7. Battery
8. Earth Terminal
9. Low Oil Warning Light
10. Air Cleaner
11. Fuel Valve
12. Choke Lever
13. Fuel Gauge
14. Fuel Tank Cap
15. Fuel Tank
16. Recoil Starter
17. 230V AC Receptacle

9
GT5600ES
Preparation before
Operating
Adding Engine Oil
Please add correct oil before starting the
generator.
Above 5oC - use SAE 30
Between 5oC to -15oC - use 10W-30
Oil Capacity - 1100ml
NOTE: Improper treatment of
generator could damage it and
shorten its life. DO NOT attempt
crank or start the engine before it
has been properly serviced with the
recommended oil. This could result in
an engine failure.
• Place generator on a at, level surface.
• Remove oil cap and dipstick. Wipe
dipstick clean.
• Slowly ll oil into engine through the oil
lter until it reaches the full mark on the
dipstick.
• Stop lling occasionally to check oil level.
Be careful do not over ll.
• Install oil ll cap and fasten the cap
properly.
• Check engine oil level before starting
each time thereafter.
Adding Fuel
DANGER: Never ll tank indoors.
Never ll fuel tank when engine is
running or hot. Turn generator engine
OFF and allow engine to cool entirely
before lling fuel tank. Avoid spilling
gasoline on HOT engine. Keep fuel
away from sparks, open ames,
pilot lights, heat, and other ignition
sources. DO NOT light a cigarette or
smoke when lling the fuel tank. Fuel
is highly FLAMMABLE and its vapors
are EXPLOSIVE.
• Use only regular UNLEADED gasoline.
Do not use any fuel with more than 10%
added ethanol, and never use E85 fuel.
•Do not mix oil with gasoline.
• Install fuel cap and wipe up any spilled
gasoline.
CAUTION: Do not overll the fuel
tank. Allow space for fuel expansion.
IF the fuel tank is overlled, fuel
can overow onto a HOT engine and
cause FIRE or EXPLOSION. If fuel
spills, wait until it evaporates before
starting engine. Check fuel lines,
tank, cap and ttings frequently for
cracks or leaks. Replace if necessary.
IMPORTANT: It is important to prevent
gum deposits from forming in fuel
system parts such as the carburetor,
fuel hose or tank during storage.
Alcohol-blended fuels (called gasohol),
ethanol or methanol) can attract
moisture, which leads to separation
and formation of acids during storage.
Acidic gas can damage the fuel
system should be emptied before
storage for 30 days or longer. See the
“Storage” section. Never use engine or
carburetor cleaner products in the fuel
tank as permanent damage may occur.
1. Engine Switch
2. Mufer
3. AC Circuit Breaker
4. Oil Drain Plug
5. Oil Fill Cap/Dipstick
6. Spark Plug
7. Battery
8. Earth Terminal
9. Low Oil Warning Light
10. Air Cleaner
11. Fuel Valve
12. Choke Lever
13. Fuel Gauge
14. Fuel Tank Cap
15. Fuel Tank
16. Recoil Starter
17. 230V AC Receptacle

GT5600ES
10
Earthing the Generator
Proper earthing of the generator will help
prevent electrical shock in the event of earth
fault condition in the generator or in connected
electrical devices. Proper earthing also helps
dissipate static electricity, which often builds up
in un-earthed devices.
This chart lists average power requirements. Your particular tool or appliance may require more or less
than the listed wattage. Where START wattage is the same as RUN wattage, this signies no additonal
power is required for starting.
Firstly add up all the “running wattage” requirements for all items that you need to power simultane-
ously. Next, add to that total the highest of the “starting wattages” you listed down. Now you know
approximately how much power you need to start and run your appliances and equipment.
Calculating Your Power Needs
Microwave 750W 750 1200
Coffee Maker 1750 1750
Electric Clothes Drier 5750 5750
Washing Machine 1150 2300
Refrigerator 700 2200
Lights 100 100
Colour Television 350 350
Electric Frypan 1500 1500
Dehumidier 400 400
Computer - Desktop 700 700
VCR 50 50
Dishwasher - Cool Dry 700 1400
- Hot Dry 1450 2000
Toaster - 2 Slice 1250 1250
- 4 Slice 1600 1600
Freezer 2200 2500
Hair Dryer 800-1700 800-1700
Steam Iron 1800 1800
Garage Door Opener - 1/4 HP 550 1100
- 1/3 HP 725 1400
Radio 200 200
Blender 375 500
Sump Pump 1/2 HP 1050 2150
Well Pump 1/2 HP 1000 2100
Household Water Pump 1200 2700
Central Air Conditioner:
10,000 BTU 1500 2200
24,000 BTU 3800 5000
32,000 BTU 5000 6500
Room Air Conditioner
10,000 BTU 1500 2200
Circular Saw 7 1/4” 1400 2300
Chainsaw 2HP 1100 2500
Portable Air Compressor 1200 3600
Hand Drill 1/2” 600 900
Drill 1/2” 600 900
Battery Charger - 15 amp 500 700
Electric Welder - 200 amp AC 9000 9000
Jigsaw 300 400
Electric Weed Trimmer 500 650
Router 1000 1300
Belt Sander 1000 1300
Table Saw 10” 1750 4250
Bench Grinder 1400 2450
Concrete Mixer 3.5c/f 1900 2500
Band Saw 1100 1350
Power Drill - Medium 1000 1200
- Heavy Duty 1500 1800
Angle Grinder - 100mm 1000 1200
- 230mm 2400 2700
Appliances Approx
Run (W)
Approx
Start (W) Appliances Approx
Run (W)
Approx
Start (W)
NOTICE: Synchronous generators
such as this model may not be
suitable to power sensitive electronic
equipment such as computers and
other equipment with digital control
circuitry. Operation of such equipment
with this model generator may cause
issues and/or permanent damage
to the equipment. For powering
sensitive electronic equipment, we
recommend to use a GT Power
inverter generator. Please contact
your GT Power dealer for further
details.

11
GT5600ES
Operating
the Generator
Starting the Engine
WARNING: Never start or stop
engine with electrical devices
plugged into the receptacles and
devices turned on.
Unplug all electrical loads from the unit’s
receptacles before starting the engine.
Make sure the unit is in a level position.
Turn the engine switch to “ON” position.
Turn fuel switch to “ON” position.
Move engine choke lever to the “CHOKE”
position.
For electric start, turn and hold key in start
switch to “START” position until generator
starts.To prolong the life of starter components,
DO NOT hold key in “start” position for more
than 15 seconds, and pause for at least 1
minute between starting attempts.

GT5600ES
12
• When engine starts, move choke lever
to 1/2 “CHOKE” position till engine runs
smoothly and then fully into “RUN”
position. If engine falters, choke back to
1/2 “CHOKE” position till engine running
smoothly and then fully into “RUN”
position again. If battery is unavailable,
use manual starting instructions.
• If engine is choking and running move
choke lever to the “CHOKE” position and
repeat starting instructions.
WARNING: Starter cord kickback
(rapid retraction) will pull hand and arm
toward engine faster than you can let
go which could cause broken bones,
fractures, bruises, or sprains resulting
in serious injury. When starting engine,
pull cord slowly until resistance is felt
and then pull rapidly to avoid kickback.
Never start or stop engine with
electrical devices plugged in and
turned on.
• If engine fails to start after 3 pulls, or if
unit shut down during operation, make
sure unit is on a level surface and check
for proper oil level in crankcase. This
unit is equipped with a low oil protection
device. Oil must be checked and at
proper level for engine to start and run.
• Contact the original equipment
manufacturer, retailer, or dealer to obtain
a spark arrester designed for the exhaust
system installed on this engine.
• Replacement parts must be the same
and installed in the same position as the
original parts
IMPORTANT: Do not overload the
generator. Also,do not overload
individual panel receptacles. These
outlets are protected against overload
with push-to-reset-type circuit breakers.
If amperage rating of any circuit
breaker is exceeded, that breaker
opens and electrical output to that
receptacle is lost.
Connecting Electrical Loads
• Let engine run till stable and warm up for
a few minutes after starting.
• Plug in and turn on the electrical loads.
• Add up the rated watts (or amps) of all
loads to be connected at one time. This
total should not be greater than (a) the
rated wattage/amperage capacity of the
generator or (b) circuit breaker rating of
the receptacle supplying the power.
For recoil start, rmly grasp the recoil handle
and pull slowly until increased resistance is
felt. Pull rapidly up and away.
WARNING: Exhaust heat/ gases could
ignite combustible, structures or damage
fuel tank causing a re, resulting in death,
serious injury and/or property damage.
Contact with mufer area could cause
burn resulting in serious injury. DO NOT
touch hot part and AVOID hot exhaust
gases.Allow equipment to cool before
touching.
• Keep at least 5 feet (152 cm) of clearance
on all sides of generator including
overhead.

13
GT5600ES
NOTICE: Start generator and let
engine stabilise before connecting
electrical loads. Connect electrical
loads in OFF position then turn ON
for operation.Turn electrical loads
OFF and disconnect from generator
before stopping generator.
NOTICE: Exceeding generators
wattage/amperage capacity could
damage generator and/or electrical
devices connected to it. DO NOT
exceed the generator’s wattage/
amperage capacity.
Overloading a generator in excess of its
rated wattage capacity can result in damage
to the generator and to connected electrical
devices.
Observe the following to prevent overloading
the unit:
• Add up the total wattage of all electrical
devices to be connected at one time.
This total should NOT be greater than
the generator’s wattage capacity.
NOTICE: The rated wattage of lights
can be taken from light bulbs. The
rated wattage of tools, appliances and
motors can usually be found on a data
label or decal afxed to the devices.
If the appliance, tool or motor does
not give wattage, multiply volts times
ampere rating to determine watts
(volts× amps = watts). Some electric
motors, such as induction types,
require about three times more watts
of power for starting than for running.
This surge of power lasts only a few
seconds when starting such motors.
Make sure to allow for high starting
wattage when selecting electrical
devices to connect to the generator:
• Figure the watts needed to start the
largest motor.
• Add to that gure the running watts of
all other connected loads. The wattage
reference guide is provided to assist
in determining how many items the
generator can operate at one time.
Stopping The Engine
• Shut off all loads then unplug the
electrical loads from generator panel
receptacles. Never start or stop the
engine with electrical devices plugged in
and turned on.
• Let engine run at no-load for several
minutes to stabilise the internal
temperatures of engine and generator.
• Move ON/OFF switch to OFF position.
• Close fuel valve.
Low Oil Level Shutdown System
The engine is equipped with a low oil level
sensor that shuts down the engine auto-
matically when the oil level drops below a
specied level.
• If the engine shuts down by itself and
the fuel tank has enough gasoline,
check engine oil level.
High Altitude
At altitudes over 1500 metres, a minimum
91 octane gasoline is acceptable. To remain
emissions compliant, high altitude adjust-
ment is required. Operation without this
adjustment will cause decreased perfor-
mance, increased fuel consumption, and
increased emissions. See an authorised
dealer for high altitude adjustment informa-
tion. Operation of the engine at altitudes
below 750 metres with the high altitude kit is
not recommended.

GT5600ES
14
Maintenance
Maintenance Schedule
Follow the calendar intervals shown below.
More frequent service is required when
operating in adverse conditions.
First hrs:
Change engine oil
Every 8hrs or daily:
Clean debris
Check engine oil level
Every 25hrs or weekly:
Clean engine air lter
Every 50hrs or 6 monthly:
Change engine oil
Yearly:
Replace engine oil lter
Service fuel valve
Service spark plug
Check mufer and spark arrester
Clean cooling system
NOTE: Once a year replace the spark
plug and replace the air lter. A new
spark plug and clean air lter assure
proper fuel-air mixture and help the
engine run better and last longer.
General Recommendations
The warranty of the generator does not
cover items that have been subjected to
operator abuse or negligence. To receive full
value from the warranty, the operator must
maintain the generator as instructed in this
manual.
Some adjustments will need to be made
periodically to properly maintain the
generator.
All adjustments in the Maintenance section
of this manual should be made at least once
each season. Follow the requirements in the
“Maintenance Schedule”.
Generator Maintenance
Generator maintenance consists of keeping
the unit clean and dry. Operate and store
the unit in a clean dry environment where it
will not be exposed to excessive dust, dirt,
moisture or any corrosive vapors. Cooling
air slots in the generator must not become
clogged with snow.
• Change engine oil leaves, or any other
foreign material.
• Check the cleanliness of the generator
frequently and clean when dust, dirt, oil,
moisture or other foreign substances are
visible on its exterior surface.
CAUTION: Never insert any object or
tool through the air cooling slots, even
if the engine is not running.
NOTE: DO NOT use a garden hose
to clean generator. Water can enter
the engine fuel system and cause
problems. In addition, if water enters
the generator though cooling air slots,
some water will be retained in voids
and crevices of the rotor and stator
winding insulation. Water and dirt build-
up on the generator internal windings
will eventually decrease the insulation
resistance of these windings.

15
GT5600ES
To Clean the Generator
• Use a damp cloth to wipe exterior
surfaces.
• A soft, bristle brush may be used to
remove dirt, oil etc.
• A vacuum cleaner may be used to pick up
loose dirt and debris.
• Low pressure air (not to exceed 25 psi)
may be used to blow away dirt. Check
cooling air slots and openings on the
generator. These openings must be kept
clean and unobstructed.
Engine Maintenance
DANGER: When working on the
generator, always disconnect spark
plug wire from spark plug and keep
wire away from spark plug.
Changing the Oil
Change the oil after the rst ve hours of
operation, then every 50 hours thereafter. If
running this unit under dirty or dusty
conditions, or in extremely hot weather,
change the oil more often.
CAUTION: Hot oil may cause burns.
Allow engine to cool before draining
oil. Avoid prolonged or repeated skin
exposure to used oil. Thoroughly wash
exposed areas with soap.
Follow the instructions below to change the
oil while the engine is cooling down:
• Clean area around oil drain plug.
• Remove oil drain plug from engine to drain
oil completely into a suitable container.
• When oil has completely drained, install oil
drain plug and fasten securely.
• Fill engine with recommended oil. (See
“Before Starting the Generator” for oil
recommendations).
• Wipe up any spilled oil.
• Dispose used oil at a proper collection
centre.
Replacing the Spark Plug
• Use spark plug F6TC, BPR6ES or
Champion RN14YC. Replace the plug
once each year. This will help the engine
start easier and run better.
• Stop the engine and pull off the spark plug
wire.
• Clean the area around the spark plug and
remove it from the cylinder head.
• Set the spark plug’s gap to 0.70-0.80 mm.
Install the correctly gapped spark plug into
the cylinder head and torque to 15ft/lbs.
Oil filler cap (oil gauge)
Lower level
Upper level

GT5600ES
16
Spark Arrestor
• Shut off generator and allow the engine
and mufer to cool down completely
before servicing spark arrestor (located on
the back of the mufer).
• Remove the clamp and spark arrestor
screen.
• Clean the spark arrestor screen with a
small wire brush.
• Replace the spark arrestor if it is
damaged.
• Install the Spark arrestor reversely.
Service Air Filter
The engine will not run properly and may be
damaged if using a dirty air lter. Replace
the air lter once a year. Clean or replace
more often if operating under dusty condi-
tions.
• Remove air lter cover.
• Wash in soapy water. Squeeze lter dry in
a clean cloth (DO NOT TWIST).
• Clean air lter cover before re-installing it.
Valve Clearance
After the rst 50 hours of operation, check
the valve clearance in the engine and adjust
if necessary.
IMPORTANT: If feeling uncomfortable
about doing this procedure or the proper
tools are not available, please take the
generator to the nearest service centre to
have the valve clearance adjusted. This
is a very important step to ensure long
life for the engine.
General
The generator should be started at least
once every seven days and be allowed to
run at least 30 minutes. If this cannot be
done and the unit must be stored for more
than 30 days, use the following information
as a guide to prepare it for storage.
DANGER: NEVER store engine with
fuel in tank indoors or in enclosed,
poorly ventilated areas where fumes
may reach an open ame, spark or
pilot light as on a furnace, water heater,
clothes dryer or other gas appliance.
CAUTION: Avoid spray from spark
plug holes when cranking engine.
DANGER: Drain fuel into approved
container outdoors, away from open
ame. Be sure engine is cool. Do not
smoke.
Other Storage Tips
• Do not store gasoline from one season to
another.
• Replace the gasoline can if it starts to rust.
Rust and/or dirt in the gasoline will cause
problems with the carburetor and fuel
system.

17
GT5600ES
• If possible, store the unit indoors and
cover it to give protection from dust and
dirt. BE SURE TO EMPTY THE FUEL
TANK.
• If it is not practical to empty the fuel tank
and the unit is to be stored for some time,
use a commercially available fuel stabiliser
added to the gasoline to increase the life
of the gasoline.
• Cover the unit with a suitable protective
cover that does not retain moisture.
DANGER: NEVER cover the generator
while engine and exhaust area are
warm.
Storage
It is important to avoid gum deposits from
forming in essential fuel system parts such
as the carburetor, fuel hose or tank during
storage. Also, experience indicates that
alcohol-blended fuels (called gasohol,
ethanol or methanol) can attract moisture,
which leads to separation and formation of
acids storage. Acidic gas can damage the
fuel system of an engine while in storage.
To avoid engine problems, the fuel system
should be emptied before storage of 30 days
or longer, as follows:
• Remove all gasoline from the fuel tank.
• Start and run engine until engine stops
from lack of fuel.
• While engine is still warm, drain oil from
crankcase. Rell with recommended
grade.
• Remove spark plugs and pour about 15ml
of engine oil in the cylinders. Cover spark
plug hole with rag. Pull the recoil starter a
couple times to lubricate the piston rings
and cylinder bore.
• Install and tighten spark plugs. Do not
connect spark plug wires.
• Clean the generator outer surfaces. Check
that cooling air slots and openings on
generator are open and unobstructed.
• Store the unit in clean, dry place.

GT5600ES
18
Troubleshooting

19
GT5600ES
Warranty
Whilst every effort is made to ensure your complete
satisfaction with this tool, occasionally, due to the mass
manufacturing techniques, a tool may not live up to our
required level of performance and you may need the
assistance of our service department.
This product is warranted for a 12 month period from the
date of the original purchase. If found to be defective in
materials or workmanship, the tool or the offending faulty
component will be replaced free of charge with another of
the same item. A small freight charge may apply. Proof of
purchase is essential.
We reserve the right to reject any claim where the
purchase cannot be veried.This warranty does not
include damage or defects to the tool caused by or
resulting from abuse, accidents or alterations. It also
does not cover any bonus items or included accessories.
Only the generator is covered under this warranty.
Please ensure that you store your receipt in a safe place.
Conditions apply to the above warranty.
1. DURATION: The manufacturer warrants that it will
repair or replace, at no charge for parts or labour, the
GT POWER Generator, if proven defective in material
or workmanship, during the following time period(s)
after date of original retail purchase:
For 1 Year:
The GT POWER GT5600ES Generator
(excluding accessories)
2. WHO GIVES THIS WARRANTY (Warrantor):
EUROQUIP NZ EUROQUIP
NEW ZEALAND AUSTRALIA
Service Line: Service Line:
+ + 64 3 547 8409 1 - 800 040 947
3. WHO RECEIVES THIS WARRANTY (Purchaser):
The original purchaser of this GT POWER Generator
4. WHAT IS COVERED UNDER THIS WARRANTY:
Defects in material and workmanship which occur
within the duration of the warranty period.
5. WHAT IS NOT COVERED UNDER THIS WARRANTY:
A. Implied warranties, including those of
merchantability and FITNESS for a particular
purpose are limited in duration to this express
warranty. After this period, all risks of loss, from
whatever reason, shall be on the purchaser.
B. ANY INCIDENTAL, INDIRECT, OR
CONSEQUENTIAL LOSS, DAMAGE, OR
EXPENSE THAT MAY RESULT FROM ANY
DEFECT, FAILURE OR MALFUNCTION OF THIS
PRODUCT.
C. This warranty does not apply to any accessory
or consumable items included with the product
which are subject to wear from usage; the repair
or replacement of these items shall be at the
expense of the owner. These items include, but
are not limited to: sparkplugs, seals, o-rings, recoil
starter parts, etc. In addition, this warranty does
not extend to any damage caused by the untimely
replacement or maintenance of any of the previ-
ously listed CONSUMABLE parts.
D. Any failure that results from accident, purchaser’s
abuse, neglect or failure to operate products in ac-
cordance with instructions provided in the owner’s
manual(s) supplied with the product.
E. Pre-delivery service, i.e. assembly and adjustment.
6. RESPONSIBILITIES OF WARRANTOR UNDER THIS
WARRANTY: Repair or replace, at Warrantor’s option,
products or components which have failed within
duration of the warranty period.
7. RESPONSIBILITIES OF PURCHASER UNDER THIS
WARRANTY:
A. Please call your re-seller or the number listed
above for warranty assistance.
B. Provide dated proof of purchase and maintenance
records.
C. All generators must be delivered or shipped to the
nearest Service Agent or re-seller. Freight costs, if
any, must be borne by the purchaser.
D. Use reasonable care in the operation and mainte-
nance of the products as described in the owner’s
manual(s).
E. No warranty costs incurred will be considered for,
or covered if Euroquip has not been contacted
and prior permission for repair / replacement has
been granted.
8. WHEN WARRANTOR WILL PERFORM REPAIR OR
REPLACEMENT UNDER THIS WARRANTY:
Repair or replacement will be scheduled and serviced
according to the normal work ow at the servicing
location and depending on the availability of replacement
parts.

Congratulations on your new GT POWER product. We are proud to have you as our customer and
will strive to provide you with the best service and reliability in the industry. This product is backed by
our extensive warranty and world-wide service network. To locate your nearest distributor or service
Table of contents
Other GT POWER Portable Generator manuals
Popular Portable Generator manuals by other brands

Westinghouse
Westinghouse WGen5300DFcv user manual

Magnum
Magnum MMG 150 operating manual

Marathon
Marathon MagnaPLUS Series Troubleshooting

YOKOGAWA
YOKOGAWA PG400 user manual

Generac Power Systems
Generac Power Systems Automatic Standby Generator owner's manual

Champion Power Equipment
Champion Power Equipment CSA40037 Owner's Manual and Operating Instructions