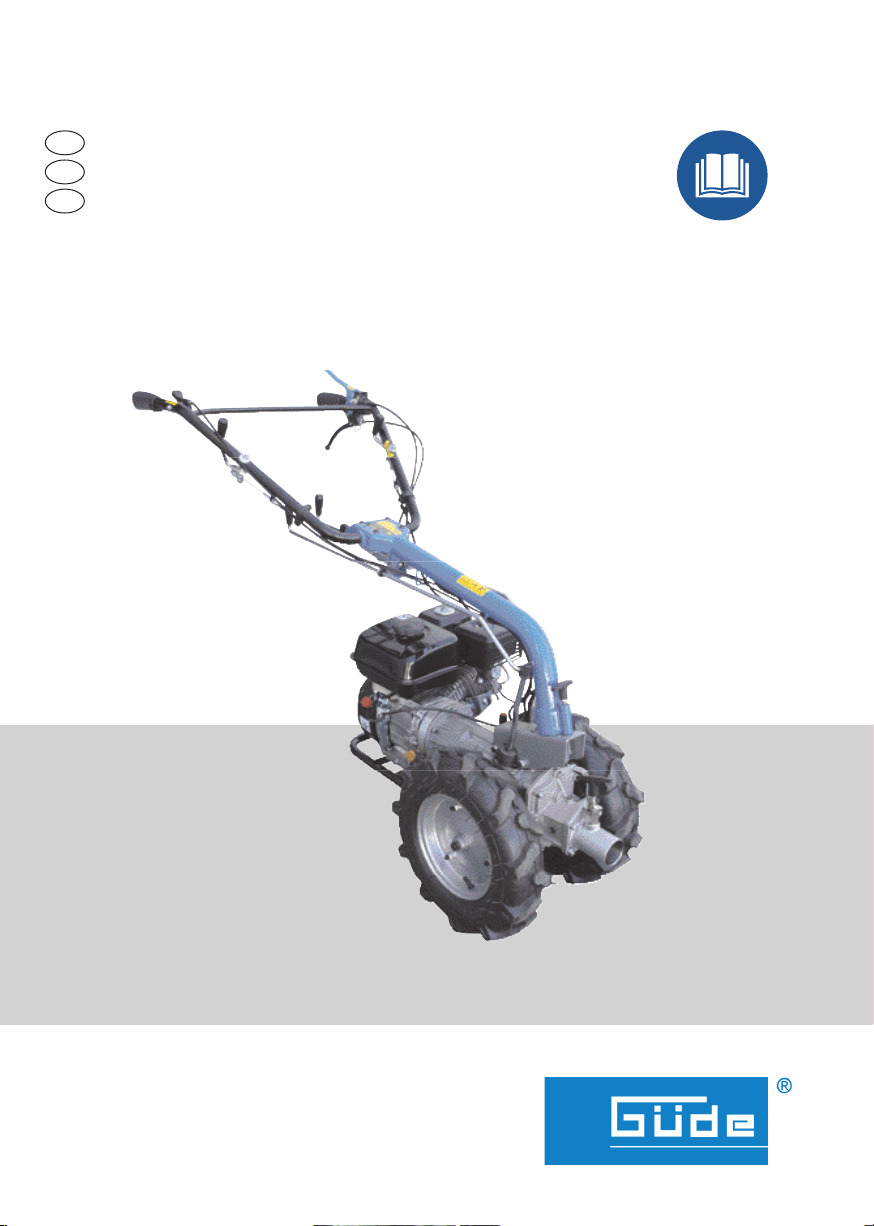
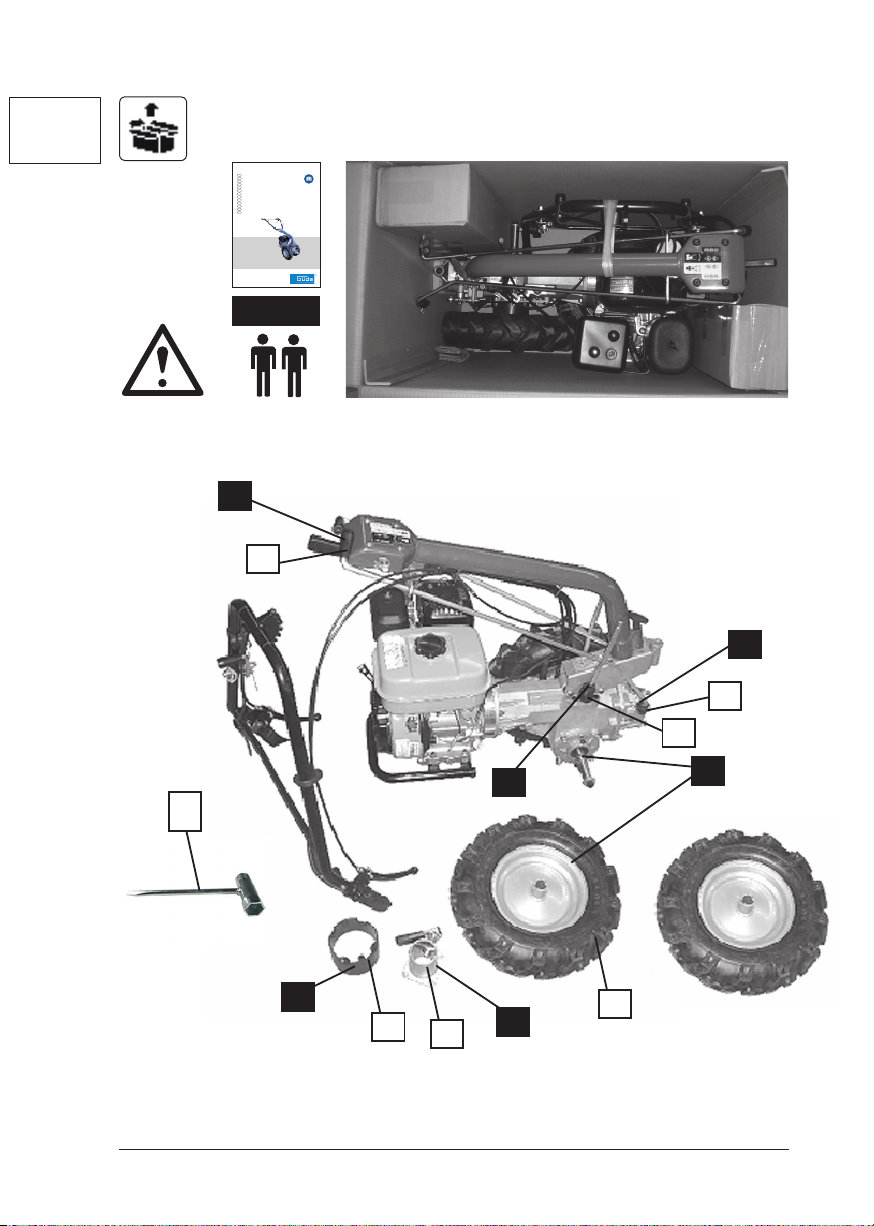
Gude 95187 User manual

GME 6.5V
95187
----------------- DOriginalbetriebsanleitung
----------------- GB Translation of the original instructions
----------------- SK Preklad originálneho návodu na prevádzku

DEUTSCH Bitte lesen Sie die Gebrauchsanweisung vor Inbetriebnahme sorgfältig durch.
ENGLISH Please read the instructions carefully before starting the machine.
SLOVENSKY Pred prvým použitím prístroja si pozorne prečítajte návod na obsluhu.

Deutsch TECHNISCHE DATEN | BESTIMMUNGSGEMÄSSE VERWENDUNG | GERÄTEBESCHREIBUNG|
RESTRISIKEN |SICHERHEITSHINWEISE | ANFORDERUNGEN AN DEN BEDIENER |
VERHALTEN IM NOTFALL | WARTUNG | SYMBOLE | GEWÄHRLEISTUNG | SERVICE
INSPEKTION UND WARTUNGSPLAN | FEHLERBEHEBUNG ______________________________24
English TECHNICAL DATA | SPECIFIED CONDITIONS OF USE | DELIVERED ITEMS | RESIDUAL RISKS |
SAFETY INSTRUCTIONS | REQUIREMENTS FOR OPERATING STAFF| EMERGENCY PROCEDURE |
MAINTENANCE SYMBOLS| GUARANTEE | SERVICE | INSPECTION AND MAINTENANCE PLAN |
FAILURE REMOVAL _____________________________________________________________31
Slovensky Technické údaje | POUŽÍVANIE PODĽA URČENIA | POPIS ZARIADENIA |
ZVYŠKOVÉ RIZIKÁ | BEZPEČNOSTNÉ POKYNY | POŽIADAVKY NA PERSONÁL OBSLUHY |
SPRÁVANIE V PRÍPADE NUDZE | ÚDRŽBA | SYMBOLY | ZÁRUKA |SERVIS
PLÁN PREHLIADOK A ÚDRŽBY | ODSTRAŇOVANIE PORÚCH ________________________________38
EG-Konformitätserklärung | EC-Declaration of Conformity | Vyhlásenie o zhode EÚ _______________________________ 45
INBETRIEBNAHME STARTINGUP THE MACHINE UVEDENIE DO PREVÁDZKY ___________________3

4
LIEFERUMFANG | DELIVERED ITEMS | ROZSAH DODÁVKY
GME6,5 PS
95180
-
---------
DOriginalbetriebsanleitung
-
---------
GB Translation of the original instructions
-
---------
FTraduction du mode d’emploid’origine
-
---------
ITraduzione del Manuale d’Uso originale
-
---------
NL Vertaling van de originele gebruiksaanwijzing
-
---------
CZ Překladoriginálního návodu k provozu
-
---------
SK Prekladoriginálneho návodu na prevádzku
-
---------
HU
Azeredetihasználati utasítás fordítása
-
---------
SLOPrevodoriginalnih navodil za uporabo
-
---------
HR Prijevodoriginalnog naputk a za uporabu.
-
---------
BG
-
---------
RO Traducerea modului original de utilizare
-
---------
BIHPrijevodoriginalnih uptstava za upotrebu.
C
A
A
ab
c
d
B
B
e
f
g
D
> 20 kg

1
1
DE Montage
GB Assembly
SK Montáž
3-5
3
DE Betrieb
GB Operation
SK Prevádzka
12-17
2
DE Inbetriebnahme
GB Starting-up the machine
SK Uvedenie do prevádzky
6-11
DE Reinigung / Wartung
GB Cleaning / Maintenance
SK Čistenie/Údržba
18-23
4
2
DE Gerätebeschreibung
GB Delivered items
SK Popis zariadenia

2
GERÄTEBESCHREIBUNG | DELIVERED ITEMS | POPIS ZARIADENIA
1
2
3
5
6
7
8
20
19 14
15
16
17
4
18
21
921
10 11
12
13

3
1
DE Radmontage
GB Wheel assembly
SK Montáž kolesa
1 2
34
A
5
1x 1x
2 x
DE
Lösen Sie die beiden Schrauben aus dem Getriebe. Schieben Sie den Schutz (a) auf die Radachse und xieren
diesen wieder mit den beiden Schrauben. Wiederholen Sie diesen Vorgang auf der anderen Radseite.
GB
Remove the two screws from the gearbox. Slide the cover (a) to the axle and x it with the two screws. Repeat this
process on the other side of the wheel.
SK
Povoľte obe skrutky s prevodového ústrojenstva. Nasuňte ochranu (a) na nápravu a zase ju zaxujte oboma
skrutkami. Tento proces zopakujte na druhej strane kolesa.
DE
Lösen Sie die Schraube am Wellenende und entnehmen Sie die Einstellunterlegscheibe.
Montieren Sie die Räder auf der Achsenwelle und stellen sicher, dass der Achsenbolzen in die
Nut eingerastet ist. Fixieren Sie das Rad jetzt wieder mit der Einstellunterlegscheibe und der
Schraube. Wiederholen Sie den Vorgang auf der anderen Radseite.
GB
The more you nacLösen the screw shaft end and remove the adjusting washer. Mount the
wheels on the axle shaft, and ensure that the axle bolt is engaged in the groove. Fix the wheel
again with Einstellunterlegscheibe and the screw. Repeat the process on the other Radseite.h
position of the steering fork arises
the assignment of the transmission.
SK
Povoľte skrutku na konci hriadeľa a odstráňte nastavovaciu podložku. Namontujte kolesá
na hriadeľ nápravy a skontrolujte, či je čap nápravy zasunutý do drážky. Teraz zase zaxujte
koleso nastavovacou podložkou a skrutkou. Proces zopakujte na druhej strane kolesa.

4
1
DE Montage Sicherungsbolzen und
Handhebel
GB Assembly safety bolt and handle
SK Montáž zaisťovacieho kolíka a
ručnej páky
67
8 9
4x
B
DE
Lösen Sie die vier Muttern an der Sicherungsbolzenaufnahme (d). Bauen Sie die Kupplungshülse (c) ein und
ziehen die Muttern wieder an.
GB
Remove the four nuts on the bolts securing admission (d). Remove the coupling sleeve (c) and tighten the nuts
again.
SK
Povoľte štyri matice na upínanie zaisťovacieho kolíka (d). Namontujte objímku spojky (c), a zase dotiahnite
matice.
C
DE
Lösen Sie die beiden Muttern an der Halteplatte (e), drehen Sie die zwei Halteplatten um 180 ° .
GB
Loosen the two nuts on the plate (s), turn the two retaining plates 180 °.
SK
Povoľte obe matice na upínacej doske (e), otočte obe upínacie dosky o 180°.
e
18

5
1
DE Montage Handhebel und
Gangschalthebel
GB Assembly lever and gear lever
10 11
2x
12 13
DE
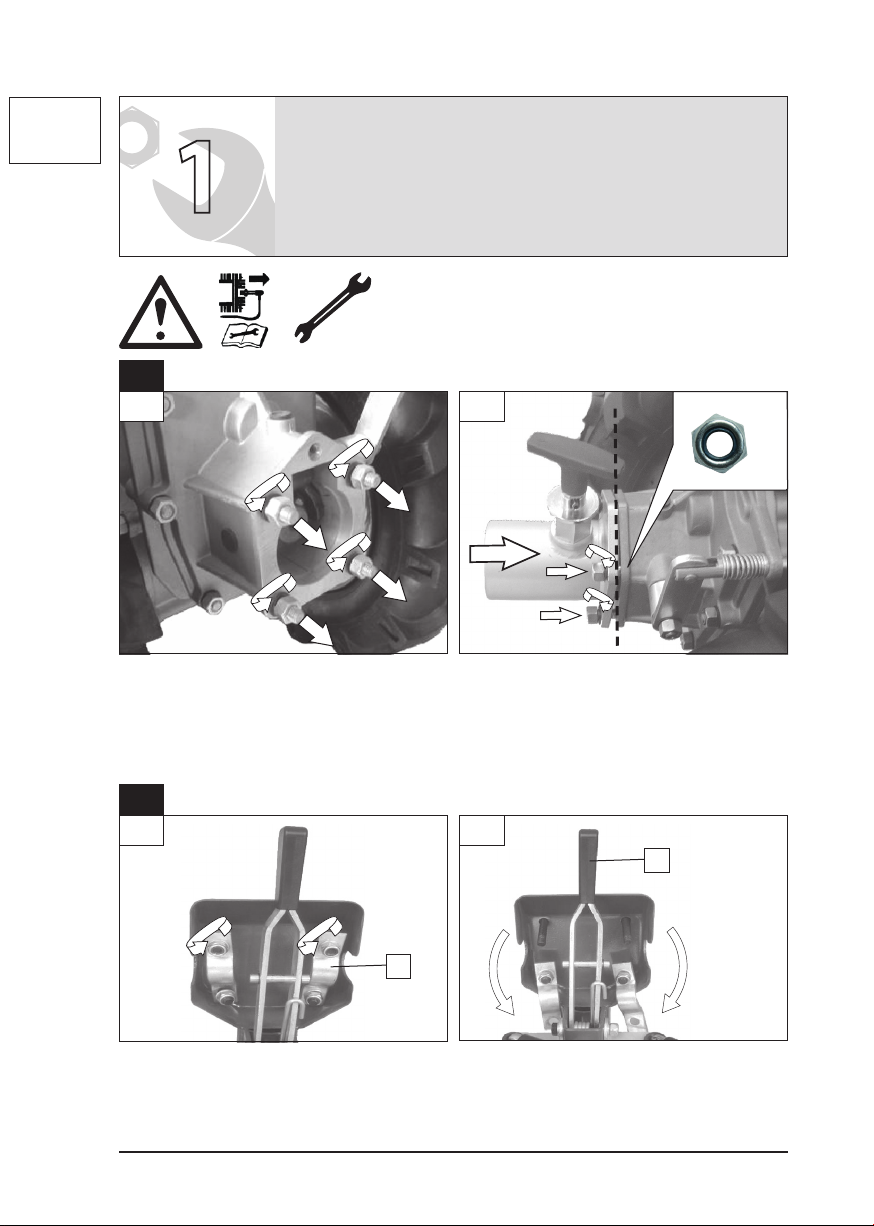
Drücken Sie den Handhebel (18) nach unten, jetzt können Sie die Lenkgabel einsetzen und mit dem Handhebel
(18) im mittleren Zahnkranz xieren. Drehen Sie die beiden Halteplatten (e) wieder um 180° nach oben und
xieren diese wieder mit den beiden Muttern.
Beim Anziehen der vier Muttern der Halteplatten beachten Sie folgendes:
- alle Muttern sollten die gleiche Einschraublänge haben.
GB
Press the hand lever (18) down, now you can use the steering fork and x it with the hand lever (18) in the middle
sprocket. Remove the two retaining plates (s) again to 180 ° upwards and x it with the two nuts.
When tightening the four nuts holding the plates, note the following:
- All nuts should be the same thread engagement.
SK
Stlačte ručnú páku (18) dole, teraz môžete nasadiť vidlicu prevodovky riadenia a ručnou pákou (18) ju zaxovať
v prostrednom čelne ozubenom kolese. Otočte obe upínacie dosky (e) zase o 180° nahor, a zaxujte ich oboma
maticami.
Pri doťahovaní štyroch matíc upínacích dosiek dbajte na nasledujúce:
- všetky matice by mali mať rovnakú dĺžku zaskrutkovania.
C
e
D
DE
Entfernen Sie die beiden Kunststokappen (f) vom Ganghebel. Setzen Sie das Gangschaltgestänge zusammen in
dem Sie die beiden Teile mit der Kunststokappe und den Splinten sichern.
GB
Remove the two plastic caps (f) of the gear lever. Put the gear shift linkage together where you secure the two
parts with the plastic cap and the cotter pins.
SK
Odstráňte z radiacej páky obe plastové viečka (f). Zmontujte radiace ústrojenstvo (tyče a páky radenia) tak, že
oba diely zaistíte plastovým viečkom a závlačkami.
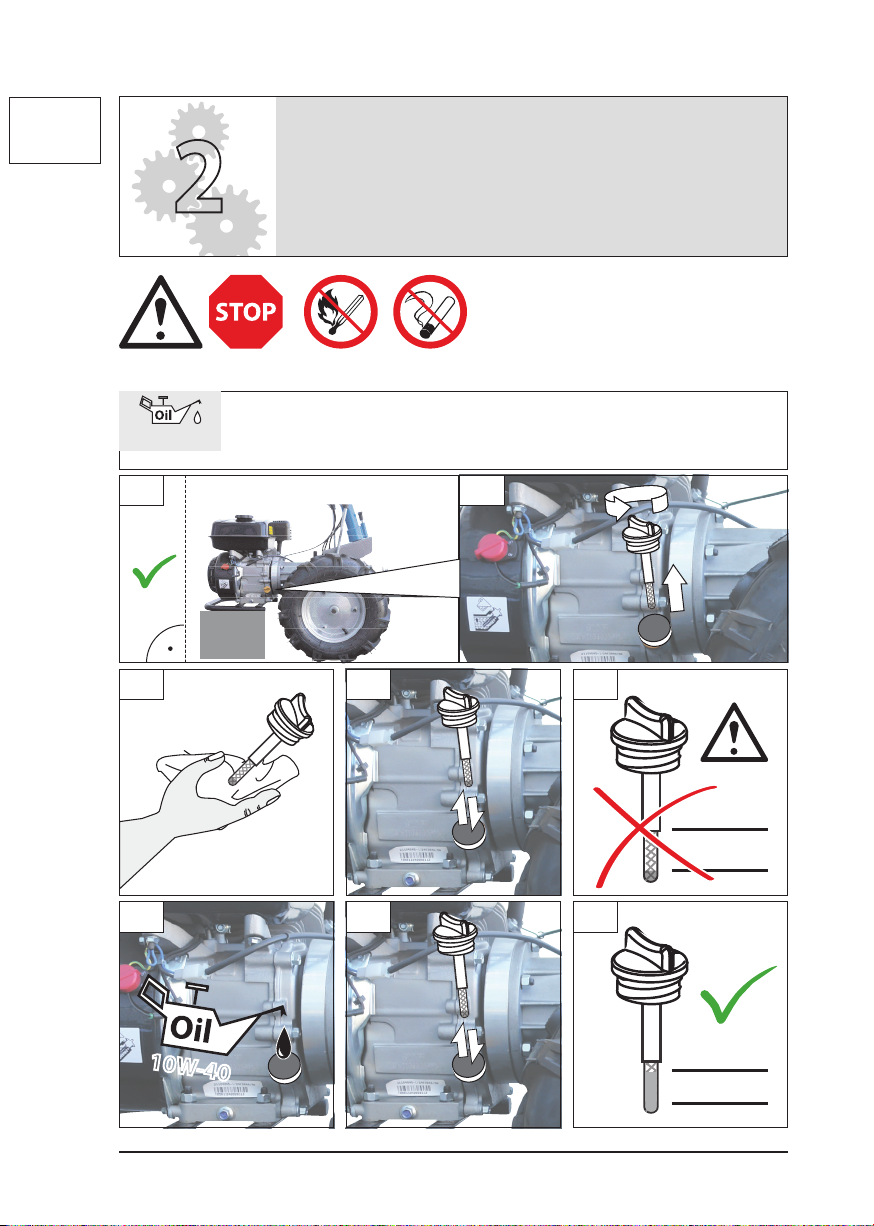
2
3
1
2
3
1
1
2
3
2
1
3
18

6
2
DE Ölstand kontrollieren - Motor
GB Oil level inspection - engine
SK Kontrola stavu oleja motora
10W-40
12
345
MAX
MIN
6
10W-40
7 8
MAX (0,6 ltr.)
MIN
DE Vor Erstinbetriebnahme muss
der Motor unbedingt mit
Motorenöl befüllt werden.
Überprüfen Sie vor jeder
Inbetriebnahme den Ölstand.
GB
Check the oil level whenever the appliance
is to be put into operation. Add engine oil if
necessary. Check the oil level whenever the
appliance is to be put into operation. Add
engine oil if necessary.
SK
Pred prvým uvedením do prevádzky sa musí
motor bezpodmienečne naplniť motorovým
olejom. Pred každým uvedením do prevádzky
skontrolujte stav oleja.
20 cm

7
2
DE Ölstand kontrollieren
Getriebe
GB Oil level inspection - gear
SK Kontrola stavu oleja prevodovky
123
45
6
MAX
MIN
MAX 1,1 ltr.
MIN
SAE 80W-90
SAE 80W-90
20 cm
DE Vor Erstinbetriebnahme muss das
Getriebe unbedingt mit Getriebeöl
befüllt werden. Überprüfen Sie
vor jeder Inbetriebnahme den
Ölstand.
Before commissioning the gearbox must be
absolutely lled with gear oil. Check the oil
level before each use.
EN Pred prvým uvedením do prevádzky
sa musí prevodovka bezpodmienečne
naplniť prevodovým olejom. Pred
každým uvedením do prevádzky
skontrolujte stav oleja.
SK

8
2
DE Ölstand kontrollieren
Kupplung
GB Oil level inspection - clutch
SK Kontrola stavu oleja spojky
4 5
8
SAE 80W
SAE 80W
2
7
6
1
3
MAX
0,3 ltr. MIN
20 cm
DE Vor Erstinbetriebnahme muss
die Kupplung unbedingt mit
Mehrzwecköl befüllt werden.
Überprüfen Sie vor jeder
Inbetriebnahme den Ölstand.
Before commissioning the coupling must
always be lled with multi-purpose oil.
Check the oil level before each use.
EN Pred prvým uvedením do prevádzky
sa musí spojka bezpodmienečne
naplniť viacúčelovým olejom. Pred
každým uvedením do prevádzky
skontrolujte stav oleja.
SK

9
1
MAX
SUPER / E10
max. 3,6 l
2
5
4
START
min. 3m
3
2
DE Tanken
GB Fuel tank lling
SK Tankovanie

10
2
DE Inbetriebnahme Einstellung der
Lenkstange
GB Commissioning the handlebar
adjustment
SK Uvedenie do prevádzky –
nastavenie vodiacej tyče riadenia
1DE
Stand der Lenkgabel
GB
State of the steering fork
SK
Stav vidlice prevodovky riadenia
I
II
I
DE
Gangwahlhebel bzw. Vorwärts-/Rückwärtsgangwahl
GB
Gear selector lever or forward/reverse gear selection
SK
Pákou alebo Stupeň rýchlosti pre jazdu dopredu
II
3
8
4
2
5
8
DE
Wählen Sie die richtige Stellung der Lenkgabel. Um die
Lenkgabel zu drehen muss das Lenkgestänge gelöst und
wieder xiert werden. Das jeweilige Anbaugerät (z. B.
Schneeschild, etc.) bestimmen die Position der Lenkgabel.
GB
Select the correct position of the steering fork. To rotate the
steering fork needs the steering rods are resolved and xed
again. The respective attachment (eg snow plow, etc.)
determine the position of the steering fork
SK
Zvoľte správnu polohu vidlice prevodovky riadenia.
Aby bolo možné otáčať vidlicou prevodovky riadenia, musí
sa povoliť mechanizmus riadenia (ťahadlo riadenia) a zase
zaxovať. Príslušné prídavné zariadenie (napr. snehová
radlica a pod.) určuje polohu riadiacej vidlice.
12
1
2
6
5

11
DE
Stand der Lenkgabel
GB
State of the steering fork
SK
Stav vidlice prevodovky riadenia
DE
Gangwahlhebel bzw. Vorwärts-/Rückwärtsgangwahl
GB
Gear selector lever or forward/reverse gear selection
SK
Pákou alebo Stupeň rýchlosti pre jazdu dopredu
2
DE Ankupplung von Anbaugeräte
GB Coupling of attachments
SK Pripojenie prídavných zariadení
1
20 cm
3
FETT/GREASE
2
DE Die Ausrichtung der Lenkstange entnehmen Sie bitte der jeweiligen Anleitung des Anbaugerätes.
Falls der Sicherungsbolzen nicht einrasten sollte, ziehen Sie 1x den Seilzugstarter.
GB For the alignment of the handlebars Please read the relevant instructions of the attachment.
If engage the locking pin does not work, pull the starter cord.
SK Vycentrovanie vodiacej tyče nájdete v príslušnom návode prídavného zariadenia.
Ak by zaisťovací kolík nezaskočil, zatiahnite 1× za lankový štartér.
DE
Wählen Sie die richtige Stellung der Lenkgabel. Um die
Lenkgabel zu drehen muss das Lenkgestänge gelöst und
wieder xiert werden. Das jeweilige Anbaugerät (z. B.
Schneeschild, etc.) bestimmen die Position der Lenkgabel.
GB
Select the correct position of the steering fork. To rotate the
steering fork needs the steering rods are resolved and xed
again. The respective attachment (eg snow plow, etc.)
determine the position of the steering fork
SK
Zvoľte správnu polohu vidlice prevodovky riadenia.
Aby bolo možné otáčať vidlicou prevodovky riadenia, musí
sa povoliť mechanizmus riadenia (ťahadlo riadenia) a zase
zaxovať. Príslušné prídavné zariadenie (napr. snehová
radlica a pod.) určuje polohu riadiacej vidlice.
4
5
1
2
3
2
1
OFF
TIPP
1x

12
2
b
c
d
3
DE Betrieb - START
GB Operation - START
SK Prevádzka – ŠTART
DE Choke muss nur geönet werden,
wenn der Motor kalt ist.
GB The choke may only be open
when the engine is cold.
SK Sýtič sa musí otvoriť len vtedy, keď je motor
studený.
1
START
68
ON
CHOKE
b
c
d
a
aON
b

13
START
5
3
DE Betrieb - START
GB Operation - START
SK Prevádzka – ŠTART
RUN
6
1
2
3
3 4
7
DE Legen Sie nun den 1. Gang ein. Beachten Sie
dabei die Stellung der Lenkgabel.
GB Now place the rst Transitional one. Note the
position of the steering fork.
Sk Teraz zaraďte 1. rýchlostný stupeň. Dbajte
pritom na polohu riadiacej vidlice.

14
3
DE Betrieb
GB Operation
SK Prevádzka
6
DE
Schalten Sie den Einrückhebel/Geräteantrieb (je Anbaugerät) (17) zu sowie den Fahrantrieb (20) auf “ON”.
GB Turn the shift lever / Gear Motors (per attachment) to (17) and the drive (20) to “ON”.
SK Zapnite radiacu páku/pohon zariadenia (podľa prídavného zariadenia) (17), a ďalej jazdný režim (20) na„ON“.
20
17
7START
-
+
8
b
a
max. 25°
ON

15
3
DE Betrieb
GB Operation
SK Prevádzka
9
10
a
b
DE
Stand der Lenkgabel
GB State of the steering fork
SK Stav riadiacej vidlice
I
11
DE
Je nach Position der Lenkgabel ergibt sich
die Belegung der Gangschaltung.
GB Results depending on the position of the
steering fork is the assignment of the
transmission.
SK Podľa polohy riadiacej vidlice vyplýva
obsadenie radenia rýchlostných stupňov.
12
c
DE
Gangwahlhebel
bzw. Vorwärts-/
Rückwärtsgang-
wahl
GB Gear selector
lever and
forward/Reverse
selection
SK Radiaca páka,
resp. voľba stupňa
rýchlosti pre jazdu
dopredu/dozadu.
II

16
3
DE Betrieb - Halten
GB Operation - STOP
SK Zastavenie prevádzky
1
2
2STOPP
3START
-
+
4
b
a
1
STOP
This manual suits for next models
1
Table of contents
Other Gude Tiller manuals