Gudsen Moza Slypod User manual

User Manual
用户手册
Slypod Remote Controller

1
MOZA Slypod Remote Controller
Remote Controller
Mark Ring
Multi-CAN Port
Antenna
Wheel
OLED Display Screen
Power ButtonUp Button
Down Button
Mark / Follow Button
DEL / Shutter Button
Dial
USB Port
Knob Screw
Rod Clip

2
Installation
a.Loosen the knob screw on the rod clip.
b. Revolve the support rod into the clip.
c. Tighten the knob screw.
Connect the remote controller to the charger via a USB-C cable, then the
charging and battery level icon will be displayed on the screen. After the battery
is fully charged, the icon will disappear.
Turn On: Press the power button for 3 seconds until the MOZA icon appears on the
screen. Turn Off: Press the power button for 3 seconds in power-on state.
Note: the diameter range of the support rod clamped by the rod clip should
be 15mm to 32mm.
Power On/Off
Charging
Buttons Operations
Getting Started
Interface
Operations
Up Button
Down Button
Mark / Follow
Button
DEL / Shutter
Button
Power
Button
Main
interface
1× click Down mode Follow mode Take photo
————BTM mode ——
UP mode
TOP mode
Move up
Enter menu
2× click
Press for 3s
Move down Mark A,B point
Delete A,B point
Power off
Menu 1× click
Option-up Option-down Return Enter the
next menu Confirm
Note:The right button(DEL/Shutter button) is used to control the camera
which can be connected to the Slypod with a camera control cable to take
photos. (Control cable needs an additional purchase)

3
UP/DOWN Mode
Long press the up button to enter the UP mode, the Slypod extends; loosen the
button, the Slypod stops extending. Turn the dial to adjust the extending speed.
Long press the down button to enter the DOWN mode, the Slypod retracts; loosen
the button, the Slypod stops retracting. Turn the dial to adjust the retracting
speed.
Pairing
a. Turn off the Slypod
b. Turn on the remote controller, enter the menu interface, and select
Wireless>Pair>Pairing
c. Turn on the Slypod and wait for 2 seconds until the controller screen displays
“Pair OK!”
Connecting to the Slypod
Status Display
Note: After the pairing is completed, please start the route calibration of
the remote controller before controlling the Slypod.
Note: To switch from other modes to UP/DOWN mode, please click the
up/down button in the menu interface.
Route Calibration Status
Wireless Connection Status
Remote Controller Battery Level
Moving Position
SlypodBattery Level
Route Bar
Moving Speed
Modes Display
Modes Operations

4
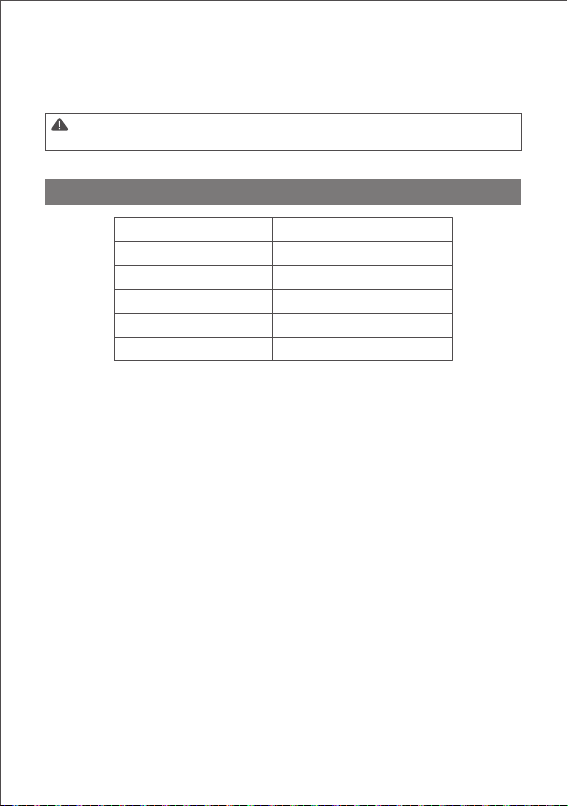
Motor>: AUTO Mode Settings
Dir: set the moving direction of the Slypod controlled by the remote controller,
click the power button to change direction.
Range: set the moving length of the Slypod controlled by the remote controller,
turn the dial to adjust the length value. (Total length is 280mm)
Time: set the moving time of the Slypod controlled by the remote controller, turn
the dial to adjust the moving time.
Run: click the power button to start or stop moving.
Set A-B Endpoints
a. Control the Slypod to move to the endpoint A with the remote controller;
b. Press the MARK button (left button) until “A” appears on the route bar, then
turn the remote controller to move the Slypod to the endpoint B;
c. Release the MARK button (left button) to complete the A-B endpoints setting.
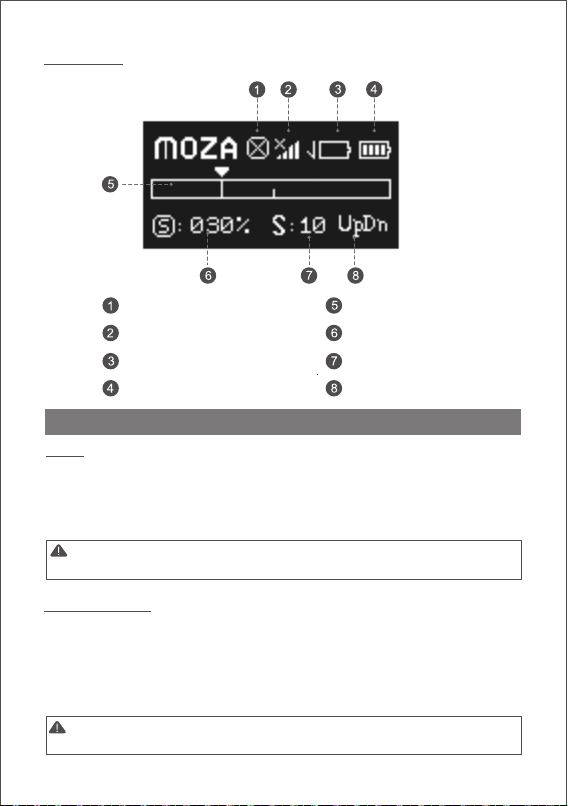
AUTO Mode
Click the power button to enter the menu, select Motor>, the moving direction
and speed of the Slypod controlled by the remote controller is able to be set.
Cancel the A-B Endpoints
With the white A-B endpoints bar displayed on the screen, long press the DEL
button (right button) to cancel the A-B endpoints.
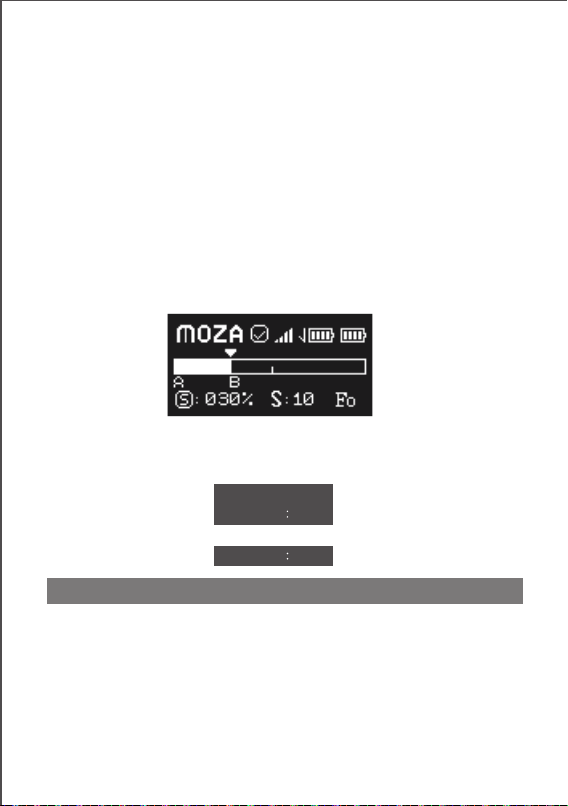
FOLLOW Mode
Click the left button (Mark/Follow Button) to enter the FOLLOW Mode, set A-B
endpoints as shown in the picture, the Slypod will move within the set range.
TOP/BTM Mode
Double click the up button to enter the TOP Mode, the Slypod extends
continuously, turn the dial to adjust the extending speed.
Menu Introduction
Dir : UP
Range 25
Time 1s
Run Run
Time [ 1s]

5
Function>Wheel Calibrate>
The remote controller controls the Slypod movement through the wheel. Under
normal circumstance, the value is the smallest when turning the wheel
anticlockwise to the endpoint, and the value gets the largest when turning the
wheel clockwise. If the wheel is abnormal, calibration is required.
Click the right button to start calibration.
a. Turn the wheel to the starting position, and click the right button of the dial to
confirm.
b. Turn the wheel to the end position, and click the right button of the dial to
confirm;
c. Click the left button to stop the calibration, or click the power button to return
to the main interface.
Brightness>:
After Brightness is selected, turn the dial to adjust its value from 0 to 100. The
higher the value, the higher the brightness of the screen.
About >:
Display the firmware version information of the remote controller.
The remote control can be upgraded independently. Operation steps:
a. Turn off the remote controller;
b. Connect the remote controller to computer with Type-C cable.
c. Long press the up button and don’t release, click the power button. “Boot
Mode” will pop up on the screen, the controller enters the upgrade mode.
d. Launch the MOZA Master software. After the firmware download is complete
(which will take about 30s), click “upgrade” to start.
Firmware Upgrade
Wheel Calibrate >
Brightness :050
1
.Turn to the st
a
rting position;
C
lick [>] to con
f
irm.
2
.Turn to the en
d
position;Click
[
>] to confirm.

6
Note: Please download the MOZA Master (1.2.0 version or above) software
from Gudsen MOZA official website to upgrade.
SPECS
Weight (battery excluded)
Dimension 38*92*48mm
165g
Working Voltage 3.7V
Battery Capacity 750mAh
Upgrade / Charging Port USB-C
Working Temperature 0-50℃
e. “Upgrading” and “Upgrade success” will be displayed in sequence on the
screen.
f. Restart the remote controller.

7
认识MOZA Slypod 遥控器
遥控器
标记环
Multi-CAN接口
天线
手轮
OLED显示屏
开关键UP键
DOWN键
MAKE键/FOLLOW键
DEL键/拍照键
拔盘
USB-C接口
管夹锁紧螺丝
管夹

8
安装
a. 将管夹锁紧螺丝拧松;
b. 将管夹套入安装遥控器的圆管上;
c. 拧紧管夹锁紧螺丝。
使用USB-C线将遥控器连接到充电器,遥控器的显示屏会显示充电图标和电量,电池充满
后,充电图标消失。
长按电源键3秒,屏幕上显示MOZA图标则开机成功。开机状态下,长按电源键3秒即关机
注意: 遥控器的管夹能夹持在直径为15mm到32mm的圆管上。
开机、关机
充电
按键功能定义
入门
界面 操作 上( ) UP
下( )
DOWN 左(FOLLOW) 右 ( )DEL 电源
主界面
单击 UpDn模式 FOLLOW模式 拍照
————BTM模式 ——
UpDn模式
TOP模式
向上运动
进入菜单
双击
长按3s 向下运动 标记A,B点 删除A,B点 关机
菜单 单击 选择条上移 选择条下移 返回 进入下一级 确认
注意:遥控器右键可控制使用相机控制线与Slypod连接的相机拍照。(相机控制线
需另购)

9
手动模式
长按上键,进入UP模式,遥控器控制Slypod向上运动;松开按键,Slypod停止向上运动
。旋转拨盘调节运动速度。顺时针旋转拨轮,速度增加;逆时针 旋转拨轮,速度减小。
长按下键,进入DOWN模式,遥控器控制Slypod向下运动;松开按键,Slypod停止向下
运动。旋转拨盘实时调节运动速度。顺时针旋转拨轮,速度增加;逆时针 旋转拨轮,速度
减小。
配对
a. 保证Slypod处于关闭状态;
b. 打开遥控器,进入菜单,选择Wireless>Pair>Pairing;
c. 按下Slypod开机键,Slypod上电(灯环闪烁)后,遥控器屏幕会显示“Pair OK!", 保持
Slypod开机键按住直至魔杖完成开机后,配对完成。
连接Slypod
状态显示
注意:配对成功后,需要先进行遥控器的行程校准,才能正常控制Slypod。参考第
11页
注意:从其他模式切换到手动模式时,需要单击菜单上键/下键进入UpDn模式
行程校准状态
无线连接状态
遥控器电量
运动位置显示
伸缩杆电量
行程显示条
运动速度显示
模式显示
操作教程

10
Motor>:Auto模式设置
Dir:设置遥控器控制Slypod运动的方向,单击电源键切换运动方向。
Range:设置遥控器控制Slypod运动行程长度,旋转拨盘调节运动行程长度。(总行程
280mm)
设置A-B限位
a. 用手轮控制遥控器标记点运动到限位A;
b. 按住MARK键,当行程显示条出现A字样时,转动手轮控制遥控器标记点运动到限位B;
c. 松开MARK键,A-B限位设置完成。
AUTO模式
a. 单击电源键进入菜单,右键选择Motor>进入auto模式,即可自行设置遥控器控制
Slypod运动的方向与速度。
取消A-B限位
在屏幕上显示有白色A-B限位条的状态下,长按DEL键,可取消设置的A-B限位,恢复行程
校准的限位。
FOLLOW模式
单击左键进入FOLLOW模式,转动遥控器手轮,Slypod则跟随手轮转动的行程位置运动到
相对的行程位置。
顺时针旋转遥控器手轮,实时控制Slypod伸出;逆时针旋转遥控器手轮,实时控制Slypod
缩回。
MARK模式
在已经进入FOLLOW模式下,如图设置A-B点限位,Slypod则在遥控器标记限位的行程范围
内运动。
TOP/BTM模式
双击上键,进入TOP模式,遥控器控制Slypod持续向上运动,旋转拨盘调节运动速度。
顺时针旋转拨轮,速度增加;逆时针 旋转拨轮,速度减小。
双击下键,进入BTM模式,遥控器控制Slypod持续向下运动,旋转拨盘调节运动速度。
顺时针旋转拨轮,速度增加;逆时针 旋转拨轮,速度减小。
菜单介绍
Dir : UP
Range 25
Time 1s
Run Run
Time [ 1s]

11
Function>Wheel Calibrate>:手轮校准
遥控器使用手轮控制Slypod运动。正常情况下,手轮逆时针旋转到限位时数值最小,手轮
顺时针旋转到限位时数值最大。如手轮异常,则需要进行手轮校准。
点击右键开始操作
a. 将手轮转动到起始位置(如图),点击拨盘右键确认;
b. 将手轮转动到结束位置(如图),点击拨盘右键确认;
c. 点击拨盘左键退出校准,或者点击菜单键回到主界面。
Brightness>:屏幕显示亮度调节
选中Brightness后,转动拨盘,可以从0到100调节其数值,数值越大,屏幕亮度越高。
About>:关于
查看遥控器固件版本信息。
Slypod遥控器可以自己单独升级,升级操作如下:
a. 将遥控器关机;
b. 使用Type-C连接遥控器和电脑;
c. 长按上键,不要松开,然后单击电源键,屏幕上会显示‘Boot Mode’,即进入固件升
级状态;
d. 在电脑中启动MOZA Master 软件,点击设备列表中对应的设备名称进入升级界面。
固件升级
Wheel Calibrate >
Brightness :050
1
.Turn to the st
a
rting position;
C
lick [>] to con
f
irm.
2.Turn to the en
d
position;Click
[
>] to confirm.
Time:设置遥控器控制Slypod行程运动的时间,旋转拨盘调节行程运动时间(最大设置时
间2000s,长按拨盘右键快速增加行程时间)
Run:单击电源键切换开始行程运动/停止运动

12
规格参数
重量
尺寸 38*92*48mm
208g
工作电压 3.7V
电池容量 750mAh
升级/充电接口 USB-C
工作温度 0-50℃
e. 电脑在联网的情况下自动下载最新版本的固件。等待固件下载完成后, 点击”升级“按
钮。
f. 升级过程中,请勿操作遥控器
g. 重启遥控器即可
注意:请从MOZA官方网站下载MOZA Master (1.2.0或以上版本)软件进行升级。
MOZA Master 软件运行前需要安装相关驱动,具体操作请咨询魔爪售后或参考官网相关教
程文档。

MOZA Slypod 遥控器
产品保修条例
保修期
自购机日起,遥控器主体保修12个月;电机、电池保修3个月。设备外壳、说明书、线材、
包装等不在"一年免费保修服务"范围内,您可以选择有偿服务。
七日内免费退货
自购机日起7日内,根据国家最新三包规定,您可以选择退货(按票面金额一次性退清货款
)、换货(更换同型号同规格的产品)或修理。
八至十五日免费换货或修理
自购机日起第8日至第15日内,主机出现性能故障,并经特约维修中心检测,确认非人为损
坏的本身质量问题,您可以选择换货(更换同型号、同规格产品)或修理;但是更换的范围,
只限于产品主机,其他配件无质量问题,不能更换;购买者在以下条件下不享受免费保修
服务,您可以选择有偿服务。
1. 超过三包有效期的
2. 无三包凭证及有效发货票的,但能够证明该产品在三包有效期内的除外
3. 包修凭证上的型号与修理产品型号不符或者涂改的
4. 非本公司特约维修人员拆动造成损坏的
5. 因不可抗拒力造成损坏的
6. 未按产品使用说明书要求使用、维护、保养而造成损坏的
用户资料
产品型号
购买日期
姓 名
电 话
地 址
产品保修卡

Web: www.gudsen.com
Table of contents
Popular Remote Control manuals by other brands

Goodmans
Goodmans GHD8015F2 Re-tuning guide

PairGain
PairGain HiGain-2 HRU-612 manual

Webasto
Webasto ThermoConnect TCon2 Operating and installation instructions

Mastervolt
Mastervolt SmartRemote Quick start installation guide

NEX ROBOTICS
NEX ROBOTICS 434 MHz manual

One Forall
One Forall ONE FOR ALL PVR 6 user guide