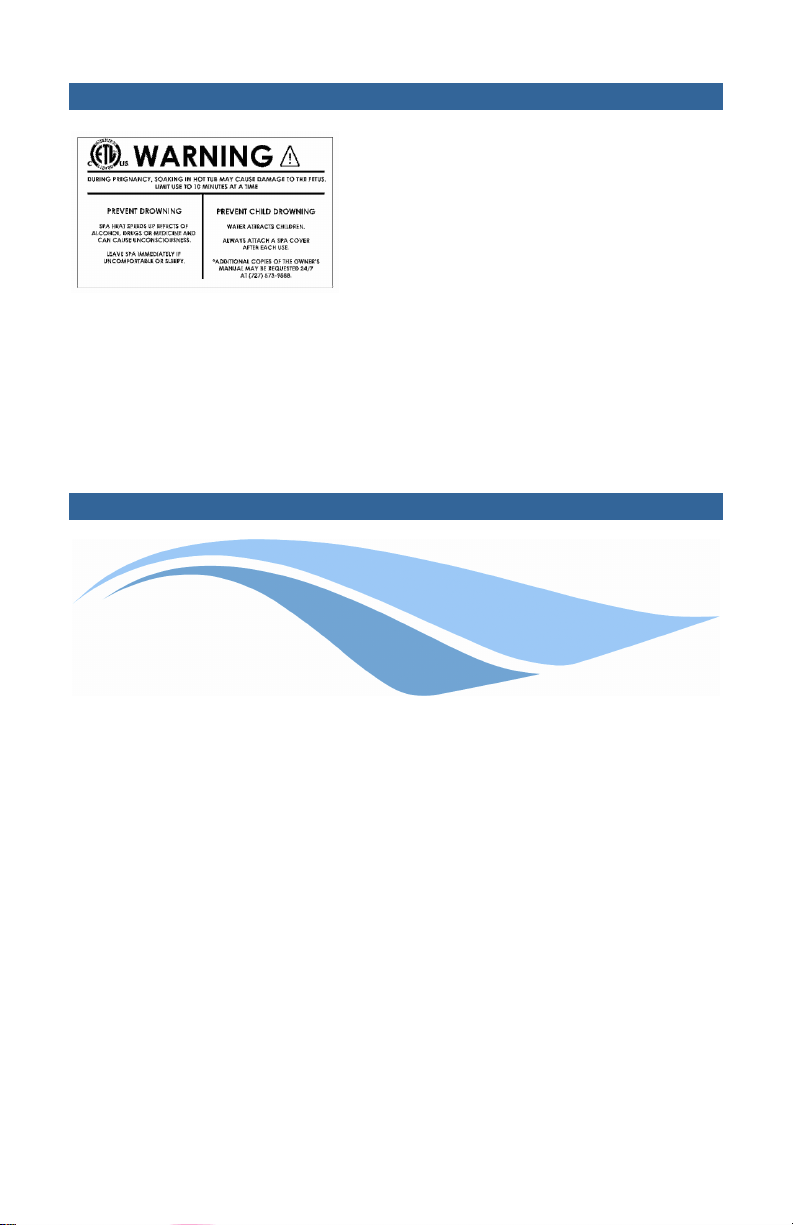
Gulf Coast Spas LX 11000 User manual

LUXURY SERIES
OWNER’S MANUAL
LX 11000 | LX 9000 | LX 8000 | LX 7000 | LX 5000
11620 54
th
Street North
C earwater, FL 33760
(727) 573-9888
www.GulfCoastSpas.com
Part Number 827114

Owner’s Information
Dea er:
Date Purchased:
__________________________
Company:
__________________________
Address:
__________________________
Te ephone:
__________________________
Insta er:
Date Insta ed: __________________________
Company:
__________________________
Address:
__________________________
Te ephone:
__________________________
Spa:
Date De ivered:
__________________________
Mode :
__________________________
Co or:
__________________________
Seria Number:
__________________________
Your unique spa seria number is ocated on a data p ate outside
the cabinet at ground eve direct y be ow the topside contro
pane . When ca ing for service, have your seria number in hand to
expedite its servicing.
You will need this serial number to access the online troubleshooting
guide at www.GulfCoastSpas.com

1
G
G
Gu
u
ul
l
lf
f
f
C
C
Co
o
oa
a
as
s
st
t
t
S
S
Sp
p
pa
a
as
s
s
O
O
Ow
w
wn
n
ne
e
er
r
r’
’
’s
s
s
M
M
Ma
a
an
n
nu
u
ua
a
al
l
l
T
T
Ta
a
ab
b
bl
l
le
e
e
o
o
of
f
f
C
C
Co
o
on
n
nt
t
te
e
en
n
nt
t
ts
s
s
Introduction ..................................................................................2
Important Safety Information....................................................3
Installation.....................................................................................7
Electrical Specifications .............................................................8
Startup .........................................................................................14
Operating Instructions ..............................................................20
Water anagement.................................................................22
Frequently Asked Questions ....................................................23
Troubleshooting .........................................................................26
aintenance and Care ..........................................................30
Shutdown / Winterizing.............................................................32
Glossary .......................................................................................33
Specifications.............................................................................34
Conditions of Warranties..........................................................44
Limited Warranty .......................................... Inside Back Cover
Online troubleshooting is available at www.GulfCoastSpas.com.
You will need your serial number to access this site.
Important – Gulf Coast Spa anufacturers is dedicated to offering
you the best in customer satisfaction and service. The warranty is a
manufacturer's limited warranty and is included in this manual. Be
sure to read, complete and sign the warranty to ensure you
understand what you are entitled to in terms of service. If you have
any questions whatsoever, do not hesitate to call Gulf Coast for
more details.
Copyright © 2007, Gulf Coast Spas, Inc. All rights reserved. No portion of this manual
may be reproduced in any manner without express written permission of Gulf Coast
Spas, Inc.
Printed in the U.S.A.
Part Number 827114 Version 4.9

2
I n t r o d u c t i o n
Your choice of a Gulf Coast spa indicates that you are devoted to
excellence. The management and staff appreciate your
patronage and takes pride in the tradition of quality spas that our
company represents.
To properly acquaint yourself with your spa, we suggest that you
take time to read through this manual before hook up and
operation. Doing so will familiarize you with important operating
and safety procedures, thereby ensuring an enjoyable experience
right from the start.
If you need any more information than this manual provides, feel
free to visit our Web site at www.GulfCoastSpas.com or call our
24/7 technical support line at (727) 573-9888.
WARNING This manual was written to ensure the proper use
and installation of your spa. Any modifications to
the procedures outlined in this manual may result in
voiding your warranty.
Important – Please complete, sign, and submit the warranty card
located on the back page of this manual within 30 days of
purchase.
This manual and its contents are subject to change without notice.
Although Gulf Coast Spas has prepared this manual as accurate
and precise as possible, we will not be liable for loss, injury or
damages caused by improper installation or use of spa (improper
or otherwise).
All Gulf Coast spas are made with quality Eon
synthetic cabinet materials. Eon materials
won’t fade and are nearly invulnerable to
mold and mildew. Where wood splits, cracks,
and stains, Eon stands in timeless perfection.

3
I m p o r t a n t S a f e t y I n f o r m a t i o n
Read and Follow All Instructions
S
S
SA
A
AV
V
VE
E
E
T
T
TH
H
HE
E
ES
S
SE
E
E
I
I
IN
N
NS
S
ST
T
TR
R
RU
U
UC
C
CT
T
TI
I
IO
O
ON
N
NS
S
S!
!
!
Avoid Risks To Children
DANGER RISK OF CHILD DROWNING Extreme care must be
exercised, to prevent unauthorized access by
children. To avoid accidents, ensure that children
cannot use the spa unless they are supervised at all
times. Always cover the spa and use safety locks.
WARNING RISK OF CHILD INJURY Do not permit children to use
the spa unless they are closely supervised at all
times. Lower water temperatures are
recommended for children. Children are especially
sensitive to hot water.
Avoid Risks of Electrocution
DANGER RISK OF ELECTRICAL SHOCK Install spa at least 5 feet
(1.5m) from all metal surfaces. A spa may be installed
within 5 feet (1.5m) of metal surfaces when each
metal surface is permanently connected by a
minimum No. 6 AWG (10 mm
2
) solid copper
conductor to the wire ground connector provided on
the terminal for this purpose. Do not permit any
electrical appliance, such as a light, telephone,
radio, or television within 5 feet (1.5m) of the spa,
unless factory installed.
Connect all metal equipment, metal enclosures of
electrical equipment, metal water pipes, or conduits
to the provided ground connector with a minimum
No. 6 AWG (10 mm
2
) solid copper conductor.
Position your spa to provide proper drainage of the compartment
for electrical components. For floor-recessed spas, allow access for
servicing from above or below floor. Consideration should be
taken for water to splash out. Water can ruin wood floors and
some finishes.

4
• DO NOT use a wall switch, ground fault circuit interrupter,
circuit breaker, fuse, or plugging and unplugging the spa as a
means of turning your spa on or off for normal everyday use.
• DO NOT bring any electrical appliances into or near the spa,
with the exception of a space heater used for
winterizing/troubleshooting ONLY. Call (727) 573-9888 for
instructions on this procedure.
• DO NOT operate any electrical appliances from inside the spa
or when you are wet unless such appliances are built-in by the
manufacturer.
Avoid Risks of Hyperthermia
WARNING To reduce the risk of injury, the water temperature in
a spa should never exceed 40ºC (104ºF). Water
temperatures between 38ºC (100ºF) and 40ºC
(104ºF) are considered safe for a healthy adult.
Lower water temperatures are recommended for
young children, senior citizens, and when spa use
exceeds 10 minutes.
WATER TE PERATURE IN EXCESS OF 38ºC AY BE
INJURIOUS TO YOUR HEALTH.
AVERTISSEMENT DES TE PERATURES DE L'EAU SUPERIEURES A
38ºC PEUVANT PRESENTER UN DANGER POUR LA
SANTE. L'AVERTISSE ENT: LA TE PERATURE D'EAU
DEPASSANT 38ºC AI EST NUISIBLE A VOTRE SANTE.
Since excessive water temperatures have a high potential for
causing fetal damage during early pregnancy, pregnant or
potentially pregnant women should limit water temperatures to
38ºC (100ºF). Before entering a spa, measure the water
temperature with an accurate thermometer. The tolerances of
water temperature-regulating devices vary.

5
Hyperthermia occurs when the internal temperature of the body
reaches a level several degrees above the normal body
temperature of 98.6ºF (37ºC). The symptoms of hyperthermia
include drowsiness, lethargy, and an increase in the internal
temperature of the body. The effects of hyperthermia include:
• Unawareness of
impending hazard
• Failure to perceive
heat
• Failure to recognize
the need to exit spa
• Physical inability to
exit spa
• Fetal damage in
pregnant women
• Unconsciousness and
danger of drowning.
Avoid Risks of Burns
• Before entering a spa, measure the water temperature
with an accurate thermometer since the tolerance of
temperature-regulating devices may vary by as much as
±5°F (2°C).
• Test the water with your hand before entering the spa to
be sure it’s comfortable.
For Spas Equipped With Audio Components
Audio components are optional and not available on all models.
WARNING Prevent Electrocution: Do not connect any auxiliary
components – for example, cable, additional
speakers, headphones, etc., to the system.
Caution Risk of Electric Shock: Do not leave audio
compartment door open. Replace audio components
only with identical components.

6
Warning Sign
Warning Sign Must Be Posted – The
red WARNING sign like the one
shown is packed with your new spa.
This sign must be posted in a
prominent place in close proximity to
the spa installation site immediately
upon completion of spa installation.
It is extremely important that this sign be permanently placed in
clear view of any persons using the spa. Occasional spa users may
not be aware of some of the dangers hot water poses to pregnant
women, small children, and people under the influence of alcohol.
If you did not receive a warning sign or your sign has become
damaged, please contact our 24/7 technical support line at
(727) 573-9888 for a replacement.
Basic Safety Guidelines
Your Gulf Coast spa is meant to be enjoyable, healthful and
relaxing. Below are some basic safety guidelines to follow every
time you use your spa.
1) Always check the temperature of your spa before entering.
High water temperatures can be hazardous to your health.
2) Persons suffering from heart disease, diabetes, high or low
blood pressure and pregnant women should consult a doctor
before using your spa.
3) Persons under the influence of medication, drugs, or alcohol
should not be allowed into your spa.
4) Do not allow children to use your spa without continuous
supervision of an adult.
5) Do not use your spa alone.
6) The GFCI breaker must be tested prior to using your spa each
time to ensure it operates properly.
7) Any electrical devices near your spa must be GFCI protected
and out of reach from inside the spa.
8) Keep all breakables away from the spa area.
9) Lock the cover on your spa when not in use.
10) Enter and exit the spa slowly. Wet surfaces can be slippery.
11) Prolonged immersion can be hazardous to your health.
12) aintain water chemistry in accordance with manufacturer’s
instructions.

7
I n s t a l l a t i o n
Proper planning is an important consideration when installing your
new spa. Site selection is a critical step and should be given some
serious thought. Planning ahead, before the delivery of your spa,
makes the installation process easier. The following information is
provided to assist you in site preparations.
1) Always comply with local building codes with respect to gates,
fences, etc.
2) Be sure your spa has proper access to water, drainage and
electricity.
3) Properly support its weight. There are many ways to support
your spa. In most cases, a 4-inch thick cement pad suffices. [Or
you may purchase a durable, synthetic spa pad by calling the
24/7 technical support line at (727) 573-9888.] Please consult
your spa sales representative before constructing a base.
4) Be sure your spa will fit into the space you have chosen.
5) Ensure there is proper access into the area of the spa for
normal servicing.
6) Provide adequate ventilation for the humidity created by your
spa. In most cases, a Spa Hard Cover is sufficient.
7) Check the load carrying capabilities of the floor on which the
spa will reside. ost homes meet the requirement of 80 pounds
per square foot.
8) Protect the pump and all equipment from the weather by
ensuring the cabinet panels are secure at all times.
Important – When building a skirt or sinking a spa into a deck or
ground, allow a minimum of 36 inches (1 meter) of unobstructed
access to all sides of your spa. This ensures proper serviceability to
internal plumbing and equipment. Consider your design carefully.
The more access the better. ake the access door in a logical
place (i.e. near controls and equipment). Call the 24/7 technical
support line at (727) 573-9888 for more details.

8
E l e c t r i c a l S p e c i f i c a t i o n s
Important – Qualified and licensed electricians must perform all
electrical hookups. The following specifications must be followed in
order to ensure proper performance and safety.
WARNING Starting an incorrectly wired spa could cause
severe damage to the mechanical equipment or
even bodily harm. Have your licensed electrician
verify GFCI wiring with the schematics on page 10-
11 prior to starting the spa or call the technical
support line at (727) 573-9888.
Caution Failure to abide by specifications listed may result in
damage to the equipment and will void the warranty.
US/Canada
All spas must be wired with a 50 Amp breaker. Failure to do so will
cause equipment damage and will not be covered under your
warranty.
All spas must be protected with an over current protective device
with built-in GFCI in the service panel.
Voltage Breaker Size Amp/GFI
Wire size Country
240V 60Hz 50 Amp dedicated 6/3 with Ground U.S. and Canada
230V 50Hz IEE Wire Regulation 3x4 mm2 European Union
EUROPE
WARNING Disconnect the electrical power before servicing.
Before obtaining access to terminals, all supply
circuits must be disconnected.
Avertissement Disconnecter du circuit d'alimentation
electrique avent l'entretien.

9
Caution Connect only to a circuit protected by a residual
current device. Test the RCD before each use of the
spa.
Attention Connecter uniquement a un circuit protege par un
disjoncteur differentiel. Toujours verifier l'efficacite du
disjoncteur differentiel avant d'utiliser le bain. Bonding
lugs. Cosses demise a la masse. Use the copper
conductors only. Employer uniquement des
conduteurs de cuivre.
Nos stations thermales sont certifiées par les Services
de l'Essai d'Intertek NA Ltd. Ontario à CAN/CSA-
C22.2 No. 218.1- 89 et ANSI/UL 1563.
Parts with extra low voltage not exceeding 12v must be
inaccessible to a person in the spa. Earthed appliances must be
permanently connected to fixed wiring. Parts incorporating
electrical components, except remote control devices, must be
located or fixed so that they cannot fall into the spa. Appliances
should be supplied through an RCD having a rated residual
operating current not exceeding 30ma.
eans for disconnection must be used in fixed wiring in
accordance with wiring rules.
Important – To allow the 240V GFCI to function properly, connect
the white Neutral wire from the spa to the Neutral terminal on the
GFCI breaker, not the Neutral bus in the GFCI breaker box. An
improperly connected Neutral causes the GFCI breaker to trip.

10
US & Canada Wiring Diagram
Important: Installation of this GFCI Circuit Breaker,
including Ampere sizing and selection of conductor size
and type, must be performed by a qualified electrician in
accordance ith the National Electrical Code, or the
Canadian Electrical Code, and all federal, state, and local
codes and regulations in effect at the time of installation.
Note: The hite Neutral ire from the back of the GFCI
must be connected to the incoming Line Neutral. The
internal mechanism of the GFCI requires this neutral
connection. The GFCI ill not ork ithout it.
GRN (GROUND)
BLK (HOT)
RED (HOT)
WHT (NEUTRAL)

11
European 1x32A Wiring Diagram
Jumper L1-L2-L3

12
European 2x16A Wiring Diagram
Jumper L2-L3

13
European 3x16A Wiring Diagram
No Jumper

14
S t a r t u p
Important – Read these step-by-step startup procedures before
starting your spa. Failure to follow any of these steps listed may
result in damage to the equipment and may void your warranty.
Special Note If you are unsure of any of the above startup
procedures, please call the 24/7 technical support line at
(727) 573-9888. For best results, read each step in its entirety before
proceeding.
Caution Running the spa pump dry (without water running
through it) can cause I EDIATE damage and will
void the warranty! Be sure that the spa is installed
properly in accordance with the instructions in this
manual.
Refer to the following picture for an explanation of your spa’s
controls, components, and technical terms. Note that not all
models have all features and components.

15
Before Adding Water
Before adding water, go through these simple steps now to
prevent common issues when setting up your spa for the first time.
Verify that the following have all been rechecked.
1. Turn off all power to the spa at the main breaker panel.
2. Open the side panels to access the internal components.
3. Check that all slide valves are opened (T-handles
pulled out) to the heater and all pumps.
4. Check that there are no obvious signs of loose
wires or broken pipes.
5. Check that the two heater unions are tight. These are hand-
tightened and do not need any kind of special tool to tighten
them.
Caution Do not use a wrench. Over-tightening may cause
damage to unions and gaskets, which will not be
covered under warranty.
6. Check that the unions on all pumps are tight.
7. Clean out any foreign debris from within the service access
area or inside of the spa itself.
8. With the drain open and filters removed, thoroughly rinse out
the spa with warm water until the drained water runs clear. Run
water through the filtration canister and jet lines to remove any
incidental dust, dirt, and debris that may have accumulated
during shipment or installation. Drain all water completely.
9. ake sure that the spa drain valve is closed and the cap is on
tight (see page 30).
10. Install the filter(s) in the filtration canister.
11. Check that all of the spa jets are open (turned full counter-
clockwise).
12. Now is the best time to clean and polish the surfaces of your
spa (see page 41).

16
Filling Your Spa
Now it's time to fill your spa with water. Do not turn
on the electricity yet until the spa is completely
filled. To properly fill your spa:
1. ake sure that the filters (in the filtration
canister) are gently screwed into place. Turn
them clockwise until they stop being careful
not to over-tighten them (this avoids cracking
the filter).
2. Connect a standard garden hose to a faucet with regular cold
tap water (not softened water or hot water).
Caution The water from your hot water tank should not be used
to fill the spa.
3. Put the AquaClara pre-filter (if equipped) on the other end of
the hose, turn on the water, and allow any sediment to be
flushed out.
4. Put the AquaClara pre-filter (if equipped) into the filtration
canister and turn on the hose.
Important To assure that the pump is properly primed, fill the
spa through the filter area only.
5. Fill the spa until the water level is about 1” above all jets (or
about ½” below the pillow). Do not over fill.
Note: Every person entering a spa displaces a given volume of
water, so adjust water level to the number of people regularly
using the spa.
Turn off the hose and check again for any small leaks.
Start-up Instructions
Caution Do not turn on any pump until your spa is properly
filled with water. Running any pump without water in
your spa can cause I EDIATE damage, which is not
covered under warranty!
By now you have rechecked your spa’s mechanical connections
and filled it with water to about 1” above all jets by adding cold
tap water through the pre-filter. Turn on power to the spa at the
main breaker panel and test the operation of the electrical
system. If you encounter a problem, please reference the
troubleshooting guide.

17
1. Turn on the breaker and test the operation of the Ground-Fault
Circuit Interrupter (GFCI) breaker by pushing the small button.
This should automatically trip the spa's circuit breaker.
DANGER If this breaker does not trip, immediately call your
electrician. Do not use your spa!
Only if pushing this button successfully trips this circuit breaker
should you reset this breaker and proceed to the next step.
2. Go to the topside control panel and look at the display. The
topside control display goes through a startup sequence after
which the panel should alternately display the time and system
status.
3. Press the Pump 1 button. You should hear the first pump turn
on, see water circulating, and see the Pump 1 light illuminate
on the panel.
4. Press the Pump 1 button again. You should hear the first pump
turn on a higher speed.
Caution If water is not flowing from the jets in the spa after 2
minutes, turn the power off at the main panel and
bleed air from the system (see page 23). Turn the
power on again. Sometimes momentarily turning
the pump off and on will help to prime. Do not do
this more than four times.
5. If the water is running smoothly through the lines, open the air
control valve to the jets and you should see an increase in jet
pressure. Check and adjust the water and airflow of every jet if
necessary.
Each jet in your spa can be adjusted for massage intensity and
directional flow. Turn the outer jet dial counterclockwise to
increase the water volume and clockwise to turn it off. Pivot
the angle of a jet to achieve an optimal massage.
An air mixture intensifies the level of your massage. Turn the air
control valve counterclockwise to increase the air mixture and
clockwise to turn it off.
To minimize heat loss, close the air control valve when your spa
is not in use.

18
6. Press the Pump 1 button a third time to turn Pump 1 off. A built-
in timer automatically turns Pump 1 off after 20 minutes, unless
the pump manually has been deactivated first.
7. Press the Pump 2 button to activate the single-speed pump (if
equipped). If Pump 2 has not primed after 2 minutes repeat
same priming procedure of step 3 above for Pump 2. Check
and adjust the water and airflow of every jet from Pump 2 if
necessary.
8. Press the Pump 2 button a second time to turn off Pump 2.
9. Press the Blower button to turn on the air blower (if equipped).
Check if air goes to air jets on the butt/bottom of each seat.
10. Press the Blower button again to turn the Blower off. A built-in
timer automatically turns the Blower off after 20 minutes, unless
it manually has been deactivated first.
11. Press the Light button to turn the spa Light on. Verify the spa
Light is on.
12. Press the Light button a second time to turn the spa Light off. A
built-in timer automatically turns the spa Light off after two
hours, unless the spa Light manually has been deactivated first.
Step-by-step Programming
Note: During programming, the heater is disabled and its icon
flashes.
Note: Use Filter Cycle times that are different from your normal
bathing times.
1. Use the Up/Down button to set the desired water temperature
(102°F recommended).
2. Press and hold down the Light button for five seconds to
access the time-of-day and filter-cycle programming menus.
This manual suits for next models
4
Table of contents
Other Gulf Coast Spas Hot Tub manuals