GUTFELS LE60933we User manual

Gebrauchsanleitung
Instruction Manual
Mode d'emploi
Instructies
Niedrig Temperatur Luftentfeuchter
Low Temperature Dehumidifier
Déshumidificateur
Luchtontvochtigers
LE60933we
GGV HANDELSGES.MBH&CO KG
AUGUST-THYSSEN-STR.8
D-41564 KAARST

Inhalt content Contenu inhoud
/ / /
Spezifikation
Information
Sicherheitsanweisungen
Teile
Programmierfunktion
Betrieb
Entwässerung
Wartung und Instandhaltung
Fehlersuche und -behebung
2
3
3-6
7
8-12
12-14
14-15
16-17
17
Specification
Where to position
Before use
Parts
Programming Feature
Operation
Drainage
Maintenance
Trouble shooting
18
19
19-22
23
24-27
28-29
30-31.
31-33
33
Spécification
Emplacement
Avant utilisation
Composants
Caractéristiques de programmation
Fonctionnement
Drainage
Entretien
Dépannage
34
35
35-38
39
40-44
44-46
46-47
48-49
49-50
Specificaties
Waar te plaatsen
Voor gebruik
Onderdelen
Programmeerfunctie
Werking
Drainage
Onderhoud
Probleemoplossing
51
52
52-55
56
57-61
61-63
63-64
65-66
66
Mit QR-Codes schnell und bequem zu allen
Informationen
Was sind QR-Codes?
QR-Codes (QR-Quick Response resp. schnelle Antwort) sind
grafische Codes, die mithilfe einer Smartphone-Kamera eingelesen
werden und schnell und bequem zu weiteren Informationen
führen (Bsp. Internetseite, Produktevideo oder Kontaktdaten).
Und so funktioniert es
Zum Scannen der QR-Codes benötigen Sie lediglich ein
Smartphone, ein QR-Code Reader App (kostenlos im App-Store
erhältlich) sowie eine Internetverbindung. *
*Beim Ausführen des QR-Code-Readers können abhängig von
Ihrem Tarif Kosten für die Internet-Verbindung entstehen.

Spezifikation
Spannung
Entfeuchtungsleistung:
Leistungsaufnahme
Raumgröße (max.)
Lüfter- (Belüftung) Geschwindigkeit
Wassertankvolumen
Zulässige Einsatztemperatur
Timer
Kontinuierliche Entwässerung
Sicherheitseinrichtung
Abmessungen (WxDxH)
Netto Gewicht
220~240V, 50Hz
9 L/Tag
TURBO (hoch) -730W
SLEEP (niedrig) – 385W
Elektrisches Heizelement-650W
3
200 m /h
3
5L
1 ~ 32oC
1 ~ 24 Stunden
Ja
Tip-over Schalter
340 x 232 x 511 mm
7.5 Kg
Modell-Nr. LE60933we
Oben wird unter 8°C, RH 80% gemessen.
Die mit * gekennzeichneten Daten können aus technischen
Gründen abweichen.
Strom & Sicherung : F2L250V oder T2L250V
Entsorgung
Dieses Produkt sollte zur Sicherheitsbehandlung zu
unserem örtlichen Recyclingzentrum gebracht werden.
Elektro- und Elektronik-Altgeräte dürfen nicht über den
Hausmüll entsorgt werden.
2
DE
Information
Ü
Feuchtigkeit wird durch
das ganze Haus
transportiert. Aus
diesem Grunde muss
der Luftentfeuchter so
aufgestellt werden,
dass er möglichst viel
feuchte Luft
aufnehmen kann.
berschüssige Achten Sie bei der
Stellung des
Luftentfeuchters
darauf, dass er auf
einer ebenen Fläche
steht und mindestens
20 cm (8") Platz auf
beiden Seiten des
Gerätes zur Verfügung
steht, um einen
effizienten Luftstrom
zu ermöglichen.
Ratschläge für die
Funktion des
Trockners. Der Abstand
zwischen Entlüfter und
Kleidung muss
mindestens 40 cm
betragen.
Geeignet für den Einsatz im Keller, Küche, Wohnzimmer usw.
Sicherheitsanweisungen
Betreiben Sie dieses Gerät auf einer festen, ebenen Fläche, um
Wasserleckagen zu vermeiden. Stellen Sie sicher, dass es immer
aufrecht steht (einschließlich Transport und Lagerung).
Es wird empfohlen, das Gerät bei der ersten Benutzung 24
Stunden lang kontinuierlich zu betreiben.
Stellen Sie es nicht auf weiche Oberflächen.
Stellen Sie sicher, dass sich zwischen den Seiten des Geräts und
allen brennbaren Materialien mindestens 400 mm befinden.
Stellen Sie sicher, dass sich mindestens 900 mm von der
Oberseite des Geräts und allen brennbaren Materialien entfernt
befinden.
Das Gerät enthält chemische Substanzen. Es kann sein, dass das
Gerät während der ersten Betriebsstunden einen chemischen
Geruch abgibt. Dieser Geruch hat aber keinerlei
gesundheitlichen Folgen.
Das Gerät verfügt über eine Kippsicherung, die das Gerät
3
Vorsicht!

ausschaltet, wenn es während des Betriebs umkippt.
Schließen Sie das Gerät nur an eine ordnungsgemäß installierte
und leicht zugängliche Steckdose an, damit Sie im Notfall schnell
den Stecker ziehen können.
DROSSELN SIE NICHT DIE LUFTEINLÄSSE UND -AUSLÄSSE.
NUR FÜR DEN INNENBEREICH.
NICHT FÜR GEWERBLICHE UND INDUSTRIELLE ZWECKE.
SETZEN SIE DAS GERÄT KEINER DIREKTEN SONNENEINSTRAHLUNG
AUS.
VERWENDEN SIE NICHT IN SCHRÄNKEN, BOOTEN, CARAVANS
ODER ÄHNLICHEN ORTEN..
VERWENDEN SIE DAS GERÄT NICHT IN BADEZIMMERN,
SCHWIMMBÄDERN, WASCHRÄUMEN ODER ÄHNLICHEN
NASSBEREICHEN.ODER ACHTEN SIE DARAUF, DASS DAS GERÄT
SPRITZGESCHÜTZT IST.
Verwenden Sie das Gerät nicht an Orten, an denen Farbe, Benzin
oder andere brennbare Flüssigkeiten verwendet oder gelagert
werden.
Lassen Sie das Gerät nicht umkippen, wenn sich Wasser im Tank
befindet.
VERMEIDEN SIE DAS GERÄT VOR SPRITZERN. LASSEN SIE KEINE
FLÜSSIGKEIT IN DAS GERÄT EINDRINGEN.
STELLEN SIE KEINEN BEHÄLTER MIT FLÜSSIGKEIT AUF DAS GERÄT.
DAS KONDENSWASSER IST WEDER FÜR MENSCHEN NOCH FÜR
TIERE GEEIGNET.
VERWENDEN SIE KEINE INSEKTENSPRAYS ODER ANDERE
BRENNBARE REINIGUNGSMITTEL AUF DEM GERÄT.
Legen Sie das Kabel nicht unter Teppiche oder andere
Oberflächen, damit Sie seinen Zustand regelmäßig überprüfen
können.
BERÜHREN SIE DEN STECKER DES GERÄTES NICHT MIT NASSEN
HÄNDEN.
4
DE
Verwenden Sie niemals das Kabel des Gerätes als Tragegurt.
Bevor Sie das Gerät bewegen, schalten Sie es aus, ziehen Sie den
Netzstecker und entleeren Sie den Wassertank. Grundsätzlich
dauert es ca. 2 Minuten, bis das Gerät heruntergefahren ist und
die Heizung abkühlen kann.
Ziehen Sie das Gerät immer vom Netz und warten Sie mindestens
1 Stunde, bevor Sie eine Wartung, einen Transport oder eine
Reinigung des Gerätes durchführen.
Schalten Sie das Gerät immer aus und ziehen Sie den Stecker aus
der Steckdose:
üWenn Sie das Gerät nicht benutzen.
üBevor Sie das Gerät reinigen.
üBevor Sie das Zubehör montieren.
üWenn ein Fehler auftritt.
üIm Falle eines Sturms.
UM ÜBERDREHEN, ÜBERSPULEN UND ÜBERZIEHEN DES
NETZKABELS ZU VERMEIDEN, VERWENDEN SIE NIEMALS NYLON-
ODER EISENDRAHT
VERWENDEN SIE KEINE VERLÄNGERUNGSKABEL.
WENN DAS NETZKABEL BESCHÄDIGT IST, MUSS ES VON EINEM
ELEKTRIKER ODER EINER ÄHNLICH QUALIFIZIERTEN PERSON
ERSETZT WERDEN, UM GEFAHREN ZU VERMEIDEN.
DIE NETZVERSORGUNG MUSS DEN ANGABEN AUF DER
RÜCKSEITE VOM TYPENSCHILD DES GERÄTES ENTSPRECHEN.
DAS GERÄT MUSS GEMÄß DEN NATIONALEN
VERDRAHTUNGSVORSCHRIFTEN INSTALLIERT WERDEN.
GREIFEN SIE DAS GERÄT NIEMALS, WENN ES INS WASSER
GEFALLEN IST, LASSEN SIE DAS GERÄT ÜBERPRÜFEN, BEVOR SIE
ES ERNEUT VERWENDEN.
Dieses Gerät soll nicht von Kindern und Personen mit
eingeschränkten körperlichen, sensorischen oder geistigen
Fähigkeiten oder mangelnden Erfahrungen und Kenntnissen
benutzt werden, nur wenn sie eine sichere Überwachung oder
Einweisung in die Benutzung des Gerätes erhalten haben und die
5

6
VERWENDEN SIE IHR TROCKENMITTEL NICHT UNTER
FOLGENDEN BEDINGUNGEN
damit verbundenen Gefahren verstehen. Kinder dürfen nicht mit
dem Gerät spielen. Die Reinigung und Wartung darf nicht von
Kindern ohne Aufsicht durchgeführt werden.
Geräte für den Innenbereich (ohne Waschküche).
Bitte halten Sie das Gerät bei Verwendung des Trockner-Modus
für Kleidung mindestens 40CM von den Gegenständen (z.B. der
Kleidung) fern und achten Sie darauf, dass kein Wasser in den
Luftauslass des Geräts tropft.
ES WIRD EMPFOHLEN, DAS GERÄT REGELMÄßIG ZUR
FACHGERECHTEN WARTUNG EINZUSENDEN.
NUR EIN LIZENZIERTER FACHMANN DARF DAS GERÄT
DEMONTIEREN ODER MODIFIZIEREN.
DIE MASCHINE DARF NUR FÜR DEN VORGESCHRIEBENEN ZWECK
VERWENDET WERDEN. JEDE ANDERE VERWENDUNG GILT ALS
MISSBRAUCH. DER BENUTZER/BETREIBER, NICHT DER
HERSTELLER HAFTET FÜR DARAUS RESULTIERENDE SCHÄDEN
ODER VERLETZUNGEN JEGLICHER ART.
Im Freien
ausgesetzt
In der Nähe
von Wasser
Wenn die Drähte des
Netzkabels ausgefranst
oder durchtrennt sind
Wo kleine Kinder
unbeaufsichtigt gelassen
werden können
Wenn ein
Verlängerungskabel
überlastet werden kann
Wo das
Netzkabel beschädigt
werden kann
Auf geneigtem oder
unebenem Untergrund Bei Brandgefahr
oder in der Nähe
einer offenen Flamme
Bei Brandgefahr
oder in der Nähe
einer offenen Flamme
Bei Gefahr von
Störungen durch
Fremdkörper
Dieses Produkt
ist nicht für die
Selbstreparatur geeignet.
Wenn die Gefahr
besteht, dass Wasser
auf das Gerät fällt.
DE
7
Teile
Rückplatte
Netzkabel
Lufteinlässe
/ Luftfilter
Wassertank
Kontrolltafel
Lufteinlässe
/ Luftfilter
FILTER-RAHMEN AKTIVKOHLEFILTER
Luftleitblech
Frontplatte
(* ) Elektrofachmann: anerkannter Kundendienst des Lieferanten
oder des Importeurs, der für derartige Reparaturen zuständig ist.
Für eventuelle Reparaturen wenden Sie sich bitte an diesen
Kundendienst (www.ggv-service.de).

8
Programmierfunktion
1.LÜFTERDREHZAHL-Anzeige
(Sleep, NORM, TURBO)
2.Display-Fenster von Feuchte/Timer
3.TIMER-Anzeige
4.AUTO-Taste
5.Luftreinigung-Anzeige
6.LÜFTERGESCHWINDIGKEIT-Taste
7.TROCKNER-Anzeige
8.TROCKNER(TURBO)-Taste
9.Feuchtigkeitsanzeige
10.ON-Anzeige (Heizelement-
Betriebsanzeige)
11.Power (EIN/AUS) Taste
12.WASSERVOLLANZEIGE
13.TIMER-Taste
14.Luftreinigung-Taste
LÜFTERGESCHWINDIGKEIT -Taste
Unter dieser Taste befinden sich 3 Modi:
uSLEEP-Modus(MUTE): Wenn das Gerät läuft, ist die
Lüfterdrehzahl niedrig und die Hitze niedrig, so dass das Gerät
leiser ist. Ist die Umgebungsfeuchtigkeit niedriger als die
eingestellte Luftfeuchtigkeit, arbeitet sie nur bei niedrigem
DE
9
Lüfter (Lüftung) ohne Heizung. Hinweis! Im SLEEP-Modus
leuchtet die Feuchtigkeitsanzeige in der Frontplatte nicht auf.
uNORM-Modus (Standard): Das Gerät arbeitet mit MITTLERER
Lüfterdrehzahl und hoher Temperatureinstellung. Liegt die
Umgebungsfeuchtigkeit unter der eingestellten
Luftfeuchtigkeit, arbeitet das Gerät nur mit einer mittleren
Lüfterdrehzahl ohne Heizung.
uTURBO-Modus: Das Gerät arbeitet mit Hoher Lüfterdrehzahl
und hoher Wärmeentwicklung. Auch wenn die
Umgebungsfeuchtigkeit niedriger ist als die eingestellte
Luftfeuchtigkeit, arbeitet das Gerät nur mit einer hohen
Lüfterdrehzahl ohne Heizung.
Die Anzeige für den eingestellten Modus leuchtet auf.
AUTO-Taste Durch Drücken dieser Taste arbeitet das Gerät
automatisch wie unten beschrieben:
Über 70% ..... funktioniert im TURBO-Modus.
Zwischen 55% und 70% .... funktioniert im SLEEP-Modell.
Weniger als 55%, ..... Gerät stoppt für 30 Minuten, bevor die
Raumluftfeuchtigkeit erneut überprüft wird. Und dann startet es
erst wieder, wenn die Luftfeuchtigkeit über 55 % liegt.
TROCKNER(WÄSCHEREI) -Taste (40% RH/hohe Lüfterdrehzahl/hohe Hitze)
Dieser Modus ist ideal, um eine gute Umgebung zum Trocknen von
Kleidung zu schaffen. Das Gerät arbeitet 8 Stunden lang
kontinuierlich mit der gewünschten Luftfeuchtigkeit von 40%,
bevor es 30 Minuten lang ruhen kann. Das Gerät wird dann die
Luftfeuchtigkeit des Raumes überprüfen. Wenn sie über 40% liegt,
arbeitet das Gerät noch 8 Stunden, bevor es den Vorgang
wiederholt. Wenn die Luftfeuchtigkeit des Raumes unter 40%
liegt, ruht das Gerät für weitere 30 Minuten, bevor die
Luftfeuchtigkeit des Raumes erneut überprüft wird. Die LED-
Anzeige über der Taste leuchtet, wenn der Modus
TROCKN(WÄSCHEREI)gewählt ist.
☆In diesem Modus ist die Lüfterdrehzahl immer auf HOCH
eingestellt, nicht einstellbar.

10
Feuchtigkeit-Taste Stellen Sie die gewünschte Luftfeuchtigkeit
ein: CO (kontinuierliche Entfeuchtung), 40%, 50%, 60% oder 70%
Der eingestellte FEUCHTIGKEITSWERT wird im Display angezeigt.
Bitte beachten Sie:
1.Nach 8 Stunden Dauerbetrieb ruht das Gerät für 30 Minuten,
bevor es den zuvor gewählten Betrieb wieder aufnimmt.
2.Wenn die FEUCHTIGKEIT- Taste nicht gesetzt ist, arbeitet das
Gerät mit der Standardeinstellung: 50%RH /niedrige
Lüfterdrehzahl /niedrige Wärme.
※Kontinuierlicher Entfeuchtungsmodus
Aus Sicherheitsgründen stoppt die Maschine nach 8 Stunden
automatisch. Nach einer 30-minütigen Pause geht es wieder an die
Arbeit. In diesem Zyklus wiederholen.
※Kontinuierlicher Entfeuchtungsmodus + Umgebungsfeuchte
unter 35%.
Die Heizung arbeitet für 15 Minuten -> Pause für einige Minuten,
wiederholt sich in diesem Zyklus, es sei denn, die Luftfeuchtigkeit
steigt an.
※Ambient Temperatur höher als 36°C
Die Heizung stoppt, das Gebläse läuft weiter, um die
Luftfeuchtigkeit (letzter eingestellter Modus) / Temperatur zu
überprüfen, und folgt dann der allgemeinen Logik des Stoppens für
30 Minuten, wenn die Luftfeuchtigkeit erreicht ist.
※Arbeiten mit Feuchteeinstellung: 40%, 50%, 60% oder 70%.
Das Gerät stoppt automatisch nach 8 Stunden Betrieb, unabhängig
davon, ob die eingestellte Luftfeuchtigkeit erreicht ist oder nicht.
Nach 30 Minuten Pause geht es wieder an die Arbeit. In diesem
Zyklus wiederholen.
POWER -Taste Drücken Sie diese Taste, um das Gerät
einzuschalten oder auszuschalten. Bitte beachten Sie, dass es
einige Minuten dauern kann, bis sich das Gerät nach dem Drücken
ausschaltet.Drücken Sie diese Taste, um das Gerät zu starten oder
auszuschalten. Bitte beachten Sie, dass es einige Minuten dauern
kann, bis sich das Gerät nach dem Drücken ausschaltet.
DE
11
TIMER -Taste
1.Drücken Sie die TIMER -Taste, um die gewünschten Arbeitszeiten
einzustellen. Während Sie die Taste drücken, zeigt die LED-
Anzeige die eingestellte Stunde an (beginnend mit, 1 bis 24 in
einem Zyklus). Die TIMER-Anzeige leuchtet gleichzeitig auf.
Wenn die eingestellte Zeit erreicht ist, schaltet sich das Gerät
automatisch aus.
2.Durch Drücken der TIMER -Taste, aber ohne die anderen
Funktionen einzuschalten, können Sie die Zeit für die Arbeit der
Maschine voreinstellen. Wenn Sie beispielsweise den Timer auf
"2" drücken, schaltet sich das Gerät 2 Stunden später
automatisch ein und arbeitet im vorherigen Modus.
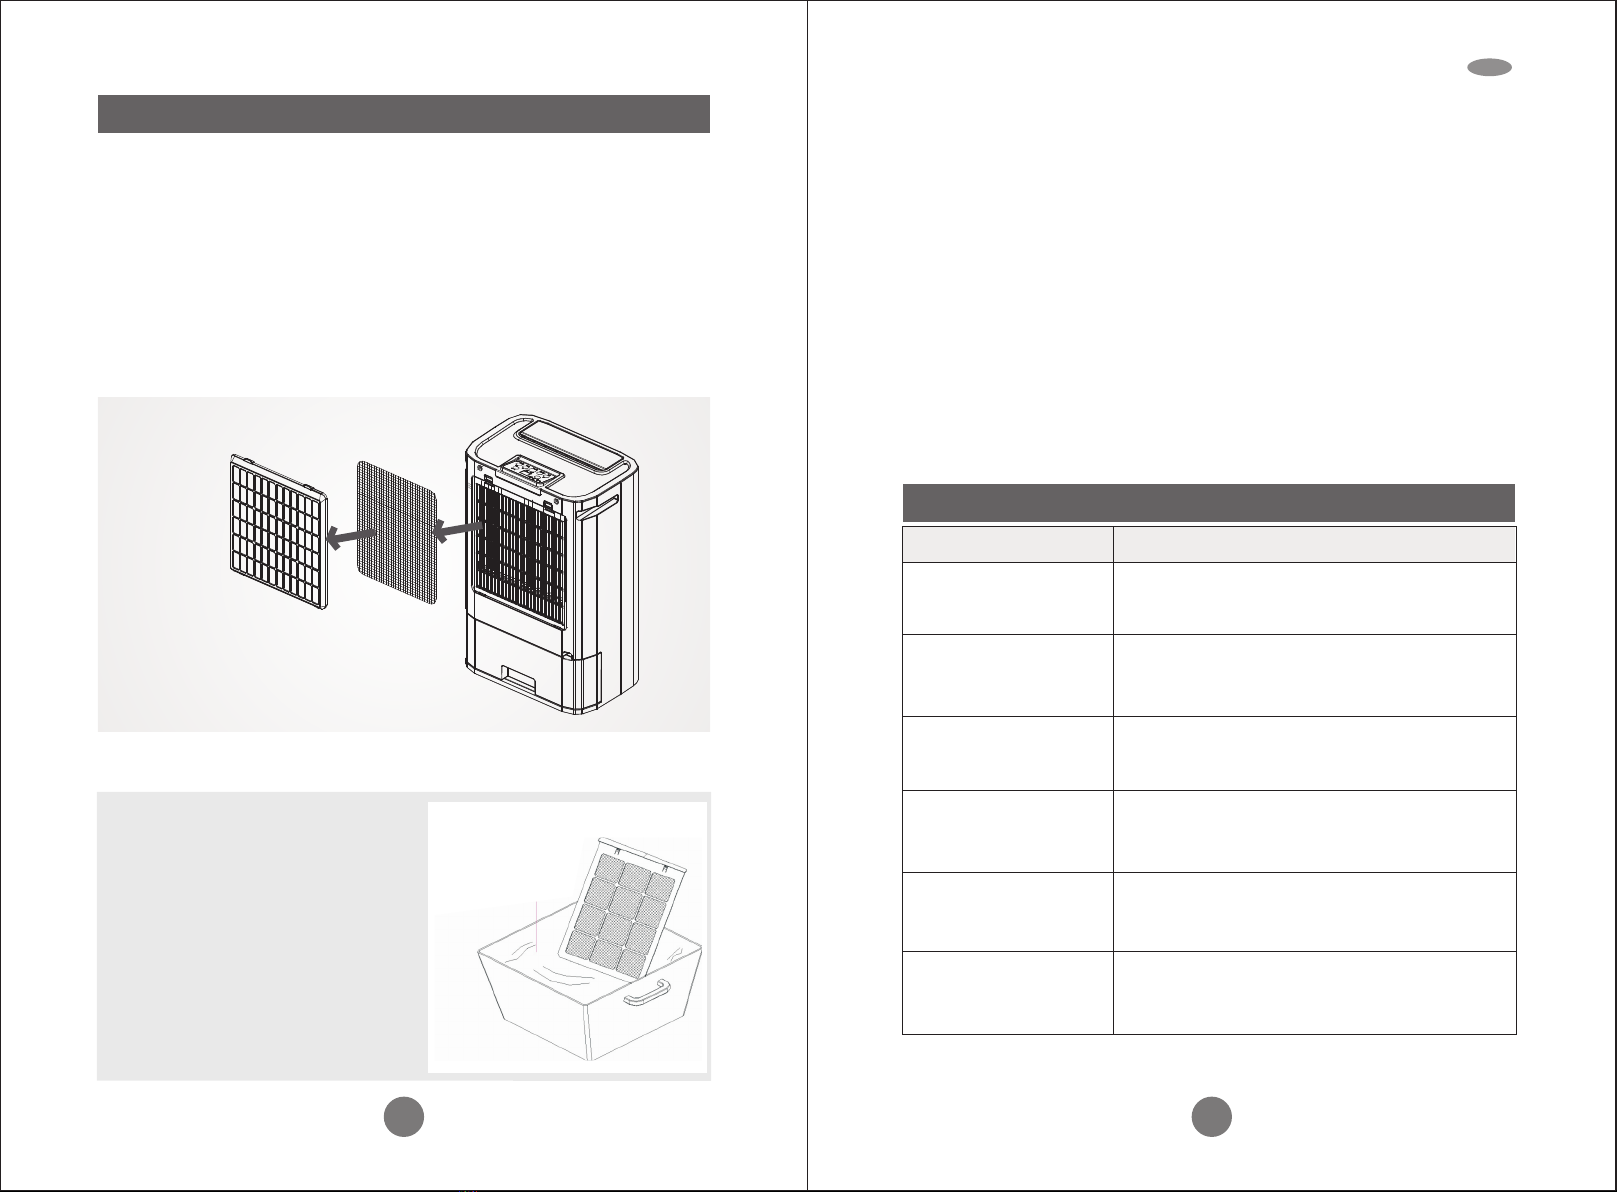
Luftreinigung-Taste In diesem Modus wird der Ventilator
betrieben, ohne die Luft zu entfeuchten. Dies ist ideal, um die Luft
zu reinigen, wenn die gewünschte Raumluftfeuchtigkeit erreicht
ist, insbesondere wenn der optionale HEPA-Filter installiert ist. Die
Anzeige AIR CLEAN leuchtet gleichzeitig auf. Die Lüfterdrehzahl ist
in diesem Modus einstellbar.
Der Kunde kann HEPA_Filter_LE60933 zu diesem LE60933WE
Luftentfeuchter als Option zur Verbesserung der Luftreinigung
wählen. Bei Bedarf wenden Sie sich bitte per E-Mail und Telefon an
den Kundendienst der EGS GmbH:
Hotline für DE +49 2944 / 9716791
Hotline für AT +43 820 / 200 170
Hotline für BENELUX + 49 2944 / 9716791
E-Mail: kontakt@egs-gmbh.de
Hinweis: Bei Verwendung eines HEPA-Filters während der
Entfeuchtung kann die Leistung des Gerätes um 10% reduziert
werden.
DISPLAY-FENSTER
Displays der Raumtemperatur(0 ~ 50oC )
Displays der Raumfeuchtigkeitthe (35~95%RH).
Displays der eingestellten Luftfeuchtigkeit, während Sie die Taste
HUMIDITY drücken. Displays der eingestellten Zeit an, während

12
Betrieb
1. Stecken Sie das Gerät in eine korrekte Netzsteckdose. (Bitte
beachten Sie das Typenschild auf der Rückseite des Gerätes.)
2. ÖFFNEN SIE DEN LUFTDEFLEKTOR.
3. Drücken Sie die POWER-Taste , um das Gerät einzuschalten. Das
Gerät arbeitet mit LOW FAN/LOW HEAT/LOW DEHUMIDIFY
(Feuchteeinstellung: 50%).
4. drücken Sie die FEUCHTIGKEIT-Taste , um die gewünschte
Sie den TIMER drücken, nach 8 Sekunden kehren Sie zur
Raumluftfeuchtigkeit zurück.
ON ANZEIGE (Heizbetriebsanzeige) )
Die Leuchte leuchtet in GRÜN, wenn das Heizelement funktioniert.
Die Leuchte leuchtet in ROT und blinkt, wenn das Gerät
umgekippt wird.
WASSERVOLLANZEIGE Es leuchtet in ROT und blinkt, wenn der
Wassertank voll ist oder sich der Tank nicht in der richtigen Position
befindet.
FEUCHTIGKEITSANZEIGE AUF DER VORDERSEITE
Dieses Gerät ist mit einer intelligenten Feuchtigkeitsanzeige auf
der Vorderseite ausgestattet, die dem Benutzer eine sofortige
visuelle Anzeige der Umgebungsfeuchtigkeit ermöglicht. Die LEDs
wechseln die Farbe, um die aktuelle Luftfeuchtigkeit anzuzeigen.
Blaues Licht - Raumluftfeuchtigkeit > 70%
Grünes Licht - Raumluftfeuchtigkeit 50~70%
Rotes Licht - Raumfeuchtigkeit < 50%
☆In SLEEP-Modus funktioniert diese
Anzeige nicht.
DE
13
Raumfeuchte einzustellen: kontinuierliche Entfeuchtung, 40%,
50%, 60% oder 70% (der eingestellte Wert erscheint auf der LED-
Anzeige).
5. 5. Drücken Sie die LÜFTERDREHZAHL-Taste , um die
Lüftungsgeschwindigkeit, MUTE, NORM (normal/standard) oder
TURBO zu wählen.
6. Drücken Sie die TIMER-Taste , um die gewünschte Arbeitszeit
einzustellen (1~24 Stunden).
7.Um das Gerät auszuschalten, drücken Sie die POWER-Taste
erneut.
☆Sie können das Gerät in den Modus AUTO oder TROCKEN
schalten, siehe Beschreibung auf der vorherigen Seite..
WICHTIG!
1.Nach dem Ausschalten des Geräts dauert es mindestens 2
Minuten, bis das Gerät vollständig ausgeschaltet ist, damit die
Heizung abkühlen kann. ZIEHEN SIE DEN STECKER NICHT DIREKT
AUS DER STECKDOSE.
2.Betreiben Sie das Gerät nicht ohne den LUFTFILTER.
3.Bei Verwendung des TROCKEN-Modus für Kleidung halten Sie
den Luftauslass des Geräts mindestens 40CM von den
Gegenständen (z.B. der Kleidung) entfernt und stellen Sie sicher,
dass kein Wasser in den Luftauslass des Geräts tropft.
☆ACHTUNG! NICHT im Schrank, im Kleiderschrank verwenden.
>60cm
>40cm
>20cm
>20cm
>20cm
>50cm

14
4.Kippschutz Dieses Gerät ist mit einem Kippschalter für
Überhitzungsschutz ausgestattet. Während das Gerät gekippt
wird, stoppt das Gerät automatisch. Die ON-Anzeige leuchtet rot
und blinkt zur Warnung, auch im Display erscheint E5. Nachdem
Sie das Gerät aufrecht gestellt haben, drücken Sie die POWER-
Taste, um es neu zu starten.
5.Selbstdiagnose: Diese Maschine ist mit einer
Selbstdiagnosefunktion ausgestattet. Wenn in der Maschine
etwas nicht stimmt, zeigt die LED das Signal von E1 bis E7 an (jede
stellt eine andere Situation dar).
E5 bedeutet, dass das Gerät umgekippt ist. Bitte stellen Sie das
Gerät wieder aufrecht auf, drücken Sie die POWER-Taste, um es
neu zu starten.
Für das andere Signal rufen Sie bitte Ihre Servicestelle an.
Nehmen Sie die Maschine auf keinen Fall selbst auseinander.
Entwässerung
Solange der Wassertank voll ist, arbeitet das Gerät nicht mehr zum
Selbstschutz. Die Wasserfüllstandsanzeige blinkt rot und das Gerät
warnt.
Um den Tank zu entleeren, folgen Sie bitte den Schritten:
1. Halten Sie das Gerät mit einer Hand fest.
2. Ziehen Sie den Tank quadratisch aus dem Gerät heraus.
3. Greifen Sie den Griff des Wassertanks, entfernen Sie den Deckel
des Tanks, entleeren Sie das Wasser aus dem Ablauf.
4. Nachdem der Tank leer war, stellen Sie sicher, dass der
Wassertank richtig positioniert ist, damit das Schild "Wasser
voll" erlischt und Ihr Luftentfeuchter wieder in Betrieb ist.
Bitte beachten Sie, wenn der Wassertank nicht gut positioniert
ist, leuchtet die Wasserfüllstandsanzeige rot und das Gerät
brummt weiter.
DE
15
KONTINUIERLICHE ENTWÄSSERUNG
Wenn der Luftentfeuchter bei sehr hoher Luftfeuchtigkeit betrieben
wird, muss der Wassertank häufiger entleert werden. In diesem
Zustand kann es günstiger sein, das Gerät für eine kontinuierliche
Entwässerung mit den folgenden Verfahren einzurichten:
1. Verbinden Sie das Ablaufloch mit einem Wasserschlauch mit einem
Innendurchmesser von 11mm. ☆ Bitte beachten Sie, dass der
Wasserschlauch nicht im Lieferumfang enthalten ist.
2. Stellen Sie sicher, dass das Wasser immer frei abfließt und der
Schlauch an der richtigen Stelle bleibt. Hinweis! Bei sehr kalter
Witterung sollten Vorkehrungen getroffen werden, um ein Lösen
des Wasserschlauches zu verhindern.
Wasserleitung für
kontinuierliche
Entwässerung

16
Ziehen Sie das Gerät immer vom Netz und warten Sie mindestens eine
Stunde, bevor Sie Wartung oder Reinigung durchführen.
REINIGUNG DES KÖRPERS
Wischen Sie das Gerät mit einem weichen Tuch ab.
Verwenden Sie niemals flüchtige Chemikalien, Benzin,
Reinigungsmittel, chemisch behandelte Kleidung oder andere
Reinigungslösungen. Das alles könnte dem Schrank schaden.
REINIGUNG DES FILTERS
Ziehen Sie den Luftfilter von der Rückseite des Gerätes heraus.
Wartung und Instandhaltung
FILTER-RAHMEN AKTIVKOHLEFILTER
1. Verwenden Sie einen Staubsauger
oder klopfen Sie den Filter leicht an,
um die Reinigung zu erleichtern.
Wenn der Filter besonders
verschmutzt ist, verwenden Sie
warmes Wasser mit einer geringen
Menge an mittlerer Stärke.
2. Stellen Sie sicher, dass der Filter
vollständig trocken ist, bevor Sie ihn
austauschen.
3. Setzen Sie den Filter nicht dem
Sonnenlicht aus.
Für Staubfilter (waschbarer Filter) -
Warmes Wasser
DE
17
Fehlersuche und -behebung
PROBLEM MÖGLICHE URSACHE
Das Gerät funktioniert
überhaupt nicht.
1.Schlechter Anschluss des Netzsteckers
2.Der Wassertank nicht gut oder voll positioniert ist.
3.Steht das Gerät aufrecht und waagerecht.
Für Aktivkohlefilter -
Dieser Filter ist nicht waschbar. Seine Lebensdauer ist variabel und
hängt von den Umgebungsbedingungen ab, unter denen das Gerät
aufgestellt wird. Der Filter sollte regelmäßig (ca. alle 6 Monate)
überprüft und bei Bedarf ausgetauscht werden.
LAGERUNG
Wenn Sie das Gerät über einen längeren Zeitraum nicht benutzen.
Bitte:
Schalten Sie das Gerät aus, ziehen Sie den Netzstecker und ordnen
Sie das Netzkabel.
Entleeren Sie den Wassertank vollständig und wischen Sie ihn
sauber.
Decken Sie das Gerät ab und lagern Sie es dort, wo es kein direktes
Sonnenlicht erhält.
Das Gerät funktioniert
nicht entfeuchtend.
Entfeuchtungsleistung
funktioniert nicht
ordentlich
Anormale Geräusche
vom Motor
Das Gerät verliert
Wasser
Nach dem Ausschalten
des Gerätes läuft der
Ventilatormotor weiter
1.Zu starker Staub auf dem Luftfilter.
2.Irgendwas steckt am Ansaug- oder Entlüftungsventil.
3.Zu niedrige Raumluftfeuchtigkeit.
1.Zu viele Türen und Fenster geöffnet.
2.Jede Raumausstattung erhöht die
Raumluftfeuchtigkeit.
1.Überprüfen und reinigen des Luftfilters
2.Steht das Gerät aufrecht oder auf einer
ebenen Fläche?
1.Wurde das Gerät gekippt?
2.Prüfen Sie, ob der Schwimmer des Wassertanks
durch Fremdkörper verstopft ist.
1.Nach dem Abschalten des Geräts werden ca.
2 Minuten benötigt, um die elektrische Heizung
durch den Betrieb des internen Lüfters abzukühlen
Bitte SCHALTEN Sie das Gerät sofort AUS, wenn es seltsame Geräusche, Gerüche usw. abgibt.

Specification
Power supply
Humidity Removal capacity
Power consumption
Air volume (max.)
Fan (Ventilation) Speed
Water tank volume
Working temperature range
Timer
Continuous Drainage
Safety Device
Size (WxDxH)
N.W.
220~240V, 50Hz
8.5 L/day
TURBO (high) -730W
SLEEP (low) – 385W
Electric heating element-650W
3
200 m /h
3
5L
1 ~ 32°C
1 ~ 24 hours
Yes
Tip-over switch
340 x 232 x 511 mm
7.5 Kg
Model no. DS3 DS3I DS3T DS3IT
Above is measured under RT 30 oC , RH 80%.
The data marked with * may vary for technical reasons. For greater
precision, please refer to the rating label placed on the product.
Current & Fuse: F2L250V or T2L250V
Disposal
This product should be taken to our local recycling centre
for safety treatment. Waste electrical and electronic
products must not be disposed of with household waste.
18
ENG
What are QR codes?
QR codes (Quick Response codes) are graphic codes, which are
read by means of a Smartphone camera and lead quickly and easily
to further information (e.g. seeinternet site, product video or
contact information).
And this is how it works
To scan the QR codes all you need is a Smartphone, a QR code
reader app (available free of charge in the App Store) and an
internet connection. *
When reading QR codes additional costs may be incurred for the
internet connection depending on the rate you pay.

Only connect the unit to a properly installed and easily accessible
outlet so that you can quickly pull the plug in an emergency.
DO NOT OBSTRUCT THE AIR INTAKES AND EXHAUSTS.
FOR INDOOR USE ONLY.
NOT FOR COMMERCIAL AND INDUSTRIAL USE.
DO NOT EXPOSE THE UNIT TO DIRECT SUNLIGHT.
DO NOT USE IN CABINET, CLOSET, BOATS, CARAVANS OR SIMILAR
LOCATIONS.
DO NOT USE THE UNIT IN BATHROOMS, SWIMMING POOLS,
WASHROOMS OR SIMILAR WET AREAS.
DO NOT USE THE UNIT CLOSE TO A BATHTUB, SHOWER, SINK AND
THE LIKE.
Do not use the appliance in locations where paint, petrol or other
flammable liquids are used or stored.
Do not allow the appliance to fall over when there is water in the
bucket.
AVOID THE UNIT FROM SPLASH. DO NOT LET ANY LIQUID ENTER
THE UNIT.
DO NOT PLACE A CONTAINER WITH LIQUID ON TOP OF THE UNIT.
THE CONDENSED WATER IS NOT FOR DRINKING EITHER FOR
HUMAN OR ANIMALS.
DO NOT USE BUG SPRAYS OR OTHER FLAMMABLE CLEANSERS ON
THE UNIT.
Do not lay the cord under carpets/rugs so that you can regularly
check its condition.
DO NOT TOUCH THE PLUG OF THE UNIT WITH WET HANDS.
Never use the cord of the unit as a carrying strap.
Before moving the unit, first switch off, then unplug and empty
the water tank. Basically, it takes around 2 minutes to stop the
unit and this allows the heater to cool down.
Always unplug the unit from the mains and wait for at least one
20
ENG
Where to position
Excess moisture will
travel throughout
your home, For this
reason, the
dehumidifier should
be positioned, so that
it can draw this moist
air towards it from all
over the home.
When positioning the
dehumidifier, ensure
that it is placed on a
level surface and that
there is a minimum of
20 cm (8") of space on
either side of the unit
to allow for efficient
airflow.
Heater advice for
Dryer function. The
distance between air
vent & clothes must
be kept at least 40cm
to avoid water drop
into machine and
cause damage.
Suitable to use in basement, kitchen, living room etc
Before use
Operate this unit on a firm, flat surface to avoid water leak.
Ensure that it is kept upright at all times (including transport and
store).
It is suggested to run the unit continuously for 24hrs on its first
use.
Do not place on soft surfaces.
Ensure that there is at least 400mm between the sides of the
appliance and any flammable materials.
Ensure that there is at least 900mm from the top of the appliance
and any flammable materials.
The unit contains a chemical substance. The unit will emit a
chemical smell during the 1st hour of operation without any
dangerous consequences.
The unit features an anti-tip safety device that will switch the
unit off if it was tipped during operating.
19
Caution!

22
SUGGEST TO SEND THE UNIT FOR PROFESSIONAL MAINTENANCE
PERIODICALLY.
ONLY A LICENSED PROFESSIONAL IS ALLOWED TO DISMANTLE OR
MODIFY THE APPLIANCE.
THE MACHINE IS TO BE USED ONLY FOR ITS PRESCRIBED PURPOSE.
ANY OTHER USE IS DEEMED TO BE A CASE OF MISUSE. THE
USER/OPERATOR, NOT THE MANUFACTUER WILL BE LIABLE FOR
ANY DAMAGE OR INJURIES OF ANY KIND CAUSED AS A RESULT OF
THIS.
DO NOT USE YOUR DESICCANT UNDER THE FOLLOWING
ENG
hour before carrying out any maintenance, transport or cleaning
of the unit.
Always switch the unit off and pull the plug out of the outlet :
If you are not using the unit.
ü
Before you clean the unit.
ü
Before you assemble the accessories.
ü
If a fault occurs.
ü
In the event of a storm.
AVOID OVER-TWISTING, -COILING, -PULLING THE POWER CORD,
NEVER USE NYLON OR IRON WIRE TO TIDE THE POWER CORD.
DO NOT USE EXTENSION CORDS.
IF THE SUPPLY CORD IS DAMAGED, IT MUST BE REPLACED BY AN
ELECTRICIAN OR SIMILARLY QUALIFIED PERSON, TO AVOID
HAZARD.
THE MAINS SUPPLY MUST CONFORM TO THE SPECIFICATION
SHOWN ON THE RATING PLATE AT THE BACK OF THE UNIT.
THE APPLIANCE SHALL BE INSTALLED IN ACCORDANCE WITH
NATIONAL WIRING REGULATIONS.
NEVER REACH TO RETRIEVE THE UNIT IF IT HAS FALLEN IN WATER.
IN SUCH CASE, IMMEDIATELY PULL THE PLUG. HAVE THE UNIT
CHECKED BEFORE USING IT AGAIN.
This appliance can be used by children aged from 8 years
and above and persons with reduced physical, sensory or
mental capabilities or lack of experience and knowledge if they
have been given supervision or instruction concerning use of the
appliance in a safe way and understand the hazards involved.
Children shall not play with the appliance. Cleaning and user
maintenance shall not be made by children without supervision.
Appliances intended for indoor use (excluding laundry room).
While using DRYER mode for clothes, please keep the unit AT
LEAST 40CM away from the objects (ex. the clothes) and ensure
no water will drip into the air vent of unit.
21
(*)Competent qualified electrician: after-sales department of the
producer or importer or any person who is qualified, approved and
competent to perform this kind of repairs in order to avoid all
danger. In case of need you should return the appliance to this
electrician (www.ggv-service.de).

24
Programming Feature
1.FAN SPEED Indicator (Sleep,
NORM, TURBO)
2.Humidity/Timer Display Window
3.TIMER Indicator
4.AUTO button
5.AIR CLEAN Indicator
6.FAN SPEED Button
7.DRYER Indicator
8.DRY(TURBO) Button
9.Humidity Button
10.ON indicator (heat element
operation indicator)
11.Power (ON/OFF) Button
12.“Full Water” indicator
13.TIMER button
14.AIR CLEAN Button
FAN SPEED BUTTON There are 3 selections under this button:
uSLEEP (MUTE): the unit will run at low fan speed with low heat,
thus, the unit is quieter. And, if the ambient humidity is less
than set humidity, it will run at low fan (ventilation) only, no
heat. Note! In sleep mode, the humidity indicator in the front
plate will not light on.
ENG
23
Parts

26
※Continuous dehumidify mode
For safety reason, the machine will stop automatically after
running for 8hrs. After rest for 30 minutes, resumes to work.
Repeat in this cycle.
※Continuous dehumidify mode + Ambient humidity less than 35%
the heater works for 15minutes -> rest for a few minutes, repeats in
this cycle, unless the humidity rises up.
※Ambient temperature higher than 36°C
the heater stops , the fan keeps running to check humidity (last set
mode) / temperature, then follows the general logic of stopping for
30 minutes if humidity is reached.
※Working with humidity setting: 40%, 50%, 60% or 70%
the machine will stop automatically after running for 8hours, no
matter the setting humidity is reached or not. After rest for
30minutes, resumes to work. Repeat in this cycle.
POWER BUTTON Press this button to start or turn off the machine.
Please note it may take a few minutes for the unit to turn off once
pressed.
TIMER BUTTON
1. Press TIMER button to set the working hours you need. While
pressing the button, the LED display will show the hour you set
(starting from , 1 to 24 in a cycle). The TIMER Indicator will light
on at the same time.
When the set time has been reached, the machine will turn off
automatically.
2. By pressing the timer but without turning on the other
functions, you can PRE-SET the time for the machine to work.
For example, if you press the timer to '2', the unit will turn on
automatically 2 hours after and works in the previous mode.
AIR CLEAN BUTTON This mode runs the fan without
dehumidifying the air. This is great for purifying the air when the
ENG
25
u
HIGH heat setting. And, if the ambient humidity is below set
humidity, the unit will run at Medium fan speed only, no heat.
uTURBO: the unit will run at HIGH fan with HIGH Heat. And, when
the ambient humidity is below set humidity, the unit will run at
HIGH fan speed only, no heat.
Indicator for the set mode will light on.
uAUTO BUTTON By pressing this button, the unit will work
automatically as below:
Above 70% …. unit works in TURBO mode.
Between 55% and 70% …. unit works in SLEEP model.
Less than 55%, …. unit stops for 30 minutes before rechecking
room humidity. Will not restart until humidity is above 55%.
DRY (LAUNDRY) BUTTON (40% RH / high fan speed/high heat)
This mode is ideal for creating a great environment for drying
clothes. The unit will work for 8hrs continuously with the desired
humidity set at 40% before resting for 30 minutes. The unit will
then check the humidity of the room. If it is above 40%, the unit
will work for another 8hrs before repeating the process. If the
humidity of the room is found to be below 40%, the unit will rest for
another 30 minutes before rechecking the humidity of the room.
The LED above the button is lit when DRY (LAUNDRY) mode is
selected.
☆Under this mode, the fan speed is always fixed at HIGH speed,
not adjustable.
HUMIDITY BUTTON Set the humidity level you need: CO
(continuous dehumidify) , 40%, 50%, 60% or 70% The set
HUMIDIFY level will show on the LED display .
Please Note:
1. After 8hrs of the heater running continuously, the unit will rest
for 30 minutes before resuming the previously selected
operation.
2. If the HUMIDITY button is not set, the unit will work at the
default setting: 50% RH /low fan speed/low heat.
NORM (standard): the unit will run at MEDIUM fan speed with

28
Operation
1. Plug the unit into a correct mains socket. (Please refer to the
rating label at the rear of the unit.)
2. OPEN THE AIR DEFLECTOR at the top.
3. Press button POWER to turn on the unit. The unit will start to
work in LOW FAN/LOW HEAT/LOW DEHUMIDIFY (humidity
setting: 50%)
4. Press button HUMIDITY to set the room humidity you need:
continuous de-humidifying , 40%, 50%, 60% or 70% (the set
level will appear on the LED display)
5. Press button FAN SPEED to choose the ventilation speed,
MUTE, NORM (normal/standard) or TURBO.
6. Press button TIMER to set the working hour you need (1~24
hours).
7. To turn off the unit, press button POWER again.
☆You may set the unit in AUTO mode or DRY mode, please refer
to the description in the previous page.
IMPORTANT!
1. After switching off the unit, it takes at least 2 minutes to OFF the
unit completely, which allows the heater to cool down. DO NOT
DISCONNECT THE PLUG DIRECTLY FOR QUICK-OFF.
2. Do not operate the unit without the AIR FILTER.
Blue light – room humidity > 70%
Green light – room humidity 50~70%
Red light –room humidity < 50%
☆In SLEEP mode, this indicator will not work.
ENG
27
desired room humidity has been reached, especially when the
optional HEPA filter is installed. AIR CLEAN indicator will light on at
the same time. The fan speed is adjustable in this mode.
Customer can choose HEPA_Filter_LE60933 to
this LE60933WE dehumidifier as optional for air purification
improvement. If it's needed, please contact customer service EGS
GmbH with email and telephone as followed:
Hotline für DE +49 2944 / 9716791
Hotline für AT +43 820 / 200 170
Hotline für BENELUX + 49 2944 / 9716791
Email: kontakt@egs-gmbh.de
Please Note: If using a HEPA filter while dehumidifying, the
performance of the unit may be reduced by 10%.
DISPLAY WINDOW
Displays the room temperature (0 ~ 50oC )
Displays the room humidity (35~95%RH).
Displays the set humidity, while pressing the HUMIDITY button.
Displays the set time while pressing the TIMER, after 8 seconds,
return to room humidity.
ON INDICATOR (heat operation indicator)
lights on in GREEN as the heat element is working.
lights on in RED and blink as the unit is tipped over.
WATER FULL INDICATOR It turns to RED and blink when the water
tank is full or the tank is not in proper position.
HUMIDITY INDICATOR IN THE FRONT
This unit is equipped with an intelligent humidity display on the
front, giving the user an immediate visual indication of the ambient
humidity. The front LED’s will change color to indicate the current
humidity level.

30
Drainage
While the water tank is full, the unit will stop working for self-
protection. The water full indicator will blink in red and the unit
will buzz for warning.
To empty the tank, please follow the steps:
1. Hold the unit with one hand to make it stand firmly.
2. Pull out the tank squarely from the unit.
3. Grasp the water tank handle, remove the cover of the tank, and
empty the water from the drain.
4. After the tank was empty, return the water tank to its position,
make sure it is properly positioned, so the 'water full' sign can go
out and your dehumidifier is operating again.
Please note, if the water tank has not been positioned well, the water
full indicator will turn into red and the unit will keep buzzing.
CONTINUOUS DRAINAGE
When the dehumidifier is operated in very high humidity, the water
tank will require more frequent drainage. In this condition, it may
be more convenient to set the unit up for continuous drainage with
the following procedures:
ENG
29
>60cm
>40cm
>20cm
>20cm
>20cm
>50cm
3. While using DRYER mode for clothes, please keep the air vent (air
outlet) of the unit AT LEAST 40CM away from the objects (ex. the
clothes) and ensure no water will drip into the air vent of unit.
☆ATTENTION! DO NOT use in the closet, wardrobe .
4. Tip Over protection This unit is equipped with tilt switch for
overheat protection. While the unit is tipped , the unit will stop
automatically. The ON indicator will turn into RED and blink for
warning, also the display window will show E5. After
repositioning the unit upright, press POWER button to re-start.
5. Self-Diagnosis: This machine is equipped with self-diagnosis
function. If something is wrong in the machine, the LED will
show the signal from E1 to E7 (each represents different
situation).
E5 means the unit is tipped over. Please re-posit the unit upright,
press POWER button to re-start.
For the other signal, please call your service centre. DO NOT
dismantle the machine by yourselves in any case.

32
CLEANING THE FILTER
Draw out the air filter from the rear of the unit.
For dust filter (washable filter) –
For active carbon filter –
This filter is not washable. Its life span is variable and depends on
the ambient conditions where the appliance is used. The filter
should be checked periodically (about every 6 months) and
replaced if necessary.
1. Use a vacuum cleaner or tap the
filter lightly for easy cleaning. If the
filter is particularly dirty, use warm
water with a small amount of
medium strength.
2. Make sure the filter is completely
dry before replacing.
3.Do not expose the filter to sunlight.
ENG
31
1. Connect the drain hole with a water tube of inner diameter
11mm. ☆ Please note, the water tube is not supplied with the
unit.
2. Ensure the water will always drain away freely and the tube will
remain in right place. Note! In very cold weather conditions,
precautions should be taken to prevent the water tube from
freeing.
3. When you don’t need it, please remove the water tube, then the
water will go again to the water tank.
Always unplug the unit from the mains and wait for at least one
hour before carrying out any maintenance or cleaning of the unit.
CLEANING THE BODY
Use soft cloth to wipe the unit clean.
Don't ever use volatile chemicals, gasoline, detergents, chemically
treated clothes, or other cleansing solutions. These all could
possibly hurt the cabinet.
Water pipe for
continuous drain
Maintenance

33
STORAGE
If not use the unit for an extended period of time. Please:
Turing the unit off, unplug and tidy AC cord.
Completely empty the water tank and wipe it clean.
Cover the unit and store where it will not receive direct sunlight.
Trouble shooting
PROBLEM POSSIBLE REASON
The unit doesn’t work at all.
The unit not work dehumidifying
Dehumidifying efficiency not good
Abnormal noises from the motor
The unit leaks water
After the unit has been switched off,
the fan motor is still running
1.Bad connection of the main plug
2.Water tank not positioned well or full.
3.Is the unit standing upright and level?
1.Too heavy dust on air filter.
2.Any things stuck on intake or air vent.
3.Too low room humidity already.
1.Too many doors and windows open.
2.Any room equipment increases the
room humidity.
1.Check and clean the air filter
2.Is the unit standing upright and on a
level surface?
1.Has the unit been tipped?
2.Check if the float of the water tank is
blocked by foreign material.
1.After the unit stops, about 2 minutes
are needed to cool down the electric
heater by running the internal fan.
Qu’est-ce qu’un code QR?
Les codes QR (QR=Quick Response ou réponse rapide) sont des
codes graphiques qui peuvent être lus à l’aide de l’appareil photo
d’un smartphone et qui donnent rapidement et facilement accès à
des informations complémentaires (par ex. un site internet, la
vidéo d’un produit ou des coordonnées).
Et voilà comment cela fonctionne
Pour scanner un code QR, vous avez simplement besoin d’un
smartphone, d’une application de lecture de codes QR (disponible
gratuitement sur
App-Store) et d’une connexion internet. *
*Selon les conditions tarifaires de votre fournisseur d’accès
internet, la
lecture de codes QR peut donner lieu à une facturation.
ENG

FR
Spécification
Alimentation électrique
Capacité d'élimination d'humidité
Consommation d'énergie
Quantité d'air (max.)
Ventilateur (Ventilation) Vitesse
Volume du réservoir d'eau
Chronomètre
Drainage continu
Dispositif de sécurité
Dimensions (LxPxH)
Poids nominal
220~240V, 50Hz
9 L/jour
TURBO (élevé) -730W
VEILLE (faible) – 385W
Système électrique de chauffage-650W
200 m3/h
3
5L
1 ~ 32oC
1 ~ 24 heures
Oui
Interrupteur en cas de renversement
340 x 232 x 511 mm
7.5 Kg
Modèle no. LE60933we
lCi-dessus est mesurée sous RT 30 oC, RH 80%.
lLes données marquées avec * peuvent varier pour des raisons
techniques. Pour plus de précision, veuillez-vous référer à
l'étiquette apposée sur le produit.
lCourant et fusible: F2L250V ou T2L250V
Disposition
Ce produit doit être apporté à notre centre de recyclage
local pour un traitement de sécurité. Les déchets
électriques et électroniques ne doivent pas être jetés avec
les ordures ménagères.
34
Plage de température de fonctionnement
Emplacement
L'excès d'humidité se
propagera dans toute la
maison, pour cette
raison, le
déshumidificateur doit
être positionné de
façon à pouvoir attirer
cet air humide de
partout dans la maison.
Lors du positionnement
du déshumidificateur,
assurez-vous qu'il est
placé sur une surface
plane et qu'il y a un
minimum de 20 cm (8 ")
d'espace de chaque côté
de l'unité pour
permettre une
circulation d'air efficace.
Conseils de chauffage
pour la fonction de
séchage. La distance
entre l'évent et les
vêtements doit être
maintenue à au moins
40 cm pour éviter que
l'eau ne tombe dans la
machine et cause des
dommages.
Convient pour utiliser dans le sous-sol, cuisine, salon etc.
Avant utilisation
Faites fonctionner cet appareil sur une surface plane et ferme
pour éviter les fuites d'eau. Assurez-vous qu'il est maintenu droit
en tout temps (y compris le transport et le magasin).
Suggérer de faire fonctionner l'unité en continu pendant 24
heures lors de sa première utilisation.
Ne pas placer sur des surfaces molles.
Assurez-vous qu'il y a au moins 400 mm entre les côtés de
l'appareil et tout matériau inflammable.
Assurez-vous qu'il y a au moins 900 mm du haut de l'appareil et
des matériaux inflammables.
L'unité contient une substance chimique. L'appareil émettra une
odeur chimique pendant la première heure de fonctionnement
sans conséquences dangereuses.
L'appareil est équipé d'un dispositif de sécurité anti-
basculement qui éteindra l'appareil s'il a été basculé pendant le
35
Avertissement!
This manual suits for next models
4
Table of contents
Languages: