GVA GVABF117 User manual

Instruction Manual
117L Bar Fridge
/GVABF117

3
General Safety Instructions 1
Parts and features 4
Getting started 5
Operating Instructions 8
FAQ’s 9
Other useful information 10
Contents

1
Your safety and the safety of others is very important.
We have provided many important safety messages in this manual and on your
appliance.
Always read and obey all safety messages.
This is the Safety Alert Symbol. This symbol alerts you to potential hazards
that can kill or injure you and others. All safety messages will follow the
Safety Alert Symbol and either the words “DANGER”, “ WARNING” or “CAUTION”.
Danger means that failure to heed this safety
statement may result in severe personal injury
or death.
Warning means that failure to heed this safety
statement may result in extensive product damage, serious personal injury, or
death.
Caution means that failure to heed this safety
statement may result in minor or moderate
personal injury, or property or equipment
damage.
Caution: Flammable Gas means that there
is a risk of re as the appliance contains a
ammable refrigerant.
All safety messages will alert you to what the potential hazard is, tell you how to
reduce the chance of injury, and let you know what can happen if the instructions
are not followed.
CAUTION:
Flammable Gas
General Safety

2
Always follow basic safety precautions and accident prevention measures when
using an electrical appliance, including the following:
Electrical safety
• Plug the bar fridge into a 220-240V, 50Hz, 3-prong power outlet that is properly
earthed to the ground in accordance with Australian standards and local codes.
Do not remove the grounding prong. If unsure, consult a qualied technician.
Improper use of the grounded plug can result in the risk of electric shock.
• The outlet voltage and circuit frequency must correspond to the voltage stated
on the appliance rating label.
• Do not use an adaptor; do not use an extension cord.
• We strongly recommend you connect the bar fridge to a separate circuit
serving only this appliance. This provides the best performance and also
prevents overloading the house wiring circuits that could cause a re hazard
from overheating.
• Use a power point that cannot easily be turned o accidentally by a switch or
pull chain.
• Do not kink, pinch or damage the power cord. Position the cord out of the
way so no one steps on or places anything on the cord or against it. Secure the
cord behind the unit so it is not left exposed or dangling to prevent accidental
injury.
• Do not use a cord that shows cracks or abrasion damage along its length
or at either end. If the supply cord is damaged, it must be replaced by the
manufacturer or its service agent. Contact the after sales support line.
• Never unplug the unit by pulling the power cord; always grip the plug rmly
and pull straight out from the socket.
• Any electrical work required for the installation of this appliance should be
carried out by a qualied electrician.
Cleaning and maintenance
• Unplug the bar fridge or disconnect the power before cleaning or servicing.
Failure to do so can result in electric shock, injury or death. Do not connect or
disconnect the electric plug with wet hands.
• Never clean this appliance with ammable uids. Do not store or use petrol or
other ammable vapours or liquids in the vicinity of this or any other appliance.
The fumes can create a re hazard or explosion.
General Safety

3
• Do not use solvent based or abrasive cleaning agents.
• Do not use mechanical devices or other means to accelerate the defrosting
process. Never use a sharp or metal instrument to remove frost as it may damage
the cooling system and will void the warranty. We recommend using a plastic
scraper.
• Do not attempt to repair or replace any part of the bar fridge unless it is
specically recommended in this manual. Refer all other servicing to a qualied
technician, or contact the after sales support line for advice on repair or
replacement.
Installation
• This appliance is heavy, take care when moving it. Use two or more people to
move and install the bar fridge. Failure to do so can result in back or other injury.
• Install the appliance in an area protected from elements such as wind, rain, water
spray or drips. Do not install it next to an oven, grill or other source of high heat.
• To ensure proper ventilation for your bar fridge, the front of the unit must be
completely unobstructed. Keep any ventilation openings in the appliance
enclosure or in the built-in structure clear of obstructions.
• Choose a well ventilated area with temperatures above 16˚C and below 32˚C.
• Do not damage the refrigerant circuit.
• The appliance must be installed level in order to ensure it works properly.
• Make certain that the pipes are not pinched, kinked or damaged during
installations. Check for leaks after connection.
Usage conditions and restrictions
• The refrigerator must be installed with all electrical, water and drain connections
in accordance with state and local codes.
• Do not use this appliance for any other than its intended purpose.
• Do not attempt to alter or modify this appliance in any way.
• Do not use electrical type appliances inside the food storage compartments of
the appliance, unless they are of the type recommended by the manufacturer.
• The appliance is not intended for use by persons (including children) with reduced
physical, sensory or mental capabilities, or lack of experience and knowledge, unless
General Safety

4
1. Chiller compartment
(including the ice
tray)
2. Drip tray
3. Glass shelves (2 x)
4. Glass crisper cover
5. Crisper drawer
6. Levelling feet
7. Temperature control
knob
8. Door rack
9. Large door rack
they have been given supervision or instruction concerning use of the appliance by
a person responsible for their safety.
• Children should be supervised to ensure that they do not operate, play with or crawl
into the appliance.
Responsible disposal
• At the end of its working life, observe any local regulations regarding
the disposal of electrical consumer goods and dispose of the appliance
appropriately for recycling and recovery of the refrigerant. Contact your local
authorities for advice on recycling facilities in your area.
• Before discarding your bar fridge, disconnect it from the power supply and cut
5
1
6
7
8
9
2
4
3
General Safety

5
Before using the bar fridge
• Remove all packaging materials from around and inside the appliance and
dispose of them responsibly. Plastic wrapping can be a suocation hazard for
babies and young children, so ensure all packaging materials are out of their
reach.
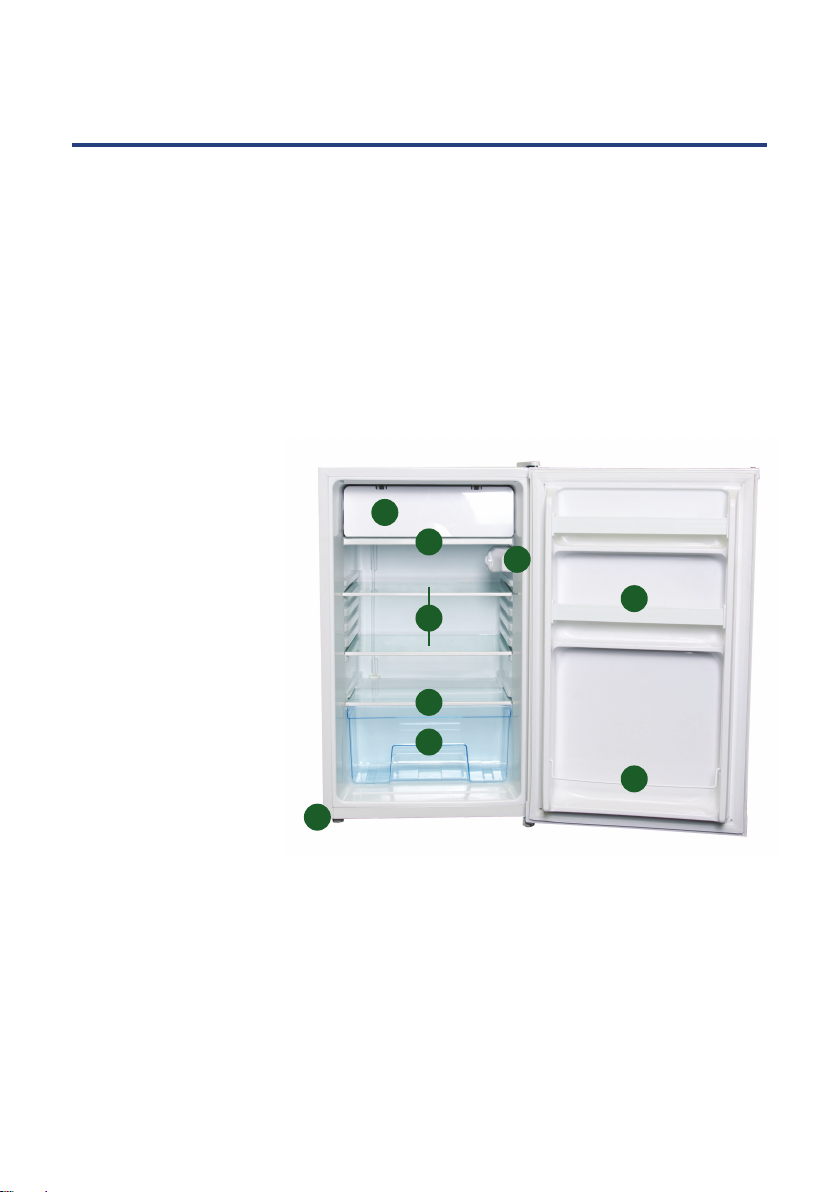
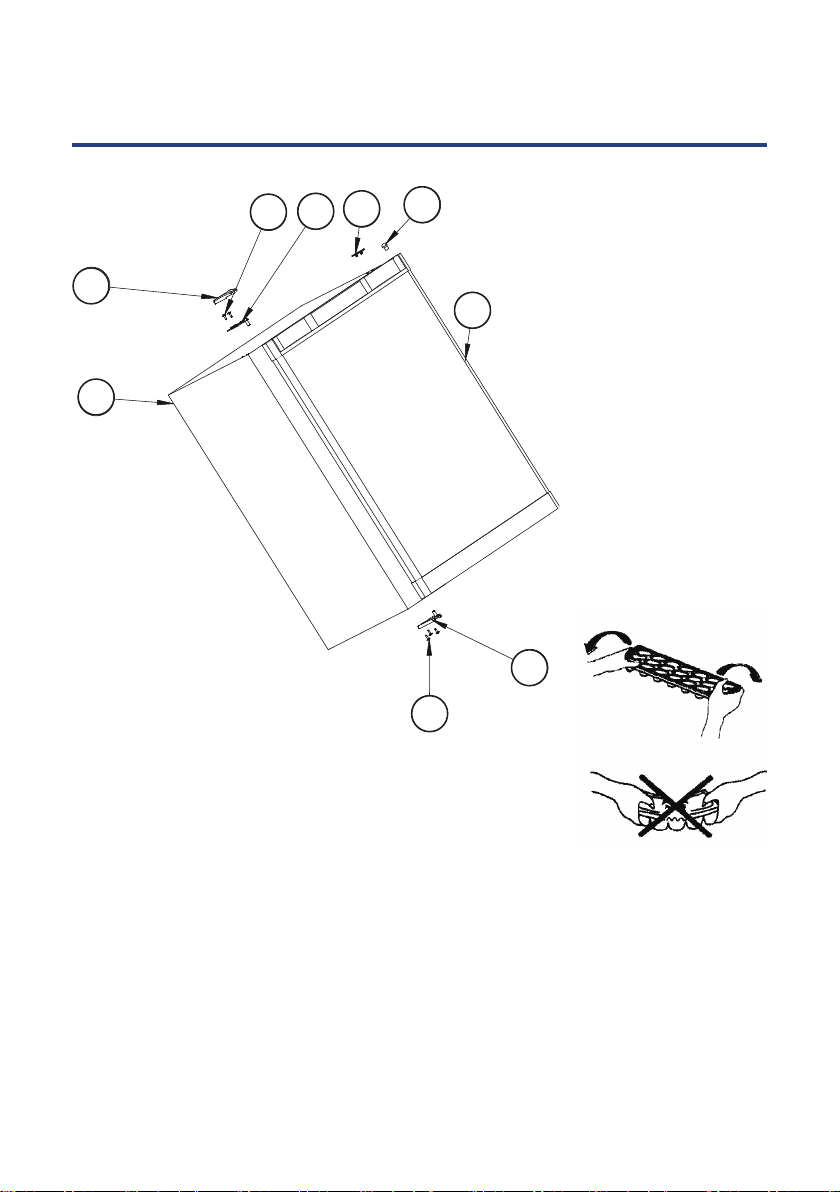
• Check to ensure you have all of the following parts:
1 x Drip tray 1 x Chiller compartment
1 x Ice tray 2 x Glass shelves
1 x Glass crisper cover 1 x Crisper drawer
1 x Instruction manual 1 x Warranty card
2 x Warranty stickers
• Before connecting the unit to the power source, let it stand upright for
approximately two hours. This will reduce the possibility of a malfunction in the
cooling system from handling during transportation.
• Clean the interior surface with lukewarm water using a soft cloth.
Installing the bar fridge
• This appliance is designed to be freestanding only and should not be recessed
or built-in.
• Place the bar fridge on a oor that is strong enough to support it when it is fully
loaded. To level the fridge, adjust the levelling feet at the bottom of the fridge.
• Leave a 10–15cm clearance between the back and sides of the fridge and
any wall or other appliance, which allows proper air circulation to cool the
compressor and condenser.
• Locate the unit away from direct sunlight and sources of heat (stove, heater,
radiator, etc.). Direct sunlight may aect the acrylic coating and heat sources
may increase power consumption. Extreme cold ambient temperatures may
also aect fridge performance.
• Avoid locating the fridge in moist areas.
• Plug the fridge into an exclusive, properly installed, grounded wall outlet. Do
not under any circumstances cut or remove the third (ground) prong from
the power cord. For advice concerning power connection and/or grounding,
contact a certied electrician or the after sales support line.
• After plugging the appliance into a wall outlet, allow the unit to cool down for
2–3 hours before placing food in the refrigerator compartment.
Getting Started

6
NOTE: Make sure you read and follow all safety advice concerning installation in the
General Safety Instructions section.
Reversing the door swing of your appliance
This fridge has the capability of the door opening from either the left or right side.
When you purchase the unit the door will open from the right side. If you want to
open the door from the left side, follow the instructions below and on the following
page to reverse the door swing (the numbers in brackets refer to the parts in the
illustrations).
NOTE: Keep all the parts you remove for re-installation of the door on the other side.
• Remove the three screws (6) that hold the lower door hinge (5), keeping the
hinge for later use.
• Remove the door from the upper pin (3), keeping the padded surface upwards
to prevent scratching.
• Remove the upper hinge cover (1), remove the two screws (2), hold the upper
hinge (3) and keep the hinge for later use.
• Remove the hole cover (7) and transfer it to the same location on the
opposite side.
Getting Started

7
3
2
1
7
8
9
4
6
5
• Insert the lower door hinge in the right side; x the lower right hinge by
tightening all the screws.
• Remove the pin cap (9) from the right side of the upper frame of the door, and
then transfer it to the same location on the opposite side.
• Put the door (4) on the lower door hinge (5), keeping the door level, and then
use the screws to x the upper hinge (3) to the body.
• Put on the upper hinge cover (1).
Figure 2:
After reversing
the door swing
1. Upper hinge cover
2. Screws
3. Upper hinge
4. Door
5. Lower door hinge
6. Screws
7. Hole cover
8. Cabinet
9. Pin cap
Getting Started

8
3
2
1
7
8
9
4
6
5
Setting the temperature control
• Your unit has only one control for regulating the
temperature in the compartment. It is located on the
upper right hand side of the compartment (see page
7).
• The rst time you turn the unit on, set the
temperature control to the highest position:“7”. After 24 to 48 hours, adjust the
temperature control to the setting that best suits your needs. The setting of “3”
should be appropriate.
• To turn the appliance o, turn the temperature control to“O” (this stops the
cooling cycle but does not shut o the power to the unit) and disconnect the
power supply cord from the wall outlet.
NOTE: If the unit is unplugged, turned o or has lost power, you must wait
three to ve minutes before restarting the unit. If you attempt to restart before
this time delay, the unit will not start.
Getting Started Operating Instructions

9
Using the ice cube tray
• Fill the ice cube tray two thirds full with cold water, or with any liquid
suitable for freezing. The recommended thermostat setting for ice making
is position “7”.
• Place the tray on the bottom of the chiller compartment for freezing. (Make
sure to dry the tray, otherwise it may stick to the bottom of the chiller).
• The best method to get ice cubes out of the tray is to hold the tray under cold
tap water for a second. Then place it over an ice bucket and twist slightly, as
illustrated on the right, to eject the ice cubes from the tray.
NOTE: Due to long-term transit and storage, the rst batch of ice cubes must
be discarded and the ice cube tray thoroughly cleaned and dried after rst use.
• Empty any water out of the drip tray periodically. Then wash and dry it before
placing it back underneath the chiller compartment.
The chiller compartment
• This compartment is designed for the production of ice cubes and short-term
storage (3-4 days at most) of some commercially frozen foods. The temperature
in this compartment does not get cold enough to freeze food safely for long
periods of time and works best when the food is already frozen.
• By design, this chiller compartment is not a true freezer. It may not keep ice
cream frozen or freeze items. A colder setting may be used for these items, but
this may also aect other items in the refrigerator.
• The chiller door is susceptible to breaking due to excessive ice build-up. This
part is not covered under your warranty. Be sure to defrost when the ice
reaches about 5mm in thickness (see page 13 for defrosting instructions). And
if you continue having problems with ice build-up, adjust the temperature
control to a lower setting.
FAQ’s
You can solve many common fridge problems easily by trying the suggestions
below to see if you can solve the problem before calling the service agent or our
after sales support line.
Operating Instructions

10
PROBLEM POSSIBLE CAUSE
Freezer does not
operate.
It is not plugged in.
The circuit breaker tripped or has blown a fuse.
The fridge temperature control is set to OFF.
The fridge turns on
and o frequently.
The room temperature is hotter than normal.
A large amount of food has been added to the fridge.
The door is opened too often.
The door is not closed completely.
The temperature control is not set correctly.
The door gasket does not seal properly.
The fridge does not have the correct clearances.
There are
vibrations.
Check to assure that the fridge is level.
The fridge seems
to make too much
noise.
The rattling noise may come from the ow of the
refrigerant, which
is normal.
As each cycle ends, you may hear gurgling sounds caused
by the ow of refrigerant in the fridge.
Contraction and expansion of the inside walls may cause
popping and crackling noises.
The fridge is not level.
The door will not
close properly.
The fridge is not level.
The door was reversed and is not properly installed.
The gasket is dirty or bent.
The shelves, bins or baskets are out of position.
Operating Instructions Other useful information

11
Defrosting the bar fridge
• Defrost the unit when the frost accumulated on the evaporator is about 5mm
thick.
• Turn the thermostat dial to the“O” position and unplug the bar fridge from
the wall.
• Remove frozen or perishable foods from the chiller compartment and place
them in a cooler to protect the food.
• During the defrost cycle, the ice melts into the water drip tray.
• To remove the water, either take out the drip tray and/or place a collection
container under the tray, or use a sponge or towel to wipe the melting ice o
the fridge oor.
• Defrosting usually takes a few hours. After defrosting, dry the drip tray, place
it back under the chiller compartment and return the thermostat dial to the
desired position.
• To defrost quickly, remove all foods from the fridge and leave the door open.
• CAUTION: Do not use boiling water because it may damage the plastic parts.
WARNING: Never use a sharp or metal instrument to remove frost as it may
damage the cooling system and will void the warranty. We recommend using a
plastic scraper.
Cleaning the bar fridge
• Turn the temperature control to the“O” position, unplug the bar fridge and
remove the food, shelves and tray.
• Wash the inside surfaces with a warm water and baking soda solution. The
solution should be about 2 tablespoons of baking soda to 1 litre of water.
• Wash the shelves and tray with a mild detergent solution.
• Clean the outside of the fridge with mild detergent and warm water.
• Wring excess water out of the sponge or cloth before cleaning the area of the
controls or any electrical parts.
• Wash the outside cabinet with warm water and mild liquid detergent. Rinse
well and wipe dry with a clean, soft cloth.
CAUTION: Make sure to unplug the unit before cleaning as failure to do so could
result in electrical shock or personal injury.
Other useful information

12
Other useful information
Table of contents
Other GVA Refrigerator manuals