GYBE Counter User manual

1
1
DE
COUNTER
AUFBAUANLEITUNG
DE
ASSEMBLY INSTRUCTIONS
EN

2
DE INHALT / LIEFERUMFANG
LIEFERUMFANG COUNTER
DEUTSCHE ANLEITUNG
Lieferumfang . . . . . . . . . . . . . . . . . . . . . . . . . . . . .
Gebrauchs- und Gefahrenhinweise . . . .
Aufbau Counter . . . . . . . . . . . . . . . . . . . . . . . 4
Abbau Counter . . . . . . . . . . . . . . . . . . . . . . . . . . . . . . . 5
1x Counter
(Thekenplatte, Unterteil,
aulasbare Stützstruktur)
1 x Transport-
tasche
1 x austauschbares
Display
1 x Doppelhub-
Handpumpe
1 x Reparatur
Set
ENGLISH MANUAL
→ You can find the English version of
this manual on page 8.

3
GEBRAUCHS- UND GEFAHRENHINWEISE DE
VON HITZEQUELLEN FERNHALTEN
Halten Sie den Counter von Feuer- und Hitzequellen fern.
Bitte keine Heizquellen unmittelbar in der Nähe des Counters platzieren,
die Materialien können bei hohen Temperaturen schmelzen.
VOR STARKEM WIND SCHÜTZEN
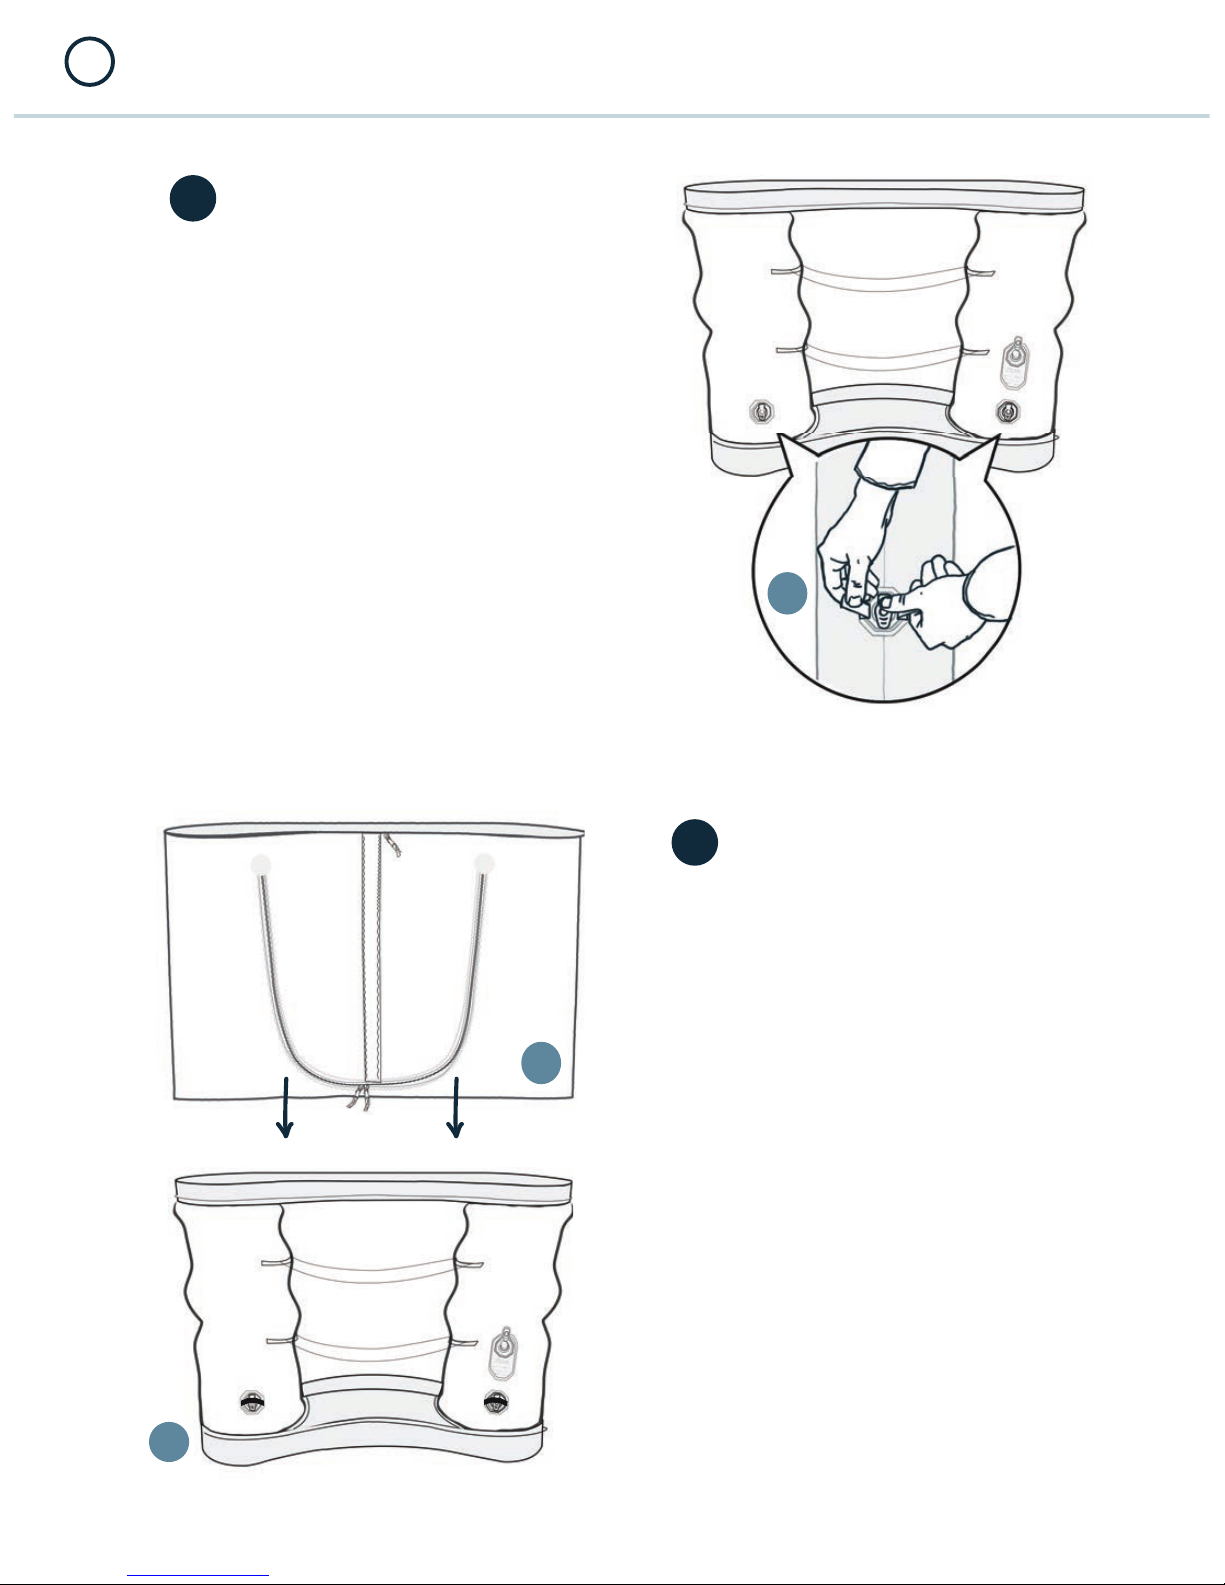
Der GYBE Counter hat ein geringes Eigengewicht. Deshalb ist darauf zu achten, dass sowohl
der Aufbau/Abbau als auch der Standort des Counters unter windgeschützten Bedingungen
erfolgt.
BELASTUNGSGRENZE BEACHTEN
Stellen Sie keine schweren Gegenstände auf den Counter. Der Counter ist nicht dafür
ausgelegt, eigenständig Personengewichte zu tragen. Sitzen oder stehen auf dem Counter
gilt als unsachgemäße Bedienung.
→ GYBE übernimmt keinerlei Haftung bei unsachgemäßer Bedienung der GYBE-Produkte.
PFLEGEHINWEISE
TROCKEN LAGERN
Verstauen Sie den Counter niemals in nassem Zustand. Achten Sie darauf, dass
der Counter trocken und in einem Temperaturbereich von 0 – 30 °C gelagert wird.
VORSICHTIG REINIGEN
Entfernen Sie Schmutz am besten mit einem feinen Handbesen oder einem nassen Lappen.
Scharfkantige Rückstände können den Stoff beschädigen.
Die Materialien sollten nur mit klarem Wasser oder mit stark verdünntem Spülmittel
gereinigt werden. Agieren Sie bei bedruckten Materialien besonders vorsichtig.
Prüfen Sie gegebenenfalls an einer unauälligen Stelle, ob der Reiniger die Oberäche angreift.
Die Counter-Materialien sind teilweise wasserabweisend und brandhemmend beschichtet.
Starkes Reiben oder lösungsmittelhaltige Reiniger zerstören diese Beschichtungen!
→ GYBE übernimmt keinerlei Haftung bei unsachgemäßer Bedienung der GYBE-Produkte.

4
Entnehmen Sie den Counter der
Transporttasche. Ziehen Sie den Counter
mit geöffneten Ventilen (A) auseinander,
damit sich die aufblasbaren Stützen
vorfüllen können. Schließen sie nun beide
Ventile (A).
Stülpen Sie das Display (A) vorsichtig über
den Counter (B).
Achten Sie, wie auf der Zeichnung
dargestellt, auf die richtige Positionierung
des Displays (A).
2
AUFBAU COUNTER
DE
1
B
A
A

5
Verbinden Sie das Display mit dem Counter
mithilfe der Reißverschlüsse (A).
3
ACHTUNG
Achten Sie darauf, dass beim Befüllen
der Luftdruck der Stützstruktur nicht
über 5 PSI / 0,4 BAR liegt. Der ideale
Luftdruck liegt zwischen 4 und 5 PSI,
bzw. 0,25 und 0,35 BAR.
Das Einlassventil muss nach dem
Befüllen immer durch den am Ventil
befestigten Stöpsel geschlossen werden.
Öffnen Sie die rückseitige Klappe (A) um
an das Einlassventil (B) zu gelangen.
Stecken Sie den Pumpschlauch in das
Einlassventil.
4
ACHTUNG
Das Display muss IMMER vor dem
vollständigen Aufblasen der Stützen mit
dem Counter verbunden sein. Wird dies nicht
befolgt, ist ein Platzen der Stützstruktur
möglich.
AUFBAU COUNTER DE
B
A
A

6
ABBAU COUNTER
DE
Stand: N 2016
Sollten Sie Fragen oder Anregungen zu
unseren Produkten haben oder Ersatzteile
und Erweiterungen benötigen, kontaktieren
Sie uns einfach:
VERTRIEB DEUTSCHLAND
Rheinstrasse 39
26382 Wilhelmshaven
Germany
WEITERE INFORMATIONEN
www.gybe-design.com
team.germany@gybe-design.com
TELEFONISCHE FRAGEN
von 09:00 — 18:00 Uhr unter:
+49 (0)4421 / 987 88 92
+49 (0)4421 / 987 88 97
is a division of
Adventure Design GmbH
Mitweidaer Straße 7
04746 Hartha, Germany
info@gybe-design.com
Graken:
www.studiomarkusguenther.com
™
Öffnen Sie den Klettverschluss des Auslass-
ventils, so dass die Ventillasche greifbar wird.
Nun öffnen Sie das Auslassventil an der Ventil-
lasche. Die Luft aus der aufblasbaren Stütz-
struktur entweicht. Anschließend kann der
Counter in der Transporttasche verstaut werden.
1 2

7
WWW.GYBE-DESIGN .COM

8
COUNTER
ASSEMBLY INSTRUCTIONS
EN

9
EN CONTENT / SCOPE OF DELIVERY
SCOPE OF DELIVERY COUNTER
ENGLISH MANUAL
Scope of delivery .............................
Instructions for use/Safetywarnings ....
Setting up your Counter ....................... 11
Taking down your Counter ................... 13
1x Counter
(Tabletop, Lower part,
inatable support
structure)
1 x Transport
bag
1 x exchangable
Display
1 x Double
action hand
pump
1 x Repair kit

10
INSTRUCTIONS FOR USE AND SAFETY WARNINGS EN
KEEP AWAY FROM SOURCES OF HEAT
Keep the Counter away from sources of heat and open flames.
Please do not place any sources of heat directly at the Counter
because the materials can melt at high temperatures.
PROTECT FROM STRONG WINDS
The GYBE Counter should not be used at wind speeds over 5 Beaufort (21 knots / 24 mph).
MAXIMUM LOAD
Please avoid, Please avoid to place heavy objects on the Counter. The Counter is not
designed to carry weights on its own. Sitting or standing on the counter is considered as
improper use.
→ GYBE does not accept any liability for improper use of GYBE products.
CARE INSTRUCTIONS
STORE IN A DRY PLACE
Never store the Counter when it is wet.
Be sure the Counter is stored dry between 0 – 30 °C. (32 – 90° F.).
CLEAN CAREFULLY
Rough, dry dirt is best removed with a fine hand brush or a wet cloth.
Crusted residues with sharp edges can damage the tent fabric.
The materials should only be cleaned with clear water or with highly diluted detergent.
Handle printed materials especially carefully. If you have any doubts, check on an
inconspicuous spot if the cleaning agent reacts corrosively with the tent surface.
Some of the Counter materials are coated with water-resistant and flame-retardant layers.
Strong scrubbing or solvent-containing cleaning agents can ruin these layers!
→ GYBE does not accept any liability for improper use of GYBE products.

11
Remove the Counter from the transport
bag.
Spread apart the Counter with open valves
(A) to prefill the inflatable pillars. Now close
both valves (A).
Carefully put the display (A) over the
Counter (B). Insure, that the display (A) is
positioned correctly as displayed.
2
SETTING UP YOUR COUNTER
EN
1
B
A
A

12
Connect the display with the Counter by
using the zippers (A).
3
ATTENTION
Ensure not to let the internal pressure of
the strut exceed 5 psi /0.4 bar.
The ideal pressure is between 4 and 5 psi
(0.25 and 0.35 bar).
Once the strut has been filled, the
inflation valve must be always closed
with the attached plug.
Open the rear flap (A) to reach the
inflation valve (B). Attach the pump hose
into the inflation valve.
4
ATTENTION
Prior to final inflation, the display must be
attached to the Counter.
If this instruction is violated a bursting of the
support structure is more than likely.
SETTING UP YOUR COUNTER EN
B
A
A

13
TAKING DOWN YOUR COUNTER
EN
Version: N 2016
If you have any questions or suggestions
concerning our products, or if you need
spare parts or extensions, please do not
hesitate to contact us at any time:
DISTRIBUTOR GERMANY
Rheinstrasse 39
26382 Wilhelmshaven, Germany
FURTHER INFORMATION
www.gybe-design.com
team.germany@gybe-design.com
CONTACT US BY PHONE
from 09:00 am— 06:00 pm:
phone +49 (0)4421 / 987 88 92
fax +49 (0)4421 / 987 88 97
is a division of
Adventure Design GmbH
Mitweidaer Straße 7
04746 Hartha, Germany
info@gybe-design.com
Graphics:
www.studiomarkusguenther.com
™
Open the velcro strap to access the valve plug. Open the deflation valve by pulling on the valve
lid. Immediately the strut will start to deflate.
Afterwards the Counter can be stowed in the
transport bag.
1 2

14
WWW.GYBE-DESIGN .COM
Table of contents
Languages:
Popular Indoor Furnishing manuals by other brands

Amart Furniture
Amart Furniture OTIS 61542 Assembly instruction

Glas Italia
Glas Italia I MASSI MENSOLE Assembling and use instruction

Vivo
Vivo DESK-DR02 instruction manual

Staples
Staples 24753- CC quick start guide

Home affaire
Home affaire 220536 manual

Accentrics Home
Accentrics Home DS-2515-900-1 Assembly manual

Mincey Marble Manufacturing
Mincey Marble Manufacturing FR-03 installation instructions

Prosedia
Prosedia Younico PRO Assembly and operating instructions

Monarch
Monarch I 3525 Assembly instructions

Woodland
Woodland CALAHAN Assembly instruction

Living Spaces
Living Spaces 305-P085170 Assembly instructions

Martha Stewart
Martha Stewart The Everyday System manual